首先下载好我们的需要的包
wget http://nginx.org/download/nginx-1.12.0.tar.gz
wget http://hk1.php.net/distributions/php-7.1.4.tar.gz
关闭系统限制
关闭系统防火墙
[root@localhost software]# systemctl stop firewalld.service
[root@localhost software]# systemctl disable firewalld.service
关闭SElinux
[root@localhost software]# sed -i 's/SELINUX=enforcing/SELINUX=disabled/' /etc/selinux/config
[root@localhost software]# setenforce 0
开始安装nginx
创建www账户 用来启动nginx
[root@localhost software]# useradd www -s /sbin/nologin
安装依赖的包
[root@localhost software]# yum -y install pcre pcre-devel zlib zlib-devel gcc-c++ gcc openssl*
解压Nginx源码包
root@localhost software]# tar zxvf nginx-1.12.0.tar.gz
进入解压后的目录,对Nginx进行配置
[root@localhost software]# cd nginx-1.12.0/
[root@localhost nginx-1.12.0]# ./configure --user=www --group=www --prefix=/usr/local/nginx --with-http_realip_module --with-http_sub_module --with-http_gzip_static_module --with-http_stub_status_module  --with-pcre
编译和安装
[root@localhost nginx-1.12.0]# make && make install
启动Nginx
[root@localhost nginx-1.12.0]# /usr/local/nginx/sbin/nginx
关闭Nginx进程
[root@localhost nginx-1.12.0]# killall nginx
[root@localhost nginx-1.12.0]# ps -ef|grep nginx
nginx命令做软连接方便使用
[root@localhost nginx-1.12.0]# ln -s /usr/local/nginx/sbin/nginx /sbin/nginx
编写nginx启动脚本
cat >> /usr/lib/systemd/system/nginx.service << EOF
[Unit]
Description=nginx - high performance web server
Documentation=http://nginx.org/en/docs/
After=network-online.target remote-fs.target nss-lookup.target

[Service]
Type=forking
PIDFile=/usr/local/nginx/logs/nginx.pid
ExecStartPre=/usr/sbin/nginx -t
ExecStart=/usr/sbin/nginx
ExecReload=//usr/sbin/nginx -s reload
ExecStop=/usr/sbin/nginx -s stop
PrivateTmp=true

[Install]
WantedBy=multi-user.target
EOF
修改完systemctl服务,需要重新加载下daemon
[root@localhost nginx-1.12.0]# systemctl daemon-reload
用systemctl启动Nginx服务,并查看状态
[root@localhost nginx-1.12.0]# systemctl start nginx
[root@localhost nginx-1.12.0]# systemctl status nginx
设置nginx开机启动
[root@localhost nginx-1.12.0]# systemctl enable nginx
PHP 7 安装
PHP 7 在15年年底推出,PHP官方说的比 PHP 5 快2倍,就为这个,这个鲜必须尝。不过有个很值得注意的地方是,虽然 PHP 7 增加了不少新特性,但也很多地方是向后不兼容的,例如 mysql 扩展,在 PHP 7 中已经被删除。 现在最新版本是7.1.4。
接着解压php源码包
[root@localhost software]# tar zxvf php-7.1.4.tar.gz
再进入解压后的文件夹
[root@localhost software]# cd php-7.1.4/
这里将只安装一些常用的扩展,大家可以根据自己的实际需要进行增减,可以通过以下命令查看PHP安装是具体有有些扩展和选项:
[root@localhost php-7.1.4]# ./configure --help
有接近300个选项。
安装之前要先安装那些准备装的扩展要用到的软件模块
[root@localhost php-7.1.4]# yum -y install libjpeg libjpeg-devel libpng libpng-devel freetype freetype-devel libxml2 libxml2-devel zlib zlib-devel curl curl-devel openssl openssl-devel
接下来 configure PHP 7
[root@localhost php-7.1.4]# ./configure --prefix=/usr/local/php --enable-fpm --with-fpm-user=nginx --with-fpm-group=nginx --with-mysqli
--with-zlib --with-curl --with-gd --with-jpeg-dir --with-png-dir --with-freetype-dir
--with-openssl --enable-mbstring --enable-xml --enable-session --enable-ftp
--enable-pdo -enable-tokenizer --enable-zip
上面已经提到,PHP 7 已经删除了 MySQL 扩展,所以 -with-mysql 不再是一个有效的选项。这里用 MySQLi 或 PDO 代替。
其中 --prefix 是安装目录,上面提到在同一个服务器安装多个 PHP 版本,这个 --prefix 设定是很有必要的。至于其他扩展大家按实际增减。
如果 configure 成功的话,将会看到以下类似字样:
+--------------------------------------------------------------------+
| License:                                                           |
| This software is subject to the PHP License, available in this     |
| distribution in the file LICENSE.  By continuing this installation |
| process, you are bound by the terms of this license agreement.     |
| If you do not agree with the terms of this license, you must abort |
| the installation process at this point.                            |
+--------------------------------------------------------------------+
编译和安装
[root@localhost php-7.1.4]# make && make install
好,PHP 7 已经安装完成,下面进行配置
先是 PHP 的配置文档
[root@localhost php-7.1.4]# cp php.ini-development /usr/local/php/lib/php.ini
修改时区,查找 date.timezone,改成(主要将前面的 ; 去掉,这个是注释用的):
root@localhost php-7.1.4]# grep date.timezone /usr/local/php/lib/php.ini
; http://php.net/date.timezone
;date.timezone =
[root@localhost php-7.1.4]# sed -i 's#;date.timezone =#date.timezone = Asia/Shanghai#' /usr/local/php/lib/php.ini
[root@localhost php-7.1.4]# grep date.timezone /usr/local/php/lib/php.ini
; http://php.net/date.timezone
date.timezone = Asia/Shanghai
好了,PHP 7 已经安装好,下面验证一下
[root@localhost php-7.1.4]# /usr/local/php/bin/php -v
PHP 7.1.4 (cli) (built: Apr 17 2017 14:58:11) ( NTS )
Copyright (c) 1997-2017 The PHP Group
Zend Engine v3.1.0, Copyright (c) 1998-2017 Zend Technologies
接下来配置 php-fpm,复制 php-fpm 的配置文档
[root@localhost php-7.1.4]# cp /usr/local/php/etc/php-fpm.conf.default /usr/local/php/etc/php-fpm.conf
[root@localhost php-7.1.4]# cp /usr/local/php/etc/php-fpm.d/www.conf.default /usr/local/php/etc/php-fpm.d/www.conf
修改 /usr/local/php/etc/php-fpm.d/www.conf,把启动用户改为和nginx服务同一个启动用户(前面Nginx使用的是www账户,这里改成和Nginx使用一样的账户;一般都是使用www用户)
groupadd nginx
useradd -g nginx nginx
启动php-fpm
执行
/usr/local/php/sbin/php-fpm
ps aux | grep php-fpm
nginx和php-fpm整合
编辑/usr/local/nginx/conf/nginx.conf
vim /usr/local/nginx/conf/nginx.conf
修改如下:
添加红框中内容

改成如下

重新载入nginx的配置文件:
/usr/loca/nginx/sbin/nginx -s reload
4、测试php文件
在cd /usr/local/nginx/html下创建index.php文件,输入如下内容
 <?php
    phpinfo();
 ?>
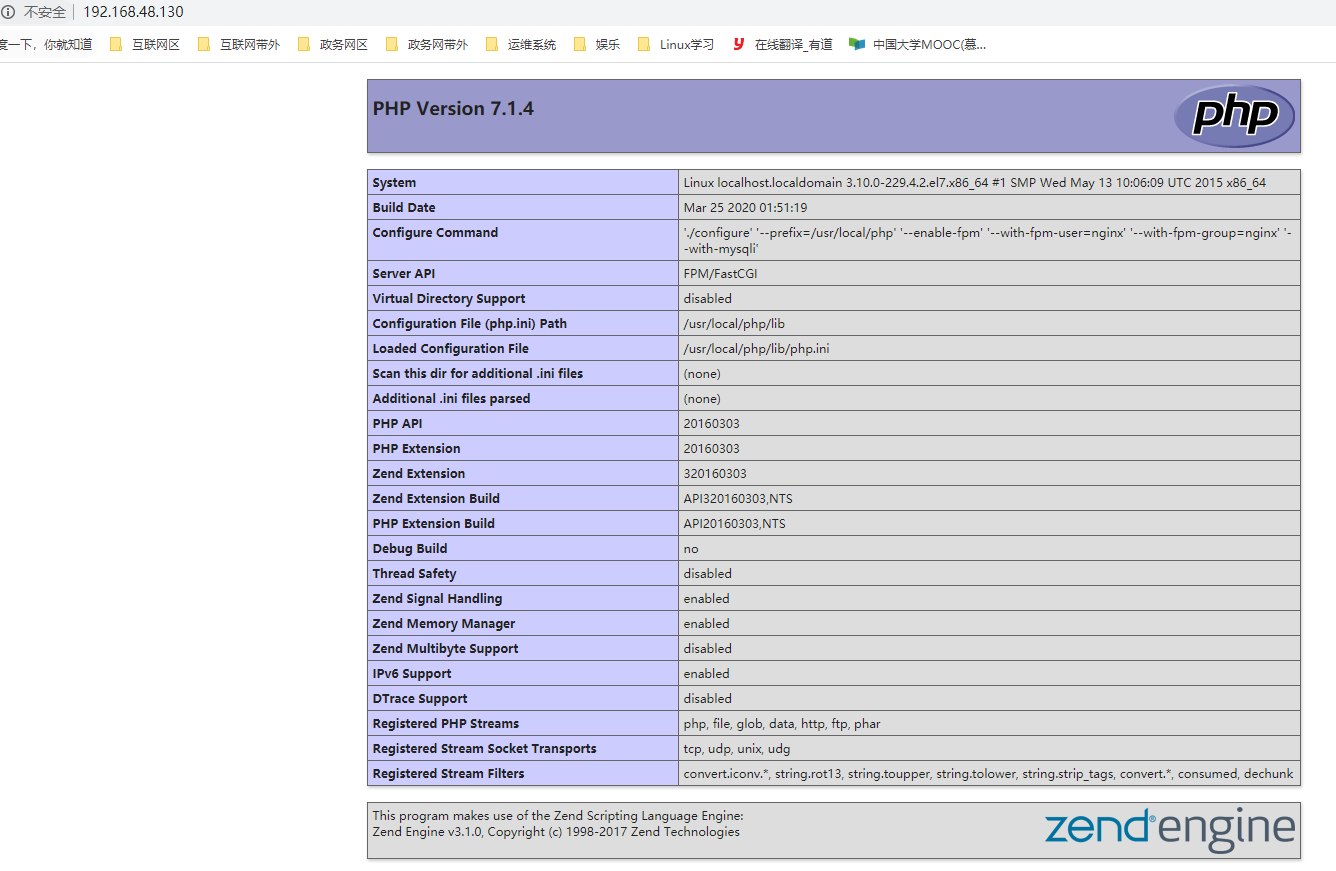
5、浏览器访问
访问http://你的服务器ip/index.php,皆可以见到php信息了。