上一章笔记链接:QT Quick QML入门笔记(三)常见元素
1. 布局介绍
对QT Quick布局一般有四种形式,
①. 绝对坐标:x、y、z、width、height、
②. 锚(anchors) 布局
③. 定位器(Row、Column、Grid、Flow)
④. 布局管理器(GridLayout、RowLayout、ColumnLayout)
2. 锚(anchors) 布局
锚布局是一种相对布局,具体如图所示:

目标布局如图,代码要如何实现呢?
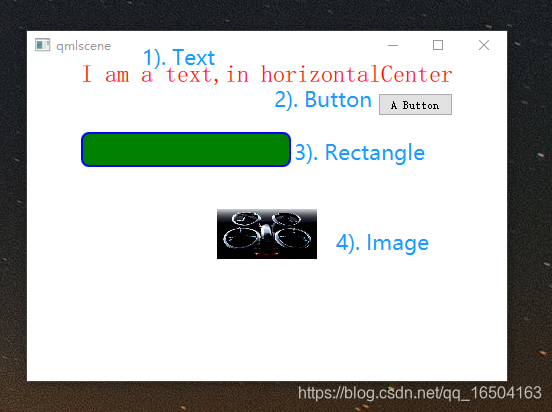
1). Text 靠最上边,且水平居中。
2). Button 在 Text 的下边,且右对齐。
3). Rectangle 在 Button下边,和Text左对齐。
4). Image在Rectangle的下边,和Text水平居中对齐。
3. 代码实例
在QT Quick QML入门笔记(三)常见元素代码中新增锚定位
import QtQuick 2.0
import QtQuick.Window 2.2
import QtQuick.Controls 1.4

Window {
    visible: true;
    width:  480;
    height: 320;

    //1). Text 靠最上边,且水平居中。
    Text {
        id: txt;

        //[布局]:
//        y: 100;        //绝对布局
        anchors.horizontalCenter:  parent.horizontalCenter;    //改为水平居中
        anchors.topMargin: 200;

        text: "I am a text,in horizontalCenter";
        color: "red";
        font.pixelSize: 24;  //像素大小
    }

    //2). Button 在 Text 的下边,且右对齐。
    Button {
        id: btn;

        //[布局]:
        anchors.right:  txt.right;
        anchors.top: txt.bottom;
        anchors.topMargin: 8;           //上边距留白8

        text: "A Button";
        onClicked: {
            console.log("clicked");      //输出日志
            txt.text = "button clicked"; //修改文字
        }
    }

    //3). Rectangle 在 Button下边,和Text左对齐。
    Rectangle {
        id : rect

        //[布局]:
//        x:200;    //绝对布局
//        y:200;
        anchors.left: txt.left;
        anchors.top: btn.bottom;
        anchors.topMargin: 16;           //上边距留白16

        height: 35                       //需要指定高宽
        width: 210
        color: "green";
        border.width: 2;
        border.color: "blue";
        radius: 8;             //圆角

        TextInput {
            id: phoneNuber;
            width: 200;
            height: 30;
            focus: true;   //与Rectangle相结合,需给焦点
            x: 4;          //相对于父的x. y偏移
            y: 4;
         }
    }

    //4). Image在Rectangle的下边,和Text水平居中对齐。
    Image {
        //[布局]:
//        x: 185;
//        y: 10;
        anchors.horizontalCenter: txt.horizontalCenter;
        anchors.top: rect.bottom;
        anchors.topMargin: 16;           //上边距留白16

        width: 100;
        height: 100;
        //本地图片:
        source:  "file:///D:/Qt/qt_quick_qml/无人机.png";
        fillMode: Image.PreserveAspectFit; //按比列填充,不会变形
    }
}
4. 运行

当改变运行框的大小,相对布局位置不会变。
下一章笔记链接:QT Quick QML入门笔记(五)处理鼠标和键盘事件
