监听器
一、监听器模式介绍
监听器模式可以用下图来体现:

当运行到关键节点的时候,系统会通过广播器发布相应的事件,而我们系统中存在一些监听器,它们会订阅一些“感兴趣”(实际是人为设定)的事件。
当有事件发布之后,相关的监听器会监听到订阅的事件,进而触发相关的“行为”(实际上就是处理事件)。
其实可以理解成 发布-订阅的一种形式。
监听器模式主要有四个要素
- 事件
- 监听器
- 广播器
- 触发机制
下面我们手动实现一下:
事件对象
创建一个天气事件的抽象类
public abstract class WeatherEvent {

	// 获得当前天气
    public abstract String getWeather();

}
接下来定义两个事件,下雨事件和下雪事件。
public class RainEvent extends WeatherEvent {
    @Override
    public String getWeather() {
        return "rain";
    }
}
public class SnowEvent extends WeatherEvent {
    @Override
    public String getWeather() {
        return "snow";
    }
}
监听器
下面定义我们的事件监听器
public interface WeatherListener {

    void onWeatherEvent(WeatherEvent event);
}
下雪的事件监听器
import org.springframework.stereotype.Component;

@Component
public class SnowListener implements WeatherListener {
    @Override
    public void onWeatherEvent(WeatherEvent event) {
        if (event instanceof SnowEvent) {
            System.out.println("hello " + event.getWeather());
        }
    }
}
下雨的事件监听器
import org.springframework.stereotype.Component;

@Component
public class RainListener implements WeatherListener {
    @Override
    public void onWeatherEvent(WeatherEvent event) {
        if (event instanceof RainEvent) {
            System.out.println("hello " + event.getWeather());
        }
    }
}
广播器
下面定义我们的事件广播器
public interface EventMulticaster {

	// 广播事件
    void multicastEvent(WeatherEvent event);

	// 添加监听器
    void addListener(WeatherListener weatherListener);

	//移除监听器
    void removeListener(WeatherListener weatherListener);

}
定义一个模板类
import org.springframework.beans.factory.annotation.Autowired;
import org.springframework.stereotype.Component;

import java.util.List;

@Component
public abstract class AbstractEventMulticaster implements EventMulticaster {

    private List<WeatherListener> listenerList = new ArrayList<>();

    @Override
    public void multicastEvent(WeatherEvent event) {
        doStart();
        listenerList.forEach(i -> i.onWeatherEvent(event));
        doEnd();
    }

    @Override
    public void addListener(WeatherListener weatherListener) {
        listenerList.add(weatherListener);
    }

    @Override
    public void removeListener(WeatherListener weatherListener) {
        listenerList.remove(weatherListener);
    }

    abstract void doStart();

    abstract void doEnd();

}
定义实现类
import org.springframework.stereotype.Component;

@Component
public class WeatherEventMulticaster extends AbstractEventMulticaster {

    @Override
    void doStart() {
        System.out.println("begin broadcast weather event");
    }

    @Override
    void doEnd() {
        System.out.println("end broadcast weather event");
    }
}
测试方法 含触发机制
public class Test {

    public static void main(String[] args) {
        WeatherEventMulticaster eventMulticaster = new WeatherEventMulticaster();
        RainListener rainListener = new RainListener();
        SnowListener snowListener = new SnowListener();
        eventMulticaster.addListener(rainListener);
        eventMulticaster.addListener(snowListener);
        eventMulticaster.multicastEvent(new SnowEvent());
        eventMulticaster.multicastEvent(new RainEvent());
        eventMulticaster.removeListener(rainListener);
        eventMulticaster.multicastEvent(new SnowEvent());
        eventMulticaster.multicastEvent(new RainEvent());
    }
}
结果:
begin broadcast weather event
hello snow
end broadcast weather event
begin broadcast weather event
hello rain
end broadcast weather event
begin broadcast weather event
hello snow
end broadcast weather event
begin broadcast weather event
end broadcast weather event
二、系统监听器介绍
下面看一下Springboot中的监听器是什么样的情况。
springboot中的系统监听器是ApplicationListener

springboot的监听器通过继承这个接口来实现监听器,这个接口是基于监听器模式的标准进行设计的。在spring3.0之后,监听器可以订阅自己感兴趣的事件,当监听器注入到spring容器中之后,在程序运行的一些关键节点,会有事件的发生,订阅相关事件的系统监听器会被触发。
这个接口继承自EventListener ,看到源码,你会发现这个接口仅仅是一个声明。
/**
 * A tagging interface that all event listener interfaces must extend.
 * @since JDK1.1
 */
public interface EventListener {
}
回到ApplicationListener。你会看到函数式接口的注解,我之间写了一篇关于Lamdda表达式的长文,你可以找来看看。
@FunctionalInterface
public interface ApplicationListener<E extends ApplicationEvent> extends EventListener {

	/**
	 * Handle an application event.
	 * @param event the event to respond to
	 */
	void onApplicationEvent(E event);
}
下面看一下系统广播器

这个接口主要就是管理事件监听器并且广播事件
public interface ApplicationEventMulticaster {

	// 添加一个系统监听器
	void addApplicationListener(ApplicationListener<?> listener);

	// 同上 不过是通过全限定类名获取
	void addApplicationListenerBean(String listenerBeanName);

	// 移除相关系统监听器
	void removeApplicationListener(ApplicationListener<?> listener);

	// 同上 不过是通过全限定类名获取
	void removeApplicationListenerBean(String listenerBeanName);

	// 移除所有系统监听器
	void removeAllListeners();

	// 下面两个都是广播事件的方法
	void multicastEvent(ApplicationEvent event);

	void multicastEvent(ApplicationEvent event, @Nullable ResolvableType eventType);
}
系统事件

最顶层是EventObject代表事件对象,ApplicationEvent代表应用事件。SpringApplicationEvent代表是Spring当中的应用事件,它这这种集成体系实现了分层描述。
- ApplicationPreparedEvent – 代表应用准备好
- ApplicationStartingEvent – 代表应用已经启动
- ApplicationFailedEvent – 代表应用失败
- …
这与刚才定义的下雪事件和下雨事件类似。每一个Event都对应一类事件。
事件发送顺序

- 首先框架启动之后,会发生start事件
- 在环境准备好之后触发environmentPrepared事件。(相关属性已经加载到容器内)
- springboot准备好上下文之后,触发contextInitialized事件
- 应用上下文创建完毕,但是bean还没有加载完成,这个时候会触发prepared事件
- 当bean实例化完成之后,但是还没有调用SpringApplication的run方法,会触发started事件
- 当run方法调用之后,会触发ready事件
在整个过程中,如果出现失败会触发failed事件。
监听器注册
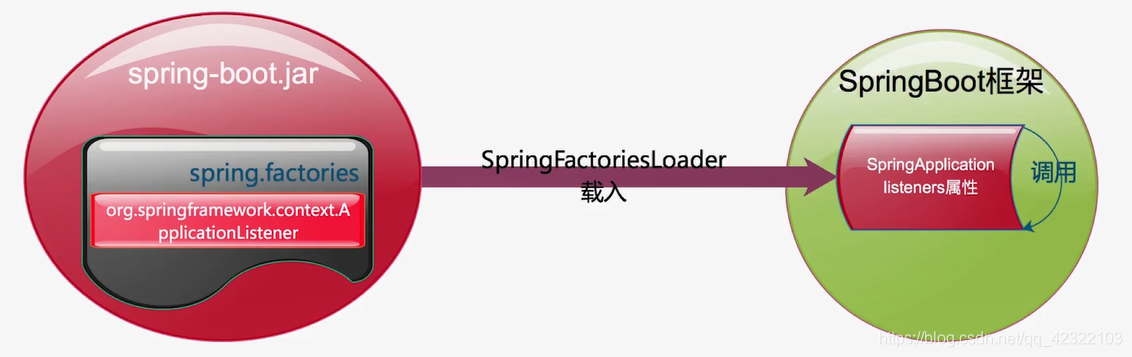
在系统初始化器那一篇文章中,我们通过看源码,发现系统初始化器的是通过加载META-INF目录下的spring.factories文件实现最终注入到spring容器的。
我们用相同的方式去探究:

一直定位一下去,发现这五行代码基本一样,是采用SpringFactoriesLoader.loadFactoryNames走的。

区别传入的type不一样。系统监听器的是ApplicationListener.class

上述过程可以用这张图来概述:
三:监听事件触发机制
第二部分,我们过了监听器如何被加载的源码,这一部分我们从run方法着手去探究事件触发机制。
考虑到不同事件的触发机制大同小异,这里就以一个作为入口,过一遍。

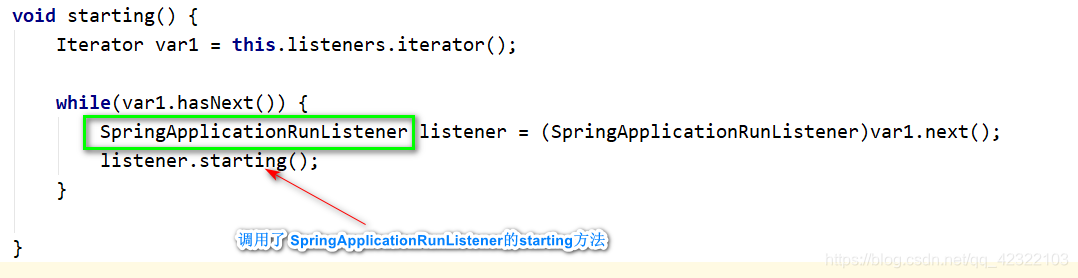
定位到listeners.starting()方法内部
我们看一下 SpringApplicationRunListener是什么样的

你会发现它定义了各个阶段的事件。
我们回到starting()方法

通过debug可以看到,运行期类的是

定位到EventPubLishingRunListener的源码,发现它调用了广播器发送了相应的事件。

这种机制使得监听器的内部实现与外部的调用隔离开了。
你可能在这里有点迷惑,我在这里的时候也迷惑了。以最初的例子为例,进行一个改造。
我们定义一个 WeatherRunListener
@Component
public class WeatherRunListener {

    @Autowired
    private WeatherEventMulticaster eventMulticaster;

    public void snow() {
        eventMulticaster.multicastEvent(new SnowEvent());
    }

    public void rain() {
        eventMulticaster.multicastEvent(new RainEvent());
    }

}
改造之前的模板类,采用注入的形式。
    @Autowired
    private List<WeatherListener> listenerList;
我们同样测试一下
@SpringBootTest
class DemoApplicationTests {


    @Autowired
    private WeatherRunListener weatherRunListener;

    @Test
    void contextLoads() {
        weatherRunListener.rain();
        weatherRunListener.snow();
    }
}
结果
begin broadcast weather event
hello rain
end broadcast weather event
begin broadcast weather event
hello snow
end broadcast weather event
这种方式 不是spring处理的基本上一样嘛
接下来进入 调用广播器的starting方法。
public void starting() {
        this.initialMulticaster.multicastEvent(new ApplicationStartingEvent(this.application, this.args));
    }
进入multicastEvent方法,发现是同名方法。resolveDefaultEventType方法功能是获取事件的class对象的包装。

继续走,发现这里创建线程池去处理一些事情

定位getApplicationListeners(event, type)方法的源码
protected Collection<ApplicationListener<?>> getApplicationListeners(
            ApplicationEvent event, ResolvableType eventType) {

 		//  获得事件的来源Object source = event.getSource();
 		// source其实是SpringApplication
        Object source = event.getSource();
        Class<?> sourceType = (source != null ? source.getClass() : null);
        // 如果已经在缓存中存在感兴趣的监听器,直接返回
        ListenerCacheKey cacheKey = new ListenerCacheKey(eventType, sourceType);

        // Quick check for existing entry on ConcurrentHashMap...
        ListenerRetriever retriever = this.retrieverCache.get(cacheKey);
        if (retriever != null) {
            return retriever.getApplicationListeners();
        }

        if (this.beanClassLoader == null ||
                (ClassUtils.isCacheSafe(event.getClass(), this.beanClassLoader) &&
                        (sourceType == null || ClassUtils.isCacheSafe(sourceType, this.beanClassLoader)))) {
            // Fully synchronized building and caching of a ListenerRetriever
            synchronized (this.retrievalMutex) {
                retriever = this.retrieverCache.get(cacheKey);
                if (retriever != null) {
                    return retriever.getApplicationListeners();
                }
                retriever = new ListenerRetriever(true);
                Collection<ApplicationListener<?>> listeners =
                        retrieveApplicationListeners(eventType, sourceType, retriever);
                this.retrieverCache.put(cacheKey, retriever);
                return listeners;
            }
        }
        else {
            // No ListenerRetriever caching -> no synchronization necessary
            return retrieveApplicationListeners(eventType, sourceType, null);
        }
    }
这里最核心的方法是retrieveApplicationListeners()方法
private Collection<ApplicationListener<?>> retrieveApplicationListeners(
        ResolvableType eventType, @Nullable Class<?> sourceType, @Nullable ListenerRetriever retriever) {

    List<ApplicationListener<?>> allListeners = new ArrayList<>();
    Set<ApplicationListener<?>> listeners;
    Set<String> listenerBeans;
	// 同步方法(防止多线程进入) 获取spring容器加载进来的监听器的实现
    synchronized (this.retrievalMutex) {
        listeners = new LinkedHashSet<>(this.defaultRetriever.applicationListeners);
        listenerBeans = new LinkedHashSet<>(this.defaultRetriever.applicationListenerBeans);
    }

    // 遍历监听器
    for (ApplicationListener<?> listener : listeners) {
    	// 是否对该事件感兴趣(底层调用 instanceOf方法)
        if (supportsEvent(listener, eventType, sourceType)) {
            if (retriever != null) {
            	// 感兴趣的话 会加入集合当中
                retriever.applicationListeners.add(listener);
            }
            allListeners.add(listener);
        }
    }


    if (!listenerBeans.isEmpty()) {
        BeanFactory beanFactory = getBeanFactory();
        for (String listenerBeanName : listenerBeans) {
            try {
                Class<?> listenerType = beanFactory.getType(listenerBeanName);
                if (listenerType == null || supportsEvent(listenerType, eventType)) {
                    ApplicationListener<?> listener =
                            beanFactory.getBean(listenerBeanName, ApplicationListener.class);
                    if (!allListeners.contains(listener) && supportsEvent(listener, eventType, sourceType)) {
                        if (retriever != null) {
                            if (beanFactory.isSingleton(listenerBeanName)) {
                                retriever.applicationListeners.add(listener);
                            }
                            else {
                                retriever.applicationListenerBeans.add(listenerBeanName);
                            }
                        }
                        allListeners.add(listener);
                    }
                }
            }
            catch (NoSuchBeanDefinitionException ex) {
                // Singleton listener instance (without backing bean definition) disappeared -
                // probably in the middle of the destruction phase
            }
        }
    }
	// 对监听器进行一个排序(按照order值)
    AnnotationAwareOrderComparator.sort(allListeners);
    if (retriever != null && retriever.applicationListenerBeans.isEmpty()) {
        retriever.applicationListeners.clear();
        retriever.applicationListeners.addAll(allListeners);
    }
    // 返回集合
    return allListeners;
}
getApplicationListeners(event, type) 方法其实就是 获得对当前event感兴趣的监听器列表。

supportsEvent(listener, eventType, sourceType)方法的内部实现大概是这个流程,最核心的两个方法是supportsEventType和supportsSourceType。

回到之前的步骤:我们现在已经获取到当前event感兴趣的监听器列表。
下面依次进行触发即可。

四:自定义监听器
创建一个包 listener
定义我们的监听器,方式与系统初始化器基本上一致,不再深入探讨,看效果吧。
第一种方式:
import org.springframework.boot.context.event.ApplicationStartedEvent;
import org.springframework.context.ApplicationListener;
import org.springframework.core.annotation.Order;

@Order(1)
public class FirstListener implements ApplicationListener<ApplicationStartedEvent> {
    @Override
    public void onApplicationEvent(ApplicationStartedEvent event) {
        System.out.println("hello first");
    }
}
在META-INF下的spring.factories中添加自定义监听器的全限定名
org.springframework.context.ApplicationListener=com.example.demo.listener.FirstListener
运行发现,注册监听器成功。

下面看第二种方式:
import org.springframework.boot.context.event.ApplicationStartedEvent;
import org.springframework.context.ApplicationListener;
import org.springframework.core.annotation.Order;

@Order(2)
public class SecondListener implements ApplicationListener<ApplicationStartedEvent> {
    @Override
    public void onApplicationEvent(ApplicationStartedEvent event) {
        System.out.println("hello second");
    }
}
更改启动类
//        SpringApplication.run(DemoApplication.class, args);
        SpringApplication springApplication = new SpringApplication(DemoApplication.class);
        springApplication.addListeners(new SecondListener());
        springApplication.run(args);
结果:

第三种方式:
import org.springframework.boot.context.event.ApplicationStartedEvent;
import org.springframework.context.ApplicationListener;
import org.springframework.core.annotation.Order;

@Order(3)
public class ThirdListener implements ApplicationListener<ApplicationStartedEvent> {
    @Override
    public void onApplicationEvent(ApplicationStartedEvent event) {
        System.out.println("hello third");
    }

}
在application.properties文件中添加
context.listener.classes=com.example.demo.listener.ThirdListener
启动

第四种方式:
import org.springframework.boot.context.event.ApplicationPreparedEvent;
import org.springframework.boot.context.event.ApplicationStartedEvent;
import org.springframework.context.ApplicationEvent;
import org.springframework.context.event.SmartApplicationListener;
import org.springframework.core.annotation.Order;

@Order(4)
public class FourthListener implements SmartApplicationListener {

	// 对哪一些事件感兴趣
    @Override
    public boolean supportsEventType(Class<? extends ApplicationEvent> eventType) {
        return ApplicationStartedEvent.class.isAssignableFrom(eventType) || ApplicationPreparedEvent.class.isAssignableFrom(eventType);
    }

	// 事件发生后,我们做一些什么事情
    @Override
    public void onApplicationEvent(ApplicationEvent event) {
        System.out.println("hello fourth");
    }
}
以上三种方式 任选一种注入到spring容器中,我这里选择第一种方式
context.listener.classes=com.example.demo.listener.ThirdListener,com.example.demo.listener.FourthListener
结果:

实现 Applicationlistene接口针对单一事件监听
实现 SmartApplicationlistener接口针对多种事件监听
