解决Tomcat闪退有一个新方法就是看看server.xml中是否有不存在的路径或者错误的路径名
在server.xml文件中配置虚拟目录
<Host name="localhost" appBase="E:\demoss" unpackWARs="true" autoDeploy="true">
<Context path="/demoss" docBase="E:\demoss"/>
</Host>
path属性用于指定Web应用的虚拟路径,docBase属性用于指定该虚拟路径所映射到的本地文件系统目录。
需要注意的是,修改后的server.xml文件不会立即生效,必须重启Tomcat服务器。
同时,docBase中的路径不能有错,如果有错会发生Tomcat闪退现象。

所以webapps中可以没有demoss目录
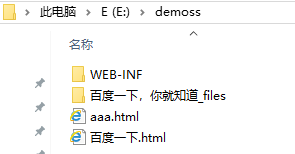
但是,docBase中的目录必须存在
这个时候可以访问http://localhost:8080/demoss/aaa.html
配置虚拟主机
Tomcat服务器允许用户在同一台计算机上配置多个Web站点,在这种情况下,需要为每个Web站点配置不同的主机名,即配置虚拟主机。
在Tomcat服务器中配置虚拟主机需要使用<Host>元素,打开Tomcat安装目录下的server.xml 文件,发现有如下所示的一行代码:
<Host name="localhost" appBase="webapps" unpackWARs="true" autoDeploy="true">
<Host> 元素代表一个虚拟主机,属性name和appBase分别表示虚拟主机的名称和路径,在此,表示虚拟主机的名称为 localhost
,路径为<Tomcat安装目录>\webapps 路径。这时如果希望添加一个虚拟主机,只需要在 server.xml 的<Engine> 元素中增加一个
<Host> 元素,将网站存放的目录配置为对应名称的主机即可。例如,将D:\demoss目录配置为一个名为demoss的虚拟主机
具体代码如下:
<Engine name="Catalina" defaultHost="localhost">
<Host name="demoss" appBase="E:\demoss" unpackWARs="true" autoDeploy="true">
<Context path="/demoss" docBase="E:\demoss"/>
</Host>
</Engine>
在上面的代码中,使用<Host> 元素配置了一个名称为demoss的虚拟主机。
<Engine> 元素中有一个defaultHost属性,该属性用于指定默认的虚拟主机,即访问的主机如果不存在,则会访问默认的虚拟主机。
将demoss配置为默认的虚拟主机的具体实现代码如下:
<Engine name="Catalina" defaultHost="demoss">
</Engine>
需要注意的是,配置好的虚拟主机要想被外界访问,还必须在 DNS(Domain Name System,域名系统) 服务器或 Windows系统中注册。因为通过浏览器访问一个URL地址时,需要明确该主机所对应的IP地址,由这个IP去连接Web服务器。所以,当虚拟主机配置完毕后,还需要再host文件中配置虚拟主机与IP地址的映射关系。
通常,hosts文件位于操作系统根目录下的System32\drivers\etc子目录中,一般新版的win10系统的hosts文件是空白的,但是我们也可以在网上搜这个文件以前的内容,内容如下:
# Copyright (c) 1993-2009 Microsoft Corp.
#
# This is a sample HOSTS file used by Microsoft TCP/IP for Windows.
#
# This file contains the mappings of IP addresses to host names. Each
# entry should be kept on an individual line. The IP address should
# be placed in the first column followed by the corresponding host name.
# The IP address and the host name should be separated by at least one
# space.
#
# Additionally, comments (such as these) may be inserted on individual
# lines or following the machine name denoted by a '#' symbol.
#
# For example:
#
# 102.54.94.97 rhino.acme.com # source server
# 38.25.63.10 x.acme.com # x client host
# localhost name resolution is handled within DNS itself.
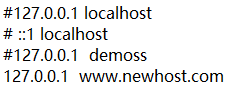
#127.0.0.1 localhost
# ::1 localhost
所以内容全被注释,相当于空文件。
我们在下面添加一条记录:127.0.0.1 demoss
127.0.0.1 demoss 的作用就是建立IP 地址(127.0.0.1)和主机名(demoss)的映射关系,所以此时在浏览器中可以通过demoss访问本地Web 服务器。那么配置一行127.0.0.1 demoss 也就是将D:\demoss 目录配置成一个名为demoss 的虚拟主机。
搭建 Web 站点(重点)
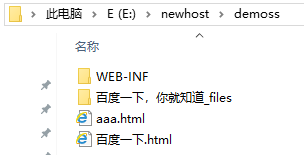
(1):在E盘根目录中创建一个newhost目录,将开发好的demoss 应用复制到newhost目录中。
(2):在server.xml文件中增加一个<Host> 元素,将该元素的name属性设置为www.newhost.com
appBase属性设置为E:\newhost,具体代码如下:
<Engine name="Catalina" defaultHost="localhost">
<Host name="www.newhost.com" appBase="E:\newhost">
</Host>
</Engine>
注意在Host里面和最开始的一样,不要再往里面加任何元素。
(3):在Windows系统的hosts文件中配置虚拟主机与IP地址的映射关系,具体代码如下:
127.0.0.1 www.new.host.com
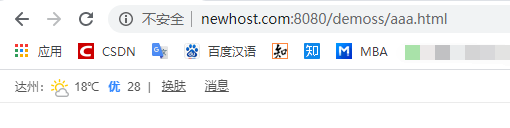
(4):重新启动Tomcat服务器,在浏览器的地址栏中输入http://www.newhost.com:8080/demoss/aaa.html访问aaa.html页面。
附录
![]()