一、概要
1.简介
1).LNMP代表的就是:Linux系统下Nginx+MySQL+PHP这种网站服务器架构。
2).Linux是一类Unix计算机操作系统的统称,是目前最流行的免费操作系统。代表版本有:debian、 centos、ubuntu、fedora、gentoo等。
3).Nginx是一个高性能的HTTP和反向代理服务器,也是一个IMAP/POP3/SMTP代理服务器。
4).Mysql是一个小型关系型数据库管理系统。
5).PHP是一种在服务器端执行的嵌入HTML文档的脚本语言。
6).这四种软件均为免费开源软件,组合到一起,成为一个免费、高效、扩展性强的网站服务系统。
2.特点
1).Nginx是一个小巧而高效的Linux下的Web服务器软件,是由 Igor Sysoev 为俄罗斯访问量第二的 Rambler 站点开发的,已经在一些俄罗斯的大型网站上运行多年,相当的稳定。
2).Nginx性能稳定、功能丰富、运维简单、处理静态文件速度快且消耗系统资源极少。
3.优点
1).作为 Web 服务器:相比 Apache,Nginx 使用更少的资源,支持更多的并发连接,体现更高的效率。
2).作为负载均衡服务器:Nginx 既可以在内部直接支持Rails和PHP,也可以支持作为 HTTP代理服务器对外进行服务。Nginx 用C编写,不论是系统资源开销还是CPU使用效率都比Perlbal要好的多。
3).作为邮件代理服务器:Nginx同时也是一个非常优秀的邮件代理服务器(最早开发这个产品的目的之一也是作为邮件代理服务器),Last/fm 描述了成功并且美妙的使用经验。
4).Nginx 安装非常的简单,配置文件非常简洁(还能够支持perl语法)。Nginx支持平滑加载新的配置,还能够在不间断服务的情况下进行软件版本的升级。
------------------------------------------------------------------------------摘要lnmp百度百科
二、准备工作
虚拟机:VMware15.5.0
CentOS Linux release 7.5.1804 (Core)
1.1)需要的源码包(统一放在一个目录)
[23:41:01 root@tuxing software]#ls
libmcrypt-2.5.8.tar.bz2  nginx-1.8.0.tar.gz  php-5.6.13.tar.bz2
mysql-5.6.26.tar.gz      pcre-8.37.tar.bz2
[23:41:37 root@tuxing software]#
1.2)CentOs7.5关闭防火墙
[23:37:22 root@tuxing ~]#systemctl stop firewalld.service				#关闭防火墙
[23:37:28 root@tuxing ~]#systemctl status firewalld.service			#关闭防火墙开机自启
[23:37:36 root@tuxing ~]#systemctl disable firewalld.service		#查看防火墙状态
1.3)源码编译之前安装开发包组
安装这两个"Development Tools"和 “Development Libraries”

[23:41:37 root@tuxing software]#yum groupinstall “Development Tools”
“Development Libraries” –y
解决依赖:
[23:43:33 root@tuxing software]#yum install gcc gcc-c++ autoconf
automake libtool make zlib zlib-devel openssl openssl-devel pcre*
pcre-devel -y
//Zlib:Nginx提供gzip模块,需要zlib的支持
//Openssl:Nginx提供SSL的功能
1.4)先解决安装pcre-8.37.tar.bz2
[23:46:10 root@tuxing software]#tar xf pcre-8.37.tar.bz2 -C /usr/local/src/
//我们只需要解压pcre源码,Nginx需要指定pcre的源码不是安装后的路径,此包的功能是支持地址重写rewrite功能 pcre的依赖可以yum安装pcre和pcre-devel解决!
三、源码安装nginx-1.8.0
1.1)解压到指定目录(/usr/local/src)即可 ##/usr/local/src是经常用的源码编译存放地!!!
[23:51:52 root@tuxing nginx-1.8.0]#tar xvf nginx-1.8.0.tar.gz -C
/usr/local/src/ ; cd /usr/local/src/nginx-1.8.0
1.2)源码编译
[23:55:36 root@tuxing nginx-1.8.0]#./configure
–prefix=/usr/local/nginx --with-http_dav_module --with-http_stub_status_module --with-http_addition_module --with-http_sub_module --with-http_flv_module --with-http_mp4_module --with-pcre=/usr/local/src/pcre-8.37
*********************************************************************************************************************
–with-pcre=/usr/local/src/pcre-8.37 //这里指的是源码,为安装nginx-1.8.0解决依赖。
由于我在下一步执行make时,所以有些报错!!!
解决:
[00:02:52 root@tuxing nginx-1.8.0]#vim objs/Makefile //注意:objs/Makefile文件在nginx-1.8.0目录里

<把-Werror删除后再执行make -j 3 ; make install ; cd>
[00:00:15 root@tuxing nginx-1.8.0]#make -j 3 ; make install ; cd
1.3)创建nginx用户
00:07:54 root@tuxing ~]#useradd -M -u 8001 -s /sbin/nologin nginx
[00:07:56 root@tuxing ~]#id nginx
uid=8001(nginx) gid=8001(nginx) groups=8001(nginx
1.4)配置Nginx支持php文件(修改三个地方)
[00:08:12 root@tuxing ~]#vim /usr/local/nginx/conf/nginx.conf
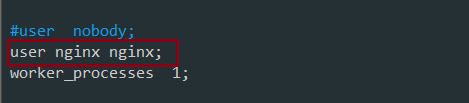
添加 user nginx nginx;
找到并在所支持的主页面格式中添加php格式的主页添加 index.php

往下找到这几段
#location ~ \.php$ {
    #    root           html;
    #    fastcgi_pass   127.0.0.1:9000;
    #    fastcgi_index  index.php;
    #    fastcgi_param  SCRIPT_FILENAME  /scripts$fastcgi_script_name;
    #    include        fastcgi_params;
    #}
去掉#号修改为:
location ~ \.php$ {
    root           html;
    fastcgi_pass   127.0.0.1:9000;
fastcgi_index  index.php;
fastcgi_param  SCRIPT_FILENAME  /usr/local/nginx/html$fastcgi_script_name;
   include        fastcgi_params;
}
1.5)启动nginx
[00:21:46 root@tuxing ~]#/usr/local/nginx/sbin/nginx  #启动
[00:23:01 root@tuxing ~]#netstat -tlnp | grep nginx
tcp        0      0 0.0.0.0:80              0.0.0.0:*               LISTEN      70015/nginx: master
[00:23:27 root@tuxing ~]#ps aux|grep nginx
root      70015  0.0  0.0  22568   800 ?        Ss   00:23   0:00 nginx: master process /usr/local/nginx/sbin/nginx
nginx     70016  0.0  0.0  25008  1552 ?        S    00:23   0:00 nginx: worker process
root      70979  0.0  0.0 112704   972 pts/1    S+   00:23   0:00 grep --color=auto nginx
然后使用浏览器测试http://IP地址/

1.6) Nginx的维护
检查配置文件语法是否有错误:
[00:24:02 root@tuxing ~]#/usr/local/nginx/sbin/nginx -t
nginx: the configuration file /usr/local/nginx/conf/nginx.conf syntax is ok
nginx: configuration file /usr/local/nginx/conf/nginx.conf test is successful
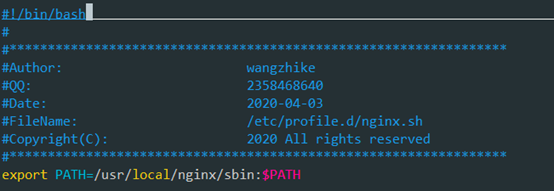
接着把写一个脚本把环境变量写入:
[00:27:50 root@tuxing ~]#vim /etc/profile.d/nginx.sh
[00:30:02 root@tuxing ~]#source /etc/profile.d/nginx.sh  	#source 一下脚本
[00:31:11 root@tuxing ~]#nginx -s stop					#关闭nginx,再启动,不然报错80端口冲突
[00:31:23 root@tuxing ~]#nginx 						#开启
开机自启动:
[00:31:29 root@tuxing ~]#echo "/usr/local/nginx/sbin/nginx &" >> /etc/rc.local
至此,LNMP之nginx安装成功!!!
