做过面向公网 WEB 运维的苦逼们肯定见识过各种恶意扫描、拉取、注入等图谋不轨行为吧?对于直接对外的 WEB 服务器,我们可以直接通过 iptables 、 Nginx 的 deny 指令或者是程序来 ban 掉这些恶意请求。
而对于套了一层 CDN 或代理的网站,这些方法可能就失效了。尤其是个人网站,可能就一台 VPS,然后套一个免费的 CDN 就行走在互联网了。并不是每个 CDN 都能精准的拦截各种恶意请求的,更闹心的是很多 CDN 还不支持用户在 CDN 上添加 BAN 规则,比如腾讯云 CDN。。。
因此,就有了本文的折腾分享。
一、真假难辨
如何禁止访问,我们先了解下常见的 3 种网站访问模式:
①、用户直接访问对外服务的普通网站
浏览器 --> DNS 解析 --> WEB 数据处理 --> 数据吐到浏览器渲染展示
②、用户访问使用了 CDN 的网站
浏览器 --> DNS 解析 --> CDN 节点 --> WEB 数据处理 --> 数据吐到浏览器渲染展示
③、用户通过代理上网访问了我们的网站
浏览器 --> 代理上网 --> DNS 解析 --> 上述 2 种模式均可能
对于第一种模式,我要禁止这个用户的访问很简单,可以直接通过 iptables 或者 Nginx 的 deny 指令来禁止均可:
iptabels:
iptables -I INPUT -s 用户 ip -j DROP
Nginx 的 deny 指令:
语 法: deny address | CIDR | unix: | all;
默认值: —
配置段: http, server, location, limit_except
顺 序:从上往下
Demo:
location / {
deny 用户 IP 或 IP 段;
}
但对于后面 2 种模式就无能为力了,因为 iptables 和 deny 都只能针对直连 IP,而后面 2 种模式中,WEB 服务器直连 IP 是 CDN 节点或者代理服务器,此时使用 iptable 或 deny 就只能把 CDN 节点 或代理 IP 给封了,可能误杀一大片正常用户了,而真正的罪魁祸首轻轻松松换一个代理 IP 又能继续请求了。
那该怎么办?
二、火眼金睛
如果长期关注张戈博客的朋友,应该还记得之前转载过一篇分享 Nginx 在 CDN 加速之后,获取用户真实 IP 做并发访问限制的方法。说明 Nginx 还是可以实实在在的拿到用户真实 IP 地址的,那么事情就好办了。
要拿到用户真实 IP,只要在 Nginx 的 http 模块内加入如下配置:
| 1 2 3 4 5 |
#获取用户真实IP,并赋值给变量$clientRealIP map $http_x_forwarded_for $clientRealIp { "" $remote_addr; ~^(?P<firstAddr>[0-9\.]+),?.*$ $firstAddr; } |
那么,$clientRealIP 就是用户真实 IP 了,其实就是匹配了 $http_x_forwarded_for 的第一个值,具体原理前文也简单分享过:
其实,当一个 CDN 或者透明代理服务器把用户的请求转到后面服务器的时候,这个 CDN 服务器会在 Http 的头中加入一个记录
X-Forwarded-For : 用户 IP, 代理服务器 IP
如果中间经历了不止一个代理服务器,这个记录会是这样
X-Forwarded-For : 用户 IP, 代理服务器 1-IP, 代理服务器 2-IP, 代理服务器 3-IP, ….
可以看到经过好多层代理之后, 用户的真实 IP 在第一个位置, 后面会跟一串中间代理服务器的 IP 地址,从这里取到用户真实的 IP 地址,针对这个 IP 地址做限制就可以了。
而且代码中还配合使用了 $remote_addr,因此$clientRealIP 还能兼容上文中第①种直接访问模式,不像 $http_x_forwarded_for 在直接访问模式中将会是空值!
所以,$clientRealIP 还能配置到 Nginx 日志格式中,替代传统的 $remote_addr 使用,推荐!
三、隔山打牛
既然已经拿到了真实 IP,却不能使用 iptables 和 deny 指令,是否无力感油然而生?
哈哈,在强大的 Nginx 面前只要想得到,你就做得到!通过对 $clientRealIP 这个变量的判断,Nginx 就能实现隔山打牛的目的,而且规则简单易懂:
Shell
| 1 2 3 4 5 6 7 8 |
#如果真实IP为 121.42.0.18、121.42.0.19,那么返回403 if ($clientRealIp ~* "121.42.0.18|121.42.0.19") { #如果你的nginx安装了echo模块,还能如下输出语言,狠狠的发泄你的不满(但不兼容返回403,试试200吧)! #add_header Content-Type text/plain; #echo "son of a bitch,you mother fucker,go fuck yourself!"; return 403; break; } |
把这个保存为 deny_ip.conf ,上传到 Nginx 的 conf 文件夹,然后在要生效的网站 server 模块中引入这个配置文件,并 Reload 重载 Nginx 即可生效:
| 1 2 |
#禁止某些用户访问 include deny_ip.conf; |
如果再想添加其他要禁止的 IP,只需要编辑这个文件,插入要禁止的 IP,使用分隔符 | 隔开即可,记得每次修改都需要 reload 重载 Nginx 才能生效。
四、奇淫巧计
为了更方便的添加和删除这些黑名单 IP,昨晚熬夜写了一个小脚本,一键添加和删除,懒人有福了!
Shell
| 1 2 3 4 5 6 7 8 9 10 11 12 13 14 15 16 17 18 19 20 21 22 23 24 25 26 27 28 29 30 31 32 33 34 35 36 37 38 39 40 41 42 43 44 45 46 47 48 49 50 51 52 53 54 55 56 57 58 59 60 61 62 63 64 65 66 67 68 69 70 71 72 73 74 75 76 77 78 79 80 81 82 83 84 85 86 87 88 89 90 91 92 93 94 95 96 97 98 99 100 101 102 103 104 105 106 107 108 109 110 111 112 113 114 115 116 117 118 119 120 121 122 123 124 125 126 127 128 129 130 131 132 133 134 135 136 137 138 139 |
#!/bin/bash ################################################################### # Deny Real IP for Nginx; Author: Jager <[email protected]> # # For more information please visit https://zhangge.net/5096.html # #-----------------------------------------------------------------# # Copyright ©2016 zhangge.net. All rights reserved. # ################################################################### NGINX_BIN=/usr/local/nginx/sbin/nginx DENY_CONF=/usr/local/nginx/conf/deny_ip.conf COLOR_RED=$( echo -e "\e[31;49m" ) COLOR_GREEN=$( echo -e "\e[32;49m" ) COLOR_RESET=$( echo -e "\e[0m" ) rep_info() { echo;echo -e "${COLOR_GREEN}$*${COLOR_RESET}";echo; } rep_error(){ echo;echo -e "${COLOR_RED}$*${COLOR_RESET}";echo;exit 1; } show_help() { printf " ################################################################### # Deny Real IP for Nginx; Author: Jager <[email protected]> # # For more information please visit https://zhangge.net/5096.html # #-----------------------------------------------------------------# # Copyright ©2016 zhangge.net. All rights reserved. # ################################################################### Usage: $0 [OPTIONS] OPTIONS: -h | --help : Show help of this script -a | --add : Add a deny ip to nginx, for example: ./$0 -a 192.168.1.1 -c | --create : Create deny config file($DENY_CONF) for Nginx -d | --del : Delete a ip from deny list, for example: ./$0 -d 192.168.1.1 -s | --show : Show current deny list " } reload_nginx() { $NGINX_BIN -t >/dev/null 2>&1 && \ $NGINX_BIN -s reload && \ return 0 } show_list() { awk -F '["){|]' '/if/ {for(i=2;i<=NF;i++) if ($i!="") printf $i"\n"}' $DENY_CONF } pre_check() { test -f $NGINX_BIN || rep_error "$NGINX_BIN not found,Plz check and edit." test -f $DENY_CONF || rep_error "$DENY_CONF not found,Plz check and edit." MATCH_COUNT=$(show_list | grep -w $1 | wc -l) return $MATCH_COUNT } create_rule() { test -f $DENY_CONF && \ rep_error "$DENY_CONF already exist!." cat >$DENY_CONF<<EOF if (\$clientRealIp ~* "8.8.8.8") { #add_header Content-Type text/plain; #echo "son of a bitch,you mother fucker,go fuck yourself!"; return 403; break; } EOF test -f $DENY_CONF && \ rep_info "$DENY_CONF create success!" && \ cat $DENY_CONF && \ exit 0 rep_error "$DENY_CONF create failed!" && \ exit 1 } add_ip() { pre_check $1 if [[ $? -eq 0 ]];then sed -i "s/\")/|$1&/g" $DENY_CONF && \ reload_nginx && \ rep_info "add $1 to deny_list success." || \ rep_error "add $1 to deny_list failed." else rep_error "$1 has been in deny list!" exit fi } del_ip() { pre_check $1 if [[ $? -ne 0 ]];then sed -ie "s/\(|$1\|$1|\)//g" $DENY_CONF && \ reload_nginx && \ rep_info "del $1 from deny_list success." || \ rep_error "del $1 from deny_list failed." else rep_error "$1 not found in deny list!" exit fi } case $1 in "-s"|"--show" ) show_list exit ;; "-h"|"--help" ) show_help exit ;; "-c"|"--create" ) create_rule ;; esac while [ $2 ];do case $1 in "-a"|"--add" ) add_ip $2; ;; "-d"|"--del" ) del_ip $2 ;; * ) show_help ;; esac exit done show_help |
使用方法:
①、根据实际情况修改第 9、10 行 Nginx 二进制文件及其 deny 配置文件路径
②、然后将此脚本保存为 deny_ctrl.sh 上传到服务器任意目录,比如放到 /root
③、给脚本赋予可执行权限:chmod +x deny_ctrl.sh 即可使用
④、使用参数:
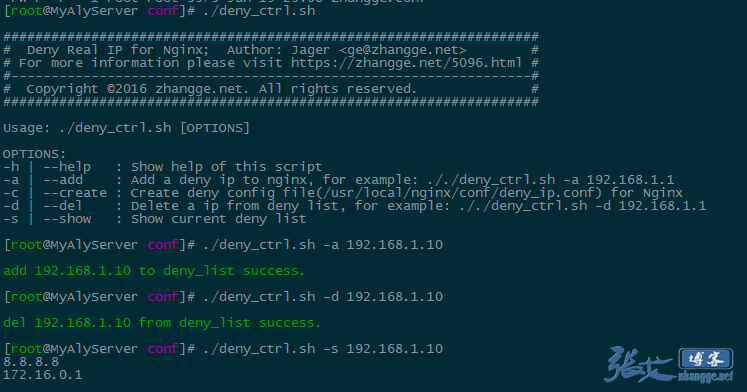
Usage: deny_ctrl.sh [OPTIONS]
OPTIONS:
-h | --help : 显示帮助信息
-a | --add : 添加一个黑名单 IP, 例如: ./deny_ctrl.sh -a 192.168.1.1
-c | --create : 初始化创建一个禁止 IP 的配置文件,需要自行 include 到需要的网站 server 模块
-d | --del : 删除一个黑名单 IP,例如: ./deny_ctrl.sh -d 192.168.1.1
-s | --show : 显示当前已拉黑 IP 清单
初次使用,先执行 ./deny_ctrl.sh -c 创建一下 Nginx 相关配置文件:deny_ip.conf,默认内容如下:
Shell
| 1 2 3 4 5 6 |
if ($clientRealIp ~* "8.8.8.8") { #add_header Content-Type text/plain; #echo "son of a bitch,you mother fucker,go fuck yourself!"; return 403; break; } |
8.8.8.8 是为了占位,规避为空的坑爹情况,实际使用中也请注意,必须要有一个 IP 占位,否则可能导致误杀哦!
生成这个文件之后,编辑网站对应的配置文件,比如 zhangge.net.conf
在 server {} 模块内部插入 include deny_ip.conf; (注意有英文分号)即可
比如:
| 1 2 3 4 5 6 7 8 9 |
server { listen 80; server_name zhangge.net; index index.html index.htm index.php default.html default.htm default.php; root /home/wwwroot/zhangge.net; include agent_deny.conf; #新增此行 #其他略 ... |
最后,使用 nginx -s reload 重载 nginx 即可。
后面需要添加黑名单或删除黑名单都可以使用 deny_ctrl.sh 脚本来操作了!
最后,顺便说明一下,本文分享的方法仅作为使用 CDN 网站遇到恶意 IP 的一种手工拉黑方案。而自动化限制的方案可以参考博客之前的分享: