1. 回顾:eureka注册中心
1.1 创建父项目
- 步骤0:父项目 could_parent_7
- 步骤一:修改pom.xml文件,配置 spring boot 版本,spring cloud版本,锁定cloud依赖,确定cloud私有仓库
    <!--1 确定spring boot的版本-->
    <parent>
        <groupId>org.springframework.boot</groupId>
        <artifactId>spring-boot-starter-parent</artifactId>
        <version>2.1.4.RELEASE</version>
    </parent>

    <!--2  确定版本-->
    <properties>
        <project.build.sourceEncoding>UTF-8</project.build.sourceEncoding>
        <java.version>1.8</java.version>
        <spring-cloud-release.version>Greenwich.RELEASE</spring-cloud-release.version>
    </properties>

    <!-- 3 锁定sprig cloud版本-->
    <dependencyManagement>
        <dependencies>
            <dependency>
                <groupId>org.springframework.cloud</groupId>
                <artifactId>spring-cloud-dependencies</artifactId>
                <version>${spring-cloud-release.version}</version>
                <type>pom</type>
                <scope>import</scope>
            </dependency>
        </dependencies>
    </dependencyManagement>

    <!-- 4 确定spring cloud私有仓库-->
    <repositories>
        <repository>
            <id>spring-milestones</id>
            <name>Spring Milestones</name>
            <url>https://repo.spring.io/milestone</url>
            <snapshots>
                <enabled>false</enabled>
            </snapshots>
        </repository>
    </repositories>
1.2 创建注册中心项目
- 步骤0:创建项目 eureka_demo
- 步骤一:修改pom.xml,配置 web 和 eureka server 依赖
<dependencies>
        <!--web起步依赖-->
        <dependency>
            <groupId>org.springframework.boot</groupId>
            <artifactId>spring-boot-starter-web</artifactId>
        </dependency>
        <!-- Eureka服务端 -->
        <dependency>
            <groupId>org.springframework.cloud</groupId>
            <artifactId>spring-cloud-starter-netflix-eureka-server</artifactId>
        </dependency>
    </dependencies>
- 步骤二:创建yml文件,配置端口号、服务名、注册地址
#端口号
server:
  port: 10086
#服务名
spring:
  application:
    name: eureka_demo
#注册地址
eureka:
  client:
    service-url:
      defaultZone: http://localhost:10086/eureka
    register-with-eureka: false   #是否注册自己到注册中心
    fetch-registry: false         #是否从注册中心拉取服务列表
- 步骤三:创建启动类,添加开启eureka server注解 @EnableEurekaServer
package com.czxy;

import org.springframework.boot.SpringApplication;
import org.springframework.boot.autoconfigure.SpringBootApplication;
import org.springframework.cloud.netflix.eureka.server.EnableEurekaServer;

/**
 * Created by cjc.
 */
@SpringBootApplication
@EnableEurekaServer     //开启eureka service
public class EurekaDemo3Application {
    public static void main(String[] args) {
        SpringApplication.run(EurekaDemo3Application.class,args);
    }
}
2. eureka详情
2.1 配置高可用的注册中心:集群
- 步骤一:修改核心yml文件,application.yml,只配置服务名(共享内容)
#服务名
spring:
  application:
    name: eureka_demo
- 步骤二:创建 application-10086.yml,配置10086端口和注册路径(10087)
#端口号
server:
  port: 10086
#注册地址
eureka:
  client:
    service-url:
      defaultZone: http://localhost:10087/eureka
    register-with-eureka: true   #是否注册自己到注册中心,默认值true(可省略)
    fetch-registry: true         #是否从注册中心拉取服务列表,默认值true(可省略)
- 步骤三:创建 application-10087.yml,配置10087端口和注册路径(10086)
#端口号
server:
  port: 10087
#注册地址
eureka:
  client:
    service-url:
      defaultZone: http://localhost:10086/eureka
    register-with-eureka: true   #是否注册自己到注册中心
    fetch-registry: true         #是否从注册中心拉取服务列表
-
步骤四:修改核心yml文件,激活10086配置,并启动程序
-
此时控制台抛异常,10087还没有启动,等10087启动后异常自动消失。
#服务名
spring:
  application:
    name: eureka_demo
  profiles:
    active: 10086
- 步骤五:修改核心yml文件,激活10087配置,并启动程序(idea不支持多启动)
#服务名
spring:
  application:
    name: eureka_demo
  profiles:
    active: 10087
- 步骤六:测试结果

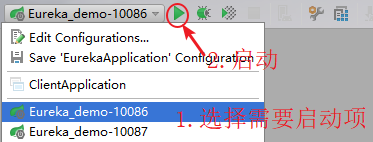
2.2 IDEA中配置多启动
- 步骤0:创建 spring boot启动项

- 步骤一:配置10086启动

- 步骤二:配置10087启动

- 步骤三:启动
2.3 回顾:服务提供方
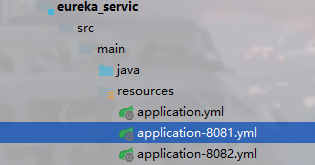
- 步骤0:创建项目 eureka_servic
- 步骤一:修改pom文件,添加web和eureka client依赖
 <dependencies>
        <!--web起步依赖-->
        <dependency>
            <groupId>org.springframework.boot</groupId>
            <artifactId>spring-boot-starter-web</artifactId>
        </dependency>
        <!-- Eureka客户端 -->
        <dependency>
            <groupId>org.springframework.cloud</groupId>
            <artifactId>spring-cloud-starter-netflix-eureka-client</artifactId>
        </dependency>
        <!--spring boot监控-->
        <dependency>
            <groupId>org.springframework.boot</groupId>
            <artifactId>spring-boot-starter-actuator</artifactId>
        </dependency>
    </dependencies>
- 步骤二:创建yml文件,配置端口号、服务名、注册路径
#端口号
server:
  port: 8080
#服务名
spring:
  application:
    name: servic
#注册路径
eureka:
  client:
    service-url:
      defaultZone: http://localhost:10086/eureka
- 步骤三:创建启动类,添加开启eureka 客户端注解 @EnableEurekaClient
package com.czxy;

import org.springframework.boot.SpringApplication;
import org.springframework.boot.autoconfigure.SpringBootApplication;
import org.springframework.cloud.netflix.eureka.EnableEurekaClient;

/**
 * Created by cjc
 */
@SpringBootApplication
@EnableEurekaClient     //开启eureka 客户端
public class Service3Application {
    public static void main(String[] args) {
        SpringApplication.run(Service3Application.class,args);
    }
}
- 步骤四:配置启动项

2.4 eureka配置详情(多读)
2.4.1 客户端的配置
#注册路径
eureka:
  client:
    service-url:
      defaultZone: http://localhost:10086/eureka
    registry-fetch-interval-seconds: 5     #从注册中心获取服务列表间隔时间
  instance:
    lease-expiration-duration-in-seconds: 10    #服务失效时间
    lease-renewal-interval-in-seconds: 5        #服务续约时间
2.4.2 服务端的配置
#服务名
spring:
  application:
    name: eureka_demo
#服务端配置
eureka:
  server:
    eviction-interval-timer-in-ms: 4000   #剔除失效服务间隔时间
    enable-self-preservation: false       #关闭自我保护
3. Ribbon 负载均衡
3.1 服务提供者(集群)
 同一个名称的服务,只要提供多个实例,注册到eureka中,就可以自动形成集群。
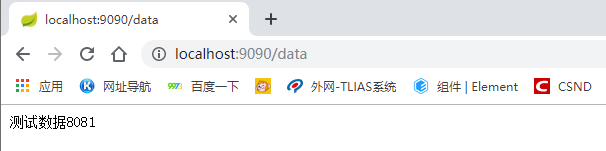
- 步骤一:创建 application-8081.yml文件,并配置端口号8081
server:
  port: 8081
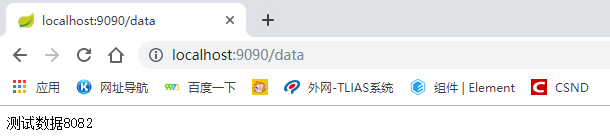
- 步骤二:创建 application-8082.yml文件,并配置端口号8082

server:
  port: 8082
- 步骤三:启动,测试

3.2 回顾:服务提供方,测试数据
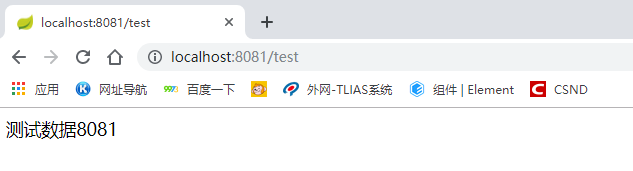
- 步骤一:编写controller,对外接口 /test , 返回的数据“测试数据 + 服务器端口号”
package com.czxy.controller;

import org.springframework.http.ResponseEntity;
import org.springframework.web.bind.annotation.GetMapping;
import org.springframework.web.bind.annotation.RequestMapping;
import org.springframework.web.bind.annotation.RestController;

import javax.servlet.http.HttpServletRequest;

/**
 * Created by cjc
 */
@RestController
@RequestMapping("/test")
public class TestController {
    @GetMapping
    public ResponseEntity<String> test(HttpServletRequest request){
        return ResponseEntity.ok("测试数据" + request.getServerPort());
    }
}

3.3 回顾:服务调用方
- -步骤0:创建项目 eureka_client
- 步骤一:核心3步,pom文件,yml文件,启动类,om文件
<dependencies>
        <!--web起步依赖-->
        <dependency>
            <groupId>org.springframework.boot</groupId>
            <artifactId>spring-boot-starter-web</artifactId>
        </dependency>
        <!-- Eureka客户端 -->
        <dependency>
            <groupId>org.springframework.cloud</groupId>
            <artifactId>spring-cloud-starter-netflix-eureka-client</artifactId>
        </dependency>
        <!--spring boot监控-->
        <dependency>
            <groupId>org.springframework.boot</groupId>
            <artifactId>spring-boot-starter-actuator</artifactId>
        </dependency>
    </dependencies>
server:
  port: 9090
spring:
  application:
    name: client
eureka:
  client:
    service-url:
      defaultZone: http://localhost:10086/eureka
package com.czxy;

import org.springframework.boot.SpringApplication;
import org.springframework.boot.autoconfigure.SpringBootApplication;
import org.springframework.cloud.netflix.eureka.EnableEurekaClient;

/**
 * Created by cjc
 */
@SpringBootApplication
@EnableEurekaClient
public class Client3Application {
    public static void main(String[] args) {
        SpringApplication.run(Client3Application.class,args);
    }
}
- 步骤二:编写配置类,配置RestTemplate实例
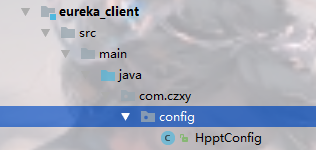
package com.czxy.config;

import org.springframework.context.annotation.Bean;
import org.springframework.context.annotation.Configuration;
import org.springframework.web.client.RestTemplate;

/**
 * Created by cjc
 */
@Configuration
public class HttpConfig {
    @Bean
    public RestTemplate restTemplate(){
        return new RestTemplate();
    }
}
- 步骤三:编写dao,DataDao,请求提供方 /test
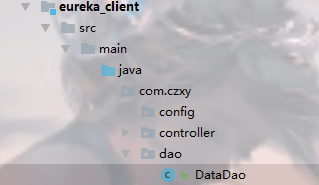
package com.czxy.dao;

import org.springframework.http.ResponseEntity;
import org.springframework.stereotype.Component;
import org.springframework.web.client.RestTemplate;

import javax.annotation.Resource;

/**
 * Created by cjc
 */
@Component
public class DataDao {
    @Resource
    private RestTemplate restTemplate;

    public ResponseEntity<String> data(){
        String url = "http://localhost:8081/test";
        return restTemplate.getForEntity(url,String.class);
    }
}
- 步骤四:编写controller,显示数据,对外提供接口 /data

package com.czxy.controller;

import com.czxy.dao.DataDao;
import org.springframework.http.ResponseEntity;
import org.springframework.web.bind.annotation.GetMapping;
import org.springframework.web.bind.annotation.RequestMapping;
import org.springframework.web.bind.annotation.RestController;

import javax.annotation.Resource;

/**
 * Created by cjc
 */
@RestController
@RequestMapping("/data")
public class DataController {
    @Resource
    private DataDao dataDao;

    @GetMapping
    public ResponseEntity<String> data(){
        return dataDao.data();
    }
}
3.4 负载均衡入门
-
eureka 内置 ribbon,也就是说自动集成负载均衡器。
-
负载均衡器,就是在集群环境下,选择需要的服务。

-
步骤一:修改配置类,让RestTemplate支持“服务名”访问机制
-
需要添加注解 @LoadBalanced
package com.czxy.config;

import org.springframework.cloud.client.loadbalancer.LoadBalanced;
import org.springframework.context.annotation.Bean;
import org.springframework.context.annotation.Configuration;
import org.springframework.web.client.RestTemplate;

/**
 * Created by cjc
 */
@Configuration
public class HttpConfig {
    @Bean
    @LoadBalanced       //让RestTemplate支持负载均衡,也就是说支持“服务名”访问
    public RestTemplate restTemplate(){
        return new RestTemplate();
    }
}
- 步骤二:修改dao,使用RestTemplate进行远程调用时,使用“服务名”进行调用即可。
package com.czxy.dao;

import org.springframework.http.ResponseEntity;
import org.springframework.stereotype.Component;
import org.springframework.web.client.RestTemplate;

import javax.annotation.Resource;

/**
 * Created by cjc
 */
@Component
public class DataDao {
    @Resource
    private RestTemplate restTemplate;

    public ResponseEntity<String> data(){
//        String url = "http://localhost:8081/test";
        String url = "http://service3/test";
        return restTemplate.getForEntity(url,String.class);
    }
}
- 测试