在java开发过程中,经常会与javabean打交道,像Entity、pojo、vo、dto等等。java应用非常讲究分层架构,因此在各层之间bean的传输与转换非常的繁琐,比如:
Student stu = new Student();
stu.setName(bean.getName());
stu.setClassName(bean.getClassName());
stu.setPeople(bean.getPeople());
stu.setScore(bean.getScore());
- 1
- 2
- 3
- 4
- 5
相信大家都会遇到或使用这种方式赋值或取值,这种做法感觉非常恶心,一旦bean的属性很多,增加代码长度不说,还特别影响阅读代码的心情。
为此,业界有很多开源的实现,比如:
apache commons PropertiyUtils
apache commons BeanUrils
Spring BeanUtils
Cglib BeanCopier
Dozer
- 1
- 2
- 3
- 4
- 5
今天就来探究下apache commons BeanUtils的用法
2.apache commons BeanUtils简介
对于BeanUtils,其实大家都有用到过。它是很多开源项目的基石,比如Struts和Spring,都能看到BeanUtils的影子。用过springMVC框架应该都知道SpringNVC框架中有一个BaseCommandController这个类,这个类的作用就是将前端传过来的参数绑定到特定的对象中去,而不需要我们request.getParamter(“name”);bean.setName(name),从而减少了不少工作。
在Struts中也有这样的功能,用的就是apache BeanUtils这个工具类。
BeanUtils主要是封装了java反射(reflection)和自省(introspection)API,来对javabean进行操作。
这里介绍BeanUtils的几个常用方法:
1.public static Object cloneBean(Object bean)  //克隆对象(此处未实现深度clone,复杂对象clone的依然只是引用)
2.public static void copyProperties(Object dest, Object orig)  //赋值
3.public static void setProperty(Object bean, String name, Object value)   //设置bean中某个属性的值
4.public static String getProperty(Object bean, String name)   //得到bean中对应属性值
5.public static void populate(Object bean, Map properties)    //Map转为bean
- 1
- 2
- 3
- 4
- 5
3.BeanUtils使用示例
3.1先定义好bean
package apache.commons.beanutil;

import java.io.ByteArrayInputStream;
import java.io.ByteArrayOutputStream;
import java.io.IOException;
import java.io.ObjectInputStream;
import java.io.ObjectOutputStream;
import java.io.Serializable;
import java.util.Date;
import java.util.List;


public class Student implements Serializable{
    private int score;
    private String className;
    private String name;
    private People people;
    private Date createDate;

    public Student() {
    }

    public Student(int score, String className, String name) {
        // TODO Auto-generated constructor stub
        this.score = score;
        this.className = className;
        this.name = name;
    }

    public int getScore() {
        return score;
    }
    public void setScore(int score) {
        this.score = score;
    }
    public String getClassName() {
        return className;
    }
    public void setClassName(String className) {
        this.className = className;
    }
    public String getName() {
        return name;
    }
    public void setName(String name) {
        this.name = name;
    }
    public People getPeople() {
        return people;
    }
    public void setPeople(People people) {
        this.people = people;
    }
    public Date getCreateDate() {
        return createDate;
    }

    public void setCreateDate(Date createDate) {
        this.createDate = createDate;
    }

    @Override
    public String toString() {
        return "Student [score=" + score + ", className=" + className + ", name=" + name + ", people=" + people
                + ", createDate=" + createDate + "]";
    }

    /**
     * 使用序列化的方式实现深度clone
     * @return
     * @throws IOException
     * @throws ClassNotFoundException
     */
    public Student deepClone() throws IOException, ClassNotFoundException{
        ByteArrayOutputStream bao = new ByteArrayOutputStream();
        ObjectOutputStream objectOutputStream = new ObjectOutputStream(bao);
        objectOutputStream.writeObject(this);

        ByteArrayInputStream baInput = new ByteArrayInputStream(bao.toByteArray());
        ObjectInputStream objectInputStream = new ObjectInputStream(baInput);
        Student stu = (Student)objectInputStream.readObject();

        return stu;
    }
}
- 1
- 2
- 3
- 4
- 5
- 6
- 7
- 8
- 9
- 10
- 11
- 12
- 13
- 14
- 15
- 16
- 17
- 18
- 19
- 20
- 21
- 22
- 23
- 24
- 25
- 26
- 27
- 28
- 29
- 30
- 31
- 32
- 33
- 34
- 35
- 36
- 37
- 38
- 39
- 40
- 41
- 42
- 43
- 44
- 45
- 46
- 47
- 48
- 49
- 50
- 51
- 52
- 53
- 54
- 55
- 56
- 57
- 58
- 59
- 60
- 61
- 62
- 63
- 64
- 65
- 66
- 67
- 68
- 69
- 70
- 71
- 72
- 73
- 74
- 75
- 76
- 77
- 78
- 79
- 80
- 81
- 82
- 83
- 84
- 85
注意Student这个类中含有People类,待会验证beanutils的cloneBean()方法是否实现了深度克隆。
People类定义:
package apache.commons.beanutil;

import java.io.Serializable;
import java.util.Date;

public class People implements Serializable{
    private String name;
    private int age;

    public People() {
    }

    public People(String name,int age) {
        this.name = name;
        this.age = age;
    }

    public String getName() {
        return name;
    }
    public void setName(String name) {
        this.name = name;
    }
    public int getAge() {
        return age;
    }
    public void setAge(int age) {
        this.age = age;
    }

    @Override
    public String toString() {
        return "People [name=" + name + ", age=" + age + "]";
    }
}
- 1
- 2
- 3
- 4
- 5
- 6
- 7
- 8
- 9
- 10
- 11
- 12
- 13
- 14
- 15
- 16
- 17
- 18
- 19
- 20
- 21
- 22
- 23
- 24
- 25
- 26
- 27
- 28
- 29
- 30
- 31
- 32
- 33
- 34
- 35
3.2 接下来测试cloneBean方法:
@Test
public void testBeanClone() throws Exception{
    Student student = new Student(80, "ll","tf");
    People people = new People("tt", 20);
    student.setPeople(people);
//  student.setCreateDate(new Date());
    System.out.println("clone前:" + student);

    Student bean = (Student)BeanUtils.cloneBean(student);
    bean.getPeople().setName("daxiong");
    People people2 = bean.getPeople();
    System.out.println(people2 == people);
    System.out.println("clone后:" + bean);
    System.out.println(student);
}
- 1
- 2
- 3
- 4
- 5
- 6
- 7
- 8
- 9
- 10
- 11
- 12
- 13
- 14
- 15
输出结果为:
clone前:Student [score=80, className=ll, name=tf, people=People [name=tt, age=20], createDate=null]
clone后:Student [score=80, className=ll, name=tf, people=People [name=tt, age=20], createDate=null]
clone前后嵌套属性是否是原有引用:true
改变属性后原有beanStudent [score=80, className=ll, name=tf, people=People [name=daxiong, age=20], createDate=null]
改变属性后克隆bean:Student [score=80, className=ll, name=tf, people=People [name=daxiong, age=20], createDate=null]
- 1
- 2
- 3
- 4
- 5
- 6
我们可以看到结果,对普通的javaeban,能够实现clone。但是对于bean中还嵌套别的bean时,clone的只是原有bean的引用。
3.3 我们采用序列化方式实现深度克隆进行一个对比:
@Test
public void testDeepClone() throws Exception{
    Student student = new Student(80, "ll","tf");
    People people = new People("tt", 20);
    student.setPeople(people);
//  student.setCreateDate(new Date());
    System.out.println("clone前:" + student);

    Student deepClone = student.deepClone();
    System.out.println("clone后:" + deepClone);
    People people2 = deepClone.getPeople();
    System.out.println("clone前后嵌套属性是否是原有引用:" + (people == people2));
    deepClone.getPeople().setName("xxxx");
    System.out.println("改变属性后原有bean:" + student);
    System.out.println("改变属性后克隆bean" + deepClone);
}
- 1
- 2
- 3
- 4
- 5
- 6
- 7
- 8
- 9
- 10
- 11
- 12
- 13
- 14
- 15
- 16
输出结果:

clone前:Student [score=80, className=ll, name=tf, people=People [name=tt, age=20], createDate=null]
clone后:Student [score=80, className=ll, name=tf, people=People [name=tt, age=20], createDate=null]
clone前后嵌套属性是否是原有引用:false
改变属性后原有bean:Student [score=80, className=ll, name=tf, people=People [name=tt, age=20], createDate=null]
改变属性后克隆beanStudent [score=80, className=ll, name=tf, people=People [name=xxxx, age=20], createDate=null]
- 1
- 2
- 3
- 4
- 5
总结:两相比较,可以看到clone前后是否为原有引用不同,采用Beanutils.cloneBean方法,只是简单的复制嵌套类的引用。这样,后面对克隆的bean修改name属性,原有的bean也发生变化。要实现深度clone,要么采用每个bean都实现Cloneable接口,在提供一个公共的方法,里面调用Object的clone()方法。要么简单的采用序列化的方式实现。
3.4 BeanUtils的copyProperties(Object dest, Object orig)方法
@Test
public void testCopyProperties() throws Exception{
    Student student = new Student(80, "ll","tf");
    People people = new People("tt", 20);
    student.setPeople(people);
//      student.setCreateDate(new Date());
    System.out.println(student);

    Student stu = new Student();
    BeanUtils.copyProperties(stu, student);
    System.out.println(stu);
    stu.getPeople().setName("ttff");
    System.out.println(student);
    System.out.println(stu);
}
- 1
- 2
- 3
- 4
- 5
- 6
- 7
- 8
- 9
- 10
- 11
- 12
- 13
- 14
- 15
输出结果:
Student [score=80, className=ll, name=tf, people=People [name=tt, age=20], createDate=null]
Student [score=80, className=ll, name=tf, people=People [name=tt, age=20], createDate=null]
Student [score=80, className=ll, name=tf, people=People [name=ttff, age=20], createDate=null]
Student [score=80, className=ll, name=tf, people=People [name=ttff, age=20], createDate=null]
- 1
- 2
- 3
- 4
可以看到copyProperties方法也是简单的复制嵌套bean的引用。。。
3.5 BeanUtils的setProperty(Object bean, String name, Object value)和getProperty(Object bean, String name)方法使用
@Test
public void testSetProperty() throws Exception{
    Student stu = new Student();
    BeanUtils.setProperty(stu, "name", "tf");
    BeanUtils.setProperty(stu, "people", new People("ttttfff", 23));
    System.out.println(stu);

    System.out.println(BeanUtils.getProperty(stu, "name"));
    System.out.println(BeanUtils.getProperty(stu, "people"));
    System.out.println(BeanUtils.getProperty(stu, "people.name") +   BeanUtils.getProperty(stu, "people.age"));
}
- 1
- 2
- 3
- 4
- 5
- 6
- 7
- 8
- 9
- 10
- 11
输出结果:
Student [score=0, className=null, name=tf, people=People [name=ttttfff, age=23], createDate=null]
tf
People [name=ttttfff, age=23]
ttttfff23
- 1
- 2
- 3
- 4
setProperty方法类类似我们直接调用setter/getter方法,,但是getProperty方法中可以采用bean.property的方式去取得嵌套类中的属性(最后一个输出)。
3.6 BeanUtils的populate(Object bean, Map properties)方法使用
将Map转为bean
@Test
public void testPopulate() throws Exception{
    Student student2 = new Student();
    Map<String, Object> map = new HashMap<>();
    map.put("name", "ttt");
    map.put("score", 80);
    map.put("people", new People("peopleName", 30));
    System.out.println("map:" + map);
    BeanUtils.populate(student2, map);
    System.out.println(student2);
}
- 1
- 2
- 3
- 4
- 5
- 6
- 7
- 8
- 9
- 10
- 11
输出:
map:{name=ttt, score=80, people=People [name=peopleName, age=30]}
Student [score=80, className=null, name=ttt, people=People [name=peopleName, age=30], createDate=null]
- 1
- 2
注意,在使用populate方法时,如果bean中出现了java.util.Date类型,而map中put的是String类型,这时候将Map转bean会出错,怎么解决这个问题呢?答案就是自己去实现一个org.apache.commons.beanutils.Converter接口,此接口和BeanUtils位于同一个包底下。注意,BeanUtils其实支持类型转换功能,比如两个bean中有同名属性但不同类型,在支持的数据类型范围内进行转换。支持的数据类型包括:
java.lang.BigDecimal
java.lang.BigInteger
boolean and java.lang.Boolean
byte and java.lang.Byte
char and java.lang.Character
java.lang.Class
double and java.lang.Double
float and java.lang.Float
int and java.lang.Integer
long and java.lang.Long
short and java.lang.Short
java.lang.String
java.sql.Date
java.sql.Time
java.sql.Timestamp
- 1
- 2
- 3
- 4
- 5
- 6
- 7
- 8
- 9
- 10
- 11
- 12
- 13
- 14
- 15
对应的类:
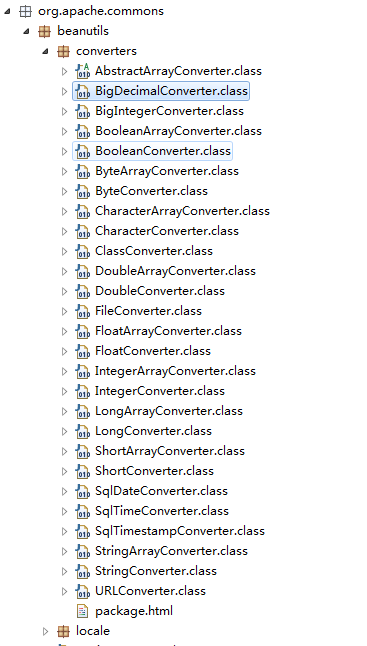
注意这里没有java.util.Date类型,只有java.sql.Date。因此,我们在使用java.util.Date时,BeanUtils并不能自己帮我们进行转换,需要我们自己去实现Converter接口。现在我们自己顶一个DateConverter类实现Date类型和字符串进行转换:
package apache.commons.beanutil;

import java.sql.Timestamp;
import java.text.DateFormat;
import java.text.ParseException;
import java.text.SimpleDateFormat;
import java.util.Date;

import org.apache.commons.beanutils.ConversionException;
import org.apache.commons.beanutils.Converter;

public class DateConverter implements Converter{
    public String Pattern = "yyyy-MM-dd HH:mm:ss";

    public DateConverter() {
    }

    public DateConverter(String pattern) {
        this.Pattern = pattern;
    }

    @Override
    public Object convert(Class clazz, Object obj) {
        if(obj == null)
            return null;
        if(clazz == Date.class){
            return convertToDate(clazz, obj, Pattern);
        }else if(clazz == String.class){
            return convertToString(clazz, obj, Pattern);
        }
        throw new ConversionException(obj.getClass().getName() + "不能转换为" + clazz.getName());
    }

    public Date convertToDate(Class clazz, Object obj, String pattern){
        DateFormat format = new SimpleDateFormat(pattern);
        if(obj instanceof String){
            String dateStr = (String)obj;
            try {
                if(clazz == Timestamp.class){
                    return new Timestamp(new Date().getTime());
                }
                Date d = format.parse(dateStr);
                return d;
            } catch (ParseException e) {
                e.printStackTrace();
                return null;
            }
        }else if(obj instanceof Date){
            return (Date)obj;
        }
        throw new ConversionException(obj.getClass().getName() + "不能转换为" + clazz.getName());
    }

    public String convertToString(Class clazz, Object obj, String pattern){
        DateFormat dateFormat = new SimpleDateFormat(pattern);
        if(obj instanceof Date){
            return dateFormat.format((Date)obj);
        }
        return obj.toString();
    }
}
- 1
- 2
- 3
- 4
- 5
- 6
- 7
- 8
- 9
- 10
- 11
- 12
- 13
- 14
- 15
- 16
- 17
- 18
- 19
- 20
- 21
- 22
- 23
- 24
- 25
- 26
- 27
- 28
- 29
- 30
- 31
- 32
- 33
- 34
- 35
- 36
- 37
- 38
- 39
- 40
- 41
- 42
- 43
- 44
- 45
- 46
- 47
- 48
- 49
- 50
- 51
- 52
- 53
- 54
- 55
- 56
- 57
- 58
- 59
- 60
- 61
在代码中改如何使用我们自己实现的DateConverter呢?其实很简单,就是在调用populate方法前加上一行代码:
ConvertUtils.register(new DateConverter(), Date.class);
- 1
为什么加上这行代码后,就能实现date类型转换呢?跟踪查看源代码后找到答案。
首先查看BeanUtils.populate方法,发现内部实现由BeanUtilsBean去实现的:

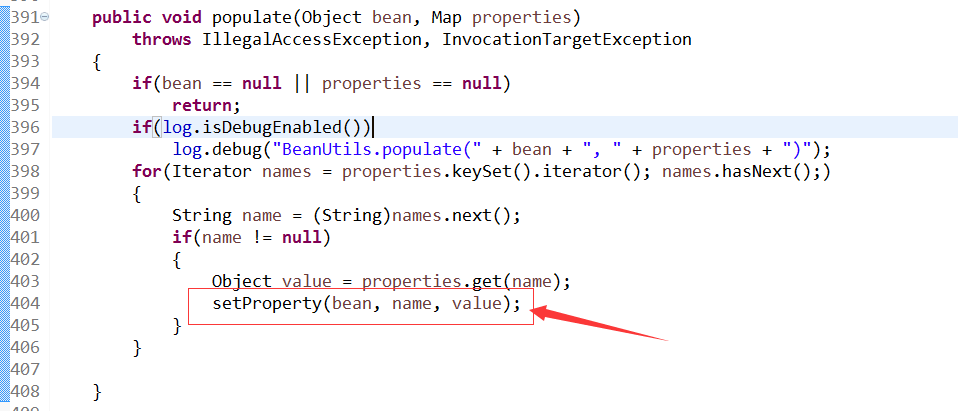
继续跟踪BeanUtilsBean,可以看到先将我们要转换的Map进行遍历,然后调用setProperty方法,是的,你没看错,就是调用setProperty,我们其实还可以看到BeanUtils.setProperty(Object bean, String name, Object value)方法,其实也是调用的BeanUtilsBean.setProperty(Object bean, String name, Object value)方法。这里可以看到将Map转为bean的过程,就是遍历Map,然后将Map中的key和Value,设置进bean中,与我们想的一模一样。
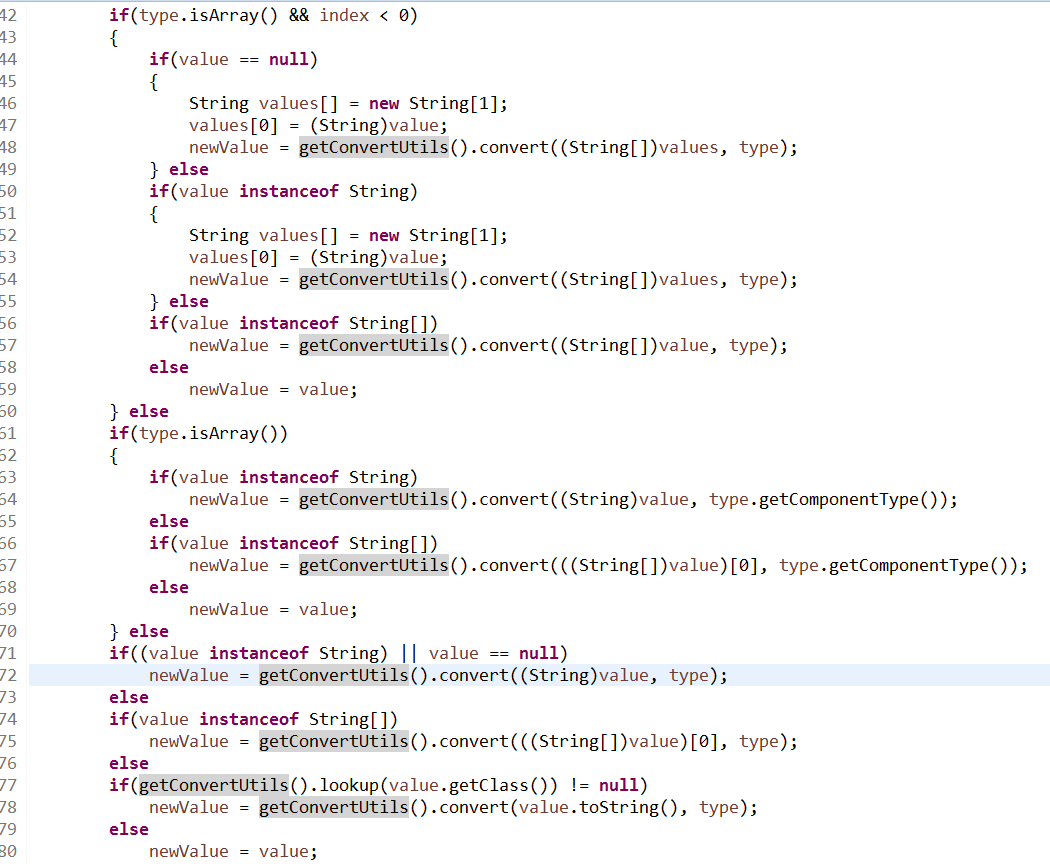
接下来,我们看看BeanUtilsBean.setProperty的方法内部,如何和ConvertUtils挂钩。下图中的value就是setProperty方法中第3个参数,将要设置的值。这里主要判断value是否为字符串及字符串数据,如何是字符串和数据,就调用getConvertUtils().convert方法进行类型转换。
下图是getConvertUtils()方法的定义,注意返回值是ConvertUtilsBean。

而我们的ConvertUtils.register(Converter converter, Class clazz)方法,内部也是ConvertUtilsBean操作的,调用register这个方法注册,其实ConvertUtilsBean里面是用一个hashMap进行存取:

至此,真相大白,为什么ConvertUtils.register注册一个Converter就可以在BeanUtils里面实现类型转换。
同理,在使用BeanUtils.copyProperties(Object dest, Object orig)时,也是调用的BeanUtilsBean.copyProperty(Object bean, String name, Object value),这样在遇到字符串转java.util.Date也需要自己实现转换。
4.总结
这里简单的介绍了apache commons BeanUtils的常用用法,并BeanUtils的类型转换问题进行一个初步探究。BeanUtils使用在我们项目编写时,能带来极大的便利。比如我们的bean中有100多个属性,每个都要一一的setter/getter简直要命,这时使用copyProperties方法能少写好几十行代码,代码看起来更简洁。但是它也存在一些缺陷,比如性能效率问题。使用BeanUtils,由于每个属性字符都要要进行判断,进行类型转换等等操作,造成的性能较低,BeanUtils对bean属性的复制时间超过手动setter/getter时间。因此对性能要求较高的系统,不适合使用apache commons BeanUtils。Cglib BeanCopier也是作为bean复制转换工具,采用asm字节码生成技术,性能非常好。先挖一个坑,有时间在研究一下。
