spring-security-学习笔记-02-基于Session的认证方式
文章目录
2 基于Session的认证方式
2.1 认证流程
基于Session认证方式的流程是,用户认证成功后,在服务端生成用户相关的数据保存在session(当前会话),而发 给客户端的 sesssion_id 存放到 cookie 中,这样用客户端请求时带上 session_id 就可以验证服务器端是否存在 session 数据,以此完成用户的合法校验。当用户退出系统或session过期销毁时,客户端的session_id也就无效了。
下图是session认证方式的流程图:
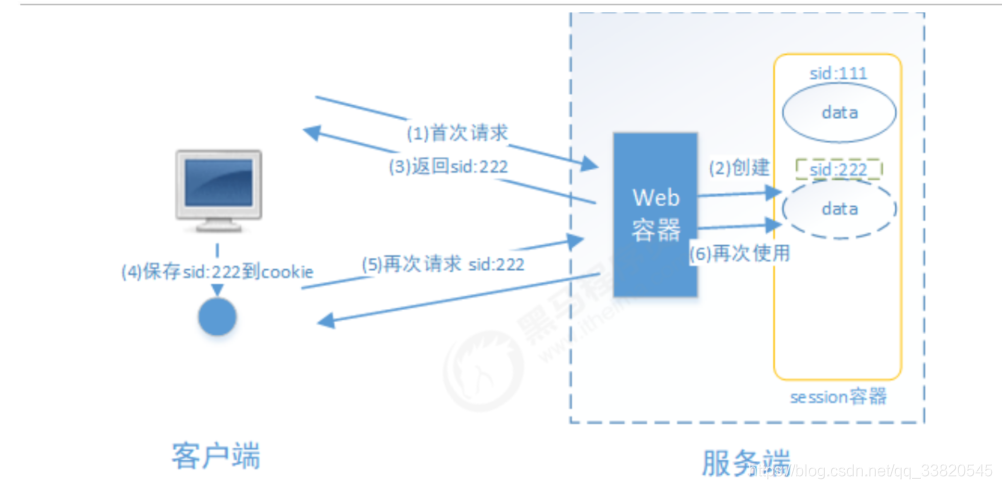
基于Session的认证机制由Servlet规范定制,Servlet容器已实现,用户通过HttpSession的操作方法即可实现,如 下是HttpSession相关的操作API。

2.2.创建工程
本案例工程使用maven进行构建,使用SpringMVC、Servlet3.0实现。
2.2.1 创建maven工程
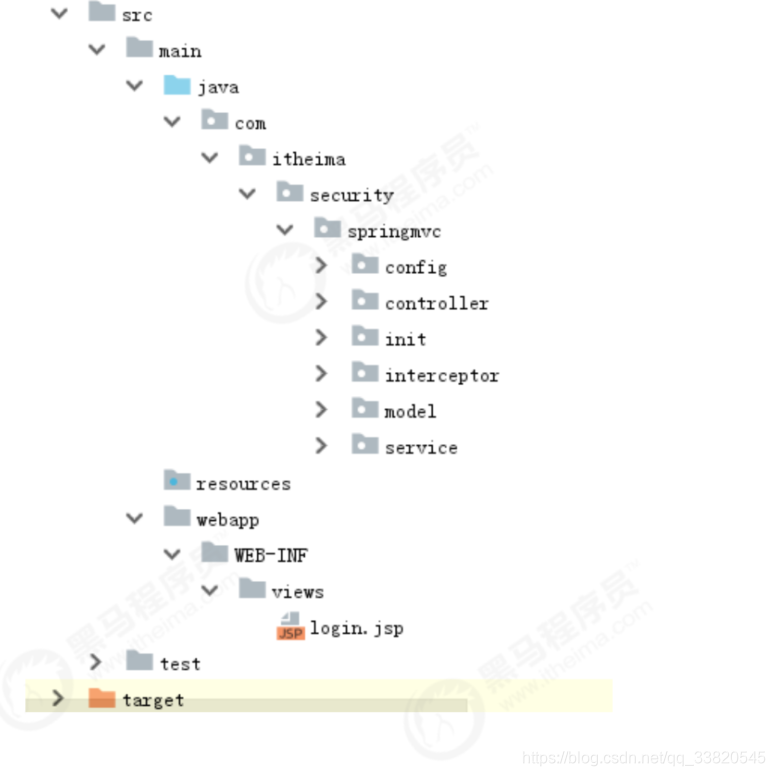
创建maven工程 security-springmvc,工程结构如下:
pom文件配置
2.2.2 Spring 容器配置
在config包下定义ApplicationConfig.java,它对应web.xml中ContextLoaderListener的配置
@Configuration
@ComponentScan(basePackages = "com.itheima.security.springmvc"
	// 排除掉这个注解@ComponentScan
	,excludeFilters = {@ComponentScan.Filter(type = FilterType.ANNOTATION
	,value = Controller.class)})
public class ApplicationConfig {
//在此配置除了Controller的其它bean,比如:数据库链接池、事务管理器、业务bean等。
 }
2.2.3 servletContext配置
本案例采用Servlet3.0无web.xml方式,的config包下定义WebConfig.java,它对应于DispatcherServlet配 置。
@Configuration//就相当于springmvc.xml文件
@EnableWebMvc
@ComponentScan(basePackages = "com.itheima.security.springmvc"
        ,includeFilters = {@ComponentScan.Filter(type = FilterType.ANNOTATION,value = Controller.class)})
public class WebConfig implements WebMvcConfigurer {

    @Autowired
    SimpleAuthenticationInterceptor simpleAuthenticationInterceptor;

    //视频解析器
    @Bean
    public InternalResourceViewResolver viewResolver(){
        InternalResourceViewResolver viewResolver = new InternalResourceViewResolver();
        viewResolver.setPrefix("/WEB-INF/view/");
        viewResolver.setSuffix(".jsp");
        return viewResolver;
    }

    @Override
    public void addViewControllers(ViewControllerRegistry registry) {
        registry.addViewController("/").setViewName("login");
    }

    @Override
    public void addInterceptors(InterceptorRegistry registry) {
        registry.addInterceptor(simpleAuthenticationInterceptor).addPathPatterns("/r/**");
    }
}
2.2.4 加载 Spring容器
在init包下定义Spring容器初始化类SpringApplicationInitializer,此类实现WebApplicationInitializer接口, Spring容器启动时加载WebApplicationInitializer接口的所有实现类。
public class SpringApplicationInitializer extends AbstractAnnotationConfigDispatcherServletInitializer {

    //spring容器,相当于加载 applicationContext.xml
    @Override
    protected Class<?>[] getRootConfigClasses() {
        return new Class[]{ApplicationConfig.class};
    }

    //servletContext,相当于加载springmvc.xml
    @Override
    protected Class<?>[] getServletConfigClasses() {
        return new Class[]{WebConfig.class};
    }

    //url-mapping
    @Override
    protected String[] getServletMappings() {
        return new String[]{"/"};
    }
}
2.3.实现认证功能
2.3.1 认证页面
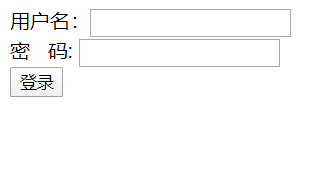
在webapp/WEB-INF/views下定义认证页面login.jsp,本案例只是测试认证流程,页面没有添加css样式,页面实 现可填入用户名,密码,触发登录将提交表单信息至/login,内容如下:
<%@ page contentType="text/html;charset=UTF-8" pageEncoding="utf-8" %>
<html>
<head>
<title>用户登录</title>
</head>
<body>
<form action="login" method="post">
用户名:<input type="text" name="username"><br>
密 码:
<input type="password" name="password"><br>
<input type="submit" value="登录">
</form>
</body>
</html>
在WebConfig中新增如下配置,将/直接导向login.jsp页面:
@Override
    public void addViewControllers(ViewControllerRegistry registry) {
        registry.addViewController("/").setViewName("login");
    }
启动项目,访问/路径地址,进行测试
2.3.2 认证接口
用户进入认证页面,输入账号和密码,点击登录,请求/login进行身份认证。
(1)定义认证接口,此接口用于对传来的用户名、密码校验,若成功则返回该用户的详细信息,否则抛出错误异常:
/***
	认证服务
 */
@Data
public interface AuthenticationService {
    /**
     * 用户认证
     * @param authenticationRequest 用户认证请求,账号和密码
     * @return 认证成功的用户信息
     */
    UserDto authentication(AuthenticationRequest authenticationRequest);
}
认证请求结构:
@Data
public class AuthenticationRequest {
    //认证请求参数,账号、密码。。
    /**
     * 用户名
     */
    private String username;

    /**
     * 密码
     */
    private String password;

}
认证成功后返回的用户详细信息,也就是当前登录用户的信息:
@Data
@AllArgsConstructor
public class UserDto {
    public static final String SESSION_USER_KEY = "_user";
    //用户身份信息
    private String id;
    private String username;
    private String password;
    private String fullname;
    private String mobile;
    /**
     * 用户权限
     */
    private Set<String> authorities;
}
(2)认证实现类,根据用户名查找用户信息,并校验密码,这里模拟了两个用户:
@Service
public class AuthenticationServiceImpl implements  AuthenticationService{
    /**
     * 用户认证,校验用户身份信息是否合法
     *
     * @param authenticationRequest 用户认证请求,账号和密码
     * @return 认证成功的用户信息
     */
    @Override
    public UserDto authentication(AuthenticationRequest authenticationRequest) {
        //校验参数是否为空
        if(authenticationRequest == null
            || StringUtils.isEmpty(authenticationRequest.getUsername())
            || StringUtils.isEmpty(authenticationRequest.getPassword())){
            throw new RuntimeException("账号和密码为空");
        }
        //根据账号去查询数据库,这里测试程序采用模拟方法
        UserDto user = getUserDto(authenticationRequest.getUsername());
        //判断用户是否为空
        if(user == null){
            throw new RuntimeException("查询不到该用户");
        }
        //校验密码
        if(!authenticationRequest.getPassword().equals(user.getPassword())){
            throw new RuntimeException("账号或密码错误");
        }
        //认证通过,返回用户身份信息
        return user;
    }
    //根据账号查询用户信息
    private UserDto getUserDto(String userName){
        return userMap.get(userName);
    }
    //用户信息
    private Map<String,UserDto> userMap = new HashMap<>();
    {
        Set<String> authorities1 = new HashSet<>();
        authorities1.add("p1");//这个p1我们人为让它和/r/r1对应
        Set<String> authorities2 = new HashSet<>();
        authorities2.add("p2");//这个p2我们人为让它和/r/r2对应
        userMap.put("zhangsan",new UserDto("1010","zhangsan","123","张三","133443",authorities1));
        userMap.put("lisi",new UserDto("1011","lisi","456","李四","144553",authorities2));
    }
}
(3)登录Controller,对/login请求处理,它调用AuthenticationService完成认证并返回登录结果提示信息:
@RestController
public class LoginController {

    @Autowired
    AuthenticationService authenticationService;
	/***
	用户登录
	* @param authenticationRequest 登录请求
	*  @return
	* */
    @RequestMapping(value = "/login",produces = "text/plain;charset=utf-8")
    public String login(AuthenticationRequest authenticationRequest, HttpSession session){
        UserDto userDto = authenticationService.authentication(authenticationRequest);
        //存入session
        session.setAttribute(UserDto.SESSION_USER_KEY,userDto);
        return userDto.getUsername() +"登录成功";
    }

}
2.4.实现会话功能
会话是指用户登入系统后,系统会记住该用户的登录状态,他可以在系统连续操作直到退出系统的过程。
认证的目的是对系统资源的保护,每次对资源的访问,系统必须得知道是谁在访问资源,才能对该请求进行合法性 拦截。因此,在认证成功后,一般会把认证成功的用户信息放入Session中,在后续的请求中,系统能够从Session 中获取到当前用户,用这样的方式来实现会话机制。
(1)增加会话控制
首先在UserDto中定义一个SESSION_USER_KEY,作为Session中存放登录用户信息的key。
public static final String SESSION_USER_KEY = "_user";
然后修改LoginController,认证成功后,将用户信息放入当前会话。并增加用户登出方法,登出时将session置为 失效。
@RestController
public class LoginController {

    @Autowired
    AuthenticationService authenticationService;

	/***
	用户登录
	* @param authenticationRequest 登录请求
	*  @return
	* */
    @RequestMapping(value = "/login",produces = "text/plain;charset=utf-8")
    public String login(AuthenticationRequest authenticationRequest, HttpSession session){
        UserDto userDto = authenticationService.authentication(authenticationRequest);
        //存入session
        session.setAttribute(UserDto.SESSION_USER_KEY,userDto);
        return userDto.getUsername() +"登录成功";
    }

	/***
	用户退出
	* @param session 当前session对象
	*  @return
	* */
    @GetMapping(value = "/logout",produces = {"text/plain;charset=UTF-8"})
    public String logout(HttpSession session){
        session.invalidate();
        return "退出成功";
    }
}
(2)增加测试资源
修改LoginController,增加测试资源1,它从当前会话session中获取当前登录用户,并返回提示信息给前台。
@GetMapping(value = "/r/r1",produces = {"text/plain;charset=UTF-8"})
    public String r1(HttpSession session){
        String fullname = null;
        Object object = session.getAttribute(UserDto.SESSION_USER_KEY);
        if(object == null){
            fullname = "匿名";
        }else{
            UserDto userDto = (UserDto) object;
            fullname = userDto.getFullname();
        }
        return fullname+"访问资源r1";
    }
    @GetMapping(value = "/r/r2",produces = {"text/plain;charset=UTF-8"})
    public String r2(HttpSession session){
        String fullname = null;
        Object userObj = session.getAttribute(UserDto.SESSION_USER_KEY);
        if(userObj != null){
            fullname = ((UserDto)userObj).getFullname();
        }else{
            fullname = "匿名";
        }
        return fullname + " 访问资源2";
    }


测试结果说明,在用户登录成功时,该用户信息已被成功放入session,并且后续请求可以正常从session中获取当 前登录用户信息,符合预期结果。
2.5.实现授权功能
现在我们已经完成了用户身份凭证的校验以及登录的状态保持,并且我们也知道了如何获取当前登录用户(从 Session中获取)的信息,接下来,用户访问系统需要经过授权,即需要完成如下功能:
- 匿名用户(未登录用户)访问拦截:禁止匿名用户访问某些资源。
- 登录用户访问拦截:根据用户的权限决定是否能访问某些资源。
(1)增加权限数据
为了实现这样的功能,我们需要在UserDto里增加权限属性,用于表示该登录用户所拥有的权限,同时修改 UserDto的构造方法。
@Data
@AllArgsConstructor
public class UserDto {
    public static final String SESSION_USER_KEY = "_user";
    //用户身份信息
    private String id;
    private String username;
    private String password;
    private String fullname;
    private String mobile;
    /**
     * 用户权限
     */
    private Set<String> authorities;
}
并在AuthenticationServiceImpl中为模拟用户初始化权限,其中张三给了p1权限,李四给了p2权限。
 //用户信息
    private Map<String,UserDto> userMap = new HashMap<>();
    {
        Set<String> authorities1 = new HashSet<>();
        authorities1.add("p1");//这个p1我们人为让它和/r/r1对应
        Set<String> authorities2 = new HashSet<>();
        authorities2.add("p2");//这个p2我们人为让它和/r/r2对应
        userMap.put("zhangsan",new UserDto("1010","zhangsan","123","张三","133443",authorities1));
        userMap.put("lisi",new UserDto("1011","lisi","456","李四","144553",authorities2));
    }
(2)增加测试资源

(3)实现授权拦截器
在interceptor包下定义SimpleAuthenticationInterceptor拦截器,实现授权拦截:
- 校验用户是否登录
- 校验用户是否拥有操作权限
@Component
public class SimpleAuthenticationInterceptor implements HandlerInterceptor {

    @Override
    public boolean preHandle(HttpServletRequest request, HttpServletResponse response, Object handler) throws Exception {
        //在这个方法中校验用户请求的url是否在用户的权限范围内
        //取出用户身份信息
        Object object = request.getSession().getAttribute(UserDto.SESSION_USER_KEY);
        if(object == null){
            //没有认证,提示登录
            writeContent(response,"请登录");
        }
        UserDto userDto = (UserDto) object;
        //请求的url
        String requestURI = request.getRequestURI();
        if( userDto.getAuthorities().contains("p1") && requestURI.contains("/r/r1")){
            return true;
        }
        if( userDto.getAuthorities().contains("p2") && requestURI.contains("/r/r2")){
            return true;
        }
        writeContent(response,"没有权限,拒绝访问");

        return false;
    }

    //响应信息给客户端
    private void writeContent(HttpServletResponse response, String msg) throws IOException {
        response.setContentType("text/html;charset=utf-8");
        PrintWriter writer = response.getWriter();
        writer.print(msg);
        writer.close();
    }
}
在WebConfig中配置拦截器,匹配/r/**的资源为受保护的系统资源,访问该资源的请求进入 SimpleAuthenticationInterceptor拦截器。
@Autowired
SimpleAuthenticationInterceptor simpleAuthenticationInterceptor;

@Override
   public void addInterceptors(InterceptorRegistry registry) {
        registry.addInterceptor(simpleAuthenticationInterceptor).addPathPatterns("/r/**");
    }

2.6 小结
基于Session的认证方式是一种常见的认证方式,至今还有非常多的系统在使用。我们在此小节使用Spring mvc技 术对它进行简单实现,旨在让大家更清晰实在的了解用户认证、授权以及会话的功能意义及实现套路,也就是它们 分别干了哪些事儿?大概需要怎么做?
而在正式生产项目中,我们往往会考虑使用第三方安全框架(如 spring security,shiro等安全框架)来实现认证 授权功能,因为这样做能一定程度提高生产力,提高软件标准化程度,另外往往这些框架的可扩展性考虑的非常全 面。但是缺点也非常明显,这些通用化组件为了提高支持范围会增加很多可能我们不需要的功能,结构上也会比较 抽象,如果我们不够了解它,一旦出现问题,将会很难定位。
