在KVM中运行的所有虚拟机在主机操作系统中作为用户空间的任务运行,通过钉选操作,可以将某一vCPU(虚拟CPU)与物理CPU进行绑定,可以看成是线程绑定到某一物理CPU中。
Pinning(钉选)实现方法:
方法一:
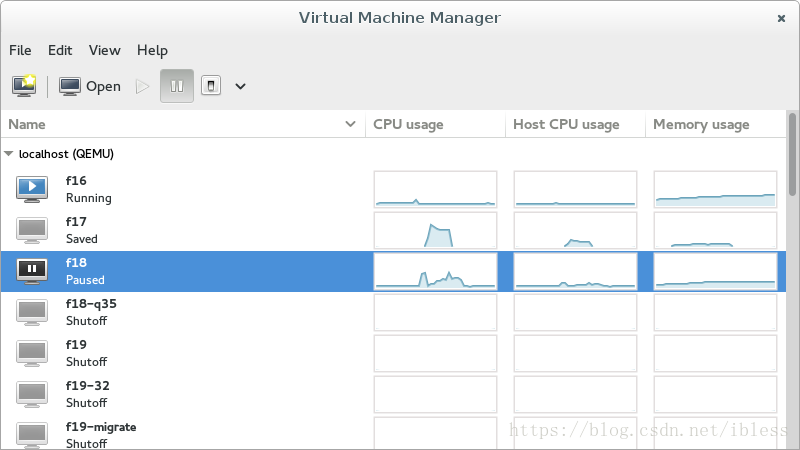
如果在安装KVM、QEMU时也安装了virt-manager,可以尝试通过图形界面的virt-manager进行CPU Pinning操作,如下图:
双击虚拟机,会出现如下页面:
 找到Processer,在有些virt-manager版本中是CPUs,然后选择Pinning,然后就可以将虚拟机的vCPU钉选到某一物理CPU上。
如果方法一种没有出现Pinning选项,可以尝试使用方法二实现钉选操作。
方法二:
1、使用virsh capabilities命令查看物理机CPU的详细信息,包括CPU个数等,截图如下:

当然,亦可以使用lscpu或者cat /proc/cpuinfo或者numactl --hardware命令查看物理CPU相关信息

2、查看正在运行的虚拟机,使用:virsh list或者virsh list --all

3、查看某一虚拟机CPU使用情况,使用virsh vcpuinfo+虚拟机ID,这里的虚拟机ID只有正在运行的虚拟机才会有,步骤2中显示的Id就是这里要用的ID,示例如下:

注:上图是已经使用过CPU钉选的图示,如果没有使用CPU钉选的话,在CPU Affinity那一行可能全是 y,而 y 表示vCPU可以使用的物理CPU内部的逻辑核。另外,示例中虚拟机是2核的,也就是有两个vCPU。
4、将某一vCPU钉选(Pinning)到某一物理CPU上,示例如下:

5、将某一vCPU钉选到某几个物理CPU上,示例如下:

将Id为3的虚拟机的vCPU0钉选到物理CPU编号为6-8上面,vCPU1钉选到物理CPU为30-32上面,使用的shell语句如下:
http://blog.51cto.com/linuxnote/1881726
http://blog.51cto.com/xiaoli110/1574840
Pinning(钉选)实现方法:
方法一:
如果在安装KVM、QEMU时也安装了virt-manager,可以尝试通过图形界面的virt-manager进行CPU Pinning操作,如下图:
双击虚拟机,会出现如下页面:
找到Processer,在有些virt-manager版本中是CPUs,然后选择Pinning,然后就可以将虚拟机的vCPU钉选到某一物理CPU上。如果方法一种没有出现Pinning选项,可以尝试使用方法二实现钉选操作。
方法二:
1、使用virsh capabilities命令查看物理机CPU的详细信息,包括CPU个数等,截图如下:
当然,亦可以使用lscpu或者cat /proc/cpuinfo或者numactl --hardware命令查看物理CPU相关信息
2、查看正在运行的虚拟机,使用:virsh list或者virsh list --all
3、查看某一虚拟机CPU使用情况,使用virsh vcpuinfo+虚拟机ID,这里的虚拟机ID只有正在运行的虚拟机才会有,步骤2中显示的Id就是这里要用的ID,示例如下:
注:上图是已经使用过CPU钉选的图示,如果没有使用CPU钉选的话,在CPU Affinity那一行可能全是 y,而 y 表示vCPU可以使用的物理CPU内部的逻辑核。另外,示例中虚拟机是2核的,也就是有两个vCPU。
4、将某一vCPU钉选(Pinning)到某一物理CPU上,示例如下:
5、将某一vCPU钉选到某几个物理CPU上,示例如下:
将Id为3的虚拟机的vCPU0钉选到物理CPU编号为6-8上面,vCPU1钉选到物理CPU为30-32上面,使用的shell语句如下:
virsh vcpupin 3 0 6-8
virsh vcpupin 3 1 30-32
上述语句中vcpupin后面的3为虚拟机Id,0为虚拟机的0号vCPU,6-8表示将0号vCPU钉选到6/7/8号物理CPU,这里6/7/8是一个范围,具体vCPU运行在哪一个是随机的。
下面是一个简单的shell脚本,可以实现CPU钉选操作:
#!/bin/sh
##本shell的作用:为8个虚拟机设置CPU pinning
show(){
	echo '-------------------------------------------------------------'
	for var in `virsh list | awk '{print $1}'|awk 'NR > 2'`
	do
		virsh vcpuinfo $var
	done
	echo '-------------------------------------------------------------'
}

#获取命令参数个数 参数为0个或者参数为1并且参数值大于0时,进行CPU钉选操作,参数个数为1并且参数值为1时,查看钉选结果
on=1
if test $# -eq 1
then
	on=$1
elif test $# -gt 1
then
	echo '参数个数大于1了\n'
	exit 0
fi

if test $on -ge 1
then
	n=0
	echo $n
	for var in `virsh list | awk '{print $1}'|awk 'NR > 2'`
	do
		n=`expr $n + 1`
		echo $var VM n=$n
		case $n in
		1)
			virsh vcpupin $var 0 0-2
			virsh vcpupin $var 1 24-26
			;;
		2)
			virsh vcpupin $var 0 3-5
			virsh vcpupin $var 1 27-29
			;;
		*)
			echo 'exit\n'
			break;
			;;
		esac
	done

	show
else
	show
fi
6、通过命令实现CPU钉选只是暂时性的,我们可以通过xml文件进行配置。配置文件的位置在/etc/libvirt/qemu/目录下,下图是我们的8个虚拟机的配置文件:

随便打开一个配置文件,其内容如下
<!--
WARNING: THIS IS AN AUTO-GENERATED FILE. CHANGES TO IT ARE LIKELY TO BE
OVERWRITTEN AND LOST. Changes to this xml configuration should be made using:
  virsh edit ubuntu3
or other application using the libvirt API.
-->


<domain type='kvm' id='3'><!--这里一开始是没有id=3的,加上之后,虚拟机的ID就是固定的了,注意:ID不要重复 -->
  <name>ubuntu3</name>
  <uuid>2af06c24-410d-448d-a97b-7857c4dbae8a</uuid>
  <memory unit='KiB'>4194304</memory>
  <currentMemory unit='KiB'>4194304</currentMemory>
  <vcpu vcpuset='4,28' >2</vcpu><!--这里原来的内容有placement='static' 我们把它去掉,添加上vcpuset='4,28'表示将该虚拟机的vcpu钉选到物理CPU为4和28的上面-->
    <cputune>
      <vcpupin vcpu='0' cpuset='4'/><!--将vCPU 0钉选到物理CPU 4上面-->
      <vcpupin vcpu='1' cpuset='28'/><!--将vCPU 1钉选到物理CPU 28上面-->
    </cputune>
    <numatune><!--这里的配置是实现内存的钉选,表示将虚拟机使用的内存钉选到node0上面-->
      <memory mode='strict' nodeset='0'/>
    </numatune>
  <os>
    <type arch='x86_64' machine='pc-i440fx-xenial'>hvm</type>
    <boot dev='hd'/>
  </os>
  <features>
    <acpi/>
    <apic/>
  </features>
  <cpu mode='custom' match='exact'>
    <model fallback='allow'>Broadwell</model>
  </cpu>
  <clock offset='utc'>
    <timer name='rtc' tickpolicy='catchup'/>
    <timer name='pit' tickpolicy='delay'/>
    <timer name='hpet' present='no'/>
  </clock>
  <on_poweroff>destroy</on_poweroff>
  <on_reboot>restart</on_reboot>
  <on_crash>restart</on_crash>
  <pm>
    <suspend-to-mem enabled='no'/>
    <suspend-to-disk enabled='no'/>
  </pm>
  <devices>
    <emulator>/usr/bin/kvm-spice</emulator>
    <disk type='file' device='disk'>
      <driver name='qemu' type='qcow2'/>
      <source file='/var/lib/libvirt/images/ubuntu3.qcow2'/>
      <target dev='vda' bus='virtio'/>
      <address type='pci' domain='0x0000' bus='0x00' slot='0x07' function='0x0'/>
    </disk>
    <disk type='file' device='cdrom'>
      <driver name='qemu' type='raw'/>
      <target dev='hda' bus='ide'/>
      <readonly/>
      <address type='drive' controller='0' bus='0' target='0' unit='0'/>
    </disk>
    <controller type='usb' index='0' model='ich9-ehci1'>
      <address type='pci' domain='0x0000' bus='0x00' slot='0x06' function='0x7'/>
    </controller>
    <controller type='usb' index='0' model='ich9-uhci1'>
      <master startport='0'/>
      <address type='pci' domain='0x0000' bus='0x00' slot='0x06' function='0x0' multifunction='on'/>
    </controller>
    <controller type='usb' index='0' model='ich9-uhci2'>
      <master startport='2'/>
      <address type='pci' domain='0x0000' bus='0x00' slot='0x06' function='0x1'/>
    </controller>
    <controller type='usb' index='0' model='ich9-uhci3'>
      <master startport='4'/>
      <address type='pci' domain='0x0000' bus='0x00' slot='0x06' function='0x2'/>
    </controller>
    <controller type='pci' index='0' model='pci-root'/>
    <controller type='ide' index='0'>
      <address type='pci' domain='0x0000' bus='0x00' slot='0x01' function='0x1'/>
    </controller>
    <controller type='virtio-serial' index='0'>
      <address type='pci' domain='0x0000' bus='0x00' slot='0x05' function='0x0'/>
    </controller>
    <interface type='network'>
      <mac address='52:54:00:16:74:bb'/>
      <source network='default'/>
      <model type='virtio'/>
      <address type='pci' domain='0x0000' bus='0x00' slot='0x03' function='0x0'/>
    </interface>
    <serial type='pty'>
      <target port='0'/>
    </serial>
    <console type='pty'>
      <target type='serial' port='0'/>
    </console>
    <channel type='spicevmc'>
      <target type='virtio' name='com.redhat.spice.0'/>
      <address type='virtio-serial' controller='0' bus='0' port='1'/>
    </channel>
    <input type='mouse' bus='ps2'/>
    <input type='keyboard' bus='ps2'/>
    <graphics type='spice' autoport='yes'>
      <image compression='off'/>
    </graphics>
    <sound model='ich6'>
      <address type='pci' domain='0x0000' bus='0x00' slot='0x04' function='0x0'/>
    </sound>
    <video>
      <model type='qxl' ram='65536' vram='65536' vgamem='16384' heads='1'/>
      <address type='pci' domain='0x0000' bus='0x00' slot='0x02' function='0x0'/>
    </video>
    <redirdev bus='usb' type='spicevmc'>
    </redirdev>
    <redirdev bus='usb' type='spicevmc'>
    </redirdev>
    <memballoon model='virtio'>
      <address type='pci' domain='0x0000' bus='0x00' slot='0x08' function='0x0'/>
    </memballoon>
  </devices>
</domain>
修改完xml文件后,记得更新虚拟机,重启物理机(不是重启虚拟机)或者使用命令:
sudo virsh define /etc/libvirt/qemu/*.xml
参考网址:
https://virt-manager.org/http://blog.51cto.com/linuxnote/1881726
http://blog.51cto.com/xiaoli110/1574840