授权服务
授权服务(Authorization Server) 应包含对接入端以及登陆用户的合法性进行验证并且颁发token等功能,对令牌的请求端点由 spring mvc 控制器进行实现,下面是一个认证服务需要实现的 endpoints:
AuthorizationEndpoint 服务用于认证请求,默认的 URL : /oauth/authorize
TokenEndpoint 服务于访问令牌的请求 默认URL: /oauth/token
资源服务(ResourceServer) 应包含对资源的保护功能,对非法请求进行拦截,对请求中 token 进行解析鉴权等,下面的过滤器用于实现 OAuth2资源服务:
OAuth2AuthenticationProcessingFilter 用来对请求给出的身份令牌解析鉴权。
等下我们创建一个类似于下方结构的认证授权

认证流程如下:
1. 客户端请求uaa授权服务
2. 认证通过后由uaa颁发令牌
3. 客户端携带令牌token 请求资源服务
4. 资源服务校验令牌的合法性,合法即返回资源信息
环境搭建
初始化数据库SQL
/*
Navicat MySQL Data Transfer


Target Server Type    : MYSQL
Target Server Version : 80013
File Encoding         : 65001

Date: 2019-11-12 17:18:59
*/

SET FOREIGN_KEY_CHECKS=0;

-- ----------------------------
-- Table structure for t_permission
-- ----------------------------
DROP TABLE IF EXISTS `t_permission`;
CREATE TABLE `t_permission` (
  `id` varchar(32) NOT NULL,
  `code` varchar(32) NOT NULL,
  `description` varchar(64) DEFAULT NULL,
  `url` varchar(128) DEFAULT NULL,
  PRIMARY KEY (`id`)
) ENGINE=InnoDB DEFAULT CHARSET=utf8;

-- ----------------------------
-- Records of t_permission
-- ----------------------------
INSERT INTO `t_permission` VALUES ('1', 'p1', '测试资源1', '/r/r1');
INSERT INTO `t_permission` VALUES ('2', 'p3', '测试资源2', '/r/r2');

-- ----------------------------
-- Table structure for t_role
-- ----------------------------
DROP TABLE IF EXISTS `t_role`;
CREATE TABLE `t_role` (
  `id` varchar(32) NOT NULL,
  `role_name` varchar(255) DEFAULT NULL,
  `description` varchar(255) DEFAULT NULL,
  `create_time` datetime DEFAULT NULL,
  `update_time` datetime DEFAULT NULL,
  `status` char(1) NOT NULL,
  PRIMARY KEY (`id`),
  UNIQUE KEY `unique_role_name` (`role_name`)
) ENGINE=InnoDB DEFAULT CHARSET=utf8;

-- ----------------------------
-- Records of t_role
-- ----------------------------
INSERT INTO `t_role` VALUES ('1', '管理员', null, null, null, '');

-- ----------------------------
-- Table structure for t_role_permission
-- ----------------------------
DROP TABLE IF EXISTS `t_role_permission`;
CREATE TABLE `t_role_permission` (
  `role_id` varchar(32) NOT NULL,
  `permission_id` varchar(32) NOT NULL,
  PRIMARY KEY (`role_id`,`permission_id`)
) ENGINE=InnoDB DEFAULT CHARSET=utf8;

-- ----------------------------
-- Records of t_role_permission
-- ----------------------------
INSERT INTO `t_role_permission` VALUES ('1', '1');
INSERT INTO `t_role_permission` VALUES ('1', '2');

-- ----------------------------
-- Table structure for t_user
-- ----------------------------
DROP TABLE IF EXISTS `t_user`;
CREATE TABLE `t_user` (
  `id` bigint(20) NOT NULL,
  `username` varchar(64) NOT NULL,
  `password` varchar(255) NOT NULL,
  `fullname` varchar(255) NOT NULL,
  `moblie` varchar(11) DEFAULT NULL,
  PRIMARY KEY (`id`)
) ENGINE=InnoDB DEFAULT CHARSET=utf8;

-- ----------------------------
-- Records of t_user
-- ----------------------------
INSERT INTO `t_user` VALUES ('1', 'zhangsan', '$2a$10$aFsOFzujtPCnUCUKcozsHux0rQ/3faAHGFSVb9Y.B1ntpmEhjRtru', '张三', '11011912011');

-- ----------------------------
-- Table structure for t_user_role
-- ----------------------------
DROP TABLE IF EXISTS `t_user_role`;
CREATE TABLE `t_user_role` (
  `user_id` varchar(32) NOT NULL,
  `role_id` varchar(32) NOT NULL,
  `create_time` datetime DEFAULT NULL,
  `creator` varchar(255) DEFAULT NULL,
  PRIMARY KEY (`user_id`,`role_id`)
) ENGINE=InnoDB DEFAULT CHARSET=utf8;

-- ----------------------------
-- Records of t_user_role
-- ----------------------------
INSERT INTO `t_user_role` VALUES ('1', '1', null, null);
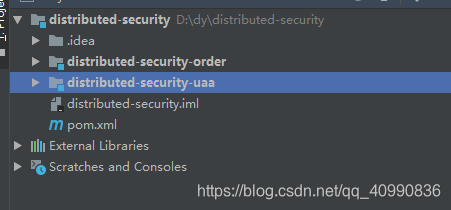
项目最终结构
创建maven 父级工程
pop.xml 文件如下
<?xml version="1.0" encoding="UTF-8"?>
<project xmlns="http://maven.apache.org/POM/4.0.0"
         xmlns:xsi="http://www.w3.org/2001/XMLSchema-instance"
         xsi:schemaLocation="http://maven.apache.org/POM/4.0.0 http://maven.apache.org/xsd/maven-4.0.0.xsd">
    <modelVersion>4.0.0</modelVersion>

    <groupId>cn.fllday.security</groupId>
    <artifactId>distributed-security</artifactId>
    <packaging>pom</packaging>
    <version>1.0-SNAPSHOT</version>
    <modules>
        <module>distributed-security-order</module>
    </modules>
    <parent>
        <groupId>org.springframework.boot</groupId>
        <artifactId>spring-boot-starter-parent</artifactId>
        <version>2.1.3.RELEASE</version>
    </parent>

    <properties>
        <project.build.sourceEncoding>UTF-8</project.build.sourceEncoding>
        <project.reporting.outputEncoding>UTF-8</project.reporting.outputEncoding>
        <java.version>1.8</java.version>
    </properties>

    <dependencyManagement>
        <dependencies>
            <dependency>
                <groupId>org.springframework.cloud</groupId>
                <artifactId>spring-cloud-dependencies</artifactId>
                <version>Greenwich.RELEASE</version>
                <type>pom</type>
                <scope>import</scope>
            </dependency>
            <dependency>
                <groupId>javax.servlet</groupId>
                <artifactId>javax.servlet-api</artifactId>
                <version>3.1.0</version>
                <scope>provided</scope>
            </dependency>
            <dependency>
                <groupId>javax.interceptor</groupId>
                <artifactId>javax.interceptor-api</artifactId>
                <version>1.2</version>
            </dependency>
            <dependency>
                <groupId>com.alibaba</groupId>
                <artifactId>fastjson</artifactId>
                <version>1.2.47</version>
            </dependency>
            <dependency>
                <groupId>org.projectlombok</groupId>
                <artifactId>lombok</artifactId>
                <version>1.18.0</version>
            </dependency>
            <dependency>
                <groupId>mysql</groupId>
                <artifactId>mysql-connector-java</artifactId>
                <version>5.1.47</version>
            </dependency>
            <dependency>
                <groupId>org.springframework.security</groupId>
                <artifactId>spring-security-jwt</artifactId>
                <version>1.0.1.RELEASE</version>
            </dependency>
            <dependency>
                <groupId>org.springframework.security.oauth.boot</groupId>
                <artifactId>spring-security-oauth2-autoconfigure</artifactId>
                <version>2.1.3.RELEASE</version>
            </dependency>
        </dependencies>
    </dependencyManagement>
    <build>
        <finalName>${project.name}</finalName>
        <resources>
            <resource>
                <directory>src/main/resource</directory>
                <filtering>true</filtering>
                <includes>
                    <include>**/*</include>
                </includes>
            </resource>
        </resources>
        <plugins>
            <plugin>
                <groupId>org.apache.maven.plugins</groupId>
                <artifactId>maven-compiler-plugin</artifactId>
                <configuration>
                    <source>1.8</source>
                    <target>1.8</target>
                </configuration>
            </plugin>
            <plugin>
                <artifactId>maven-resources-plugin</artifactId>
                <configuration>
                    <encoding>utf-8</encoding>
                    <useDefaultDelimiters>true</useDefaultDelimiters>
                </configuration>
            </plugin>
        </plugins>
    </build>
</project>
创建子项目 uaa 授权服务中心
pop.xml文件如下
<?xml version="1.0" encoding="UTF-8"?>
<project xmlns="http://maven.apache.org/POM/4.0.0"
xmlns:xsi="http://www.w3.org/2001/XMLSchema-instance"
xsi:schemaLocation="http://maven.apache.org/POM/4.0.0 http://maven.apache.org/xsd/maven-4.0.0.xsd">
<parent>
<artifactId>distributed-security</artifactId>
<groupId>cn.fllday.security</groupId>
<version>1.0-SNAPSHOT</version>
</parent>
<modelVersion>4.0.0</modelVersion>
<artifactId>distributed-security-uaa</artifactId>
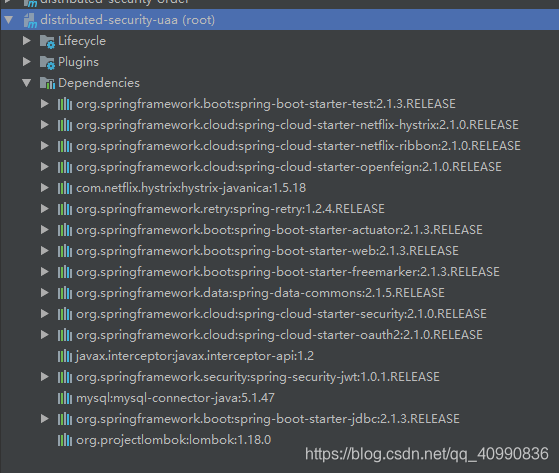
<dependencies>
<dependency>
<groupId>org.springframework.boot</groupId>
<artifactId>spring-boot-starter-test</artifactId>
</dependency>
<dependency>
<groupId>org.springframework.cloud</groupId>
<artifactId>spring-cloud-starter-netflix-hystrix</artifactId>
</dependency>
<dependency>
<groupId>org.springframework.cloud</groupId>
<artifactId>spring-cloud-starter-netflix-ribbon</artifactId>
</dependency>
<dependency>
<groupId>org.springframework.cloud</groupId>
<artifactId>spring-cloud-starter-openfeign</artifactId>
</dependency>
<dependency>
<groupId>com.netflix.hystrix</groupId>
<artifactId>hystrix-javanica</artifactId>
</dependency>
<dependency>
<groupId>org.springframework.retry</groupId>
<artifactId>spring-retry</artifactId>
</dependency>
<dependency>
<groupId>org.springframework.boot</groupId>
<artifactId>spring-boot-starter-actuator</artifactId>
</dependency>
<dependency>
<groupId>org.springframework.boot</groupId>
<artifactId>spring-boot-starter-web</artifactId>
</dependency>
<dependency>
<groupId>org.springframework.boot</groupId>
<artifactId>spring-boot-starter-freemarker</artifactId>
</dependency>
<dependency>
<groupId>org.springframework.data</groupId>
<artifactId>spring-data-commons</artifactId>
</dependency>
<dependency>
<groupId>org.springframework.cloud</groupId>
<artifactId>spring-cloud-starter-security</artifactId>
</dependency>
<dependency>
<groupId>org.springframework.cloud</groupId>
<artifactId>spring-cloud-starter-oauth2</artifactId>
<!--<exclusions>-->
<!--<exclusion>-->
<!--<groupId>org.springframework.security.oauth.boot</groupId>-->
<!--<artifactId>spring-security-oauth2-autoconfigure</artifactId>-->
<!--</exclusion>-->
<!--</exclusions>-->
</dependency>
<dependency>
<groupId>javax.interceptor</groupId>
<artifactId>javax.interceptor-api</artifactId>
</dependency>
<dependency>
<groupId>org.springframework.security</groupId>
<artifactId>spring-security-jwt</artifactId>
</dependency>
<dependency>
<groupId>mysql</groupId>
<artifactId>mysql-connector-java</artifactId>
</dependency>
<dependency>
<groupId>org.springframework.boot</groupId>
<artifactId>spring-boot-starter-jdbc</artifactId>
</dependency>
<dependency>
<groupId>org.projectlombok</groupId>
<artifactId>lombok</artifactId>
</dependency>
</dependencies>
</project>
引入的maven 依赖如下
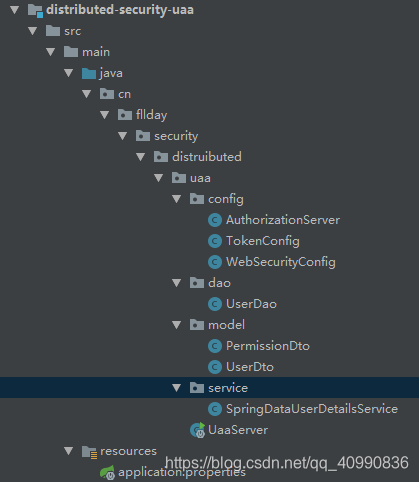
uua 模块的项目结构如下
application.properties
spring.application.name=uaa-service
server.port=53020
spring.main.allow-bean-definition-overriding=true

#logging.level.root = debug
#logging.level.org.springframework.web = info

spring.http.encoding.enabled=true
spring.http.encoding.charset=utf-8
spring.http.encoding.force=true

server.tomcat.remote-ip-header=x-forwarded-for
server.tomcat.protocol-header=x-forwarded-proto
server.tomcat.max-http-post-size=5MB
server.use-forward-headers=true
server.servlet.context-path=/uaa

spring.freemarker.enabled=true
spring.freemarker.suffix=.html
spring.freemarker.request-context-attribute=rc
spring.freemarker.content-type=text/html
spring.freemarker.charset=UTF-8
spring.mvc.throw-exception-if-no-handler-found=true
spring.resources.add-mappings=false

spring.datasource.url=jdbc:mysql://ip:port/user_db?useUnicode=true
spring.datasource.username=username
spring.datasource.password=password
spring.datasource.driver-class-name=com.mysql.jdbc.Driver

management.endpoints.web.exposure.exclude=refresh,health,info,env

feign.hystrix.enabled=true
feign.compression.request.enabled=true
feign.compression.request.mime-types[0]=text/xml
feign.compression.request.mime-types[1]=application/xml
feign.compression.request.mime-types[2]=application/json
feign.compression.request.min-request-size=2048
feign.compression.response.enabled=true
实体类根据SQL文件创建就可以了。一个一个对应起来就ok了。我就不写了
UserDao.java
@Repository
public class UserDao {


    @Autowired
    JdbcTemplate jdbcTemplate;

    public UserDto getUserByUsername(String usernmae)
    {
        String sql = "select id,username,password,fullname from t_user where username = ?";
        List<UserDto> result = jdbcTemplate.query(sql, new Object[]{usernmae}, new BeanPropertyRowMapper<>(UserDto.class));
        if (result== null && result.size() <= 0)return null;
        return result.get(0);
    }
    // 根据用户id 查询用户权限
    public List<String> findPermissionByUserId(String userId)
    {
        String sql = "SELECT * FROM t_permission WHERE id IN (" +
                " SELECT permission_id FROM t_role_permission WHERE role_id IN (" +
                " SELECT role_id FROM t_user_role WHERE user_id = ? " +
                ")" +
                ")";
        List<PermissionDto> result = jdbcTemplate.query(sql, new Object[]{userId}, new BeanPropertyRowMapper<>(PermissionDto.class));
        List<String> permissions = new ArrayList<String>();
        result.forEach( p->permissions.add(p.getCode()) );
        return permissions;
    }
}
SpringDataUserDetailsService这个类需要实现 UserDetailsService
@Service
public class SpringDataUserDetailsService implements UserDetailsService {

    @Autowired
    private UserDao userDao;

    @Override
    public UserDetails loadUserByUsername(String s) throws UsernameNotFoundException {
        UserDto bean = userDao.getUserByUsername(s);
        if (bean == null)
            return null;
        List<String> permissions = userDao.findPermissionByUserId(bean.getId());
        String[] permissionArray = new String[permissions.size()];
        permissions.toArray(permissionArray);
        UserDetails userDetails = User.withUsername(bean.getUsername()).password(bean.getPassword()).authorities(permissionArray).build();
        return userDetails;
    }
}
下面就是配置类了
TokenConfig token存储策略
@Configuration
public class TokenConfig {
    // 令牌存储策略
    @Bean
    public TokenStore tokenStore()
    {
        // 内存方式,生成普通令牌
        return new InMemoryTokenStore();
    }
}
授权服务器配置类
需要使用 @EnableAuthorizationServer 注解并集成 AuthorizationServerConfigurerAdapter 来配置 OAuth2.0 授权服务器
AuthorizationServerConfigurerAdapter 要求配置以下几个类,这几个类是由Spring创建的独立配置对象,他们会被Spring传入 AuthorizationServerConfigurer 进行配置
ClientDetailsServiceConfigurer: 用来配置客户端详情服务(ClientDetailService),客户端详情信息在这里进行初始化,你可以把客户端详情信息写死在这里或者通过数据库来配置,我们这边写死在这里就好了
AuthorizationServerEndpointsConfigurer: 用来配置令牌(token)的访问断电和令牌服务(token services)
AuthorizationServerSecurityConfigurer: 用来配置令牌端点的安全约束
配置客户端详细信息
ClientDetailsServiceConfigurer 负责查找 ClientDetails,而ClientDetails 有几个重要属性如表:
| 属性名 | 作用 |
|---|---|
| clientId | 必须的 用来标识客户端的id |
| secret | 需要值得信任的客户端 , 客户端安全码,如果有的话 |
| scope | 用来限制客户端的访问范围,如果为空(默认),那么客户端拥有全部的访问范围 |
| authorizedGrantTypes | 由此客户端可以使用的授权类型,默认为空 |
| authorities | 此客户端可以使用的权限(基于SpringSecurity authorities) |
客户端详情(client details)能够在应用程序运行的时候进行更新,可以通过访问底层的存储服务,例如将客户端向高清存储在一个关系数据库的表中,你就可以使用jdbcClientDetailsService 或者通过自己实现 ClientDetailsService 来进行管理
管理令牌
AuthorizatonServerTokenService 接口定义了一些操作使你可以进行一些必要的管理,令牌可以被用来加载身份信息。
InMemoryTokenStore:这个版本是被默认采用的。 我们的授权认证也是基于这个JdbcTokenStore:这是一个基于JDBC的版本,看名字也知道,使用的时候需要 引入依赖spring-jdbcJwtTokenStore:这个版本全程是JSON Web Token (Jwt)他可以吧令牌相关的数据进行编码,因此对于后台来说,他不需要进行存储,这是一个优势,但是他也有一个缺点,那就是撤销一个已经授权的令牌将会非常困难,所以它通常用来处理一个生命周期比较短的令牌以及撤销刷新令牌(refresh_token)。另一个缺点就是这个令牌占用的空间比较大,如果你加入了比较多的用户凭证信息,Jwt不会保存任何数据。
我们这边选择内存方式。
配置授权类型(Grant Types)
AuthorizationServerEndpointsConfigurer 通过设定以下属性支持的授权类型(GrantTypes)
authenticationManager: 认证管理器,当你选择了资源所有者密码(password)授权类型的时候,请设置这个属性注入一个AuthenticationManager对象
userDetailsService 如果你设置这个属性的话,说明你有一个自己的UserDetailsService接口的实现。
authorizationCodeServices: 这个属性是用来设置授权码服务的,主要用于authorization_code授权码类型模式
implicatGrantService: 设置隐式授权模式,用来管理隐式授权模式的状态
toeknGranter 授权将会交给你自己来完全掌控
默认的URL链接如下
 /**
     * /oauth/authorize     授权端点
     * /oauth/token         令牌断点
     * /oauth/confirm-access用户确认授权提交端点
     * /auth/error          授权服务错误信息断电
     * /auth/check_token    用户资源服务访问的令牌解析断电
     * /oauth/token_key     提供公有密钥的端点,如果你使用jwt令牌的话
     */
需要注意的是这个授权端点URL应该被SpringSecurity保护起来只提供给授权用户访问
@Configuration
@EnableAuthorizationServer
public class AuthorizationServer extends AuthorizationServerConfigurerAdapter {

    @Autowired
    private TokenStore tokenStore;

    @Autowired
    private AuthorizationCodeServices authorizationCodeServices;


    @Bean
    public AuthorizationCodeServices authorizationCodeServices()
    {
        return new InMemoryAuthorizationCodeServices();
    }
    @Autowired
    private AuthenticationManager authenticationManager;

    @Autowired
    private ClientDetailsService clientDetailsService;


    // 配置客户端详细信息
    @Override
    public void configure(ClientDetailsServiceConfigurer clients) throws Exception {
        clients.inMemory() // 使用内存存储
            .withClient("c1") // client_id
            // 客户端密钥
            .secret(new BCryptPasswordEncoder().encode("secret"))
            // 资源列表
            .resourceIds("res1")
            // 授权方式
            .authorizedGrantTypes("authorization_code","password","client_creentials","implicit","refresh_token")
            // 允许授权的范围
            .scopes("all")
            //
            .autoApprove(false)  // false 跳转到授权页面
            // 加上验证回调地址
            .redirectUris("http://www.baidu.com");

    }


    // 令牌管理服务
    public AuthorizationServerTokenServices tokenServices()
    {
        DefaultTokenServices service = new DefaultTokenServices();
        service.setClientDetailsService(clientDetailsService);  // 客户端信息服务
        service.setSupportRefreshToken(true);   // 是否产生刷新令牌
        service.setTokenStore(tokenStore);  // 设置令牌存储策略
        service.setAccessTokenValiditySeconds(7200);// 令牌默认有效期 2 小时
        service.setRefreshTokenValiditySeconds(259200);
        return service;
    }

    /**
     * /oauth/authorize     授权端点
     * /oauth/token         令牌断点
     * /oauth/confirm-access用户确认授权提交端点
     * /auth/error          授权服务错误信息断电
     * /auth/check_token    用户资源服务访问的令牌解析断电
     * /oauth/token_key     提供公有密钥的端点,如果你使用jwt令牌的话
     */

    /**
     *  令怕i访问端点
     * @param endpoints
     * @throws Exception
     */
    @Override
    public void configure(AuthorizationServerEndpointsConfigurer endpoints) throws Exception {
        endpoints
                // 密码管理模式
                .authenticationManager(authenticationManager)
                // 授权码模式
                .authorizationCodeServices(authorizationCodeServices)
                .tokenServices(tokenServices()) // 令牌管理服务
                .allowedTokenEndpointRequestMethods(HttpMethod.POST); // 允许post提交
    }


    /**
     *  配置令牌端点(Token Endpoint)的安全约束
     * @param security
     * @throws Exception
     */
    @Override
    public void configure(AuthorizationServerSecurityConfigurer security) throws Exception {
        security.tokenKeyAccess("permitAll()")         // /oauth/token_key  公开
                .checkTokenAccess("permitAll()")       // /auth/check_token  检测令牌
                .allowFormAuthenticationForClients();  // 允许通过表单认证,申请令牌

        super.configure(security);
    }
}
授权服务配置总结
授权服务分成三大块,可以关联记忆。
既然要完成,它首先得知道客户端从哪里读取,因此要进行客户端详情配置,既然要颁发token,那么必须要定义 token的相关 endpoint , 以及 token 如何存取,以及客户端支持那些类型的 token。
既然暴露了一些 endpoint, 那对这些 endpoint 可以定义一些安全上的约束等。
Web 安全配置
配置 WebSecirutyConfig.java , 继承WebSecurityConfigurerAdapter
@Configuration
@EnableGlobalMethodSecurity(securedEnabled = true,prePostEnabled = true)
public class WebSecurityConfig extends WebSecurityConfigurerAdapter {
    //认证管理器
    @Bean
    public AuthenticationManager authenticationManagerBean() throws Exception {
        return super.authenticationManagerBean();
    }

    @Bean
    public PasswordEncoder passwordEncoder() {
        return new BCryptPasswordEncoder();
    }

    // 安全拦截机制
    @Override
    protected void configure(HttpSecurity http) throws Exception {
        http.csrf().disable()
                .authorizeRequests()
                .antMatchers("/r/r1").hasAnyAuthority("p1")
                .antMatchers("/login*").permitAll()
                .anyRequest().authenticated()
                .and()
                .formLogin()
        ;

    }
}
配置启动类
UaaServer.java
@SpringBootApplication
@EnableDiscoveryClient
@EnableHystrix
@EnableFeignClients(basePackages = {"cn.fllday.security.distruibuted.uaa"})
public class UaaServer {
    public static void main(String[] args) {
        SpringApplication.run(UaaServer.class);
    }
}
到这里我们的授权认证中心就已经完成了。接下来配置一个客户端。
创建一个order 的模块
pom.xml 文件
<?xml version="1.0" encoding="UTF-8"?>
<project xmlns="http://maven.apache.org/POM/4.0.0"
         xmlns:xsi="http://www.w3.org/2001/XMLSchema-instance"
         xsi:schemaLocation="http://maven.apache.org/POM/4.0.0 http://maven.apache.org/xsd/maven-4.0.0.xsd">
    <modelVersion>4.0.0</modelVersion>

    <groupId>cn.fllday.security</groupId>
    <artifactId>distributed-security-order</artifactId>
    <version>1.0-SNAPSHOT</version>
    <parent>
        <artifactId>distributed-security</artifactId>
        <groupId>cn.fllday.security</groupId>
        <version>1.0-SNAPSHOT</version>
    </parent>

    <dependencies>
        <dependency>
            <groupId>org.springframework.boot</groupId>
            <artifactId>spring-boot-starter-actuator</artifactId>
        </dependency>
        <dependency>
            <groupId>org.springframework.boot</groupId>
            <artifactId>spring-boot-starter-web</artifactId>
        </dependency>
        <dependency>
            <groupId>org.springframework.cloud</groupId>
            <artifactId>spring-cloud-starter-security</artifactId>
        </dependency>
        <dependency>
            <groupId>org.springframework.cloud</groupId>
            <artifactId>spring-cloud-starter-oauth2</artifactId>
        </dependency>
        <dependency>
            <groupId>javax.interceptor</groupId>
            <artifactId>javax.interceptor-api</artifactId>
        </dependency>
        <dependency>
            <groupId>com.alibaba</groupId>
            <artifactId>fastjson</artifactId>
        </dependency>
        <dependency>
            <groupId>org.projectlombok</groupId>
            <artifactId>lombok</artifactId>
        </dependency>
    </dependencies>
</project>
引入的依赖如下
application.properties 文件
spring.application.name=order-service
server.port=53022
spring.main.allow-bean-definition-overriding=true

logging.level.root=debug
logging.level.org.springframework.web=info
spring.http.encoding.enabled=true
spring.http.encoding.charset=utf-8
spring.http.encoding.force=true
server.tomcat.remote-ip-header=x-forwarded-for
server.tomcat.protocol-header=x-forwarded-proto
server.use-forward-headers=true
server.servlet.context-path=/order


spring.freemarker.enabled=true
spring.freemarker.suffix=.html
spring.freemarker.request-context-attribute=rc
spring.freemarker.content-type=text/html
spring.freemarker.charset=utf-8
spring.mvc.throw-exception-if-no-handler-found=true
spring.resources.add-mappings=false
资源服务器配置
@EnableResourceServer 注解到一个@Configuration 配置类上,并且必须使用ResourceServerConfigurer 这个配置对象来进行配置。 下面是一些可以配置的属性
tokenServices:ResourceServerTokenServices 类的实例,用来实现令牌服务tokenStore:TokenStore类的实力,制定令牌如何访问,与tokenServices 配置可选resourceId: 这个资源服务器的id,这个属性是可选的,但是推荐设置并在授权服务中进行验证- 其他的拓展例
tokenExtractor令牌提取器用来提取请求中的令牌
HttpSecurity 配置这个与SpringSecurity 类似
- 请求匹配器,用来设置需要进行保护的资源路径,默认的情况下是保护资源服务器全部路径。
- 通过http.authorizeRequests() 来设置受保护资源的访问规则
- 其他的自定义权限保护规则通过 httpSecurity 来进行配置
@EnableResourceServer 注解自动增加了一个类型为Oauth2AuthenticationProcessingFilter 的过滤器链
ResourceServerConfig.java
package cn.fllday.security.distributed.order.config;

import org.springframework.context.annotation.Bean;
import org.springframework.context.annotation.Configuration;
import org.springframework.security.config.annotation.web.builders.HttpSecurity;
import org.springframework.security.config.http.SessionCreationPolicy;
import org.springframework.security.oauth2.config.annotation.web.configuration.EnableResourceServer;
import org.springframework.security.oauth2.config.annotation.web.configuration.ResourceServerConfigurerAdapter;
import org.springframework.security.oauth2.config.annotation.web.configurers.ResourceServerSecurityConfigurer;
import org.springframework.security.oauth2.provider.token.RemoteTokenServices;
import org.springframework.security.oauth2.provider.token.ResourceServerTokenServices;

@Configuration
@EnableResourceServer
public class ResourceServerConfig extends ResourceServerConfigurerAdapter {
    public static final String RESOURCE_ID = "res1";

    @Override
    public void configure(HttpSecurity http) throws Exception {
        http.authorizeRequests()
                .antMatchers("/**").access("#oauth2.hasScope('all')")
                .and().csrf().disable()
                .sessionManagement().sessionCreationPolicy(SessionCreationPolicy.STATELESS);
        super.configure(http);
    }
    // 资源服务令牌解析服务
    /**
     * 使用远程服务请求授权服务器校验的token,必须制定校验token 的url, client_id,client_secret
     * @return
     */
    @Bean
    public ResourceServerTokenServices tokenServices()
    {
        RemoteTokenServices service = new RemoteTokenServices();
        service.setCheckTokenEndpointUrl("http://localhost:53020/uaa/oauth/check_token");
        service.setClientId("c1");
        service.setClientSecret("secret");
        return service;
    }
    @Override
    public void configure(ResourceServerSecurityConfigurer resources) throws Exception {
        resources.resourceId(RESOURCE_ID) // 资源id
                .tokenServices(tokenServices()) // 验证令牌的服务
                .stateless(true);
    }
}
添加安全访问控制
WebSecurityConfig.java
@Configuration
@EnableGlobalMethodSecurity(securedEnabled = true,prePostEnabled = true)
public class WebSecurityConfig extends WebSecurityConfigurerAdapter {
    @Override
    protected void configure(HttpSecurity http) throws Exception {
        http.csrf().disable()
                .authorizeRequests()
                .antMatchers("/r/**").authenticated() // 表示 /r/的路径都会受到保护
                .anyRequest().permitAll();
    }
}
创建资源接口
OrderController.java
@RestController
@RequestMapping(value = "/r")
public class OrderController {

    @GetMapping(value = "/r1")
    @PreAuthorize("hasAnyAuthority('p1')") // 拥有p1权限方可发个文
    public String r1()
    {
        return "访问资源1";
    }

    @GetMapping(value = "/r2")
    @PreAuthorize("hasAnyAuthority('p2')") // 拥有p2权限方可发个文
    public String r2()
    {
        return "访问资源2";
    }
}
配置启动类
Order.java
@SpringBootApplication
@EnableDiscoveryClient
public class OrderServer {
    public static void main(String[] args) {
        SpringApplication.run(OrderServer.class,args);
    }
}
顺序启动 uaa 和 order
测试
这里使用的工具是postman
我们先尝试访问获取token的接口
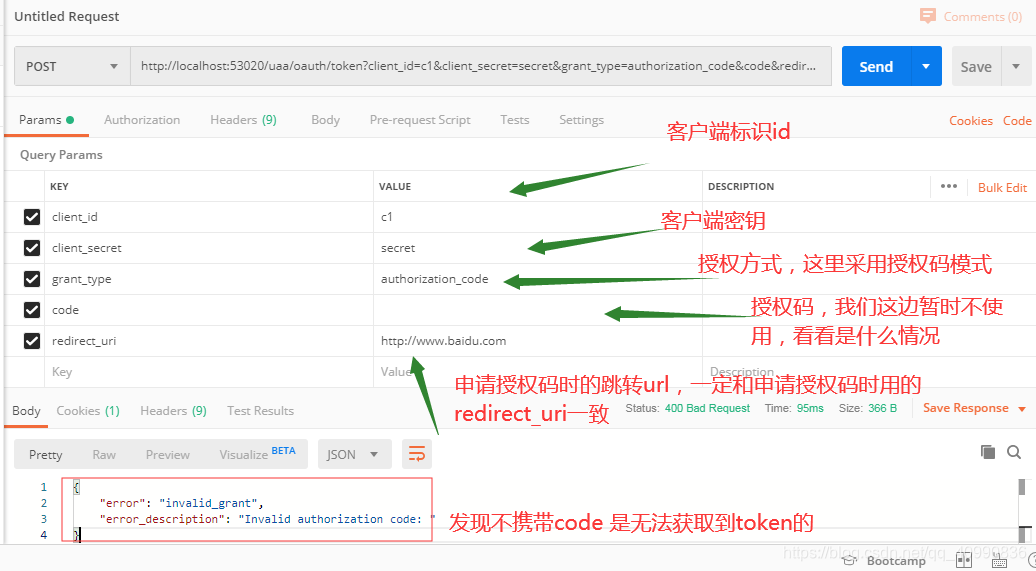
这里的参数都是哪里来的呢?
发现原来在我们的AuthorizationServer类中configure方法中ClientDetailsServiceConfigurer 配置过了
那么code 哪里来的呢?
我们使用浏览器访问http://localhost:53020/uaa/login有一个登陆页面。我们使用数据库中添加的用户名和密码,如果你用的我的sql文件的话,用户名 zhangsan, 密码 123。登陆成功后访问http://localhost:53020/uaa/oauth/authorize?client_id=c1&response_type=code&scope=all&redirect_uri=http://www.baidu.com, 出现一个页面为
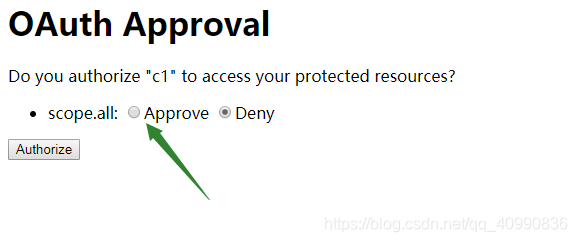
点击Authorize
你的页面就跳转到百度了。 但是浏览器后面会跟上一串字符串

访问token接口的code 参数的值就是这么来的
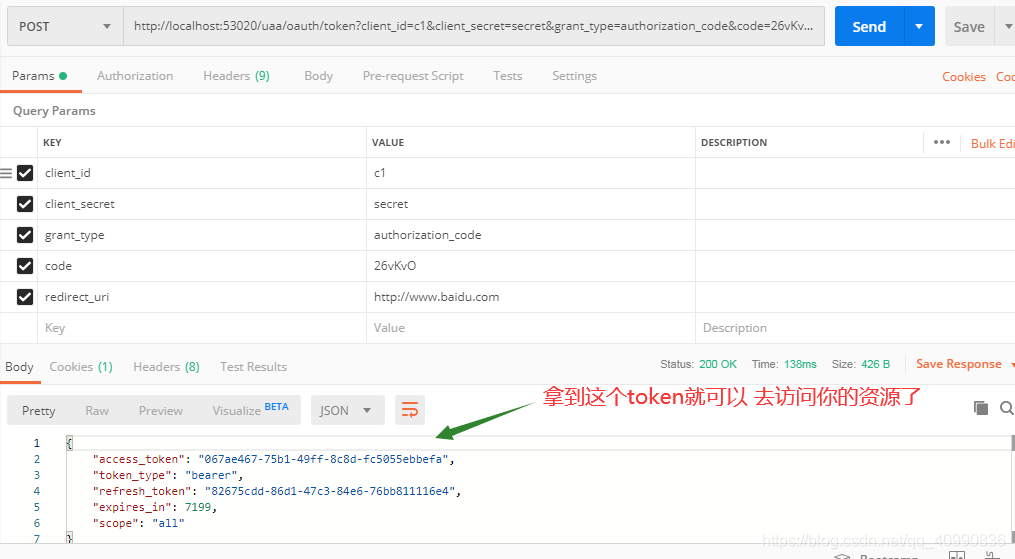
访问获取token的接口
访问资源
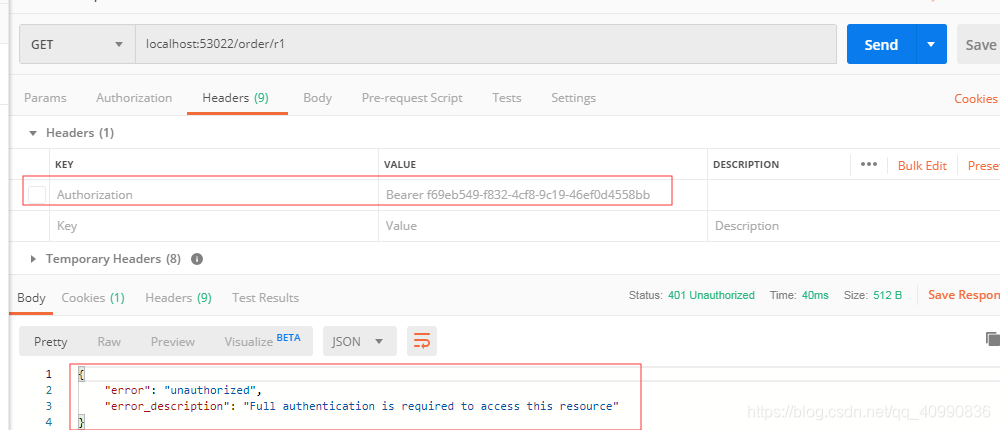
不懈怠token 就会报错,总之就是不同意你访问这个资源
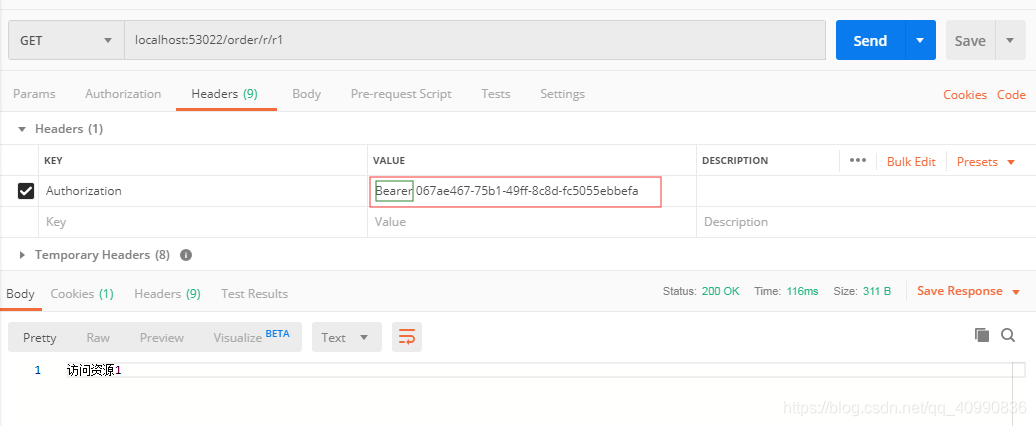
注意看我图里绿色圈圈起来的地方。token 需要加上 Bearer 有个空格哦!!
访问没有资源的接口

下面我们去看看那个校验token的接口做了什么
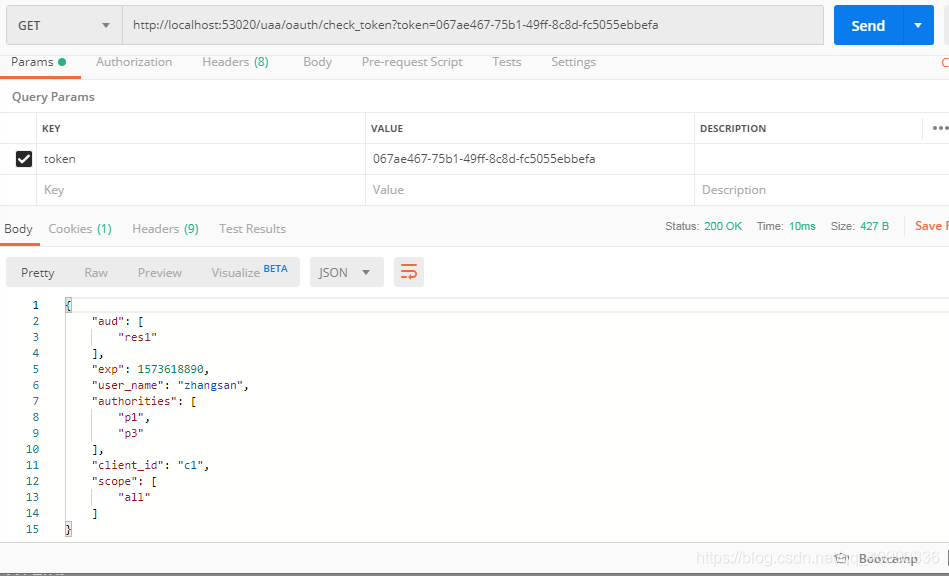
上面的不用解释了吧!
至于其他的模式。等下次在挨个解释吧。 下一篇文章会使用jwt,以及通过 springcloud 的网关来控制。
