一、什么是组件
组件就是将一些通用功能剥离出来,通过重构,封装形成模块,供外部业务调用。组件化开发有利于团队的分工协作,提高开发效率,所以目前流行的三大前端框架,都是以组件为核心。
前端组件化从方向上可以分为javascript component和web component,前者是需要框架提供能力,而后者则需要浏览器支持,虽然w3c规范中也有了组件的标准,怎奈各个浏览器差异化较大,故当前还是javascript component为王。无论哪种组件模式,都需要支持对html,css,javascript的封装,实现完整的功能呈现。以对话框为例,组件需要包括页面的呈现(html,css),还需要实现点击button的逻辑处理。

二、组件注册
组件分为全局组件和局部组件,其注册的方式也有差异。
1、全局组件
顾名思义,全局组件是在全局生效的,这类组件适合整个项目需要统一使用的,比如对话框,列表等,我们来注册一个简单的组件样例(我们的例子都是基于vue-cli的工程架构),在main.js中增加
Vue.component('child-compoment',{
  data:function(){
    return{
       msg:"this  is child-compoment"
    }
  },
  template:"<div>{{msg}}</div>"
})
看下这个组件的结构,
(1)使用Vue.component()来创建。
(2)这个方法包括两个入参,第一个是组件的名称,建议使用短连接符命名模式。第二个参入是组件定义的内容。
(3)组价内容中定义了data和template,实际上,还可以定义compute,watch,methods以及生命周期钩子等,与new Vue的选项类似。
这里要注意两点:
(1)data中是一个函数,而不是一个数组,否则在组件复用时,data中的数据就会共享。
(2)Vue.component()需要定义在new Vue之前,否则不生效。
下面我们来使用这个组件,在App.vue中修改
<template>
  <div id="app">
    <img src="./assets/logo.png">
    <!--短连接符模式-->
    <child-compoment></child-compoment>
  </div>
</template>
最终的效果如下:

最终渲染如下,在组件的位置填充了template。

2、局部组件
还要很多组件是不需要全局使用的,比如说一些业务组件,只需要特定的几个页面使用,对于这类组件适合局部注册,在需要的地方的引入。我们继续来看,在App.vue中增加:
var partComponent={
   data:function(){
    return{
       msg:"this  is part-compoment"
    }
  },
  template:"<div>{{msg}}</div>"
}
export default {
  name: 'App',
  components:{
    "part-component":partComponent
  }
}
首先自定义个组件partComponent,这个与全局组件定义是一样的,在App组件中使用components属性注册这个组件。然后使用这个组件
<template>
  <div id="app">
    <img src="./assets/logo.png">
    <!--短连接符模式-->
    <!-- <child-compoment></child-compoment> -->
    <part-component></part-component>
  </div>
</template>
展示效果与全局组件一样,大家可以试下。
使用vue-cli手脚架创建工程的同学用可能已经发现,webpack已经为我们创建了多个默认的组件,比如刚才使用App组件。App.vue就对应一个组件,包含了html,js,css,然后使用export导出。
在使用该组件的页面,将整个模块导入注册。
import App from './App'
...
new Vue({
  el: '#app',
  router,
  components: { App },
  template: '<App/>'
})
有了组件后,我们就可以玩搭积木一样搭建我们的系统。
三、组件间通讯
组件是可以嵌套使用的,比如上面的例子中,App组件中就使用了partComponent组件,App就是父组件,partComponent是子组件,父子间必然存在信息的传递,包括父组件信息向下传递,以及子组件信息的向上传递。
1、props
父组件向子组件传递采用的是props属性的方式。还采用上面的例子,我们需要父组件传递一个title的参数给子组件。
var partComponent={
    props:['title'],
   data:function(){
    return{
       msg:"this  is part-compoment"
    }
  },
  template:"<div>{{msg}}:{{title}}</div>"
}
首先,我们在子组件props中声明title的属性,在template中使用显示title的值。此时子组件已经准备好了接受title的参数值,那父组件如何传递呢
<part-component title="apple phone"></part-component>在父组件调用子组件时,在html中指定该属性值即可。
有些时候,传递的title是个动态值,我们从父组件的data中获取后传递给子组件。父组件中data的定义如下:
export default {
  name: 'App',
  data:function(){
    return{
       title:"apple phone"
    }
  },
  components:{
    "part-component":partComponent
  }
}
将title的传递给子组件
<part-component v-bind:title="title" ></part-component>v-bind:title="title",其中的title表示绑定子组件props的title,后面的值"title"表示data中的title。简而言之,就是将父组件的title绑定到子组件的props定义的title上,完成数据的传递。
v-bind还可以传递整个对象,如下:
var partComponent={
    props:['title','info'],
   data:function(){
    return{
       msg:"this  is part-compoment"
    }
  },
  template:"<div>{{msg}}:{{title}},{{info.id}},{{info.name}}</div>"
}
export default {
  name: 'App',
  data:function(){
    return{
       title:"apple phone",
       info:{
        id:'1',
        name:'hw phone'
      }
    }
  },
  components:{
    "part-component":partComponent
  }
}
<part-component v-bind:title="title" v-bind:info="info" ></part-component>传递的方式与传递单个参数时一样的,在父组件的data中定义info对象,使用v-bind绑定整个对象,子组件partComponent的props中定义待传递的对象名info,在模板template中就可以正常使用该对象了。
props除了上面的数组定义模式,还可以采用对象模式,定义每个属性的类型和默认值。
var partComponent={
    props:{
      //对象定义模式,定义类型和默认值
      title:{
        type:String,
        default:"this is zte phone"
      },
      info:Object
    },
   data:function(){
    return{
       msg:"this  is part-compoment"
    }
  },
  template:"<div>{{msg}}:{{title}},{{info.id}},{{info.name}}</div>"
}
我建议大家采用这种模式,虽然复杂下,但是可读性好。
父子组件采用v-bind绑定实现信息的传递,那如果在父组件中改变这个值,子组件是否变化呢,反之,如果子组件改变该值,是否会体现在父组件上呢?
我们来看第一种情况,在父组件中定义两个方法,changeTile,changeInfo,改变title和info的值。
export default {
  name: 'App',
  data:function(){
    return{
       title:"apple phone",
       info:{
        id:'1',
        name:'8G flash'
      }
    }
  },
  methods:{
    changeTile:function(){
      this.title ="xiaomi phone"
    },
    changeInfo:function(){
      this.info={
        id:"2",
        name:"16G flash"
      }
    }
  },
  components:{
    "part-component":partComponent
  }
}
接下定义两个button调用该方法。
<template>
  <div id="app">
    <img src="./assets/logo.png">
    <part-component v-bind:title="title" v-bind:info="info"></part-component>
    <button @click="changeTile">改变title值</button>
    <button @click="changeInfo">改变info对象值</button>
  </div>
</template>结果可以看到,当父组件的值改变后,子组件也跟着改变。有时我们希望他们之间隔离,父组件的变化不要影响到子组件。
在组件中我们创建一个新的属性,并以传递进来的值进行初始化,之后就可以操作这个新的属性。
我们重新定义partTitle,partInfo接受props中的title和info,此时再点击,子组件的值就不会改变了。
var partComponent={
    props:{
      //对象定义模式,定义类型和默认值
      title:{
        type:String,
        default:"this is zte phone"
      },
      info:Object
    },
   data:function(){
    return{
       msg:"this  is part-compoment",
       partTile:this.title,
       partInfo:this.info
    }
  },
  template:"<div>{{msg}}:{{partTile}},{{partInfo.id}},{{partInfo.name}}</div>"
}
我们在来看第二种情况,在子组件中定义两个按钮。
var partComponent={
    props:{
      //对象定义模式,定义类型和默认值
      title:{
        type:String,
        default:"this is zte phone"
      },
      info:Object
    },
   data:function(){
    return{
       msg:"this  is part-compoment",
       partTile:this.title,
       partInfo:this.info
    }
  },
  methods:{
    partChangeTile:function(){
      this.title ="xiaomi phone"
    },
    partChangeInfo:function(){
      this.info={
        id:"2",
        name:"16G flash"
      }
    }
  },
  template:"<div>"+
            "<div>{{msg}}:{{partTile}},{{partInfo.id}},{{partInfo.name}}</div>"+
            "<button @click='partChangeTile'>子组件改变title值</button>"+
            "<button @click='partChangeInfo'>子组件改变info对象值</button>"+
            "</div>"
}
此时点击子组件的button,发现控制台给出了警告:
Avoid mutating a prop directly since the value will be overwritten whenever the parent component re-renders. Instead, use a data or computed property based on the prop's value.
什么意思呢,在vue2.0中,props传递的是单向的数据流,只能从父组件流向子组件,反之是不可以的,这样设计的是有其合理性,父组件可以包含很多子组件,如果每个子组件都能影响父组件,那将不可控。
2、emit
终于啰里啰嗦的将props讲完了,prop是解决了父组件向子组件的信息传递,那么子组件如何向父组件传递呢,vue给出的是自定义事件的方式。我们继续来看。
第一步:在子组件模板定义一个事件触发按钮
<button @click='postMsg'>传递消息给父组件</button>第二步:在子组件methods中定义该postMsg方法
postMsg:function(){
   this. $emit('childclick', '将我抛出去吧')
}
这是用了emit自定义了一个事件,包含两个参数,第一个是事件的名字,第二个是事件的参数。
第三步:父组件调用子组件时利用v-on绑定该事件。
<part-component v-bind:title="title" v-bind:info="info" @childclick="getMsg"></part-component>第四步:父组件的method中实现getMsg方法,接受事件。
 getMsg:function(data){
      console.log(data);
    }
通过这四步,就可以将子组件的信息发送到父组件。
四、插槽
插槽(slot)用于做内容分发的,我们在自定义组件的标签中加入<div>。
<part-component v-bind:title="title" v-bind:info="info" @childclick="getMsg">
      <div>这是自定义组件</div>
    </part-component>
part-component子组件对应的模板如下:
template:"<div>"+
            "<div>{{msg}}:{{partTile}},{{partInfo.id}},{{partInfo.name}}</div>"+
            "<button @click='partChangeTile'>子组件改变title值</button>"+
            "<button @click='partChangeInfo'>子组件改变info对象值</button>"+
            "<button @click='postMsg'>传递消息给父组件</button>"+
            "</div>"
我们看下渲染后的结果

"<div>这是自定义组件</div>"并没有如期的渲染出来。我们将这个模板修改下,加入<slot>标签
  template:"<div>"+
            "<div>{{msg}}:{{partTile}},{{partInfo.id}},{{partInfo.name}}</div>"+
            "<button @click='partChangeTile'>子组件改变title值</button>"+
            "<button @click='partChangeInfo'>子组件改变info对象值</button>"+
            "<button @click='postMsg'>传递消息给父组件</button>"+
            "<slot/>"+
            "</div>"
在看下渲染的结果

此时正确的渲染出来了,<slot>插槽就是个占坑的作用,坑里面的内容由父组件在定义子组件标签时写入。这个对于组件的封装非常重要,同一个组件再不同的场景中,可以展示不用的效果。
有时间我们需要多个插槽,可以给slot具名,根据名称确定待插入的内容。
在子组件的模板中,我们增加两个slot,分别命名为header,footer
template:"<div>"+
"<slot name='header'></slot>"+
"<div>{{msg}}:{{partTile}},{{partInfo.id}},{{partInfo.name}}</div>"+
"<button @click='partChangeTile'>子组件改变title值</button>"+
"<button @click='partChangeInfo'>子组件改变info对象值</button>"+
"<button @click='postMsg'>传递消息给父组件</button>"+
"<slot name='footer'></slot>"+
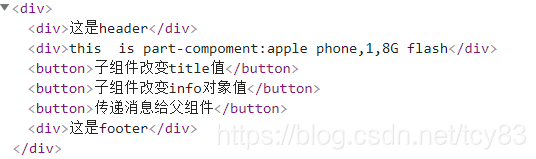
"</div>"在父组件中,定义这两个slot的内容
<part-component v-bind:title="title" v-bind:info="info" @childclick="getMsg">
      <template slot="header">
        <div>这是header</div>
      </template>
      <div slot="footer">这是footer</div>
    </part-component>
最终渲染的结果,在适合的位置插入了正确的内容
接下来我们看下插槽的作用域,将父组件中的slot内容修改下:
<part-component v-bind:title="title" v-bind:info="info" @childclick="getMsg">
      <template slot="header">
        <div>访问父组件的title:{{title}}</div>
      </template>
      <div slot="footer">访问子组件的msg:{{msg}}</div>
</part-component>执行结果发现,父组件的title正常访问,但是子组件的msg报错了,说明这里的作用域是父组件。官方文档上描述:父组件模板的所有东西都会在父级作用域内编译;子组件模板的所有东西都会在子级作用域内编译。
![]()
有些场景下,我们希望这里能访问子组件的变量,vue提供了作用域插槽,我们来看下怎么使用的:
template:"<div>"+
            "<slot name='header'></slot>"+
            "<div>{{msg}}:{{partTile}},{{partInfo.id}},{{partInfo.name}}</div>"+
            "<button @click='partChangeTile'>子组件改变title值</button>"+
            "<button @click='partChangeInfo'>子组件改变info对象值</button>"+
            "<button @click='postMsg'>传递消息给父组件</button>"+
            "<slot name='footer' v-bind:msg='msg'></slot>"+
            "</div>"
<part-component v-bind:title="title" v-bind:info="info" @childclick="getMsg">
<template slot="header">
<div>访问父组件的title:{{title}}</div>
</template>
<template slot="footer" slot-scope="slotProps">
<div >访问子组件的msg:{{slotProps.msg}}</div>
</template>
</part-component>在template中,绑定msg对象,在父组件的插槽中使用slot-scope="slotProps",定义其作用域,并通过slotProps.msg访问子组件的msg。
五、总结
组件是vue很重要的内容,也是提高我们实际项目开发效率的一大利器。本文主要讲解了一些基本的知识和使用,还有
