3. 微服务架构开发实战之服务治理
- 3. 微服务架构开发实战之使用Eureka集群实现高可用服务治理
- 3.1 服务治理解决了什么问题?
- 3.2 服务治理的解决思路是什么?
- 3.3 服务治理的框架有哪些?
- 3.4 使用Eureka 实现服务治理
- 3.4.1 Eureka 服务注册中心集群搭建
- 3.4.2 Eureka 客户端注册
- 3.4.3 重要参数讲解
- 3.4.3.1 自我保护模式相关参数
- 3.4.3.2 什么时候需要Prefer IP Address?
- 3.4.3.3 如何对Eureka Server 添加注册认证?
- 3.4.3.4 状态检查和健康检查
- 3.4.4 为访问服务注册中心添加登陆验证
- 3.4.5 建议 Spring Cloud LoadBalance 替换Ribbon
- 3.4.6 JDK 11 使用注意事项
- 3.5 项目结构
- 3.6 如何创建多模块微服务架构项目
- 4. 源码下载
3. 微服务架构开发实战之使用Eureka集群实现高可用服务治理
这节课讲述如何开发微服务架构应用程序以及如何使用Eureka集群实现高可用服务治理。
视频教程:
03 微服务架构开发实战之服务治理
更多精彩内容: 微服务架构开发实战专栏简介
3.1 服务治理解决了什么问题?
进程间通信是微服务架构的核心,基于微服务架构的应用程序是一个分布式系统。
一个单体应用程序一旦拆分成多个微服务之后,是基于进程间的通信, 我们往往一般无法精确地知道其他微服务位于哪台机器上,尤其如果某个微服务部署地址一旦发生变化,那么难道去一个一个去通知所有相关的微服务么?
我们肯定不能这么干,不然光沟通就累死了。
业界针对这个问题提供了一套解决方案,那就是服务治理。
可能有些人还是不理解究竟为什么需要服务注册?
- 第一:微服务与微服务之间的请求是跨进程的,无论选择基于SOAP 协议的XML 传输还是基于 REST JSON 传输,或选择RPC 框架如Dubbo实现服务治理,都需要知道请求的地址(IP 和端口以及Actuator健康检查的地址)
- 第二:微服务的部署的IP 一般都是动态IP分配不可能那么多静态IP 给你用。
- 第三:弹性扩容,需要动态扩容机器部署,这些后期的一些部署IP 等信息是无法提前预知的。
因此必须有一个高可用的服务治理解决方案。
关于为什么需要客户端负载均衡?
举个例子, 比如我们现在有微服务A,有三个一模一样的,A1,A2,A3,都通过服务注册中心返回给你,你客户端收到这个列表后,就需要使用Ribbon 或Open Feign 或Spring Cloud LoadBalancer 实现负载均衡,从而决定从这三个中选择哪一个微服务实例来提供服务,
3.2 服务治理的解决思路是什么?
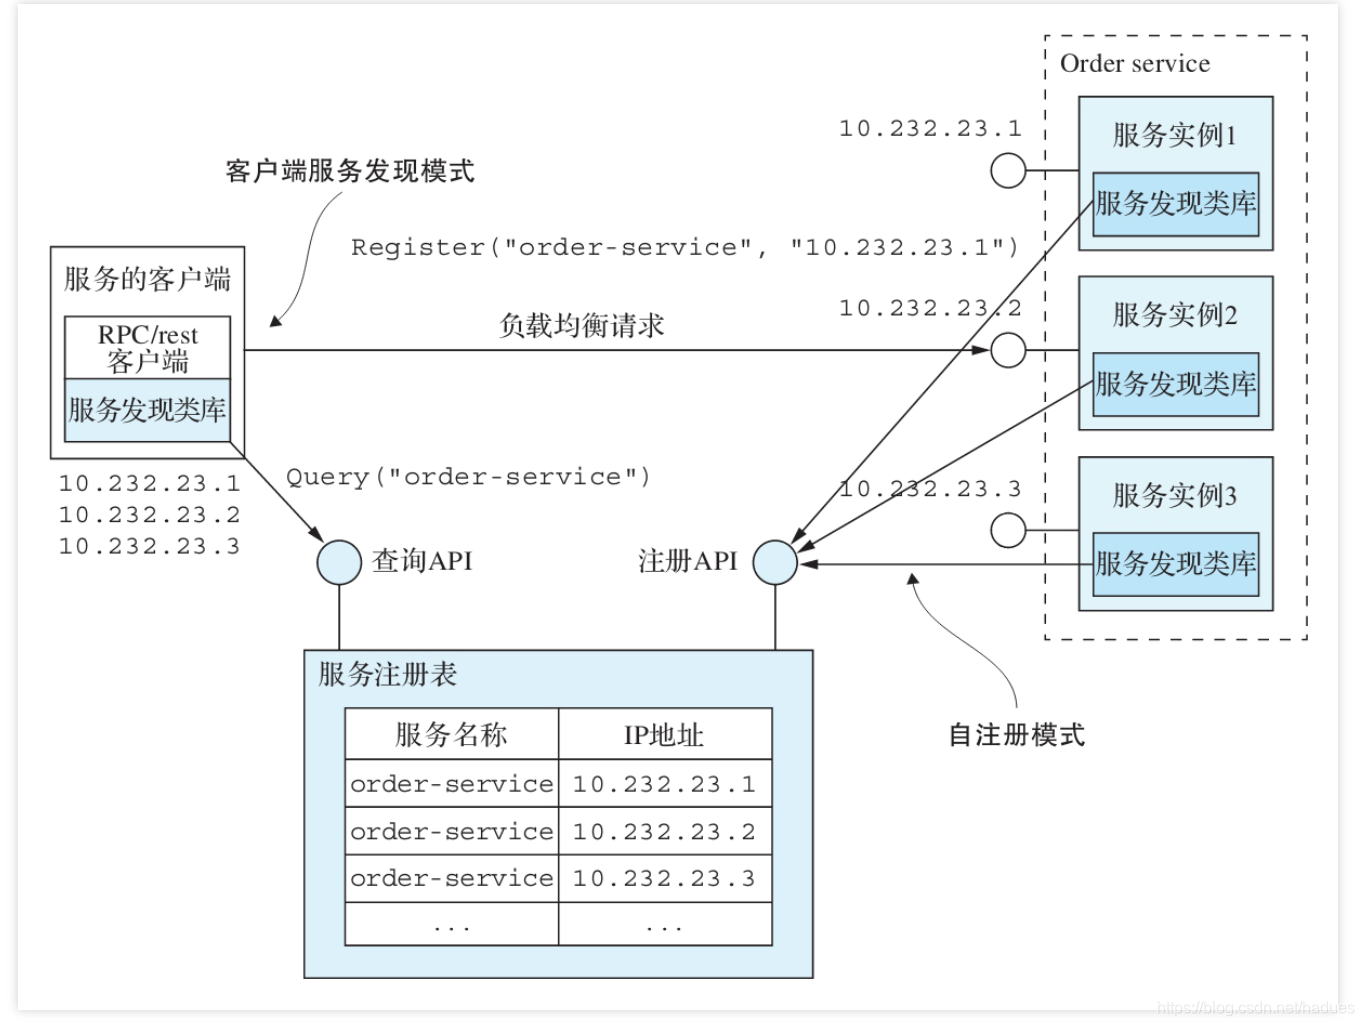
服务治理的解决思路是启动一个服务注册中心,然后各个微服务都去这个服务注册中心将自己的信息登记,注册。
这样如果想知道某一个微服务处于哪台机器上部署着,只需要查询这个服务注册中心即可。
这个服务注册中心就相当于一个微服务注册表,每个微服务都要去上面进行登记注册。
原理图如下所示:
3.3 服务治理的框架有哪些?
业界针对服务治理提供了很多框架来帮助我们快速实现服务治理的功能。
比如最早的Netflix 公司开源的Eureka,经过Spring 官方团队的封装之后就变成了Spring Cloud Eureka
除此之外,还有Consul, Zookeeper K8S 等其他解决方案。
3.4 使用Eureka 实现服务治理
对应的IP 如下所示
| 服务器名称 | 服务器ip地址 |
|---|---|
| server1 | 192.168.159.146 |
| server2 | 192.168.159.147 |
| server3 | 192.168.159.148 |
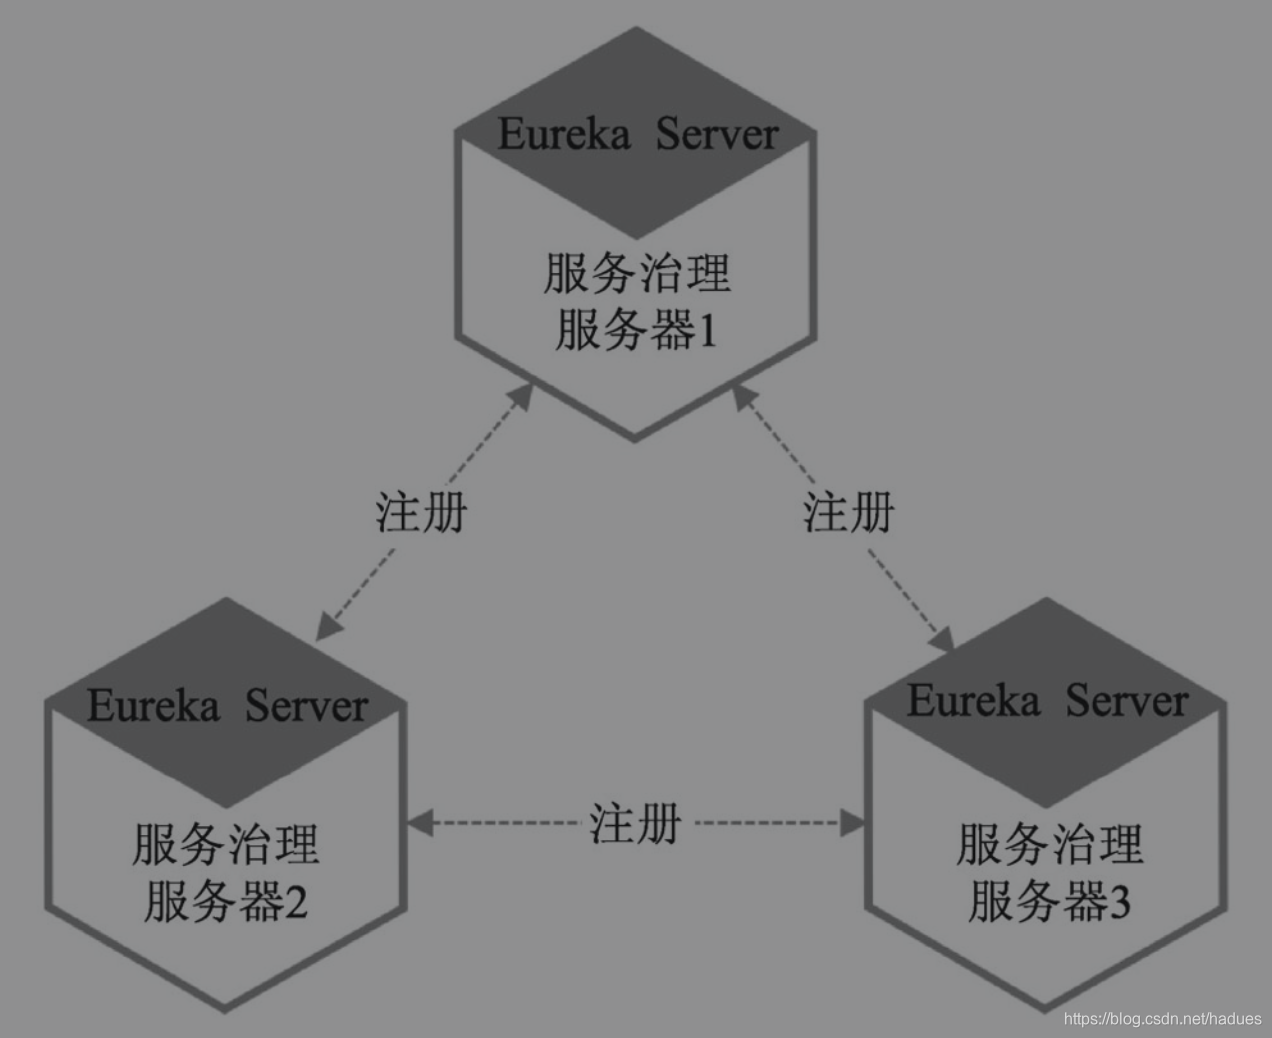
然后在三个服务注册中心的配置文件中这样指定:
-
server1 注册server2 和server 3 的地址
-
server2 注册server1 和server3 的地址
-
server3 注册server1 和server2的地址
3.4.1 Eureka 服务注册中心集群搭建
3.4.2 Eureka 客户端注册
3.4.3 重要参数讲解
3.4.3.1 自我保护模式相关参数
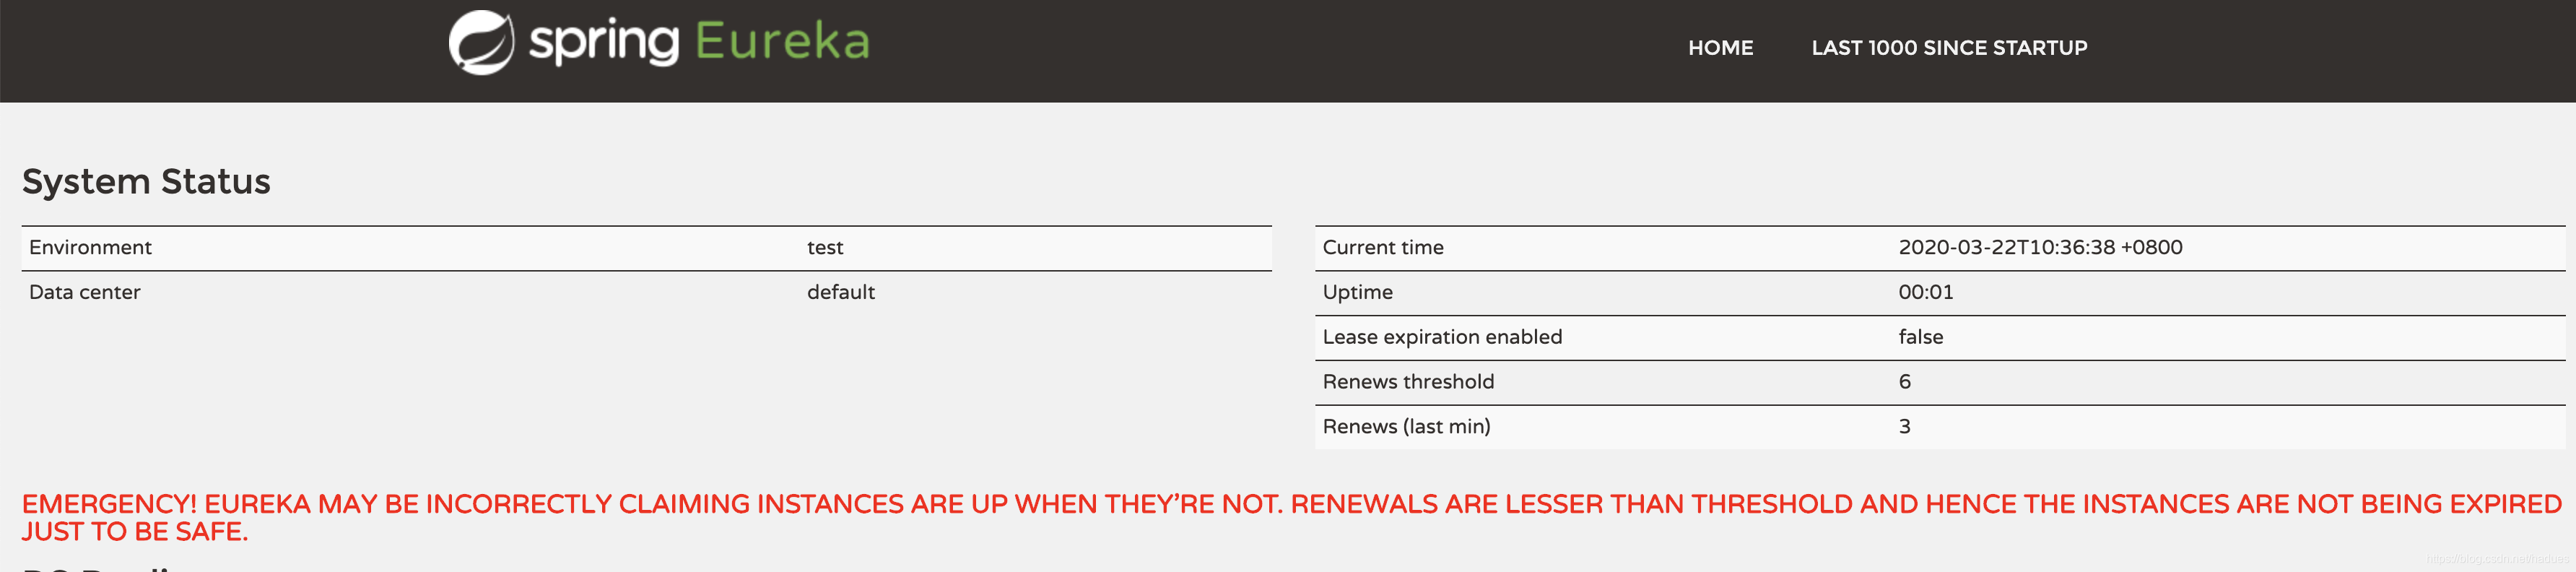
- Renews (last min):表示最近一分钟从Eureka 实例收到的续订次数
- Renews threshold:续订阀值,Eureka服务器期望每分钟从Eureka实例收到的续订阀值,初始化值最低为1 (次)
- 服务注册中心不注册自己:
2*(n+1)*0.85只取整数部分- 服务注册中心注册自己:
2*n*0.85只取整数部分
修复建议:
- 开启自我保护
- 集群或修改参数
# 默认值是true
eureka.server.enable-self-preservation=true
# default is 30
eureka.instance.leaseRenewalIntervalInSeconds=30
# default is 0.85 we can set the value to 0.49
eureka.server.renewalPercentThreshold=0.49
如果n 等于3 ,不注册自身,按照默认值计算阀值
2*(3+1)*0.85= 6.8-> 6 == 实际每分钟续订次数 6 =2*32*(3+1)*0.49= 3.92-> 3 < 实际每分钟续订次数 6 =2*3
自我保护模式的意义何在?
试想一种场景,当一个客户端,通过API Gateway 调用微服务A,如果微服务A宕机不可用,那么如果API Gateway如果仍旧不断向A发出请求,那么很快API Gateway 资源(比如线程)就会耗尽。当然我们可以使用服务熔断技术,这样可以解决这个问题,但是仍旧有一个问题就是如何判断这个微服务已经宕机了?是强检测还是包容检测?
我们知道Eureka 是一个服务注册中心,它的自我保护开启和关闭的区别其实在于:
- 如果自我保护开始,也就是说当 eureka.server.enable-self-preservation=true 时候,Eureka 将会相对来说比较包容微服务和服务注册中心之间的弱网络情况(网络不稳有波动),比如等待90秒后,如果还未注册上,就将其从服务注册中心剔除。
- 如果自我保护关闭,也就是说当eureka.server.enable-self-preservation=false时候,Eureka 将会一旦有微服务在规定时间内没续期成功就直接将其从列表移除,这样其实有些过于暴力,除非微服务和服务注册中心能确保长期处于带宽网络良好情况,否则网络一旦有波动就将微服务实例从列表剔除
3.4.3.2 什么时候需要Prefer IP Address?
在某些情况下,Eureka最好公布服务的IP地址而不是主机名。 将eureka.instance.preferIpAddress设置为true,并且当应用程序向eureka注册时,它将使用其IP地址而不是其主机名。
- 如果Java无法确定主机名,则IP地址将发送到Eureka。
- 设置主机名的唯一明确方法是设置
eureka.instance.hostname属性。- 我们可以在运行时使用环境变量来设置主机名,例如,
eureka.instance.hostname = $ {HOST_NAME}。
当服务器有多个网卡的时候,一定不要使用主机名,而应该使用IP地址。
因为如果使用主机名,当有多个网卡的时候,对应多个虚拟IP地址,程序应该绑定到哪个IP地址上呢?
另外,如果通过主机名,一般需要在hosts 文件中配置,否则很容易出现找不到该服务器的错误。
因此最佳实践最好将 eureka.instance.preferIpAddress设置为true,避免不必要的麻烦。
3.4.3.3 如何对Eureka Server 添加注册认证?
我们知道,一般情况下,只要知道这个Eureka Server 地址,添加一个依赖,开启一个注解,再做些配置就可以将自己的微服务注册到服务注册中心上,这样其实是不安全的,如果不想让一些微服务服务注册上去,如何为这个注册添加一个认证呢?
我们知道默认的defualt-zone 地址是:http://localhost:8761/eureka/
如果要添加注册身份认证,那么需要将上面的URL 作如下改变:
user:password@localhost:8761/eureka
对于更加复杂的要求,可以创建类型为
DiscoveryClientOptionalArgs的@Bean并将ClientFilter实例注入其中,所有这些都应用于从客户端到服务器的调用。
3.4.3.4 状态检查和健康检查
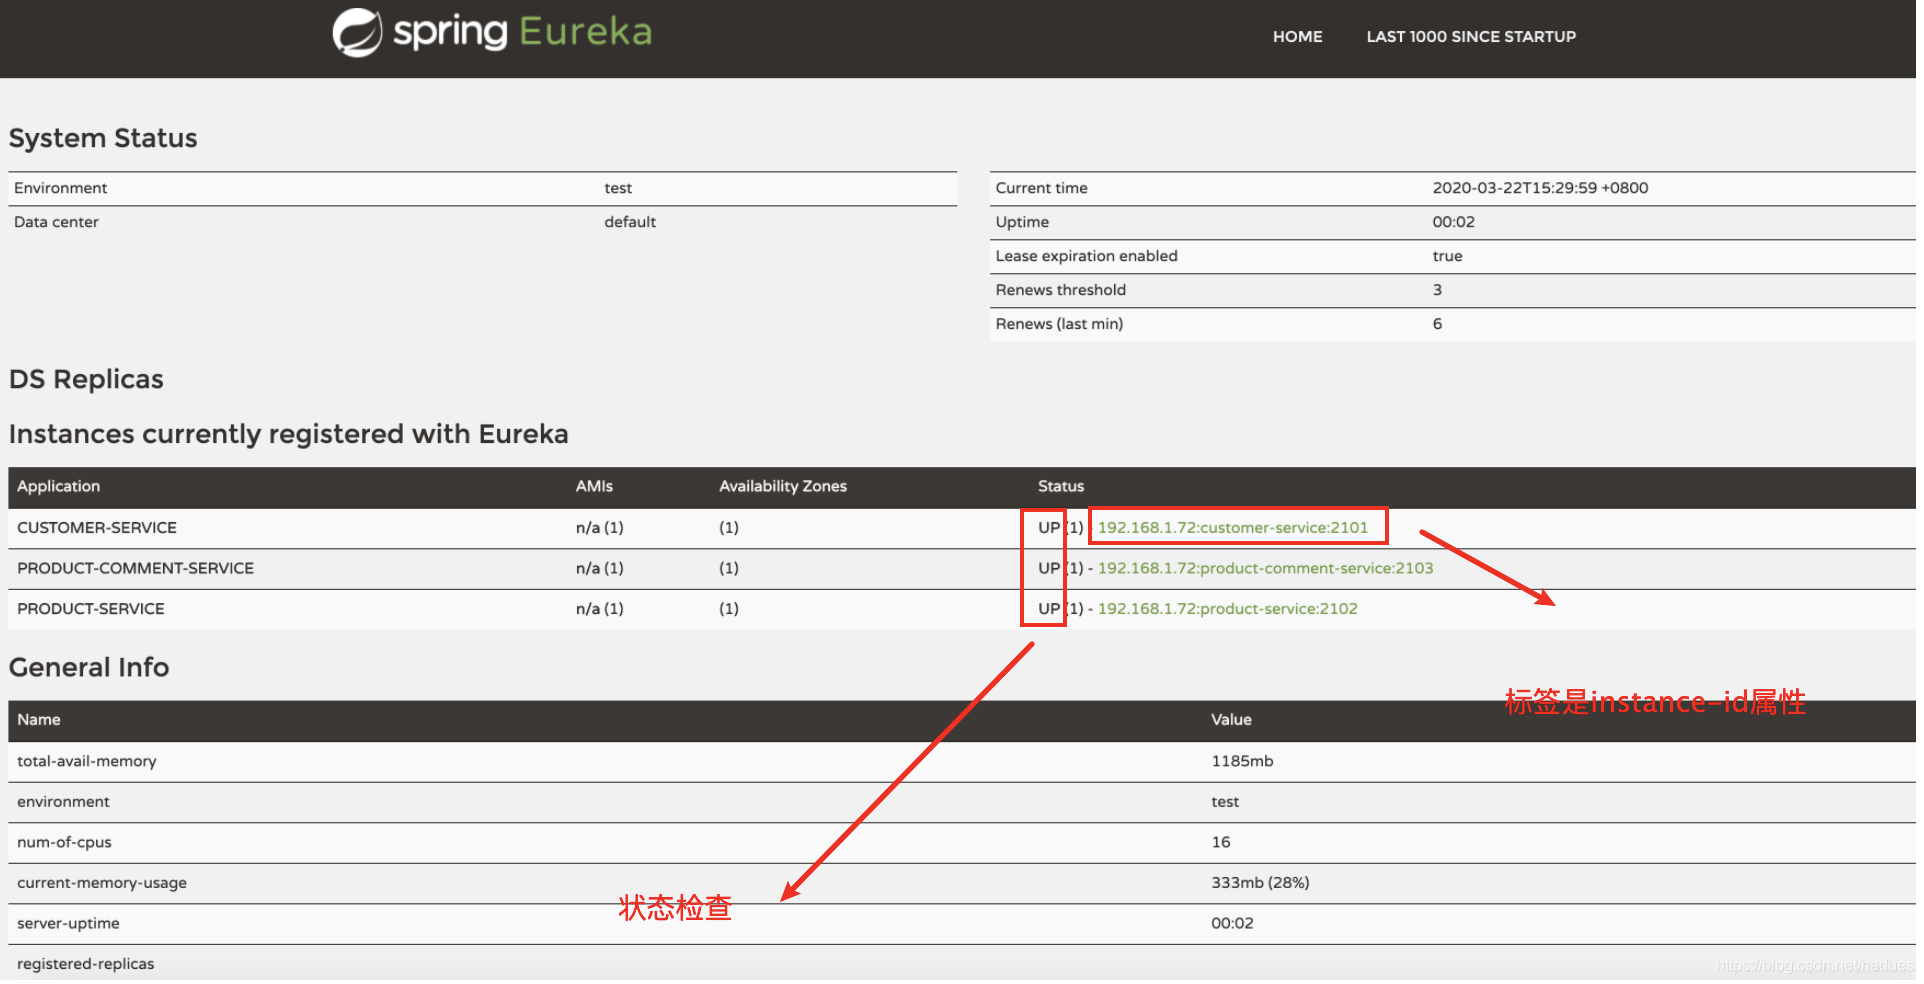
正如上图所示,如果想修改超链接标签,那么重写eureka.instance.instance-id 属性,但是一般不建议修改。
超链接地址就是微服务基础地址+ statusPageUrlPath
UP 就是检查微服务基础地址+ healthCheckUrlPath
在Eureka 配置服务注册中心的时候,针对状态检查和健康检查默认配置如下所示:
eureka:
  instance:
    statusPageUrlPath: /actuator/info
    healthCheckUrlPath: /actuator/health
但是我建议修改成如下所示:
eureka:
  instance:
    statusPageUrlPath: /actuator
    healthCheckUrlPath: /actuator/health
因为这样的话,状态检查的话,希望点击超链接直接进入首页,http://localhost:8080/user-server/
检查微服务是否健康,请求是 http://localhost:8080/user-server/actuator/health
3.4.4 为访问服务注册中心添加登陆验证
Eureka Server 服务注册中心首页,如果不想直接被访问到,我们可以通过Spring Security 来进行保护。
这样只有通过输入账号密码认证后才可以访问服务注册中心首页。
- 添加这个依赖:
<dependency>
      <groupId>org.springframework.boot</groupId>
      <artifactId>spring-boot-starter-security</artifactId>
</dependency>
- 然后开启相关配置:
@EnableWebSecurity
class WebSecurityConfig extends WebSecurityConfigurerAdapter {

    @Override
    protected void configure(HttpSecurity http) throws Exception {
        http.csrf().ignoringAntMatchers("/eureka/**");
        super.configure(http);
    }
}
还记得default-zone 么? 它的默认值是:http://localhost:8761/eureka/
也就是说,服务注册中心的核心功能请求上下文都是/eureka/**
建议:前期可以先不开启这个功能,更多详解见我的另外一篇博文:Spring Boot 2.x 最佳实践之 Spring Security
集成
3.4.5 建议 Spring Cloud LoadBalance 替换Ribbon
spring-cloud-starter-netflix-eureka-server 和 spring-cloud-starter-netflix-eureka-client 默认集成使用了 spring-cloud-starter-netflix-ribbon Ribbon 作为客户端的负载均衡实现,但是建议使用 Spring Cloud LoadBalance
如果要替换,那么需要做两处修改:
修改配置文件:
spring.cloud.loadbalancer.ribbon.enabled=false
pom.xml 排除依赖:
<dependency>
            <groupId>org.springframework.cloud</groupId>
            <artifactId>spring-cloud-starter-netflix-eureka-client</artifactId>
            <exclusions>
                <exclusion>
                    <groupId>org.springframework.cloud</groupId>
                    <artifactId>spring-cloud-starter-ribbon</artifactId>
                </exclusion>
                <exclusion>
                    <groupId>com.netflix.ribbon</groupId>
                    <artifactId>ribbon-eureka</artifactId>
                </exclusion>
            </exclusions>
</dependency>
3.4.6 JDK 11 使用注意事项
JDK 11 中移除了JAXB 模块,如果项目中使用了JDK 11,那么需要在项目中额外添加一个依赖
<dependency>
    <groupId>org.glassfish.jaxb</groupId>
    <artifactId>jaxb-runtime</artifactId>
</dependency>
3.5 项目结构
在开始本节课之前呢,先来回顾下上一节的设计的项目目录结构。
3.5.1 单体架构项目推荐目录结构
上节课提到,在单体架构项目中,建议一个项目的不同业务模块存放在不同的文件夹中。
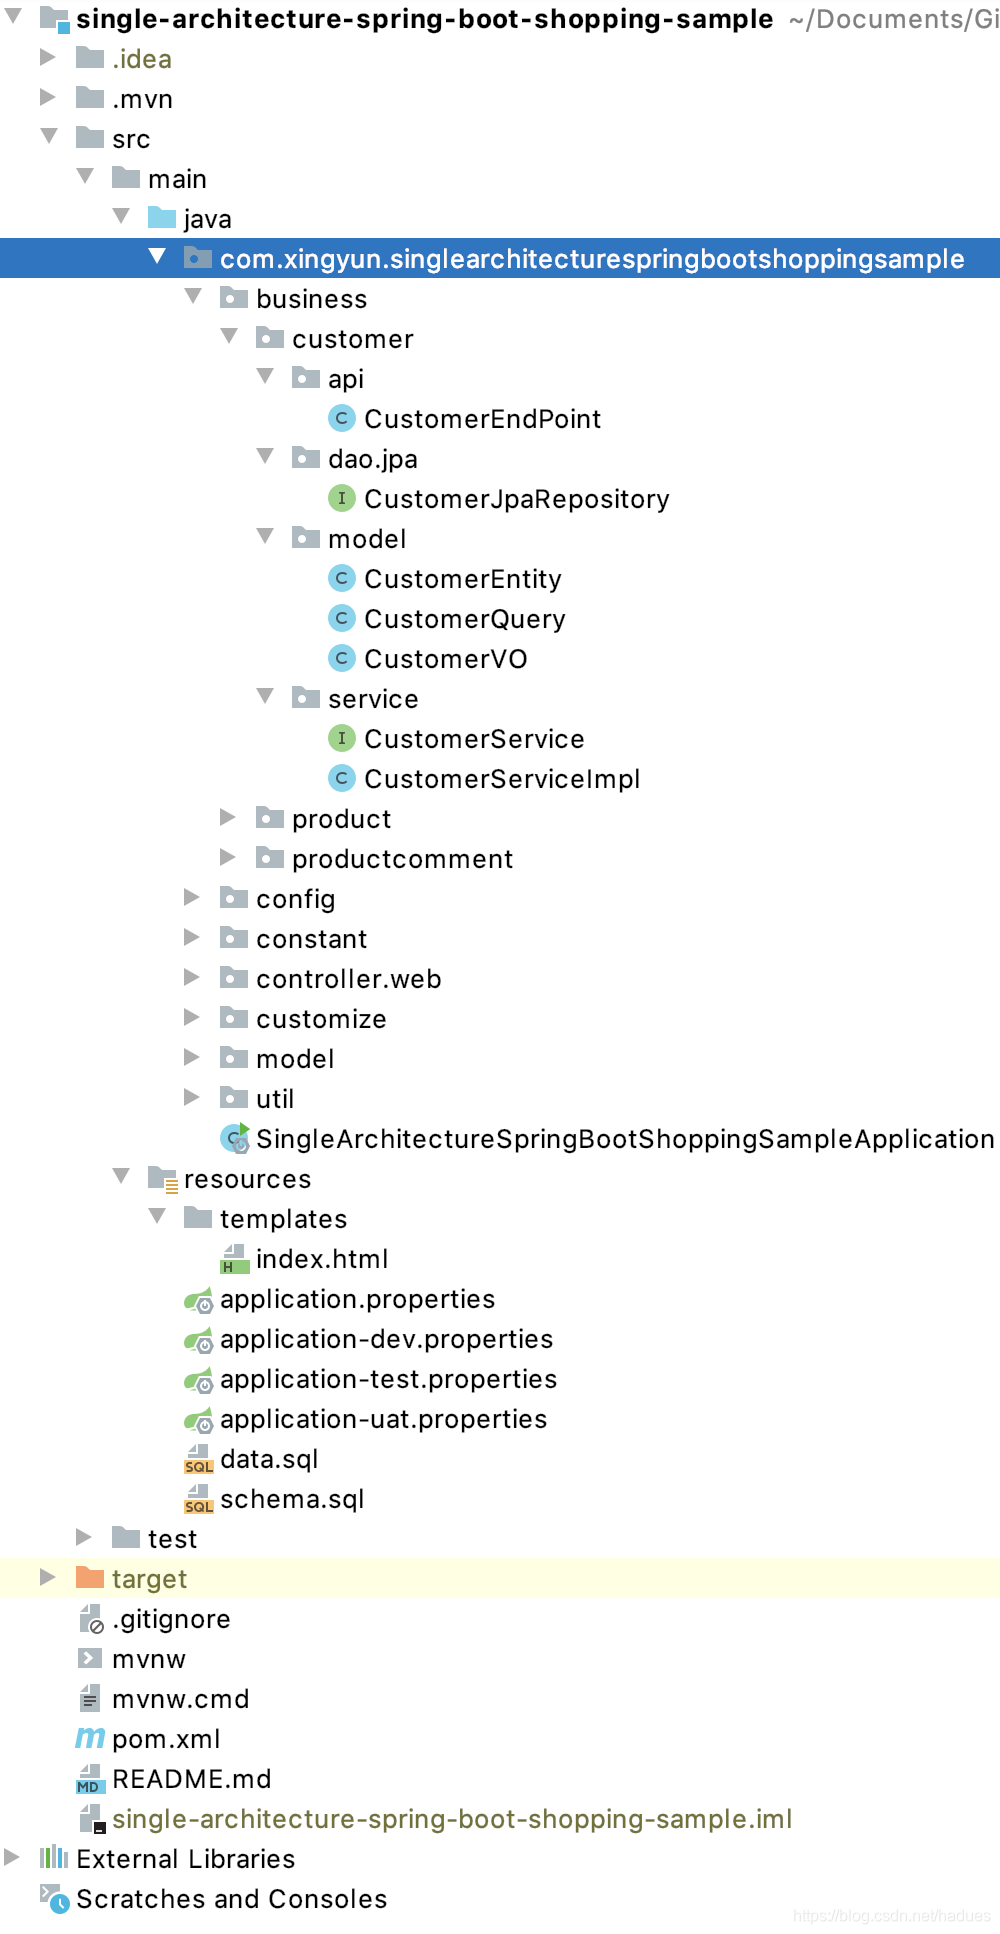
这种目录的最主要原因是有助于今后拆分成改造升级为微服务。
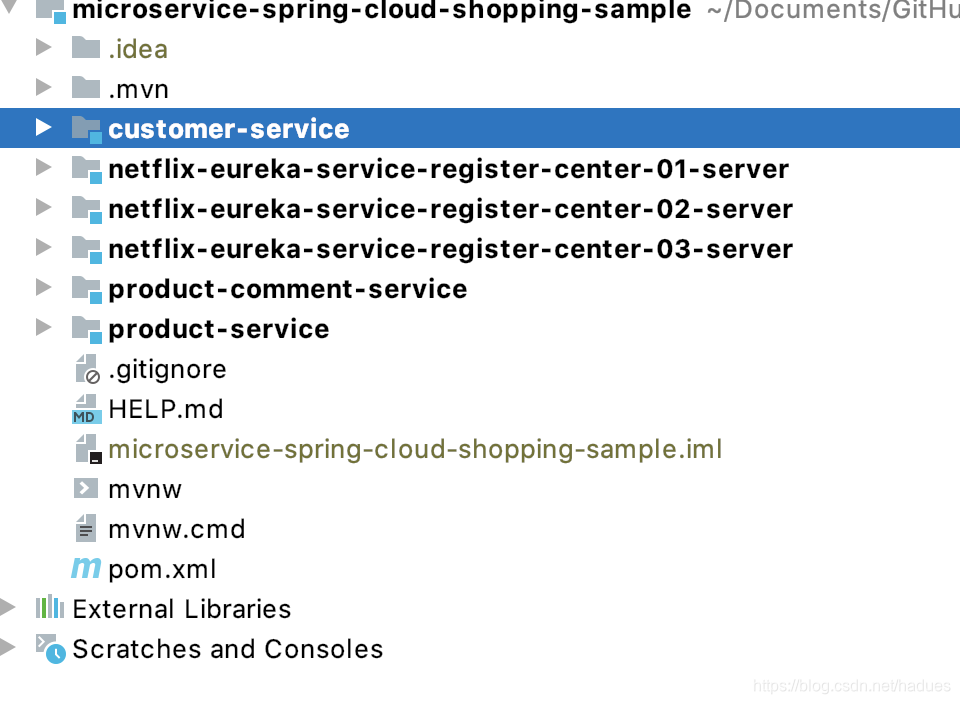
3.5.2 微服务架构推荐目录结构
微服务架构下,对于项目有了模块化的思想,一个项目可以由多个模块组成。
3.6 如何创建多模块微服务架构项目
那么如何创建这样的多模块项目呢?
3.6.1 创建公共的父pom.xml
创建公共的父pom.xml 的一个原因是因为我们知道一个项目可能拥有多个微服务模块,那么每个微服务可能都需要spring boot 和Spring Cloud 等公共依赖。
如果每个微服务都自己配置这些,后期升级将会需要改动很多。
在maven中有子父类继承的概念,我们可以创建一个公共的父pom.xml,然后其他微服务继承它,那么今后改动升级只需要改动这一个地方就行了。
这种方式易于开发和管理微服务架构下的多个微服务模块。
- 首先创建一个基于Spring Boot 或Maven 的普通项目,然后在pom.xml 中
packaging打包方式修改为pom 格式
完整父pom.xml示例如下:
<?xml version="1.0" encoding="UTF-8"?>
<project xmlns="http://maven.apache.org/POM/4.0.0" xmlns:xsi="http://www.w3.org/2001/XMLSchema-instance"
         xsi:schemaLocation="http://maven.apache.org/POM/4.0.0 https://maven.apache.org/xsd/maven-4.0.0.xsd">
    <modelVersion>4.0.0</modelVersion>

    <!-- parent project 继承自Spring Boot -->
    <parent>
        <groupId>org.springframework.boot</groupId>
        <artifactId>spring-boot-starter-parent</artifactId>
        <version>2.2.5.RELEASE</version>
    </parent>

    <!-- 作为父项目-子模块架构 packaging 必须设置为pom 而不是jar 或者war -->
    <groupId>com.xingyun</groupId>
    <artifactId>microservice-spring-cloud-shopping-sample</artifactId>
    <version>0.0.1-RELEASE</version>
    <packaging>pom</packaging>
    <name>microservice-spring-cloud-shopping-sample</name>
    <description>microservice spring cloud shopping project for Spring Boot</description>

    <properties>
        <!-- 通用属性配置 -->
        <java.version>1.8</java.version>
        <!-- 设置maven编译插件版本,可通过下面网址查看最新的版本-->
        <guava.version>23.0</guava.version>
        <spring-cloud.version>Hoxton.SR3</spring-cloud.version>
    </properties>

    <dependencies>
        <dependency>
            <groupId>org.projectlombok</groupId>
            <artifactId>lombok</artifactId>
            <optional>true</optional>
        </dependency>
        <!-- https://mvnrepository.com/artifact/com.google.guava/guava -->
        <dependency>
            <groupId>com.google.guava</groupId>
            <artifactId>guava</artifactId>
            <version>${guava.version}</version>
        </dependency>

        <dependency>
            <groupId>org.springframework.boot</groupId>
            <artifactId>spring-boot-starter-actuator</artifactId>
        </dependency>

        <dependency>
            <groupId>org.springframework.boot</groupId>
            <artifactId>spring-boot-starter-test</artifactId>
            <scope>test</scope>
            <exclusions>
                <exclusion>
                    <groupId>org.junit.vintage</groupId>
                    <artifactId>junit-vintage-engine</artifactId>
                </exclusion>
            </exclusions>
        </dependency>
    </dependencies>

    <dependencyManagement>
        <dependencies>
            <dependency>
                <groupId>org.springframework.cloud</groupId>
                <artifactId>spring-cloud-dependencies</artifactId>
                <version>${spring-cloud.version}</version>
                <type>pom</type>
                <scope>import</scope>
            </dependency>
        </dependencies>
    </dependencyManagement>

    <build>
        <plugins>
            <plugin>
                <groupId>org.springframework.boot</groupId>
                <artifactId>spring-boot-maven-plugin</artifactId>
            </plugin>
        </plugins>
    </build>

</project>
- 删除所有src (包括src)目录下的所有内容
3.6.2 创建三个服务注册中心模块
接下来我们将创造三个服务中心模块,用于构建Eureka 服务器集群。
- 选中项目右键,New-----> Module
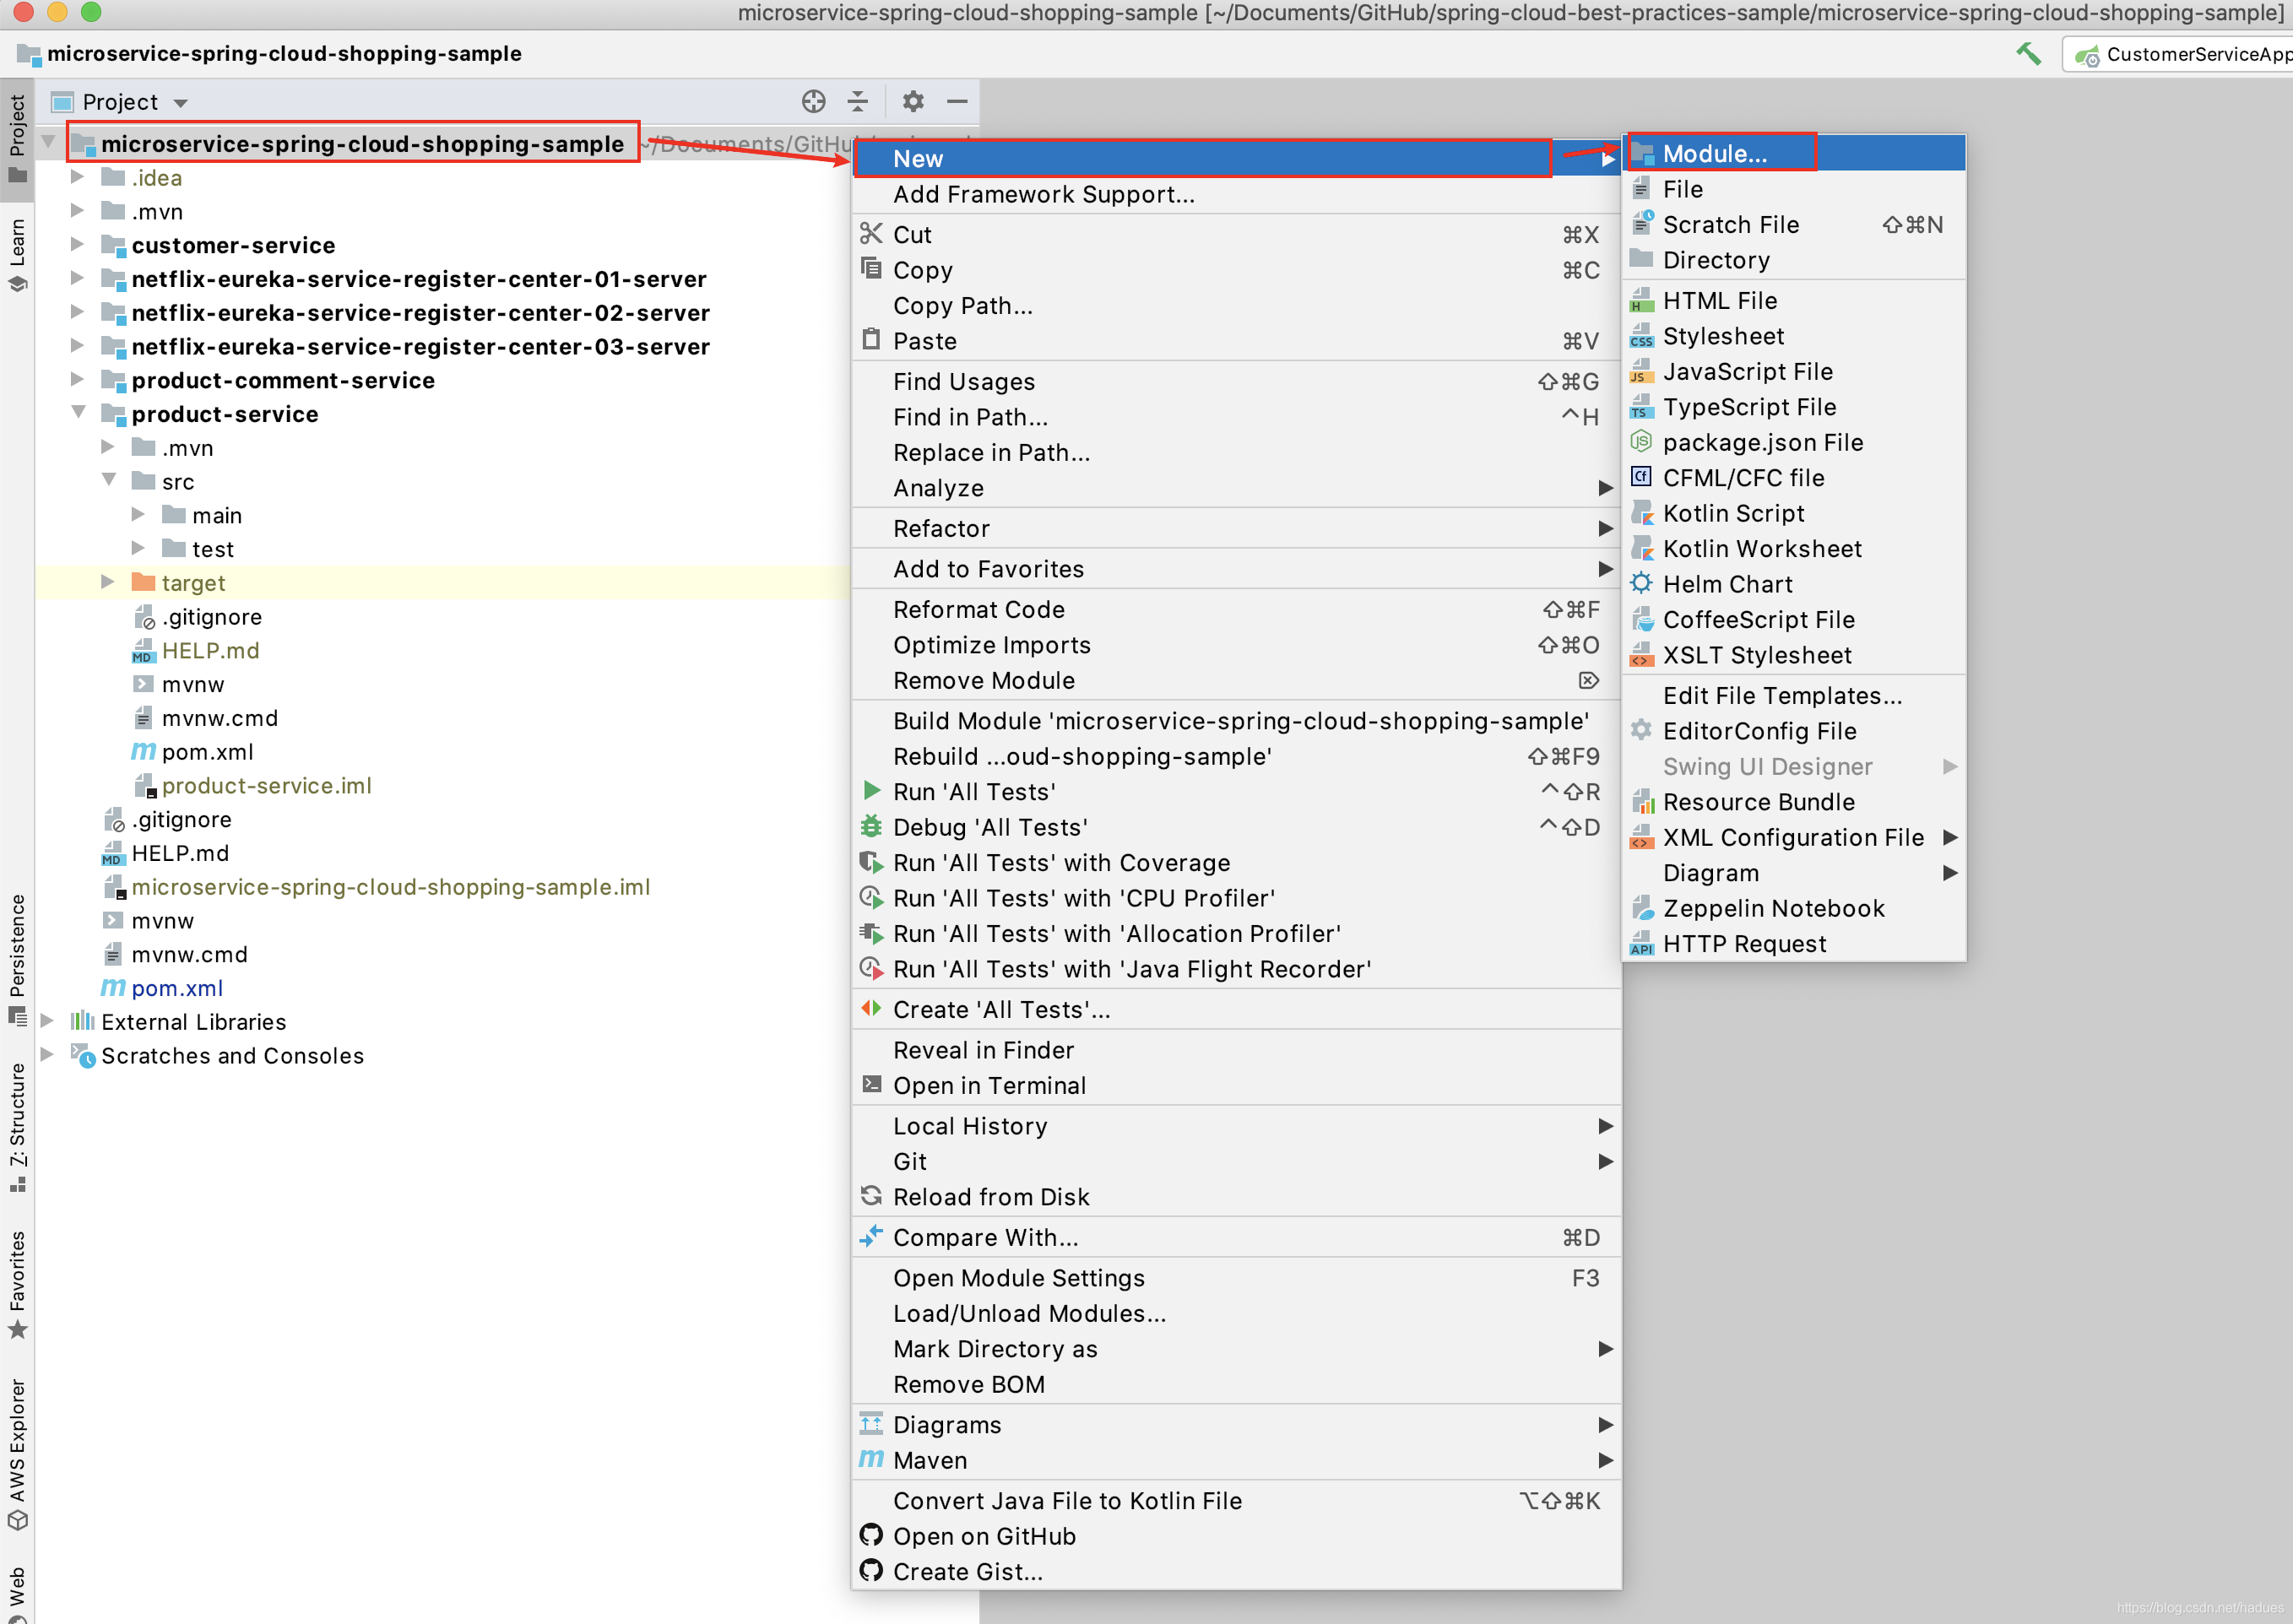
- 然后我们可以看到如下图所示目录:
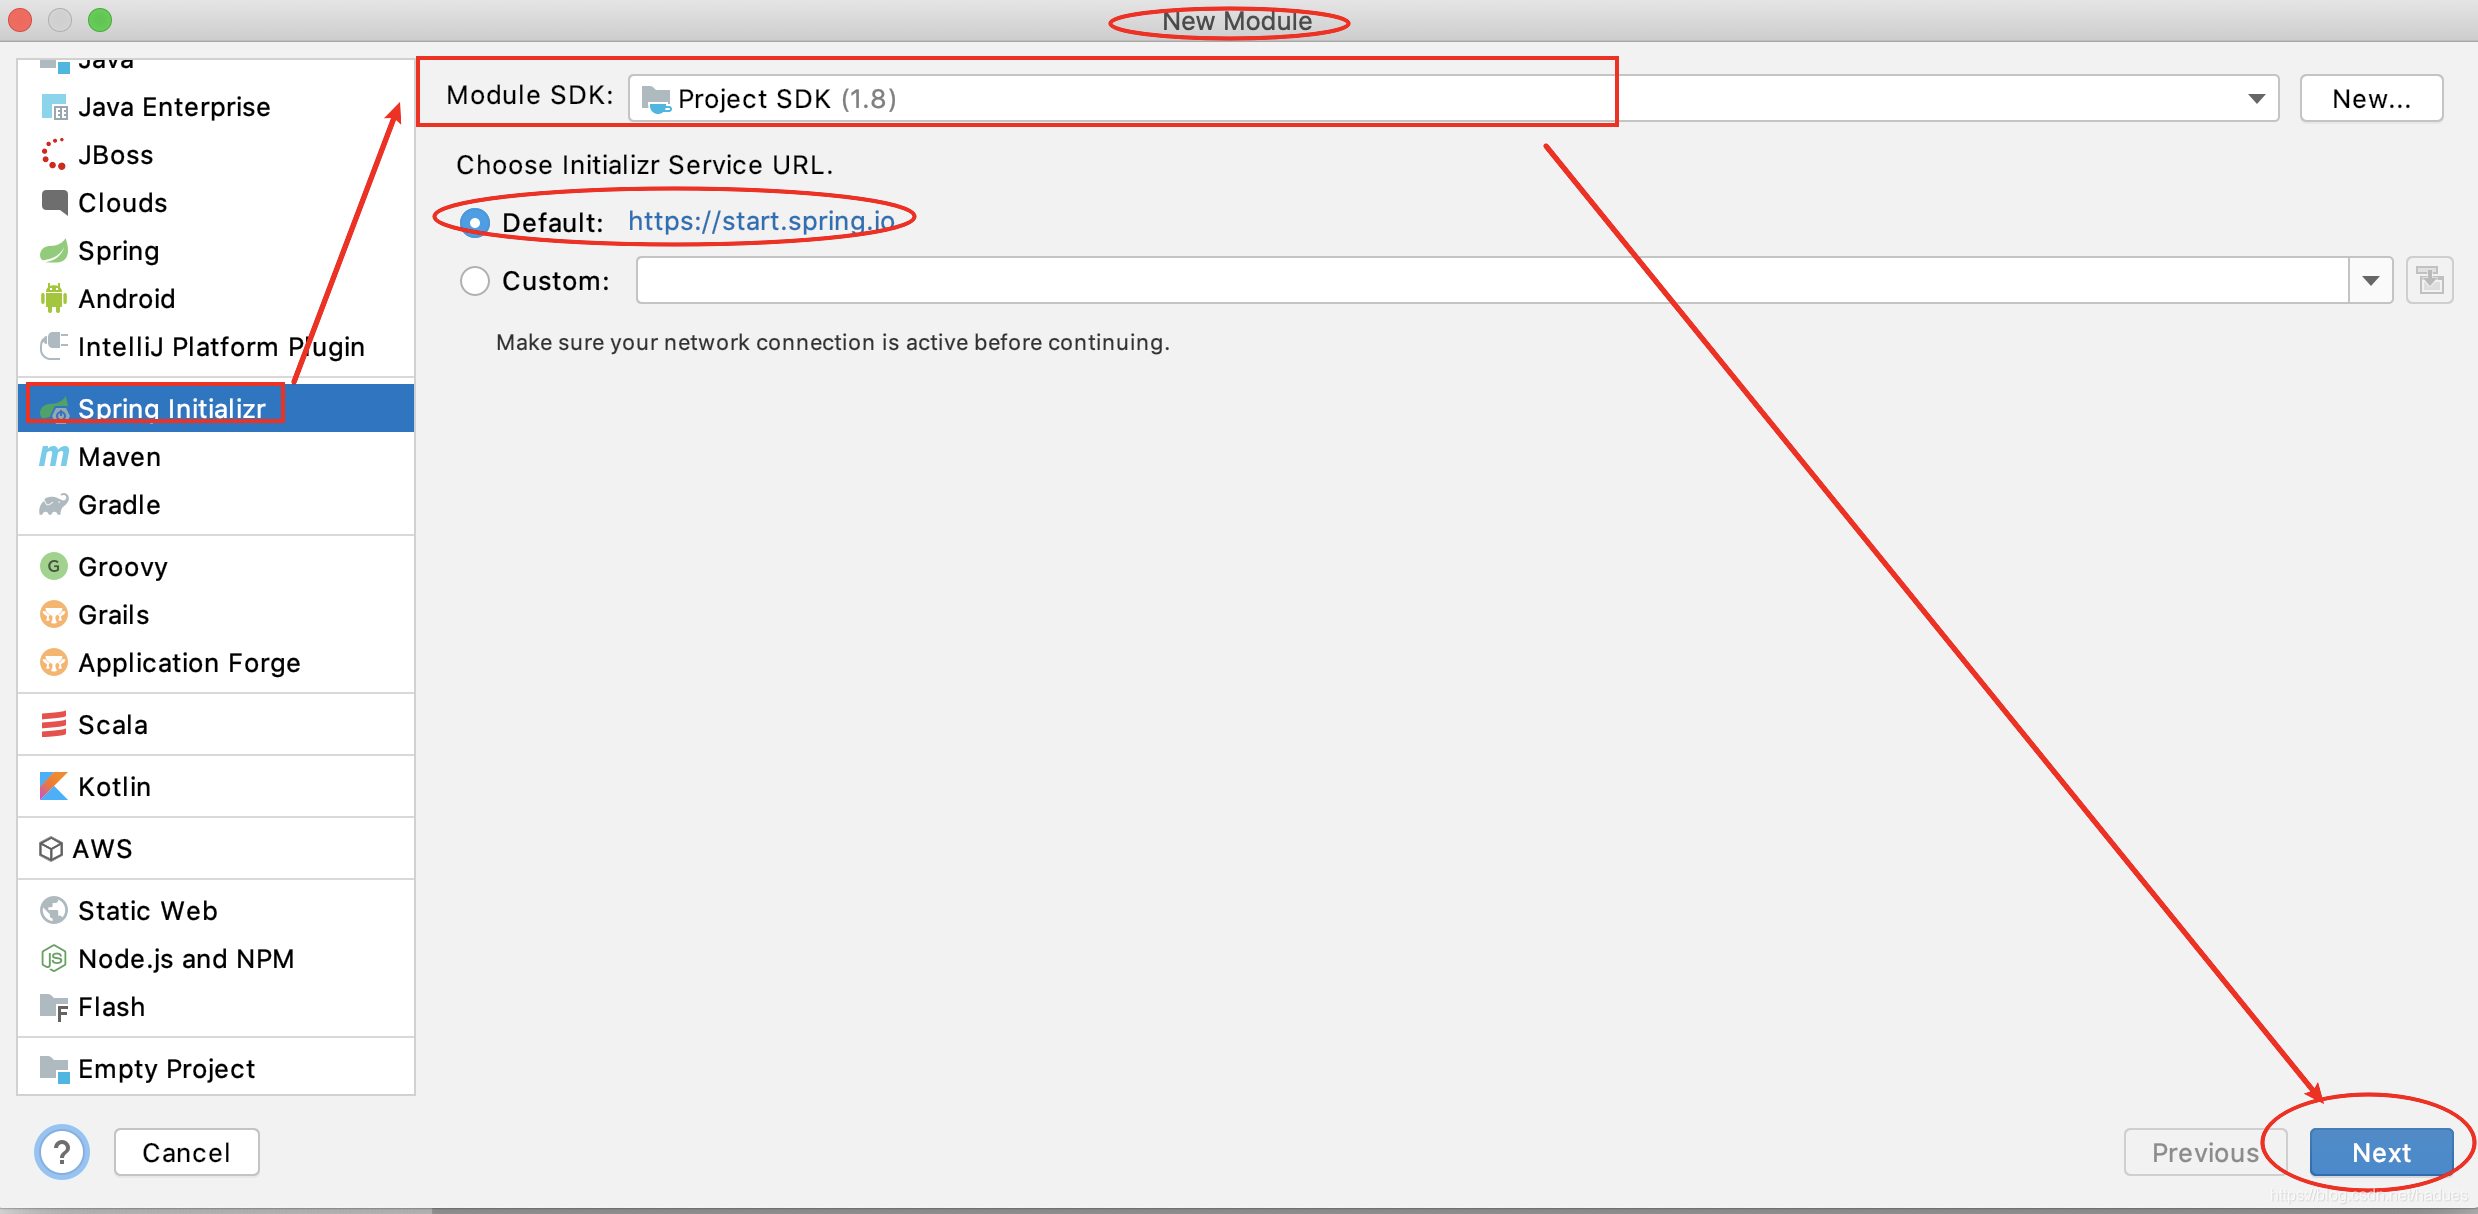
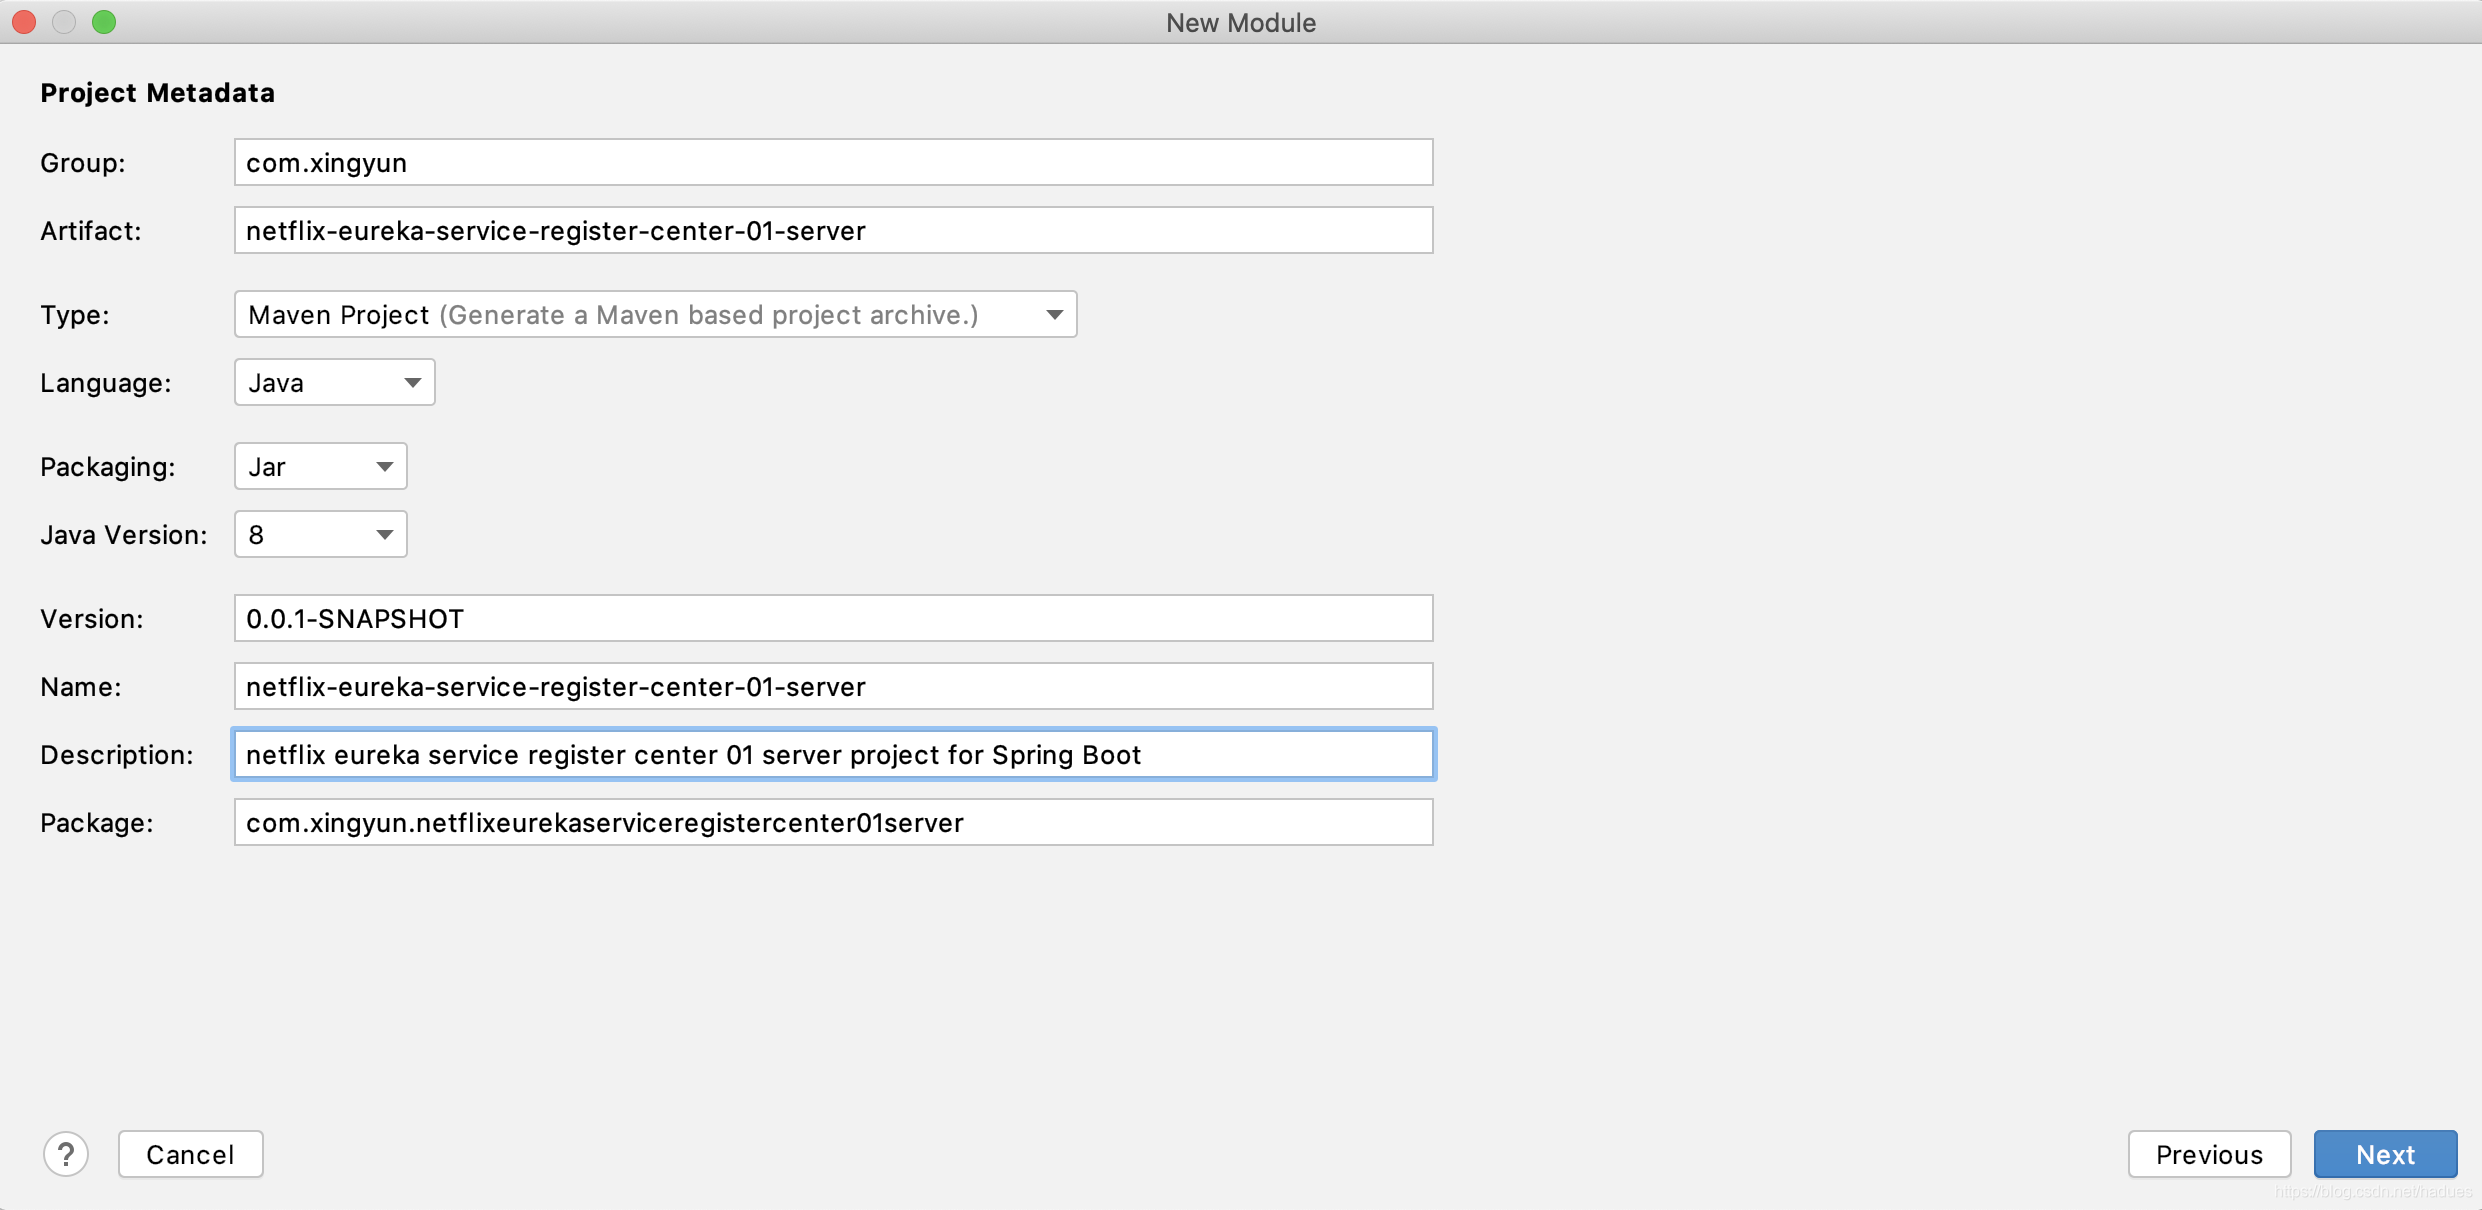
- 其他创建方式和之前基本一样,我们填写下项目信息
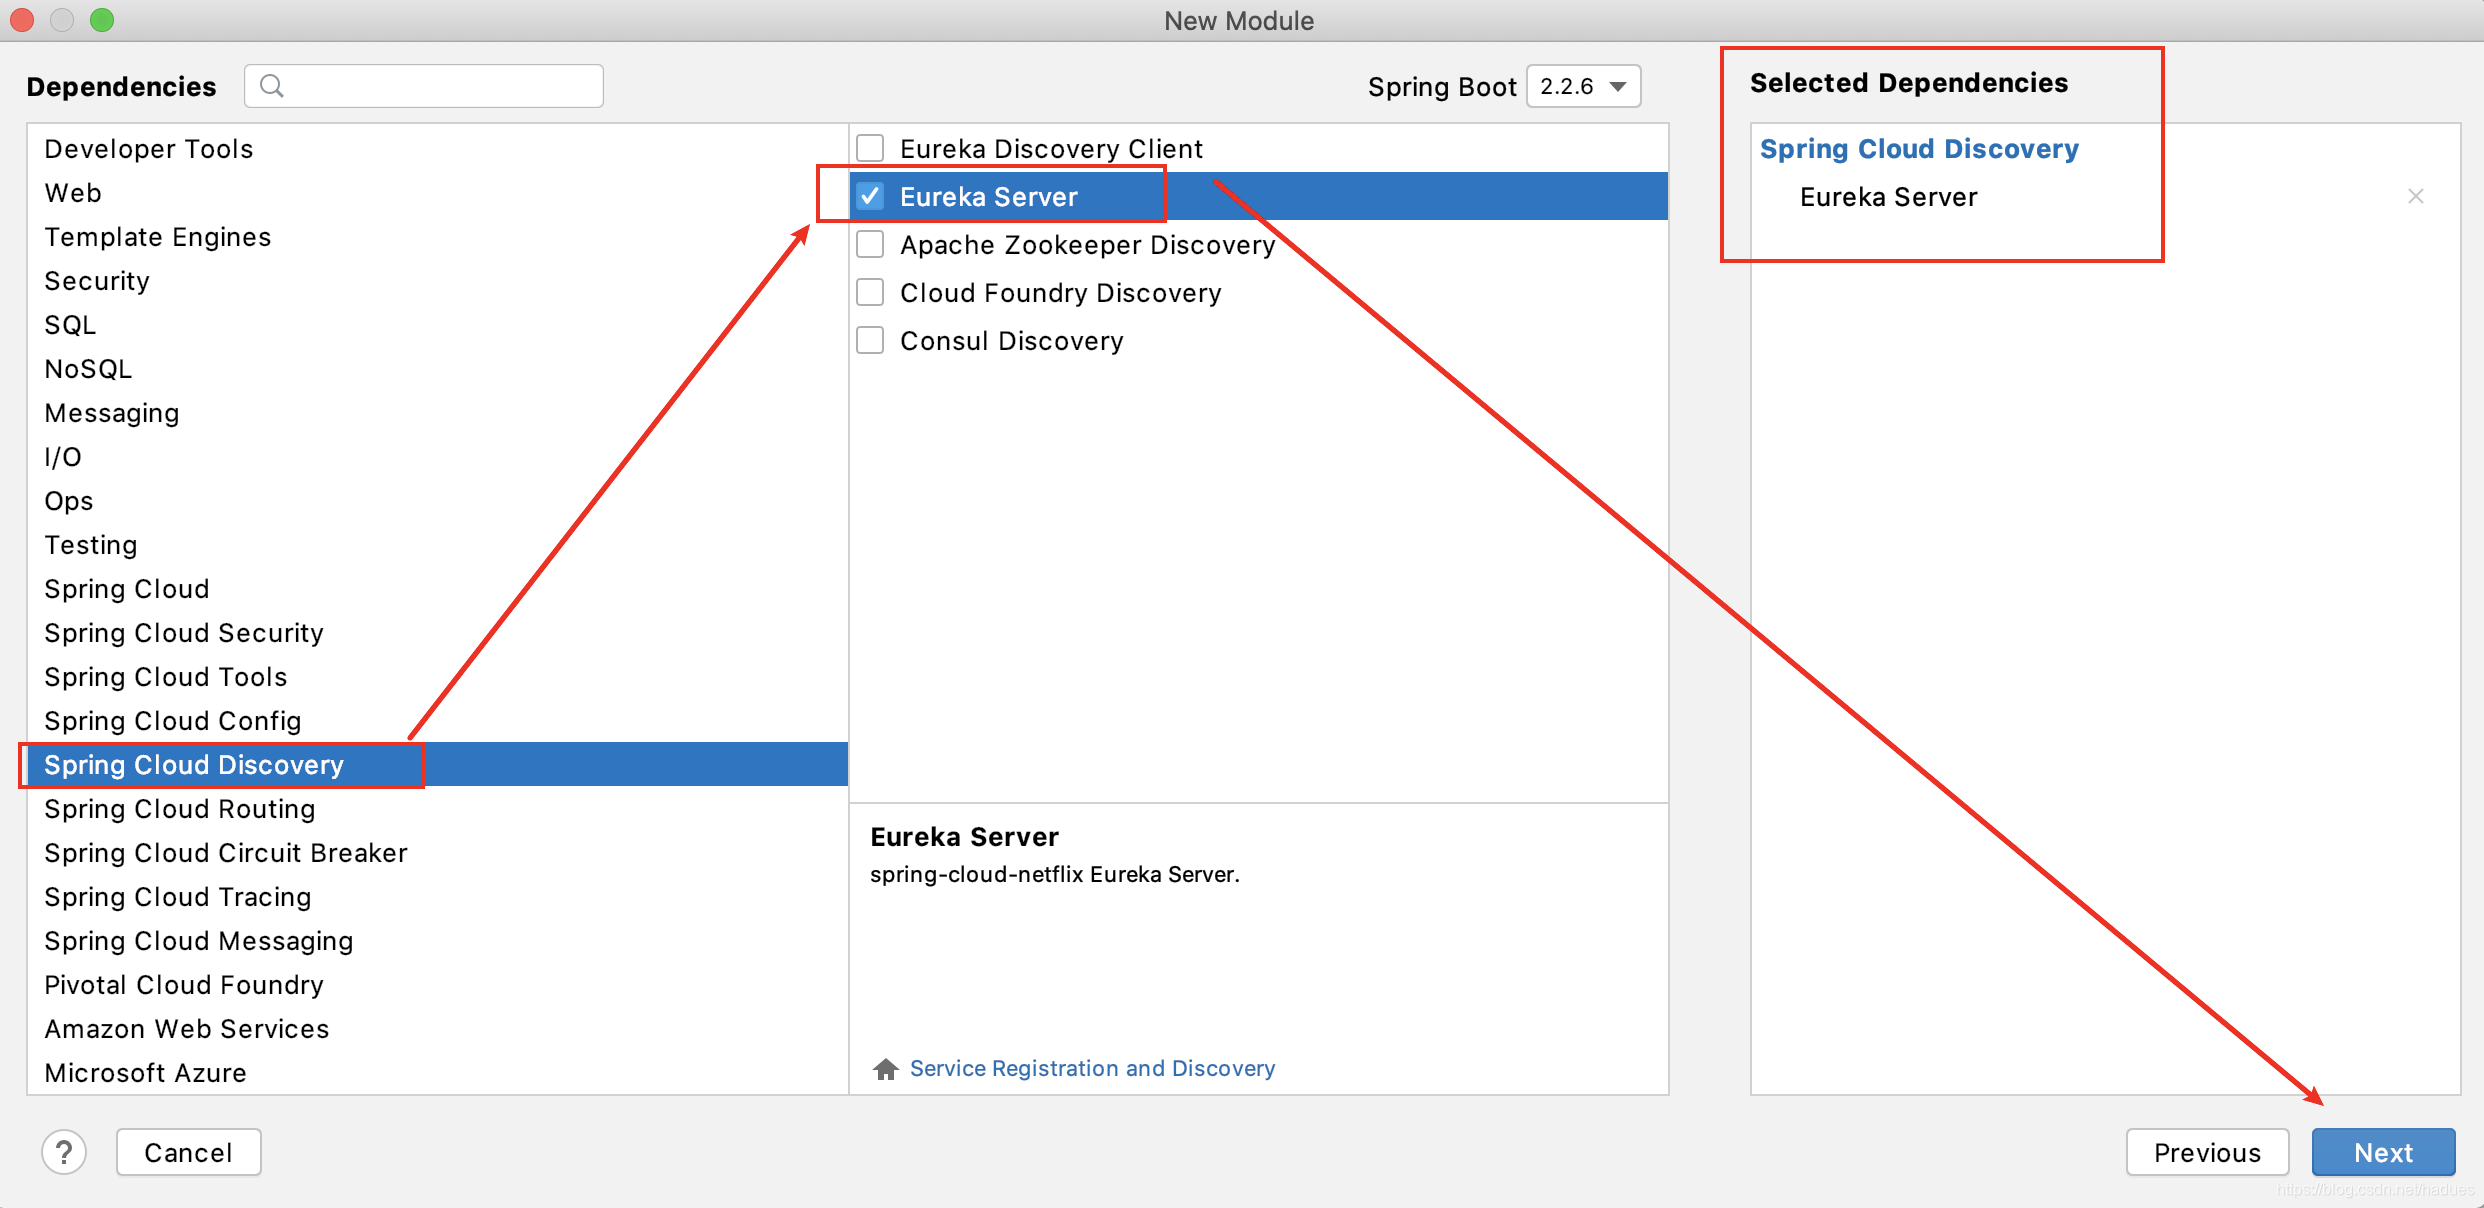
- 由于我们要搭建服务注册中心,因此我们需要选择Eureka Server 依赖
- 然后保持模块保存路径即可,默认会保存到当前项目的根目录下。
3.6.2.1 添加依赖和修改pom.xml
- 然后我们需要修改pom.xml,修改的地方主要是parent 节点
要将原来的parent继承自spring boot 修改为我们刚才的父pom.xml 中的groupId 和artifactId
另外要注意的是我们必须为我们的服务注册中心添加如下依赖:
<dependency>
      <groupId>org.springframework.cloud</groupId>
      <artifactId>spring-cloud-starter-netflix-eureka-server</artifactId>
    </dependency>
只有添加了这个依赖,才能让我们的程序提供Eureka Server 的服务注册和服务发现等相关功能。
修改后的完整pom.xml 示例如下
<?xml version="1.0" encoding="UTF-8"?>
<project xmlns="http://maven.apache.org/POM/4.0.0" xmlns:xsi="http://www.w3.org/2001/XMLSchema-instance"
         xsi:schemaLocation="http://maven.apache.org/POM/4.0.0 https://maven.apache.org/xsd/maven-4.0.0.xsd">
    <modelVersion>4.0.0</modelVersion>

    <!-- change parent project-->
    <parent>
        <groupId>com.xingyun</groupId>
        <artifactId>microservice-spring-cloud-shopping-sample</artifactId>
        <version>0.0.1-RELEASE</version>
        <relativePath>../</relativePath> <!-- lookup parent from current project -->
    </parent>

    <!-- netflix eureka service register center project information -->
    <!-- we won't set the group id,due to we will use the parent group id-->
    <artifactId>netflix-eureka-service-register-center-01-server</artifactId>
    <version>0.0.1-SNAPSHOT</version>
    <!--default value is jar,but we had better set it-->
    <name>netflix-eureka-service-register-center-01-server</name>
    <description>netflix eureka service register center 01 server project for Spring Boot</description>

    <properties>
        <java.version>1.8</java.version>
    </properties>

    <dependencies>
        <dependency>
            <groupId>org.springframework.cloud</groupId>
            <artifactId>spring-cloud-starter-netflix-eureka-server</artifactId>
            <!-- Since Ribbon load-balancer is now in maintenance mode, we suggest switching to using the Spring Cloud LoadBalancer, also included in Eureka starters, instead -->
            <!--            <exclusions>-->
            <!--                <exclusion>-->
            <!--                    <groupId>org.springframework.cloud</groupId>-->
            <!--                    <artifactId>spring-cloud-starter-ribbon</artifactId>-->
            <!--                </exclusion>-->
            <!--                <exclusion>-->
            <!--                    <groupId>com.netflix.ribbon</groupId>-->
            <!--                    <artifactId>ribbon-eureka</artifactId>-->
            <!--                </exclusion>-->
            <!--            </exclusions>-->
        </dependency>

        <!-- if you want to secure your eureka server,please added it -->
        <!--        <dependency>-->
        <!--            <groupId>org.springframework.boot</groupId>-->
        <!--            <artifactId>spring-boot-starter-security</artifactId>-->
        <!--        </dependency>-->

        <!--The JAXB modules which the Eureka server depends upon were removed in JDK 11.
         If you intend to use JDK 11 when running a Eureka server you must include these dependencies in your POM or Gradle file.
         在JDK 11中删除了Eureka服务器依赖的JAXB模块。如果打算在运行Eureka服务器时使用JDK 11,则必须在POM或Gradle文件中包括这些依赖项。
         -->
        <!--        <dependency>-->
        <!--            <groupId>org.glassfish.jaxb</groupId>-->
        <!--            <artifactId>jaxb-runtime</artifactId>-->
        <!--        </dependency>-->
    </dependencies>


    <build>
        <plugins>
            <plugin>
                <groupId>org.springframework.boot</groupId>
                <artifactId>spring-boot-maven-plugin</artifactId>
            </plugin>
        </plugins>
    </build>
</project>
3.6.2.2 添加注解
- 然后需要在程序的启动类中开启一个
@EnableEurekaServer注解
import org.springframework.boot.SpringApplication;
import org.springframework.boot.autoconfigure.SpringBootApplication;
import org.springframework.cloud.netflix.eureka.server.EnableEurekaServer;

/**
 *
 * Eureka 服务注册中心 将当前应用程序作为Netflix Eureka Service Register Center
 * 只需要添加@EnableEurekaServer注解就可以启动Eureka 服务器的相关功能
 * 这个服务器包含一个带有UI 和Restful API 功能的首页,请求路径是/eureka/*
 * 微服务的注册信息全部保存在内存中
 *
 */
@EnableEurekaServer
@SpringBootApplication
public class NetflixEurekaServiceRegisterCenter01ServerApplication {

    public static void main(String[] args) {
        SpringApplication.run(NetflixEurekaServiceRegisterCenter01ServerApplication.class, args);
    }
}
3.6.2.3 application.properties or bootstrap.properties?
接下来我们需要创建我们的yml 文件,之所以要创建这种文件而不是application*.properties 的一个重大原因是因为Spring Cloud 在加载上下文的时候最先加载的是bootstrap*.yml 或bootstrap*.properties ,然后才会加载application*.yml或application*.properties 文件。
因此有些如果在application*.properties 或application*.yml 文件里配置一些属性,可能Spring Cloud 启动的时候有些属性加载不到,因此为了避免这样的情况,强烈建议使用bootstrap.properties 或bootstrap.yml 文件。
实际开发中,更推荐使用bootstrap.yml 文件,这是因为这种文件更容易看,针对一些重复属性,不需要繁琐设置。
当然底层
bootstrap.yml最终还是会转化成bootstrap.properties的,最后再交给相关类去解析。
- 创建
bootstrap.yml文件
spring:
  profiles:
    #config active which one profile
    active: test
3.6.2.4 创建server 01 的bootstrap-test.yml文件
spring:
  application:
    # config app name
    name: netflix-eureka-service-register-center-01-server
  cloud:
    loadbalancer:
      ribbon:
        enabled: true
    discovery:
      enabled: true
  # spring cloud eureka server default use freemarker
  freemarker:
    template-loader-path: classpath:/templates/
    prefer-file-system-access: false

# config server information
server:
  address: 192.168.159.146
  port: 8761
  servlet:
    context-path: /${spring.application.name}

# config eureka
eureka:
  # config eureka instance
  instance:
#    在某些情况下,Eureka最好公布服务的IP地址而不是主机
#    设为true表示当注册到服务注册中心时候使用IP地址而不是主机名
    prefer-ip-address: true
    # config http enable
    non-secure-port-enabled: true
    # config http port
    non-secure-port: ${server.port}
    # config https port enable
    secure-port-enabled: false
    # config https port
    secure-port: 443
    home-page-url-path: ${server.servlet.context-path}
    home-page-url: http://${server.address}:${eureka.instance.non-secure-port}${eureka.instance.home-page-url-path}
    # 只有当prefer-ip-address:false hostname属性才有效
    #hostname: peer1
    status-page-url-path: /
    status-page-url: ${eureka.instance.home-page-url}${eureka.instance.status-page-url-path}
    health-check-url-path: /actuator/health
    health-check-url: ${eureka.instance.home-page-url}${eureka.instance.health-check-url-path}
    #如果超过90秒还没有续期,就从列表剔除掉它,default 90
    lease-expiration-duration-in-seconds: 90
    # 每间隔30秒续期一次 生产环境最好使用默认值 30
    lease-renewal-interval-in-seconds: 30
#    data-center-info: myData
#    environment: dev
    #instance-id:
    #metadata-map:
    # 切勿重写这个值
    #ip-address: ${server.address}
  client:
    # 是否向注册中心注册自己
    register-with-eureka: true
    # 是否获取注册中心服务列表副本
    fetch-registry: true
    # Eureka 服务注册中心地址
    service-url:
      # default value http://localhost:8761/eureka/
      defaultZone: http://192.168.159.147:8761/netflix-eureka-service-register-center-02-server/eureka/,http://192.168.159.148:8761/netflix-eureka-service-register-center-03-server/eureka/
      # 第一个服务注册中心
#      zone1: http://192.168.159.129:8761/netflix-eureka-service-register-center-01-server/eureka/
#      zone2: http://192.168.159.130:8761/netflix-eureka-service-register-center-02-server/eureka/
#      zone3: http://192.168.159.131:8761/netflix-eureka-service-register-center-03-server/eureka/
      # 第二个服务注册中心
      #zone3: http://127.0.0.1:8763/netflix-eureka-service-register-center-02-server/eureka/
    # whether use eureka Discovery client
    enabled: true
    #  禁用刷新Eureka客户端的功能,避免配置文件修改引起其他微服务调用失败
    refresh:
      enable: true
    healthcheck:
      enabled: false
    prefer-same-zone-eureka: false
  server:
    #自我保护模式是否开启,建议设置为true default is true
    enable-self-preservation: true
    # 自身不注册算法 2*(n+1)*0*85
    # 自身注册算法 2*n*0.85 只取整数部分
    renewal-percent-threshold: 0.85
    # default is 0
    wait-time-in-ms-when-sync-empty: 5

# config Spring Boot Actuator
management:
  endpoint:
    shutdown:
      enabled: true
    health:
      show-details: when_authorized
3.6.2.5 创建server 02 的bootstrap-test.yml文件
spring:
  application:
    # config app name
    name: netflix-eureka-service-register-center-02-server
  cloud:
    loadbalancer:
      ribbon:
        enabled: true
    discovery:
      enabled: true
  # spring cloud eureka server default use freemarker
  freemarker:
    template-loader-path: classpath:/templates/
    prefer-file-system-access: false

# config server information
server:
  address: 192.168.159.147
  port: 8761
  servlet:
    context-path: /${spring.application.name}

# config eureka
eureka:
  # config eureka instance
  instance:
#    在某些情况下,Eureka最好公布服务的IP地址而不是主机
#    设为true表示当注册到服务注册中心时候使用IP地址而不是主机名
    prefer-ip-address: true
    # config http enable
    non-secure-port-enabled: true
    # config http port
    non-secure-port: ${server.port}
    # config https port enable
    secure-port-enabled: false
    # config https port
    secure-port: 443
    home-page-url-path: ${server.servlet.context-path}
    home-page-url: http://${server.address}:${eureka.instance.non-secure-port}${eureka.instance.home-page-url-path}
    # 只有当prefer-ip-address:false hostname属性才有效
    #hostname: peer1
    status-page-url-path: /
    status-page-url: ${eureka.instance.home-page-url}${eureka.instance.status-page-url-path}
    health-check-url-path: /actuator/health
    health-check-url: ${eureka.instance.home-page-url}${eureka.instance.health-check-url-path}
    #如果超过90秒还没有续期,就从列表剔除掉它,default 90
    lease-expiration-duration-in-seconds: 90
    # 每间隔30秒续期一次 生产环境最好使用默认值30
    lease-renewal-interval-in-seconds: 30
#    data-center-info: myData
#    environment: dev
    #instance-id:
    #metadata-map:
    ip-address: ${server.address}
  client:
    # 是否向注册中心注册自己
    register-with-eureka: true
    # 是否获取注册中心服务列表副本
    fetch-registry: true
    # Eureka 服务注册中心地址
    service-url:
      # default value http://localhost:8761/eureka/
      defaultZone: http://192.168.159.146:8761/netflix-eureka-service-register-center-01-server/eureka/,http://192.168.159.148:8761/netflix-eureka-service-register-center-03-server/eureka/
      # 第一个服务注册中心
#      zone1: http://192.168.159.129:8761/netflix-eureka-service-register-center-01-server/eureka/
#      zone2: http://192.168.159.130:8761/netflix-eureka-service-register-center-02-server/eureka/
#      zone3: http://192.168.159.131:8761/netflix-eureka-service-register-center-03-server/eureka/
      # 第二个服务注册中心
      #zone3: http://127.0.0.1:8763/netflix-eureka-service-register-center-02-server/eureka/
    # whether use eureka Discovery client
    enabled: true
    #  禁用刷新Eureka客户端的功能,避免配置文件修改引起其他微服务调用失败
    refresh:
      enable: true
    healthcheck:
      enabled: false
    prefer-same-zone-eureka: false
  server:
    #自我保护模式是否开启,建议设置为true default is true
    enable-self-preservation: true
    # 自身不注册算法 2*(n+1)*0*85
    # 自身注册算法 2*n*0.85 只取整数部分
    renewal-percent-threshold: 0.85
    # default is 0
    wait-time-in-ms-when-sync-empty: 5

# config Spring Boot Actuator
management:
  endpoint:
    shutdown:
      enabled: true
    health:
      show-details: when_authorized
2.6.2.6 创建server-03 的bootstrap-test.yml文件
spring:
  application:
    # config app name
    name: netflix-eureka-service-register-center-03-server
  cloud:
    loadbalancer:
      ribbon:
        enabled: true
    discovery:
      enabled: true
  # spring cloud eureka server default use freemarker
  freemarker:
    template-loader-path: classpath:/templates/
    prefer-file-system-access: false

# config server information
server:
  address: 192.168.159.148
  port: 8761
  servlet:
    context-path: /${spring.application.name}

# config eureka
eureka:
  # config eureka instance
  instance:
#    在某些情况下,Eureka最好公布服务的IP地址而不是主机
#    设为true表示当注册到服务注册中心时候使用IP地址而不是主机名
    prefer-ip-address: true
    # config http enable
    non-secure-port-enabled: true
    # config http port
    non-secure-port: ${server.port}
    # config https port enable
    secure-port-enabled: false
    # config https port
    secure-port: 443
    home-page-url-path: ${server.servlet.context-path}
    home-page-url: http://${server.address}:${eureka.instance.non-secure-port}${eureka.instance.home-page-url-path}
    # 只有当prefer-ip-address:false hostname属性才有效
    #hostname: peer1
    status-page-url-path: /
    status-page-url: ${eureka.instance.home-page-url}${eureka.instance.status-page-url-path}
    health-check-url-path: /actuator/health
    health-check-url: ${eureka.instance.home-page-url}${eureka.instance.health-check-url-path}
    #如果超过90秒还没有续期,就从列表剔除掉它,default 90
    lease-expiration-duration-in-seconds: 90
    # 每间隔30秒续期一次 生产环境最好使用默认值30
    lease-renewal-interval-in-seconds: 30
#    data-center-info: myData
#    environment: dev
    #instance-id:
    #metadata-map:
    ip-address: ${server.address}
  client:
    # 是否向注册中心注册自己
    register-with-eureka: true
    # 是否获取注册中心服务列表副本
    fetch-registry: true
    # Eureka 服务注册中心地址
    service-url:
      # default value http://localhost:8761/eureka/
      defaultZone: http://192.168.159.146:8761/netflix-eureka-service-register-center-01-server/eureka/,http://192.168.159.147:8761/netflix-eureka-service-register-center-02-server/eureka/
      # 第一个服务注册中心
#      zone1: http://192.168.159.129:8761/netflix-eureka-service-register-center-01-server/eureka/
#      zone2: http://192.168.159.130:8761/netflix-eureka-service-register-center-02-server/eureka/
#      zone3: http://192.168.159.131:8761/netflix-eureka-service-register-center-03-server/eureka/
      # 第二个服务注册中心
      #zone3: http://127.0.0.1:8763/netflix-eureka-service-register-center-02-server/eureka/
    # whether use eureka Discovery client
    enabled: true
    #  禁用刷新Eureka客户端的功能,避免配置文件修改引起其他微服务调用失败
    refresh:
      enable: true
    healthcheck:
      enabled: false
    prefer-same-zone-eureka: false
  server:
    #自我保护模式是否开启,建议设置为true default is true
    enable-self-preservation: true
    # 自身不注册算法 2*(n+1)*0*85
    # 自身注册算法 2*n*0.85 只取整数部分
    renewal-percent-threshold: 0.85
    # default is 0
    wait-time-in-ms-when-sync-empty: 5

# config Spring Boot Actuator
management:
  endpoint:
    shutdown:
      enabled: true
    health:
      show-details: when_authorized
3.6.3 创建微服务模块
创建微服务模块和之前创建模块方式相同, 这里不做过多概述。
3.6.3.1 添加Eureka Discovery Client 依赖
唯一注意的是,当微服务选择依赖的时候不再是选择Eureka Server 而是选择Eureka Discovery Client.
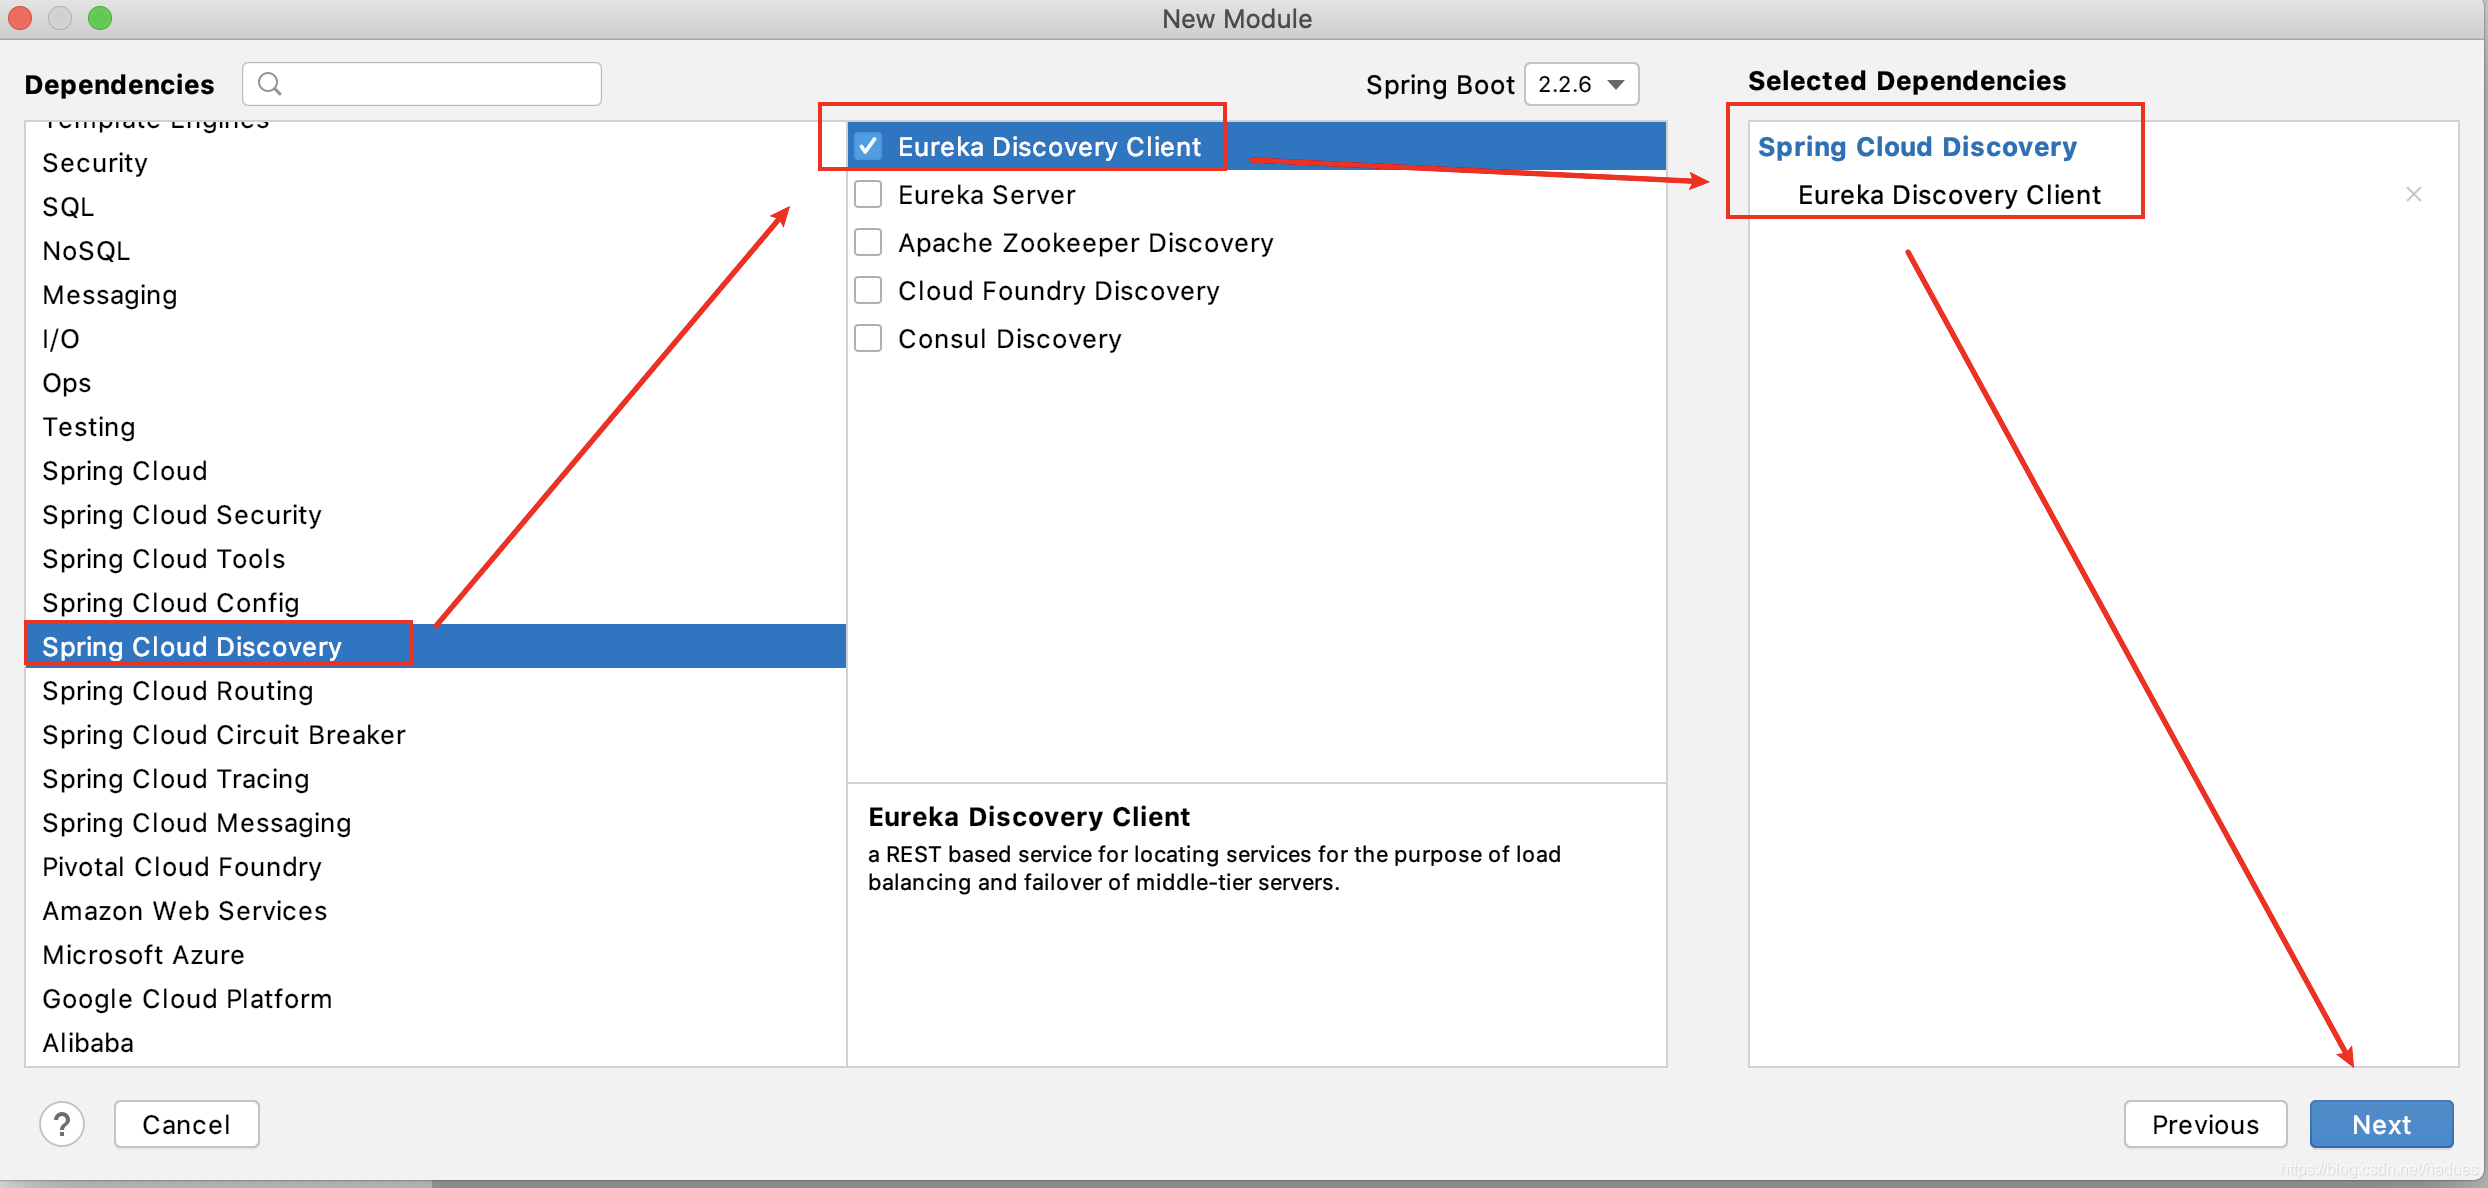
选择上面的操作完成后会会给项目添加下面的一个依赖,使用它可以将我们的微服务注册到服务注册中心。
<dependency>
      <groupId>org.springframework.cloud</groupId>
      <artifactId>spring-cloud-starter-netflix-eureka-client</artifactId>
    </dependency>
值得注意的是,我们同样最好修改下pom.xml 的parent 节点为我们的父pom.xml
完整的pom.xml 如下图所示:
<?xml version="1.0" encoding="UTF-8"?>
<project xmlns:xsi="http://www.w3.org/2001/XMLSchema-instance" xmlns="http://maven.apache.org/POM/4.0.0"
         xsi:schemaLocation="http://maven.apache.org/POM/4.0.0 https://maven.apache.org/xsd/maven-4.0.0.xsd">
    <modelVersion>4.0.0</modelVersion>

    <!-- change parent project-->
    <parent>
        <groupId>com.xingyun</groupId>
        <artifactId>microservice-spring-cloud-shopping-sample</artifactId>
        <version>0.0.1-RELEASE</version>
        <relativePath>../</relativePath> <!-- lookup parent from current project -->
    </parent>

    <artifactId>customer-service</artifactId>
    <version>0.0.1-SNAPSHOT</version>
    <name>customer-service</name>
    <description>customer service project for Spring Boot</description>

    <properties>
        <java.version>1.8</java.version>
        <swagger.version>2.9.2</swagger.version>
    </properties>

    <dependencies>

        <dependency>
            <groupId>org.springframework.boot</groupId>
            <artifactId>spring-boot-starter-web</artifactId>
        </dependency>

        <dependency>
            <groupId>org.springframework.boot</groupId>
            <artifactId>spring-boot-starter-thymeleaf</artifactId>
        </dependency>

        <dependency>
            <groupId>org.springframework.boot</groupId>
            <artifactId>spring-boot-starter-data-jpa</artifactId>
        </dependency>

        <dependency>
            <groupId>com.h2database</groupId>
            <artifactId>h2</artifactId>
            <scope>runtime</scope>
        </dependency>

        <dependency>
            <groupId>mysql</groupId>
            <artifactId>mysql-connector-java</artifactId>
            <scope>runtime</scope>
        </dependency>

        <!-- JSON API documentation for spring based applications -->
        <!-- https://mvnrepository.com/artifact/io.springfox/springfox-swagger-ui -->
        <dependency>
            <groupId>io.springfox</groupId>
            <artifactId>springfox-swagger-ui</artifactId>
            <version>${swagger.version}</version>
        </dependency>
        <!-- Automated JSON API documentation for API's built with Spring -->
        <!-- Home Page:https://github.com/springfox/springfox -->
        <!-- https://mvnrepository.com/artifact/io.springfox/springfox-swagger2 -->
        <dependency>
            <groupId>io.springfox</groupId>
            <artifactId>springfox-swagger2</artifactId>
            <version>${swagger.version}</version>
        </dependency>

        <dependency>
            <groupId>org.springframework.cloud</groupId>
            <artifactId>spring-cloud-starter-netflix-eureka-client</artifactId>
            <!--Since Ribbon load-balancer is now in maintenance mode, we suggest switching to using the Spring Cloud LoadBalancer, also included in Eureka starters, instead-->
<!--            <exclusions>-->
<!--                <exclusion>-->
<!--                    <groupId>org.springframework.cloud</groupId>-->
<!--                    <artifactId>spring-cloud-starter-ribbon</artifactId>-->
<!--                </exclusion>-->
<!--                <exclusion>-->
<!--                    <groupId>com.netflix.ribbon</groupId>-->
<!--                    <artifactId>ribbon-eureka</artifactId>-->
<!--                </exclusion>-->
<!--            </exclusions>-->

<!--            By default, EurekaClient uses Jersey for HTTP communication. If you wish to avoid dependencies from Jersey, you can exclude it from your dependencies.-->
<!--            <exclusions>-->
<!--                <exclusion>-->
<!--                    <groupId>com.sun.jersey</groupId>-->
<!--                    <artifactId>jersey-client</artifactId>-->
<!--                </exclusion>-->
<!--                <exclusion>-->
<!--                    <groupId>com.sun.jersey</groupId>-->
<!--                    <artifactId>jersey-core</artifactId>-->
<!--                </exclusion>-->
<!--                <exclusion>-->
<!--                    <groupId>com.sun.jersey.contribs</groupId>-->
<!--                    <artifactId>jersey-apache-client4</artifactId>-->
<!--                </exclusion>-->
<!--            </exclusions>-->
        </dependency>

    </dependencies>

    <build>
        <plugins>
            <plugin>
                <groupId>org.springframework.boot</groupId>
                <artifactId>spring-boot-maven-plugin</artifactId>
            </plugin>
        </plugins>
    </build>

</project>
3.6.3.2 添加服务发现注解
为了让我们的微服务成功注册到服务注册中心,我们还需要开启一个服务发现的注解
在程序的启动类中同样加入如下注解
import org.springframework.boot.autoconfigure.SpringBootApplication;
import org.springframework.cloud.netflix.eureka.EnableEurekaClient;

@EnableEurekaClient
@SpringBootApplication
public class CustomerServiceApplication {

    public static void main(String[] args) {
        SpringApplication.run(CustomerServiceApplication.class, args);
    }
}
3.6.3.3 添加bootstrap.yml 文件
bootstrap.yml配置内容如下:
# config active which one profile file
spring:
  profiles:
    active: dev
bootstrap-dev.yml文件配置内容如下:
# Netflix Eureka Config
eureka:
  instance:
    #在某些情况下,Eureka最好公布服务的IP地址而不是主机
    #设为true表示当注册到服务注册中心时候使用IP地址而不是主机名
    prefer-ip-address: true
    # config http enable
    non-secure-port-enabled: true
    # config http port
    non-secure-port: ${server.port}
    # config https port enable
    secure-port-enabled: false
    # config https port
    secure-port: 443
    home-page-url-path: ${server.servlet.context-path}
    # home page url
    #home-page-url: http://${eureka.instance.ip-address}:${eureka.instance.non-secure-port}${eureka.instance.home-page-url-path}
    # 只有当prefer-ip-address:false hostname属性才有效
    #hostname: localhost
    # default value is /actuator/info
    status-page-url-path: /
    # link status page url
    #status-page-url: ${eureka.instance.home-page-url}${eureka.instance.status-page-url-path}
    # 如果超过90秒还没有续期,就从列表剔除掉它,default 90
    lease-expiration-duration-in-seconds: 90
    # 每间隔30秒续期一次 生产环境最好使用默认值30
    lease-renewal-interval-in-seconds: 30
    # label
    #instance-id:
    health-check-url-path: /actuator/health
    # 健康检查地址
    #health-check-url: ${eureka.instance.home-page-url}${eureka.instance.health-check-url-path}
    #ip-address: ${server.address}

  client:
    # whether get service list from service register center
    fetch-registry: true
    # whether register self to service register center
    register-with-eureka: true
    service-url:
      #defaultZone: http://127.0.0.1:8761/netflix-eureka-service-register-center-01-server/eureka/,http://127.0.0.1:8762/netflix-eureka-service-register-center-02-server/eureka/,http://127.0.0.1:8763/netflix-eureka-service-register-center-03-server/eureka/
      defaultZone: http://192.168.159.146:8761/netflix-eureka-service-register-center-01-server/eureka/,http://192.168.159.147:8761/netflix-eureka-service-register-center-02-server/eureka/,http://192.168.159.148:8761/netflix-eureka-service-register-center-03-server/eureka/
    refresh:
      enable: true
    enabled: true
    healthcheck:
      enabled: true
    prefer-same-zone-eureka: true

spring:
  # app config
  application:
    name: customer-service
  # spring cloud config
  cloud:
    discovery:
      enabled: true
    loadbalancer:
      ribbon:
        enabled: true
  # spring data jpa config
  jpa:
    # enable or disable show data view in web console
    open-in-view: true
    # enable print sql
    show-sql: true
    hibernate:
      # create:Create the schema and destroy previous data
      # create-drop:Create and then destroy the schema at the end of the session.
      # update:Update the schema if necessary.
      # none:Disable DDL handling
      ddl-auto: create
      naming:
        implicit-strategy: org.springframework.boot.orm.jpa.hibernate.SpringImplicitNamingStrategy
        physical-strategy: org.springframework.boot.orm.jpa.hibernate.SpringPhysicalNamingStrategy
    database: h2
  # spring datasource config
  datasource:
    url: jdbc:h2:mem:in_memory_shopping_db;DB_CLOSE_DELAY=-1
    #url: jdbc:h2:~/embedded_file_test_db;DB_CLOSE_DELAY=-1
    username: sa
    password: sa
    initialization-mode: never
    driver-class-name: org.h2.Driver
  # h2 database config
  h2:
    console:
      enabled: true
      path: /h2-console

# logback config
logging:
  level:
    root: INFO

# spring boot actuator config
management:
  endpoint:
    health:
      show-details: when_authorized
    shutdown:
      enabled: false

# tomcat server config
server:
  port: 2101
  servlet:
    context-path: /${spring.application.name}
  #address: 127.0.0.1
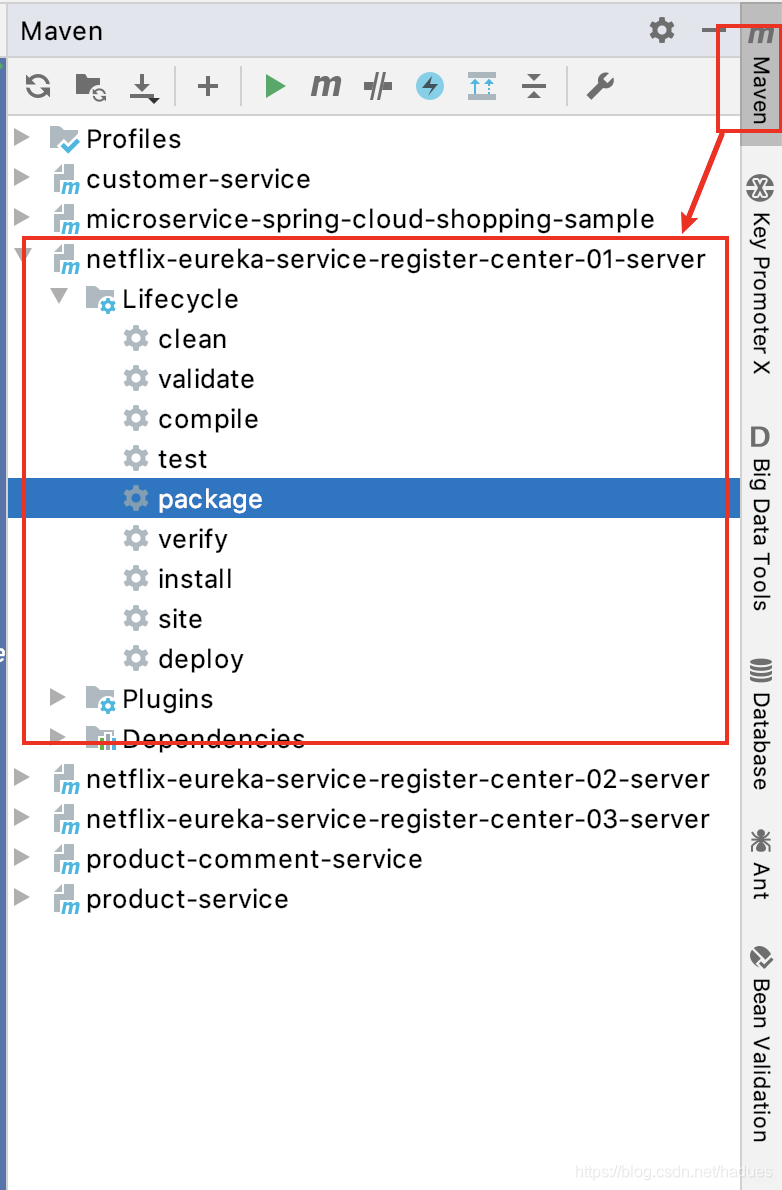
3.6.4 项目打包
- 在
Intellij idea的右侧我们可以打开maven 视图,然后选择需要打包的项目,然后点击package 进行打包即可。
这里暂时采用手动打包方式,后期我们可以采用自动化打包方式,或使用Docker.K8S之类
3.6.5 项目部署
- 每个模块打包完成后我们可以将他们使用Xftp 上传到我们的服务器上
- 然后通过xshell 进行启动我们的服务注册中心或微服务即可。
好了到了这里,本篇博文讲解完毕。
如果实践的过程中有什么问题,可以发邮件给我或关注微信公众号“技术宅星云” 或关注知识星球,都可以联系到我。
