1.Channel
来看一下Channel的接口
package java.nio.channels;

import java.io.IOException;
import java.io.Closeable;

public interface Channel extends Closeable {

    public boolean isOpen();


    public void close() throws IOException;

}
与缓冲区不同,通道的api主要由接口指定。不同的操作系统上通道的实现会有根本性的区别,所以通道API接口仅仅描述了可以做什么。通道的实现通常用于操作系统本地代码。通道接口允许您以一种受控制且可移植的方式来访问IO服务。
所有的通道只有两个共同的操作,打开和关闭。
IO广义分为两大类:FileIO和StreamIo 所以有两种类型的通道。 文件file通道和socket通道。
FileChannel
SocketChannel、ServerChannel、DatagramChannel
1.1打开通道
Socket通道有可以直接创建新socket通道的工厂方法
FileChannel 只能在一个打开的RandomAccessFile、FileinputStream或者FileOutputStream对象上调用getChannel()方法获取。
SocketChannel sc = SocketChannel.open( );
sc.connect (new InetSocketAddress ("somehost", someport));
ServerSocketChannel ssc = ServerSocketChannel.open( );
ssc.socket( ).bind (new InetSocketAddress (somelocalport));
DatagramChannel dc = DatagramChannel.open( );
RandomAccessFile raf = new RandomAccessFile ("somefile", "r");
FileChannel fc = raf.getChannel( );
1.2使用通道
ByteBufferUML类图如下:
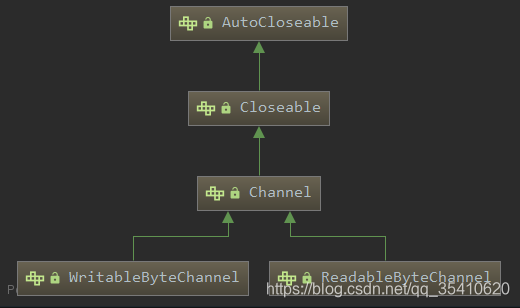
ByteChannel接口
public interface ByteChannel extends ReadableByteChannel, WritableByteChannel {
}
他们继承的两个接口如下:
public interface ReadableByteChannel extends Channel {


    public int read(ByteBuffer dst) throws IOException;

}
package java.nio.channels;

import java.io.IOException;
import java.nio.ByteBuffer;


public interface WritableByteChannel
    extends Channel
{


    public int write(ByteBuffer src) throws IOException;

}
通道可以是单向的,也可以是双向的,主要看实现的接口,如果实现一个接口就是单向的,如果实现两个接口就是双向的。实现的接口任意选择。两个接口分别提供了 读和写的功能。要么只能读或者只能写或者读写都可以。
设计思想学习:以一个新的名称聚集两个其他接口,实现双向通道,这是简化类定义的语法糖,它使得操作器实例来测试通道对象变得更加简单。这是一种很好的类设计技巧
下面demo表示实现了通道间数据表的复制
package com.soecode.lyf.demo.test.io.nio.nio.pile;

import java.io.IOException;
import java.nio.ByteBuffer;
import java.nio.channels.Channels;
import java.nio.channels.ReadableByteChannel;
import java.nio.channels.WritableByteChannel;

/**
 * 实现从一个通道到复制数据到另一个通道
 *
 * @author 魏文思
 * @date 2019/11/18$ 20:05$
 */
public class ChannelCopy {


    public static void main(String[] args) throws IOException {

        ReadableByteChannel source = Channels.newChannel(System.in);
        WritableByteChannel dest = Channels.newChannel(System.out);
        channelCopy2(source, dest);
        source.close();
        dest.close();
    }

    public static void channelCopy1(ReadableByteChannel src, WritableByteChannel dest) throws IOException {
        ByteBuffer buffer = ByteBuffer.allocateDirect(16 * 1024);
        while (src.read(buffer) != -1) {
            //准备缓冲区
            buffer.flip();
            dest.write(buffer);
            //compact方法 把buffer中内部数组剩余未读取的数据复制到该数组从索引为0开始,
            // 然后position设置为复制剩余数据后的最后一位元素的索引+1,limit设置为capcity,此时0-position
            //之间是未读数据,而position-limit之间是buffer的剩余空间,可以put数据。
            buffer.compact();
        }
        buffer.flip();
        while (buffer.hasRemaining()) {
            dest.write(buffer);
        }
    }

    private static void channelCopy2(ReadableByteChannel src,
                                     WritableByteChannel dest)
            throws IOException {
        ByteBuffer buffer = ByteBuffer.allocateDirect(16 * 1024);
        while (src.read(buffer) != -1) {
// Prepare the buffer to be drained
            buffer.flip();
// Make sure that the buffer was fully drained
            while (buffer.hasRemaining()) {
                dest.write(buffer);
            }
// Make the buffer empty, ready for filling
            buffer.clear();
        }
    }

}
1.3 关闭通道
与缓冲区不同,通道不能被重复使用。一个打开的通道即代表与一个特定IO服务的特定连接并封装该连接的状态。当通道关闭时,那个连接会丢失,然后通道不再接受任何东西。
调用通道close()方法时,可能会导致在通道关闭底层IO服务的过程中线程暂时阻塞,哪怕该通道处于非阻塞模式。一个通道上多次调用close方法时没有任何坏处的,但是如果第一个线程在close方法中阻塞,那么在它完成关闭通道之前,任何其他调用close方法都会阻塞。后续再再该通道上的调用close方法不会产生任何操作,只会立即返回。可以通过isOpen( )方法来测试通道的开放状态。如果返回 true 值,那么该通道可以使用。如 果返回 false 值,那么该通道已关闭,不能再被使用。
2、Scatter/Gather 分散和收集
scatter和gather参考http://ifeve.com/java-nio-scattergather/
Scatter(分散):在读操作时,将数据写个多个buffer中。

代码如下:
ByteBuffer header = ByteBuffer.allocate(128);
ByteBuffer body   = ByteBuffer.allocate(1024);
ByteBuffer[] bufferArray = { header, body };
channel.read(bufferArray);
Gather(聚集):写操作时将多个buffer的数据写入同一个Channel

代码如下:
ByteBuffer header = ByteBuffer.allocate(128);
ByteBuffer body   = ByteBuffer.allocate(1024);

//write data into buffers
ByteBuffer[] bufferArray = { header, body };

channel.write(bufferArray);
3.内存映射文件
新的FileChanel类提供了一个名为map()d的方法,该方法可以在一个打开的文件和一个特殊类型的ByteBuffer之间建立一个虚拟内存映射。map方法返回的MappedByteBuffer对象的行为在多数方面类似一个基于内存的缓冲区,只不过该对象的数据元素存储在磁盘的一个文件中。
调用 get( )方法会从磁盘文件中获取数据,此 数据反映该文件的当前内容,即使在映射建立之后文件已经被一个外部进程做了修改。通过文件映 射看到的数据同您用常规方法读取文件看到的内容是完全一样的。相似地,对映射的缓冲区实现一 个 put( )会更新磁盘上的那个文件(假设对该文件您有写的权限),并且您做的修改对于该文件的 其他阅读者也是可见的。
特点:内存映射文件比常规使用读写高效。
如何映射?
FileChannel部分源码如下
public abstract class FileChannel
extends AbstractChannel
implements ByteChannel, GatheringByteChannel, ScatteringByteChannel
{
// This is a partial API listing
public abstract MappedByteBuffer map (MapMode mode, long position,long size)
public static class MapMode
{
public static final MapMode READ_ONLY
public static final MapMode READ_WRITE
public static final MapMode PRIVATE
} }
参数model,position,size
假如需要映射100-299(含299),代码如下
buffer = fileChannel.map (FileChannel.MapMode.READ_ONLY, 100, 200);如果需要整个文件
buffer = fileChannel.map(FileChannel.MapMode.READ_ONLY, 0, fileChannel.size());映射范围不应该超过文件的实际大小。
文件的属性设置,获取的映射只读还是允许修改映射的文件。
4.transferTo() 和TransFrom()方法
transferTo()
将数据源从通道传输到其他channel中
package com.soecode.lyf.demo.test.io.nio.nio;

import java.io.IOException;
import java.io.RandomAccessFile;
import java.nio.channels.FileChannel;

/**
 * @author 魏文思
 * @date 2019/11/20$ 10:52$
 */
public class TestTransfer {
    public static void main(String[] args) throws IOException {
        RandomAccessFile  fromFile =new RandomAccessFile("C:\\Users\\DELL\\Desktop\\测试文件\\niotest\\aaa.txt","rw");
        //获取fileChannel
        FileChannel fromChannel = fromFile.getChannel();

        RandomAccessFile toFile = new RandomAccessFile("C:\\Users\\DELL\\Desktop\\测试文件\\niotest\\bbb.txt", "rw");
        FileChannel toChannel = toFile.getChannel();
        //定义传输位置
        long position=0L;
        //定义最多传输字节
        long count=fromChannel.size();
        //将数据从源通道传输到另一个通道
        fromChannel.transferTo(position,count,toChannel);

    }

}
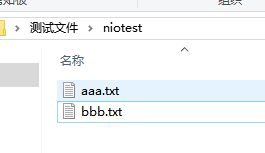
实现的效果将aaa的数据进行了复制,复制到了bbb.txt
transferFrom()he和上面的用法类似
5.FileChannel的常用方法总结

