粒子连线
Particle [] particles;

int numParticles =50;

float maxDistance =50.0;

void setup()
{
  size(800,800);

  particles =new Particle[numParticles];

  for(int i=0;i<particles.length;i++)
  {
    particles[i] =new Particle();
  }

}

void draw()
{
  background(0);
  for(int i=0;i<particles.length;i++)
  {
    particles[i].update();
   // fill(255,255,255);
   // ellipse(particles[i].xPos,particles[i].yPos,5,5);
  }
  stroke(255,255,255);
  for(int i =0;i<particles.length;i++)
  {
    for(int j =0;j<particles.length;j++)
    {
      if(i!=j)//display ellipse
      {
        if(dist(particles[i].xPos,particles[i].yPos,particles[j].xPos,particles[j].yPos)<maxDistance)
       {
        line(particles[i].xPos,particles[i].yPos,particles[j].xPos,particles[j].yPos);
       }
      }
    }
  }

}
class Particle
{
  float xPos;
  float yPos;

  float xSpeed;
  float ySpeed;

  Particle()
   {
     xPos =random(0,width);
     yPos =random(0,height);

     xSpeed =random(-2,2);
     ySpeed =random(-2,2);
   }

   void update()
   {
     xPos+=xSpeed;
     yPos+=ySpeed;

     if(xPos<0)
     {
       xPos=0;
       xSpeed =-1.0*xSpeed;
     }
      if(yPos<0)
     {
       yPos=0;
       ySpeed =-1.0*ySpeed;
     }
      if(xPos>width)
     {
       xPos=width;
       xSpeed =-1.0*xSpeed;
     }
      if(yPos>height)
     {
       yPos=height;
       ySpeed =-1.0*ySpeed;
     }
   }


}
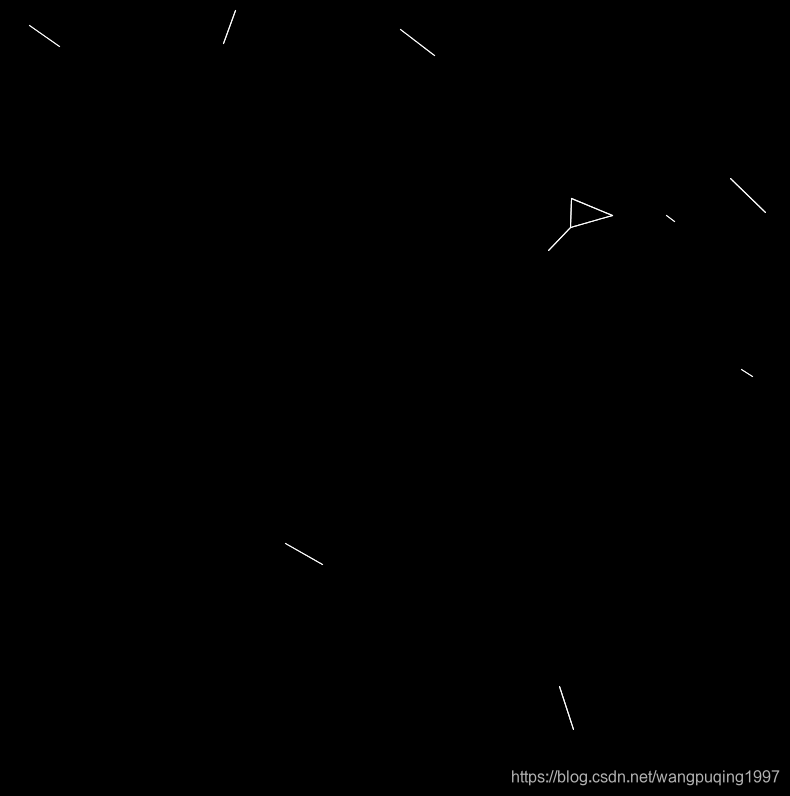
想要显示粒子 可以去掉if(i!=j)的判断。
核心原理就是通过dist()函数得到两个点的距离,判断距离然后用line函数画线。
controlP5库 Gui Button
import controlP5.*;

ControlP5 gui;

float backgroundRed =0;
float backgroundBlue =0;
float backgroundGreen =0;

void setup()
{
  size(640,480);

  gui =new ControlP5(this);

  gui.addButton("ChanegColor").setPosition(220,200).setSize(200,19);
  gui.addButton("Balck").setPosition(220,250).setSize(200,19);
}

void draw()
{
  background(backgroundRed,backgroundBlue,backgroundGreen);
}

public void ChanegColor()
{
  backgroundRed =random(0.255);
  backgroundBlue=random(0,255);
  backgroundGreen =random(0,255);
}
public void Balck()
{
  backgroundRed =0;
  backgroundBlue=0;
  backgroundGreen =0;
}
建立两个button组件,通过点击button组件改变窗口背景颜色。

controlP5库 Gui Slider
import controlP5.*;

ControlP5 gui;


Slider backgroundRedSlider;
Slider backgroundBlueSlider;
Slider backgroundGreenSlider;

void setup()
{
  size(640,480);

  gui =new ControlP5(this);

  backgroundRedSlider =gui.addSlider("red").setPosition(220,200).setRange(0,255);
  backgroundBlueSlider =gui.addSlider("blue").setPosition(220,230).setRange(0,255);
  backgroundGreenSlider =gui.addSlider("green").setPosition(220,260).setRange(0,255);

}

void draw()
{
  background(backgroundRedSlider.getValue(),backgroundBlueSlider.getValue(),backgroundGreenSlider.getValue());
}
getValue()获取Slider的值。
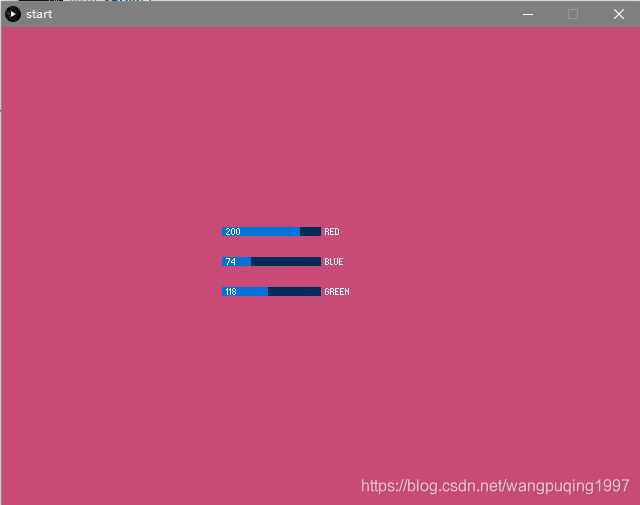
做出一个通过改变Slider值来改变背景颜色的小程序。
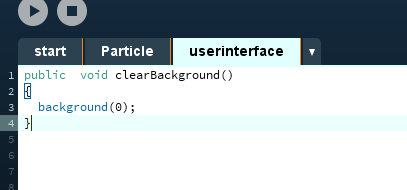
在粒子连线中加入UI
import controlP5.*;

Particle [] particles;

ControlP5 gui;

int numParticles =50;

float maxDistance;

Slider maxDistSlider;
Slider bgFadeSlider;
Slider speedSlider;
Slider strokeWidthSlider;


void setup()
{
  size(800,800);

  gui =new ControlP5(this);

  maxDistSlider =gui.addSlider("maxDist").setPosition(20,20).setRange(0,300);
  bgFadeSlider=gui.addSlider("fade").setPosition(20,50).setRange(0,100);
  speedSlider=gui.addSlider("speed").setPosition(20,80).setRange(0,10);
  strokeWidthSlider=gui.addSlider("stroke").setPosition(20,110).setRange(0,5);

  gui.addButton("clearBackground").setPosition(20,135).setSize(100,20);


  particles =new Particle[numParticles];

  for(int i=0;i<particles.length;i++)
  {
    particles[i] =new Particle();
  }
  background(0);
}

void draw()
{
 // background(0);

  maxDistance =maxDistSlider.getValue();
  noStroke();
  fill(0,0,0,bgFadeSlider.getValue());
  rect(0,0,width,height);

  for(int i=0;i<particles.length;i++)
  {
    particles[i].update(speedSlider.getValue());
   // fill(255,255,255);
   // ellipse(particles[i].xPos,particles[i].yPos,5,5);
  }
  stroke(255,255,255);
  strokeWeight(strokeWidthSlider.getValue());

  for(int i =0;i<particles.length;i++)
  {
    for(int j =0;j<particles.length;j++)
    {
      if(i!=j)//display ellipse
      {
        if(dist(particles[i].xPos,particles[i].yPos,particles[j].xPos,particles[j].yPos)<maxDistance)
       {
        line(particles[i].xPos,particles[i].yPos,particles[j].xPos,particles[j].yPos);
       }
      }
    }
  }

}
class Particle
{
  float xPos;
  float yPos;

  float xSpeed;
  float ySpeed;

  Particle()
   {
     xPos =random(0,width);
     yPos =random(0,height);

     xSpeed =random(-1,1);
     ySpeed =random(-1,1);
   }

   void update(float speedMult)
   {
     xPos+=xSpeed*speedMult;
     yPos+=ySpeed*speedMult;

     if(xPos<0)
     {
       xPos=0;
       xSpeed =-1.0*xSpeed;
     }
      if(yPos<0)
     {
       yPos=0;
       ySpeed =-1.0*ySpeed;
     }
      if(xPos>width)
     {
       xPos=width;
       xSpeed =-1.0*xSpeed;
     }
      if(yPos>height)
     {
       yPos=height;
       ySpeed =-1.0*ySpeed;
     }
   }


}

核心知识就是 getValue();
可以自定义两点的距离,线条淡化的程度,粒子移动的速度,线条的宽度,清理屏幕。
