文章目录
一、@ResponseBody注解
1.导包

2.@ResponseBody返回json数据
@ResponseBody注解标在方法上,方法就返回json数据。
	@Autowired
	EmployeeDao employeeDao;
	/**
	 * 	将返回的数据放在响应体中.
	 * 	如果是对象,自动转换为json格式
	 */
	@ResponseBody
	@RequestMapping("/getallajax")
	public Collection<Employee> ajaxGetAll() {
		Collection<Employee> all = employeeDao.getAll();
		return all;
	}
访问项目http://localhost:8080/6.SpringMVC_CRUD/getallajax浏览器显示结果如下:
[{"id":1001,"lastName":"E-AA","email":"[email protected]","gender":1,"department":
{"id":101,"departmentName":"D-AA"},"birth":null},{"id":1002,"lastName":"E-
BB","email":"bb@163.com","gender":1,"department":{"id":102,"departmentName":"D-
BB"},"birth":null},{"id":1003,"lastName":"E-
CC","email":"cc@163.com","gender":0,"department":{"id":103,"departmentName":"D-
CC"},"birth":null},{"id":1004,"lastName":"E-
DD","email":"dd@163.com","gender":0,"department":{"id":104,"departmentName":"D-
DD"},"birth":null},{"id":1005,"lastName":"E-
EE","email":"ee@163.com","gender":1,"department":{"id":105,"departmentName":"D-
EE"},"birth":null}]
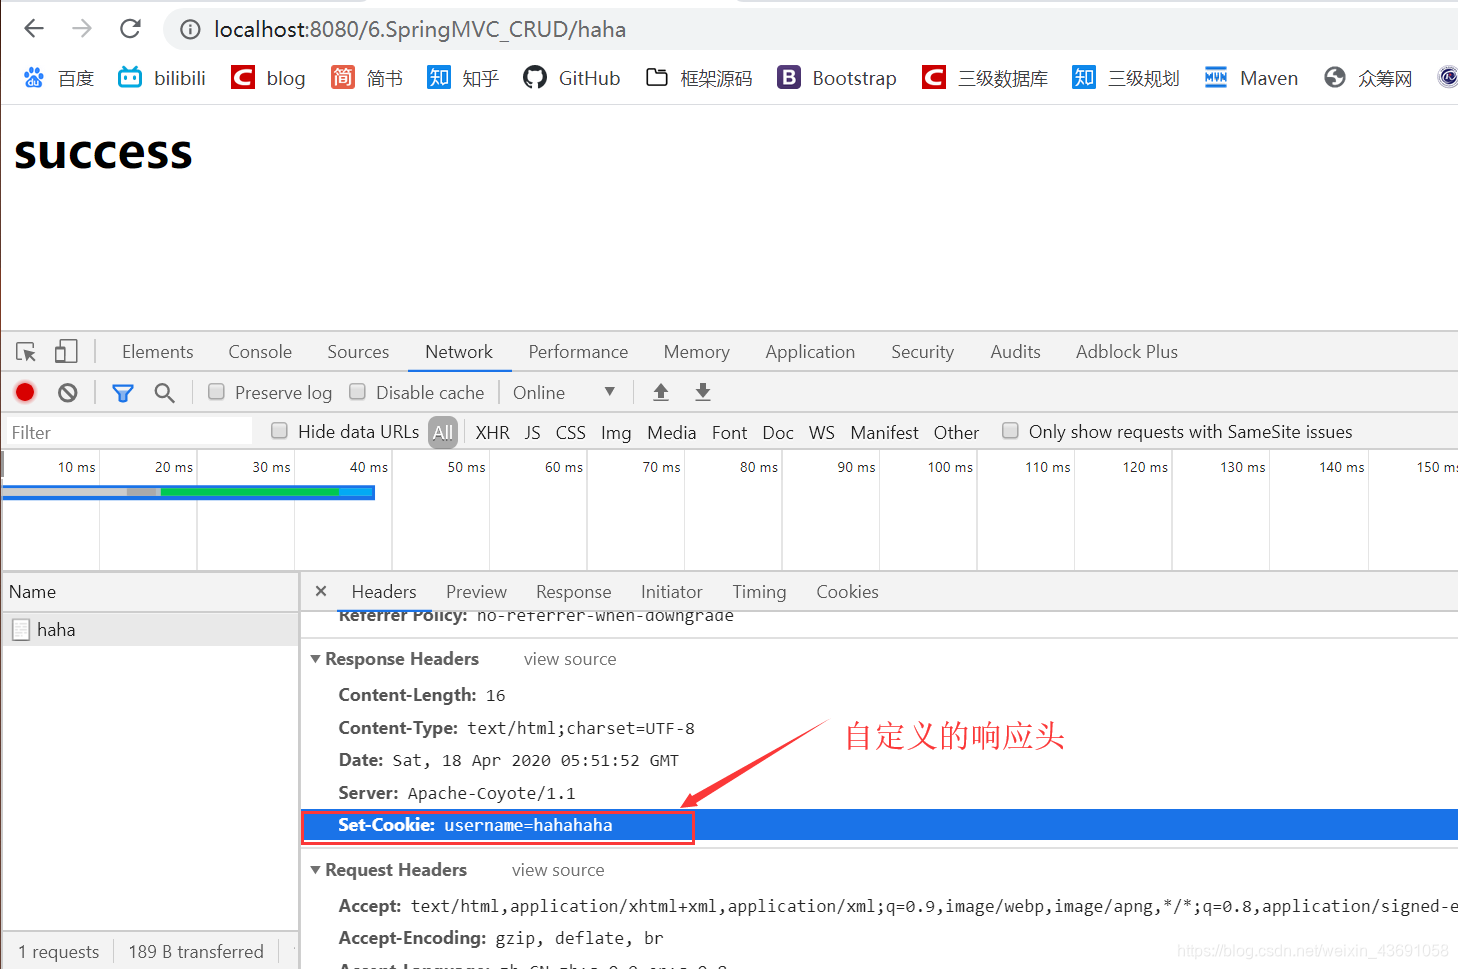
3.使用ResponseEntity既能返回响应数据还能定制响应头
	@RequestMapping("/haha")
	public ResponseEntity<String> haha() {
		String body = "<h1>success</h1>";
		MultiValueMap<String, String> headers = new HttpHeaders();// 自定义响应头
		HttpStatus statusCode;
		headers.add("Set-Cookie", "username=hahahaha");
		return new ResponseEntity<String>(body, headers, HttpStatus.OK);
	}
二、@RequestBody注解
1.@RequestBody获取请求体内容
handler处理器
	// @RequestBody获取一个请求的请求体
	@RequestMapping("/testRequestBody")
	public String testRequestBody(@RequestBody String body) {
		System.out.println("请求体:" + body);
		return "success";
	}
前端页面
	<head>
		<meta charset="UTF-8">
		<title>Insert title here</title>
		<%
			pageContext.setAttribute("ctp",request.getContextPath());
		%>
	</head>
	<body>
		<form action="${ctp }/testRequestBody" method="POST" enctype="multipart/form-data">
			<input name="username" value="tomcat"/>
			<input name="passworld" value="123456"/>
			<input type="file" name="file"/>
			<input type="submit"/>
		</form>
	</body>

点击提交成功打印出请求体
打印结果:
请求体:-----------------------------7e43752205b6
Content-Disposition: form-data; name="username"
tomcat
-----------------------------7e43752205b6
Content-Disposition: form-data; name="passworld"
123456
-----------------------------7e43752205b6
Content-Disposition: form-data; name="file"; filename=""
Content-Type: application/octet-stream
-----------------------------7e43752205b6--
2.@RequestBody获取请求数据
前端页面
- 通过ajax发送json请求给服务器。
<%@ page language="java" contentType="text/html; charset=UTF-8"
	pageEncoding="UTF-8"%>
<!DOCTYPE html>
<html>
	<head>
		<meta charset="UTF-8">
		<title>Insert title here</title>
		<%
			pageContext.setAttribute("ctp", request.getContextPath());
		%>
	</head>
	<script type="text/javascript" src="jQuery/jQuery-3.4.1.js"></script>
	<body>
		<a href="${ctp }/testRequestBody">ajax发送json数据</a>	//点击发送ajax请求
	</body>
	<script type="text/javascript">
		$("a:first").click(function() {
			var emp = {
				lastname : "张三",
				email : "[email protected]",
				gender : 1
			};
			var empStr = JSON.stringify(emp);//将js对象转换为json对象
			$.ajax({
				url : '${ctp}/testRequestBody',
				type : "POST",
				data : empStr,
				contentType : "application/json",
				success : function(data) {
					alert(data)
				}
			});
			return false;
		});
	</script>
</html>
处理器
- 使用
@RequestBody注解,可以接收json数据,将请求体中的数据封装为Employee 对象。
	// @RequestBody可以获取一个请求的请求体
	@RequestMapping("/testRequestBody")
	public String testRequestBody(@RequestBody Employee employee) {
		System.out.println("请求体:" + employee);
		return "success";
	}

3.使用HttpEntity获取请求体的同时获取请求头
- 除了使用@RequestBody获取请求体内容,还可以使用HttpEntity来获取请求头和请求体的内容。
	@RequestMapping("/test01")
	public String test01(HttpEntity<String> str) {
		System.out.println(str);
		return "success";
	}
