如果你曾经订购过披萨,你可能会知道流程。他们首先会询问你的电 话号码。电话号码除了能够让送货司机在找不到你家的时候打电话给 你,还可以作为你在这个披萨店的标识。如果你是回头客,他们可以 使用这个电话号码来查找你的地址,这样他们就知道将你的订单派送 到什么地方了。
对于一个新的顾客来讲,查询电话号码不会有什么结果。所以接下 来,他们将询问你的地址。这样,披萨店的人就会知道你是谁以及将 披萨送到哪里。但是在问你要哪种披萨之前,他们要确认你的地址在 他们的配送范围之内。如果不在的话,你需要自己到店里并取走披 萨。
在每个披萨订单开始前的提问和回答阶段可以用下图的流程图来表示。
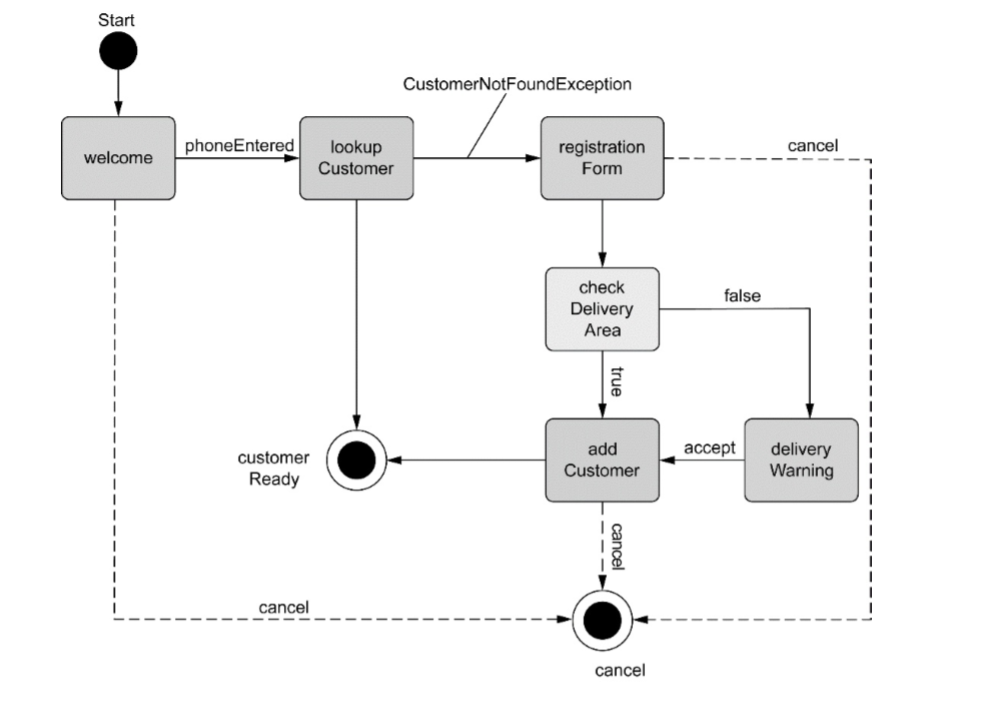
这个流程不是线性的而是在好几个地方根据不同的条件有了分支。例如,在查找顾客后,流程可能结束(如果找到了顾客),也有可能转移到注册表单(如果没有找到 顾客)。同样,在checkDeliveryArea状态,顾客有可能会被警 告也有可能不被警告他们的地址在配送范围之外。
一、识别顾客的流程定义(customer-flow.xml)
 1 <?xml version="1.0" encoding="UTF-8"?>
 2 <flow xmlns="http://www.springframework.org/schema/webflow"
 3   xmlns:xsi="http://www.w3.org/2001/XMLSchema-instance"
 4   xsi:schemaLocation="http://www.springframework.org/schema/webflow
 5   http://www.springframework.org/schema/webflow/spring-webflow-2.0.xsd">
 6
 7     <input name="order" required="true"/>
 8
 9     <!-- Customer -->
10     <view-state id="welcome">
11         <transition on="phoneEntered" to="lookupCustomer"/>
12         <transition on="cancel" to="cancel"/>
13     </view-state>
14
15     <action-state id="lookupCustomer">
16         <evaluate result="order.customer" expression=
17             "pizzaFlowActions.lookupCustomer(requestParameters.phoneNumber)" />
18         <transition to="registrationForm" on-exception=
19             "com.springinaction.pizza.service.CustomerNotFoundException" />
20         <transition to="customerReady" />
21     </action-state>
22
23     <view-state id="registrationForm" model="order" popup="true" >
24         <on-entry>
25           <evaluate expression=
26               "order.customer.phoneNumber = requestParameters.phoneNumber" />
27         </on-entry>
28         <transition on="submit" to="checkDeliveryArea" />
29         <transition on="cancel" to="cancel" />
30     </view-state>
31
32     <decision-state id="checkDeliveryArea">
33       <if test="pizzaFlowActions.checkDeliveryArea(order.customer.zipCode)"
34           then="addCustomer"
35           else="deliveryWarning"/>
36     </decision-state>
37
38     <view-state id="deliveryWarning">
39         <transition on="accept" to="addCustomer" />
40         <transition on="cancel" to="cancel" />
41     </view-state>
42
43     <action-state id="addCustomer">
44         <evaluate expression="pizzaFlowActions.addCustomer(order.customer)" />
45         <transition to="customerReady" />
46     </action-state>
47
48     <!-- End state -->
49     <end-state id="cancel" />
50     <end-state id="customerReady" />
51 </flow>
这个流程包含了几个新的技巧,包括首次使用的<decision-state>元素。因为它是pizza流程的子流程,所以它也可以接受 Order对象作为输入。
1.询问电话号码
welcome状态是一个很简单的视图状态,它欢迎访问Spizza站点的顾 客并要求他们输入电话号码。这个状态并没有什么特殊的。它有两个 转移:如果从视图触发phoneEntered事件的话,转移会将流程定 向到lookupCustomer,另外一个就是在全局转移中定义的用来响 应cancel事件的cancel转移。welcome状态的有趣之处在于视图本身。视图welcome定义在“/WEBINF/flows/ pizza/customer/welcome.jsp”中,如下所示。
 1 <%@ page language="java" import="java.util.*" pageEncoding="UTF-8"%>
 2 <%@ taglib prefix="c" uri="http://java.sun.com/jsp/jstl/core" %>
 3 <%@ taglib prefix="form" uri="http://www.springframework.org/tags/form" %>
 4 <%
 5 String path = request.getContextPath();
 6 String basePath = request.getScheme()+"://"+request.getServerName()+":"+request.getServerPort()+path+"/";
 7 %>
 8
 9 <!DOCTYPE HTML PUBLIC "-//W3C//DTD HTML 4.01 Transitional//EN">
10 <html>
11   <head>
12     <base href="<%=basePath%>">
13
14     <title>My JSP 'welcome.jsp' starting page</title>
15
16     <meta http-equiv="pragma" content="no-cache">
17     <meta http-equiv="cache-control" content="no-cache">
18     <meta http-equiv="expires" content="0">
19     <meta http-equiv="keywords" content="keyword1,keyword2,keyword3">
20     <meta http-equiv="description" content="This is my page">
21     <!--
22     <link rel="stylesheet" type="text/css" href="styles.css">
23     -->
24
25   </head>
26
27   <body>
28     <h2>Welcome to Spizza!!!</h2>
29     <form:form>
30         <!-- 流程执行的key -->
31         <input type="hidden" name="_flowExecutionKey" value="${flowExecutionKey}"/>
32
33         <input type="text" name="phoneNumber"/><br/>
34         <!-- 触发phoneEntered事件 -->
35         <input type="submit" name="_evenId_phoneEntered" value="Lookup Customer"/>
36     </form:form>
37   </body>
38 </html>
这个简单的表单提示用户输入其电话号码。但是表单中有两个特殊的 部分来驱动流程继续。
首先要注意的是隐藏的“_flowExecutionKey”输入域。当进入视图 状态时,流程暂停并等待用户采取一些行为。赋予视图的流程执行 key(flow execution key)就是一种返回流程的“回程票”(claim ticket)。当用户提交表单时,流程执行key会 在“_flowExecutionKey”输入域中返回并在流程暂停的位置进行恢 复。
还要注意的是提交按钮的名字。按钮名字的“_eventId_”部分是提 供给Spring Web Flow的一个线索,它表明了接下来要触发事件。当点 击这个按钮提交表单时,会触发phoneEntered事件进而转移 到lookupCustomer。
2.查找顾客
当欢迎表单提交后,顾客的电话号码将包含在请求参数中并准备用于 查询顾客。lookupCustomer状态的<evaluate>元素是查找发生的地方。它将电话号码从请求参数中抽取出来并传递 到pizzaFlowActions bean的lookupCustomer()方法中。 lookupCustomer()方法要么返回Customer对象,要么抛出CustomerNotFoundException异常。 在前一种情况下,Customer对象将会设置到customer变量中(通 过result属性)并且默认的转移将把流程带到customerReady状 态。但是如果不能找到顾客的话,将抛出 CustomerNotFoundException并且流程被转移 到registrationForm状态。
3.注册新顾客
registrationForm状态是要求用户填写配送地址的。就像我们之 前看到的其他视图状态,它将被渲染成JSP。JSP文件如下所示。
 1 <%@ taglib prefix="c" uri="http://java.sun.com/jsp/jstl/core" %>
 2 <%@ taglib prefix="form" uri="http://www.springframework.org/tags/form" %>
 3 <html>
 4
 5   <head><title>Spring Pizza</title></head>
 6
 7   <body>
 8     <h2>Customer Registration</h2>
 9
10     <form:form commandName="order">
11       <input type="hidden" name="_flowExecutionKey"
12              value="${flowExecutionKey}"/>
13       <b>Phone number: </b><form:input path="customer.phoneNumber"/><br/>
14       <b>Name: </b><form:input path="customer.name"/><br/>
15       <b>Address: </b><form:input path="customer.address"/><br/>
16       <b>City: </b><form:input path="customer.city"/><br/>
17       <b>State: </b><form:input path="customer.state"/><br/>
18       <b>Zip Code: </b><form:input path="customer.zipCode"/><br/>
19       <input type="submit" name="_eventId_submit"
20              value="Submit" />
21       <input type="submit" name="_eventId_cancel"
22              value="Cancel" />
23     </form:form>
24     </body>
25 </html>
在这里不是通过请求参数一个个地处理输入域,而是以更好的方式将 表单绑定到Customer对象上——让框架来做所有繁杂的工作。
4.检查配送区域
在顾客提供其地址后,我们需要确认他的住址在配送范围之内。如果 Spizza不能派送给他们,那么我们要让顾客知道并建议他们自己到店 面里取走披萨。为了做出这个判断,我们使用了决策状态。决策状 态checkDeliveryArea有一个<if>元素,它将顾客的邮政编码传 递到pizzaFlowActions bean的checkDeliveryArea()方法中。 这个方法将会返回一个Boolean值:如果顾客在配送区域内则 为true,否则为false。
如果顾客在配送区域内的话,那流程转移到addCustomer状态。否 则,顾客被带入到deliveryWarning视图状 态。deliveryWarning背后的视图就是“/WEBINF/flows/pizza/customer/deliveryWarning.jspx”,如下所示:
 1 <%@ taglib prefix="c" uri="http://java.sun.com/jsp/jstl/core" %>
 2 <html>
 3   <head><title>Spring Pizza</title></head>
 4
 5   <body>
 6         <h2>Delivery Unavailable</h2>
 7
 8         <p>The address is outside of our delivery area. The order
 9         may still be taken for carry-out.</p>
10
11         <a href="${flowExecutionUrl}&_eventId=accept">Accept</a> |
12         <a href="${flowExecutionUrl}&_eventId=cancel">Cancel</a>
13   </body>
14 </html>
在deliveryWarning.jsp中与流程相关的两个关键点就是那两个链接, 它们允许用户继续订单或者将其取消。通过使用与welcome状态相 同的flowExecurtionUrl变量,这些链接分别触发流程中的 accept或cancel事件。如果发送的是accept事件,那么流程会转 移到addCustomer状态。否则,接下来会是全局的取消转移,子流 程将会转移到cancel结束状态。
5.存储顾客数据
当流程抵达addCustomer状态时,用户已经输入了他们的地址。为 了将来使用,这个地址需要以某种方式存储起来(可能会存储在数据 库中)。addCustomer状态有一个<evaluate>元素,它会调 用pizzaFlowActions bean的addCustomer()方法,并将customer流程参数传递进去。
一旦这个过程完成,会执行默认的转移,流程将会转移到ID 为customerReady的结束状态。
6.结束流程
这个流程中,它 不仅仅只有一个结束状态,而是两个。当子流程完成时,它会触发一 个与结束状态ID相同的流程事件。如果流程只有一个结束状态的话, 那么它始终会触发相同的事件。但是如果有两个或更多的结束状态, 流程能够影响到调用状态的执行方向。
当customer流程走完所有正常的路径后,它最终会到达ID 为customerReady的结束状态。当调用它的披萨流程恢复时,它会 接收到一个customerReady事件,这个事件将使得流程转移 到buildOrder状态。
要注意的是customerReady结束状态包含了一个<output>元素。 在流程中这个元素等同于Java中的return语句。它从子流程中传递 一些数据到调用流程。在本示例中,<output>元素返回customer 流程变量,这样在披萨流程中,就能够将identifyCustomer子流 程的状态指定给订单。另一方面,如果在识别顾客流程的任意地方触 发了cancel事件,将会通过ID为cancel的结束状态退出流程,这 也会在披萨流程中触发cancel事件并导致转移(通过全局转移)到 披萨流程的结束状态。