温馨提示: 本文总共8252字,阅读完大概需要10-15分钟,希望您能耐心看完,倘若你对该知识点已经比较熟悉,你可以直接通过目录跳转到你感兴趣的地方,希望阅读本文能够对您有所帮助,如果阅读过程中有什么好的建议、看法,欢迎在文章下方留言或者私信我,您的意见对我非常宝贵,再次感谢你阅读本文。
| 一: 初见 |
一:初见
定义: 简单来说,负载均衡就是将用户的请求平均分配到不同的服务器上,从而实现HA(高可用性)。类型:方便大家理解,负载均衡可以简单划分为以下的两种类型
- ;集中式: 它是在服务提供方和服务消费方之间的独立设备,通过它的某种策略将用户请求分配给指定的服务器,常见的类型有:Nginx、LVS、硬件F5等。
- 进程式: 它是将负载均衡(简称:LB-Load Banlance)的逻辑集成在消费方,通过服务注册中心获取到消费方的信息,通过某种策略将请求发给指定的消费方服务,常见的有:SpringCloud中的Ribbon(本文就以它作为刨析对象,通过了解其中的原理,手写一个简单的轮询算法实现负载均衡的效果)
| 二: 负载均衡-Ribbon |
二: 负载均衡-Ribbon
(一) 定义: Ribbon是SpringCloud分布式解决方案中的一个落地实现,通过它可以实现负载均衡的效果,实际上它可以简单的理解为: 负载均衡 + RestTemplate(它是HttpClient的封装,用于服务之间发起请求,如果大家不是很熟悉的话,可以在下方留言,后面看看是否需要专门出一片关于它的文章进行解析它)
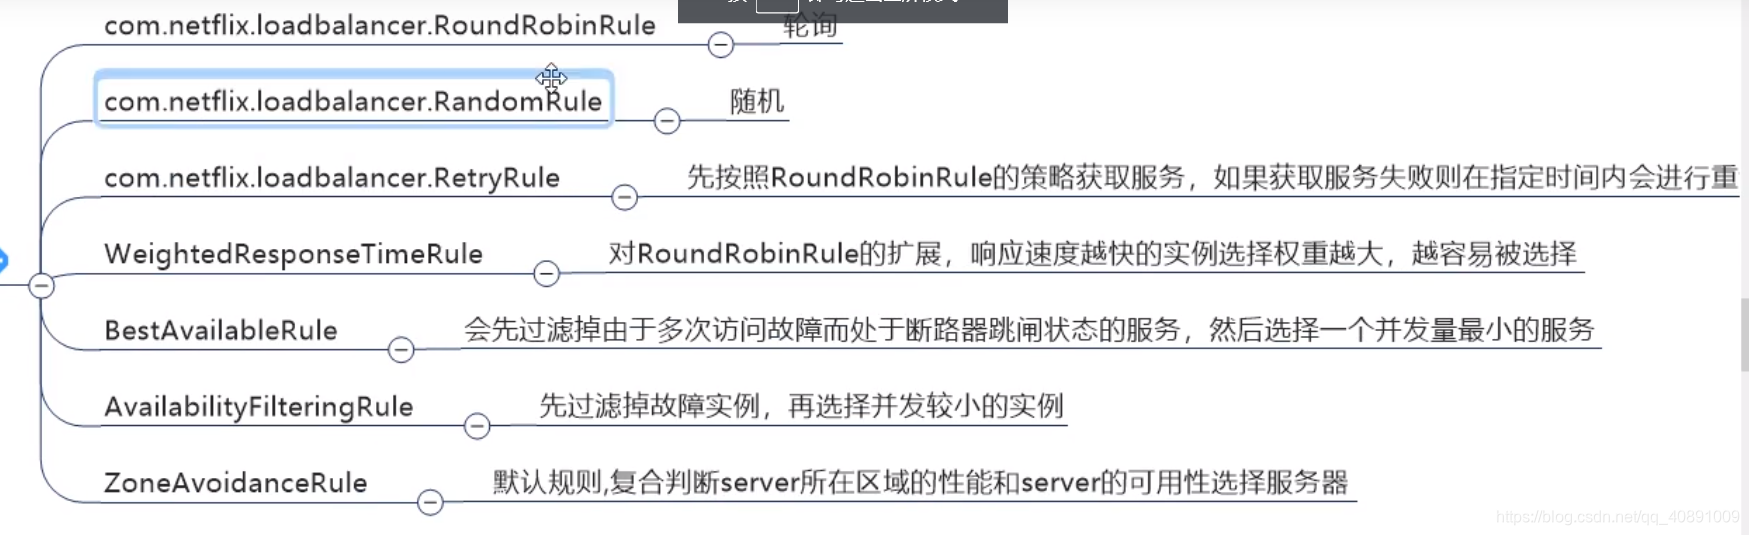
(二) 原理图:
- Ribbon中的核心接口IRule的结构如下(具体的负载均衡算法实现):
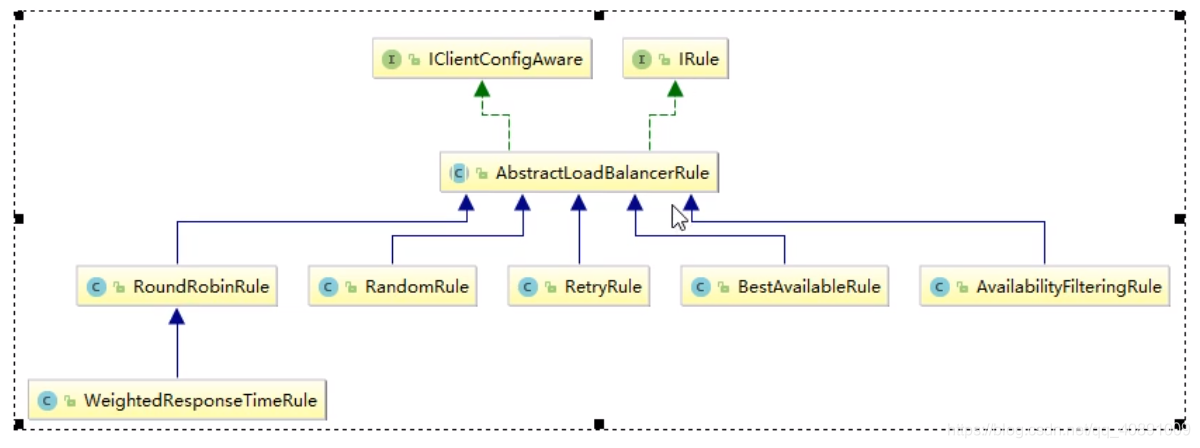
- IRule接口下的负载均衡算法的实现
(三) 使用方式:
实际上如果我们是使用的是Eureka作为服务注册中心的,默认Eureka依赖就引入了Ribbon,我们只需要简单的两步即可实现负载均衡效果:
-
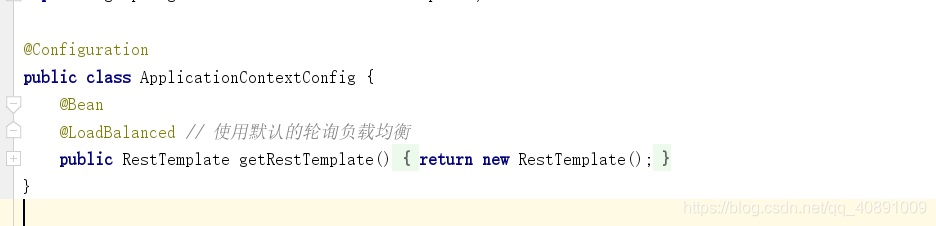
在RestTemplate配置类中使@LoadBanlance注解
-
然后在启动类中标明:@RibbonClient注解即可让RestTemplate在请求的时候实现负载均衡的效果,倘若不是使用Eureka作为服务注册中心,则需要在项目的POM文件中手动引入Ribbon的坐标。
-
(注意: 上面的注解都是在消费服务中使用,因为Ribbon是属于进程式的负载均衡类型,是通过将负载均衡的逻辑集中在消费者中从而达到负载均衡的效果)
-
图解1(配置RestTemplate):
-
图解2(在主启动类启动负载均衡)
 扫描二维码关注公众号,回复: 10955976 查看本文章
| 三: 手写一个Ribbon的轮询算法 |
三:手写一个Ribbon的轮询算法
实现步骤:
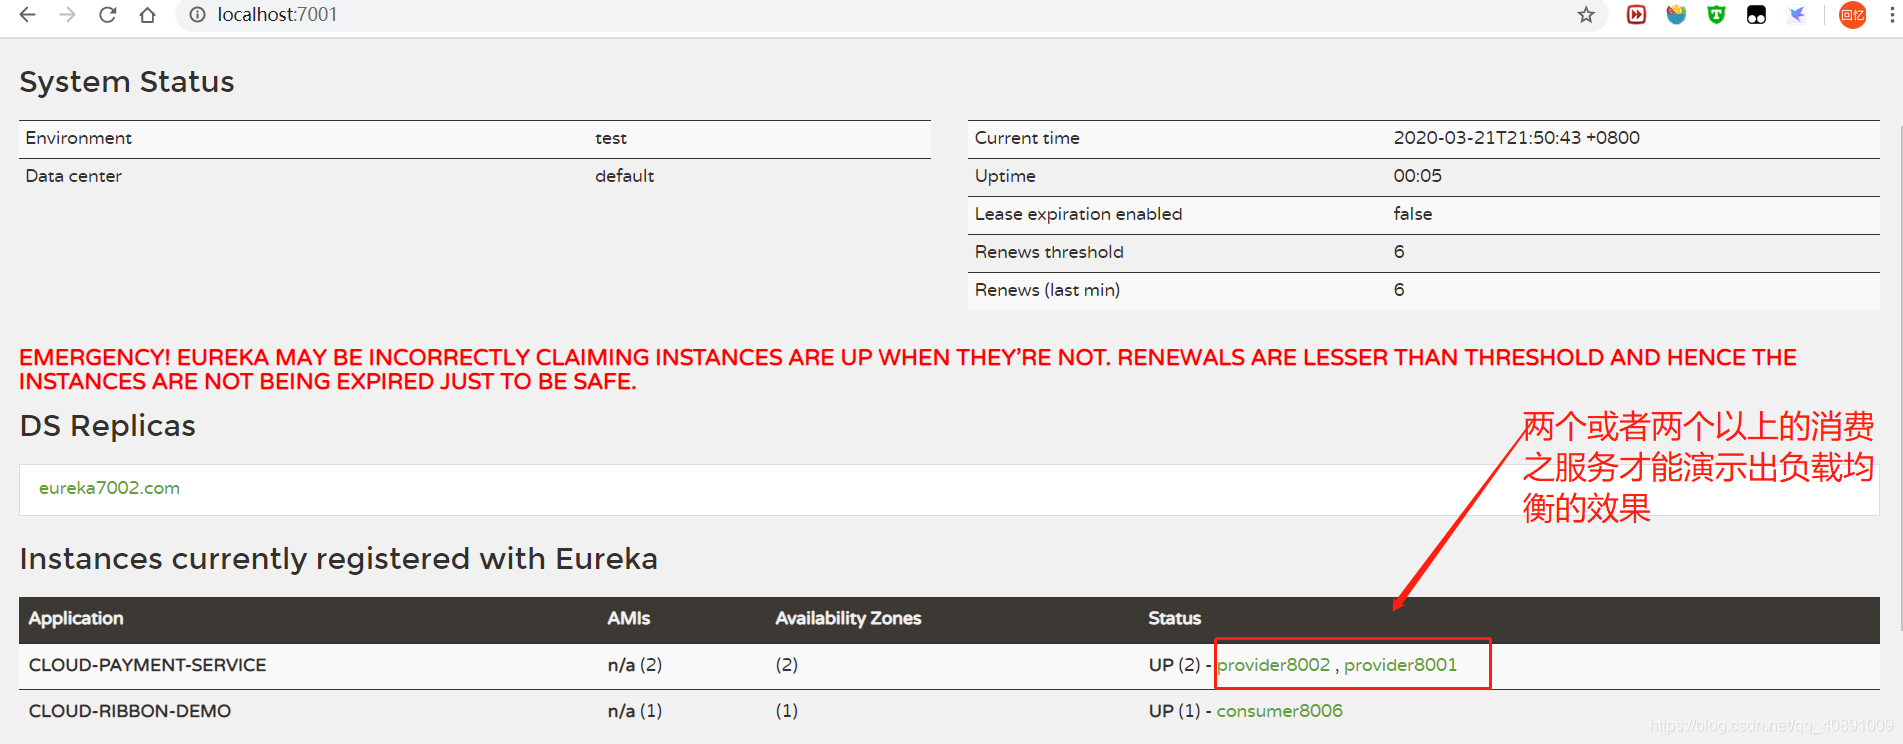
温馨提醒: 轮询算法即客户端的每一次请求都会被平均分配给不同的消费服务器,以此循环,故总结出轮询算法的规律: 集群中提供服务的服务下标 = 客户端请求次数 % 提供服务的消费者总数。同时,要实现负载均衡,你还需要有至少两个或以上的消费服务注册在注册中心上,如果你还不知道怎么将服务注册到注册中心上,你可以查看我上一篇文章: 一文让你轻松读懂SpringCloud的服务注册和发现组件Eureka,或者还有其它疑问的可以直接在文章下方留言,我看到了会及时回复的。
步骤一: 面向接口开发,所以需要定义一个接口是用于获取消费者服务的方法,具体代码如下
package com.elvis.springcloud.custom;

import org.springframework.cloud.client.ServiceInstance;

import java.util.List;

/**
 *  负载均衡算法标准(面向接口开发)
 */
public interface CustomIRule {

    // 获取服务的集群
    List<ServiceInstance>  getInstances(String serviceId);

}
步骤二: 实现轮询算法
package com.elvis.springcloud.custom;

import lombok.extern.slf4j.Slf4j;
import org.springframework.beans.factory.annotation.Autowired;
import org.springframework.cloud.client.ServiceInstance;
import org.springframework.cloud.client.discovery.DiscoveryClient;
import org.springframework.stereotype.Component;

import java.util.List;
import java.util.concurrent.atomic.AtomicInteger;

@Component
@Slf4j
public class CustomIRuleImpl implements CustomIRule
{
    // 该注解是用来获取注册在注册中心的消费者服务的信息,它要起作用,还需要在主启动类表明@EnableDiscoveryClient注解
    @Autowired
    private DiscoveryClient discoveryClient;

    private static  AtomicInteger serviceIndex = null;

    public CustomIRuleImpl(){
        serviceIndex =  new AtomicInteger(0);
    }

    // 获取特定服务的集群列表
    @Override
    public List<ServiceInstance> getInstances(String serviceId) {
        List<ServiceInstance> instances = discoveryClient.getInstances(serviceId);
        return instances;
    }

    // 根据算法获取集群中本次访问的服务
    public ServiceInstance getServerInstance(String serverId){
        // 列出当前服务的所有集群
        List<ServiceInstance> instances = this.getInstances(serverId);
        if(null == instances || instances.isEmpty()){
            log.error("获取集群服务列表失败");
            return null;
        }
        ServiceInstance chooseServer = null;
        do{
            // 获取本次访问的服务在集群中的下标
            Integer index = getAndIncrement();
            log.info("请求的次数:"+index);
            // 从集群中获取到服务
            // 轮询算法基础: 需要访问的服务下标 = 请求的次数 % 当前服务集群的总数
            int serverIndex = index % instances.size();
            chooseServer = instances.get(serverIndex);
        }while (chooseServer == null);
        return chooseServer;
    }

    // 获取客户端访问的次数
    public final  Integer getAndIncrement(){
        int current;
        int next;
        do {
            // 如果访问次数超过Integer取值的最大值,则重新置为0
            // 注意: 每次重启服务后,访问次数都会从0开始
            current =  serviceIndex.get();
            next = current >= Integer.MAX_VALUE ? 0 : (current+1);
            // 通过自旋锁和线程安全原子类保证线程安全(这个知识如果有需要会在后面的课程专门开启一系列的文章进行解读)
            // 每次都进行比较: 看当前的值是否等于预期的值,如果相等,则设置为next,并返回next,不然就一直自旋,直到拿到符合的值位置
        }while (!serviceIndex.compareAndSet(current,next));
        return  next;
    }

}
步骤三: 主启动类和RestTemplate类
package com.elvis.springcloud.config;

import org.springframework.cloud.client.loadbalancer.LoadBalanced;
import org.springframework.context.annotation.Bean;
import org.springframework.context.annotation.Configuration;
import org.springframework.web.client.RestTemplate;

// 项目配置类
@Configuration
public class ApplicationContextConfig {
    @Bean
    //@LoadBalanced // 使用默认的轮询负载均衡,这里注释掉,使用我们自己书写的算法实现负载均衡
    public RestTemplate getRestTemplate(){
        return new RestTemplate();
    }
}

// 主启动类
package com.elvis.springcloud;

import org.springframework.boot.SpringApplication;
import org.springframework.boot.autoconfigure.SpringBootApplication;
import org.springframework.cloud.client.discovery.EnableDiscoveryClient;
import org.springframework.cloud.netflix.eureka.EnableEurekaClient;
import org.springframework.cloud.netflix.ribbon.RibbonClient;
import ribbonconfig.IRuleImpl;

@SpringBootApplication
@EnableEurekaClient
// 此处的name属性的值就是我们消费者需要访问服务的服务名称(即配置在:application配置文件中的:application.name的值,这个值是必填的,不然无法找到需要负载均衡的服务)
@RibbonClient(name = "CLOUD-PAYMENT-SERVICE")
@EnableDiscoveryClient
public class ConsumerOrder8006 {
    public static void main(String[] args) {
        SpringApplication.run(ConsumerOrder8006.class,args);
    }
}


// 实现方法调用
package com.elvis.springcloud.controller;

import com.elvis.springcloud.custom.CustomIRuleImpl;
import com.elvis.springcloud.model.CommonResult;
import com.elvis.springcloud.model.Payment;
import org.springframework.beans.factory.annotation.Autowired;
import org.springframework.cloud.client.ServiceInstance;
import org.springframework.cloud.client.discovery.DiscoveryClient;
import org.springframework.http.ResponseEntity;
import org.springframework.web.bind.annotation.PathVariable;
import org.springframework.web.bind.annotation.RequestMapping;
import org.springframework.web.bind.annotation.RestController;
import org.springframework.web.client.RestTemplate;

import java.util.List;

@RestController
public class ConsumerController {
    @Autowired
    private RestTemplate restTemplate;
    //private final String url = "http://localhost:8001/payment/get/";
    // 此处直接使用服务的名称,而不需要直接写死请求路径
    private final String url = "http://CLOUD-PAYMENT-SERVICE";

    @Autowired
    private DiscoveryClient discoveryClient;

    @Autowired
    private CustomIRuleImpl customIRule;

    @RequestMapping("/ribbon/demo")
    public String testCustomRoundRibbon(){
        ServiceInstance serverInstance = customIRule.getServerInstance("cloud-payment-service");
        if(null != serverInstance){
            String result = restTemplate.getForObject(serverInstance.getUri()+"/payment/test/ribbon", String.class);
            System.out.println("本次调用服务的端口:"+result);
            return result;
        }
        return "测试失败";
    }
}
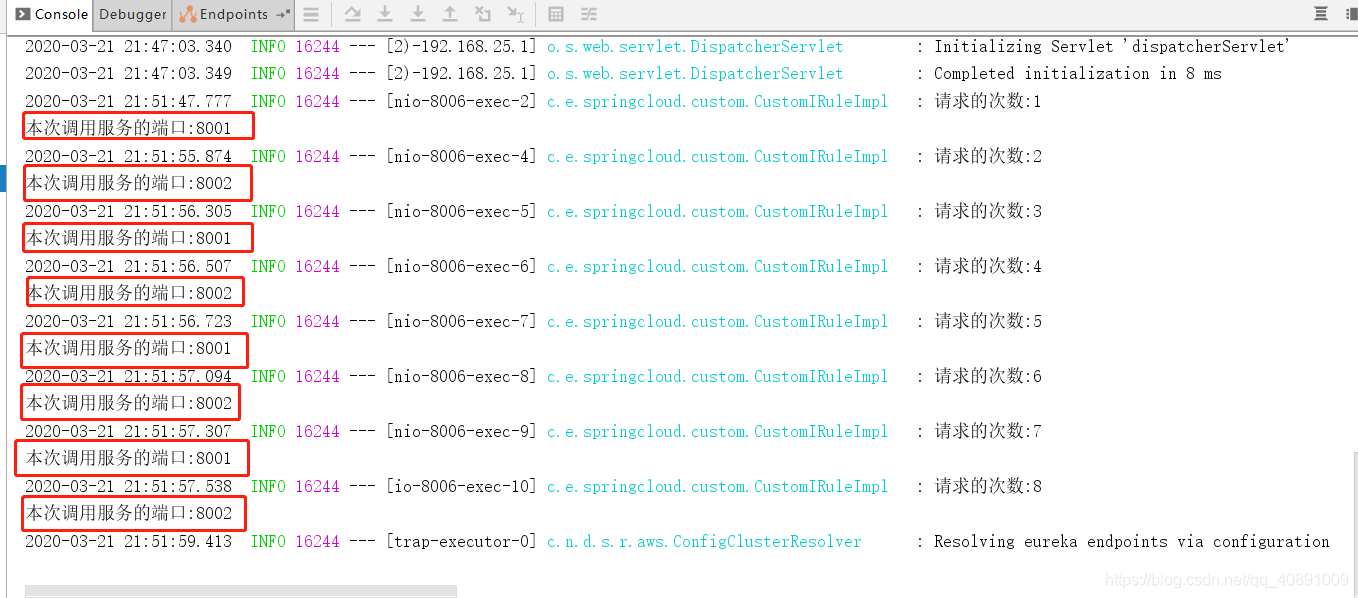
步骤四: 实现结果
| 四: 小结 |
四:小结
总的来说,SpringCloud已经是一套比较成熟的分布式解决方案,我们通过它的Ribbon组件来实现负载均衡会变得更轻松,本文也只是就Ribbon组件分析了它的作用和通过手写轮询算法案例对它的实现流程有了进一步的理解,当然更多的知识还有待我们继续学习,学无止境,希望大家不要只做一个搬运工,而是对技术有更高的追求。
看到此处,恭喜你已经完成了本文-负载均衡知识的阅读,非常感谢你能够坚持下来,如果本文能够对你有一点点帮助,我会非常开心,方便可以帮我点击一下赞和关注,后面我会更新更多关于SpringCloud和Java相关知识的文字,如果你有什么建议,欢迎在文章下方留言或者私信我,你的建议对我非常重要,再次感谢你的阅读!
