要打包的话,依然是maven,当然要跳过test,否则依然会报错java.awt.headlessException,
idea中跳过测试只需要点一个按钮,如图
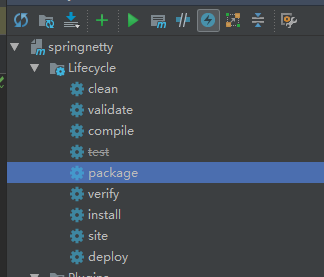
就是上排图片倒数第4个![]()
然后在pom中加入如下代码
<build>
   <plugins>
      <plugin>
         <groupId>org.apache.maven.plugins</groupId>
         <artifactId>maven-compiler-plugin</artifactId>
         <configuration>
            <source>1.7</source>
            <target>1.7</target>
         </configuration>
      </plugin>
      <plugin>
         <groupId>org.apache.maven.plugins</groupId>
         <artifactId>maven-shade-plugin</artifactId>
         <executions>
            <execution>
               <phase>package</phase>
               <goals>
                  <goal>shade</goal>
               </goals>
            </execution>
         </executions>
         <configuration>
            <shadedArtifactAttached>true</shadedArtifactAttached>
            <shadedClassifierName>shaded</shadedClassifierName>
               <transformer
                     implementation="org.apache.maven.plugins.shade.resource.ManifestResourceTransformer">
                  <mainClass>com.guanjian.SpringnettyApplication</mainClass>
               </transformer>
         </configuration>
      </plugin>
      <plugin>
         <groupId>com.akathist.maven.plugins.launch4j</groupId>
         <artifactId>launch4j-maven-plugin</artifactId>
         <executions>
            <execution>
               <id>l4j-clui</id>
               <phase>package</phase>
               <goals>
                  <goal>launch4j</goal>
               </goals>
               <configuration>
                  <headerType>gui</headerType>
                  <jar>${project.build.directory}/${artifactId}-${version}-shaded.jar</jar>
                  <outfile>${project.build.directory}/hasCode.exe</outfile>
                  <downloadUrl>http://java.com/download</downloadUrl>
                  <classPath>
                     <mainClass>com.guanjian.SpringnettyApplication</mainClass>
                     <preCp>anything</preCp>
                  </classPath>
                  <icon>src/main/resources/0.ico</icon>
                  <jre>
                     <minVersion>1.7.0</minVersion>
                     <jdkPreference>preferJre</jdkPreference>
                  </jre>
                  <versionInfo>
                     <fileVersion>1.0.0.0</fileVersion>
                     <txtFileVersion>${project.version}</txtFileVersion>
                     <fileDescription>${project.name}</fileDescription>
                     <copyright>2012 hasCode.com</copyright>
                     <productVersion>1.0.0.0</productVersion>
                     <txtProductVersion>1.0.0.0</txtProductVersion>
                     <productName>${project.name}</productName>
                     <companyName>hasCode.com</companyName>
                     <internalName>hasCode</internalName>
                     <originalFilename>hasCode.exe</originalFilename>
                  </versionInfo>
               </configuration>
            </execution>
         </executions>
      </plugin>
   </plugins>
</build>
如果找不到<groupId>com.akathist.maven.plugins.launch4j</groupId> <artifactId>launch4j-maven-plugin</artifactId>,你可以加上
<dependency>
   <groupId>com.akathist.maven.plugins.launch4j</groupId>
   <artifactId>launch4j-maven-plugin</artifactId>
   <version>1.7</version>
</dependency>
丢到依赖里面,重新加载,等加载完了再删了这个依赖。
要改的地方就是两个<mainClass></mainClass>改成你自己的springboot主类,另外加一个0.ico的图片放到<icon>src/main/resources/0.ico</icon>,点package,生成的exe如下图
![]()