文章目录
前言
当前 Java EE 中, SpringBoot 已经逐渐成为主流, 慢慢替代了笨重的 SSM, 而随着前端的发展, 类似 Angular 这种单页面前端框架也逐渐成为主流, 目前比较火的前端框架, 比如: Angular, VueJS, React 等, 今天, 笔者就带着大家手把手创建一个 SpringBoot 整合 Angular2+ 的项目.
1. 环境准备
1.1 框架版本
本次整合的环境为 SpringBoot 2+ 和 Angular 2+ , 笔者的环境为:
- SpringBoot 2.1.3
<parent>
        <groupId>org.springframework.boot</groupId>
        <artifactId>spring-boot-starter-parent</artifactId>
        <version>2.1.3.RELEASE</version>
        <relativePath/> <!-- lookup parent from repository -->
</parent>
- Angular 6.1.3
{
  "name": "angboot-web",
  "version": "0.0.0",
  "scripts": {
    "ng": "node --max-old-space-size=6000 ./node_modules/@angular/cli/bin/ng",
    "start": "npm run ng -- serve",
    "build:ng": "npm run build:ng:app",
    "build:ng:app": "npm run ng -- build --vendor-chunk",
    "build": "npm run build:ng",
    "build:prod": "npm run build:ng:prod",
    "build:watch": "concurrently -r \"npm run build:ng:app -- --watch\"",
    "test": "npm run test:app -- --watch false",
    "test:app": "npm run ng -- test angboot-web",
    "lint": "tsc -p rules/tsconfig.json && npm run ng -- lint",
    "e2e": "npm run ng -- e2e --serve false",
    "generate-index-files": "node ./generate-index-files.js"
  },
  "private": true,
  "dependencies": {
    "@angular/animations": "^6.1.3",
    "@angular/common": "^6.1.3",
    "@angular/compiler": "^6.1.3",
    "@angular/core": "^6.1.3",
    "@angular/forms": "^6.1.3",
    "@angular/http": "^6.1.3",
    "@angular/platform-browser": "^6.1.3",
    "@angular/platform-browser-dynamic": "^6.1.3",
    "@angular/router": "^6.1.3",
    "core-js": "^2.4.1",
    "rxjs": "^6.2.0",
    "lodash": "^4.17.4",
    "@ng-bootstrap/ng-bootstrap": "^2.0.0",
    "bootstrap": "^4.0.0",
    "bootstrap-float-label": "4.0.2",
    "split.js": "^1.2.0",
    "stompjs": "^2.3.3",
    "zone.js": "^0.8.19"
  },
  "devDependencies": {
    "@angular/compiler-cli": "^6.1.3",
    "@angular-devkit/build-angular": "~0.7.4",
    "typescript": "^2.7.2",
    "@angular/cli": "~6.1.3",
    "@angular/language-service": "^6.1.3",
    "@types/jasmine": "~2.8.3",
    "@types/jasminewd2": "^2.0.2",
    "@types/jquery": "^2.0.49",
    "@types/node": "^6.0.101",
    "@types/geojson": "^1.0.0",
    "concurrently": "^3.5.1",
    "codelyzer": "^4.2.1",
    "jasmine-core": "~2.8.0",
    "jasmine-spec-reporter": "~4.2.1",
    "karma": "~2.0.0",
    "karma-chrome-launcher": "~2.2.0",
    "karma-coverage-istanbul-reporter": "~1.4.2",
    "karma-jasmine": "~1.1.1",
    "karma-jasmine-html-reporter": "^0.2.2",
    "protractor": "~5.1.2",
    "ts-node": "~4.1.0",
    "tslint": "~5.9.1",
    "vinyl-fs": "^2.4.4",
    "through2": "^2.0.3",
    "js-yaml": "^3.11.0",
    "rxjs-tslint": "^0.1.4"
  }
}
如何环境的大版本有所不同, 代码可能有有一些兼容性写法问题, 大家在网上搜索或者查阅官方文档笔者相信可以找到对应的解决方式. 当然, 也可以评论留言, 笔者和你一起研究学习.
1.2 初始化项目
-
SpringBoot
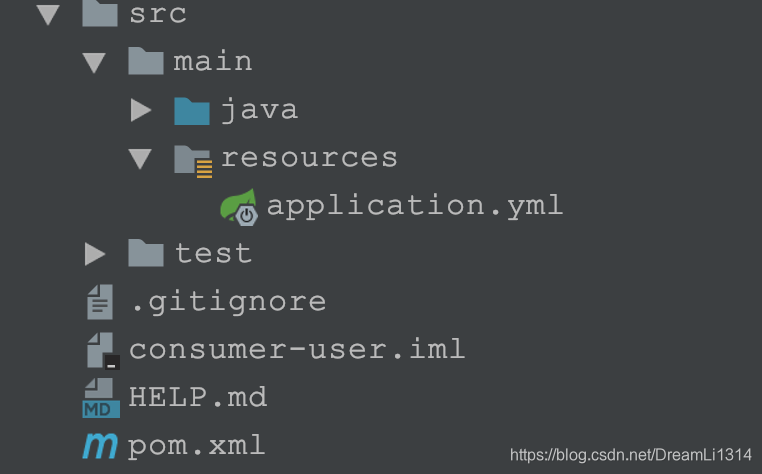
SpringBoot 项目可以通过 Spring 官方提供的 SpringBoot 初始化向导(官网或者 IDEA 等等)进行创建 SpringBoot 的初始化项目, 项目结构如下:
-
Angular
在项目根路径下创建一个文件夹 web(大家可以按照自己的喜好命名)作为 Angular 的项目根路径. 然后在web 这个目录下创建 Angular 的项目(可以 Copy 或者 Angular CLI 创建). 结构如下:
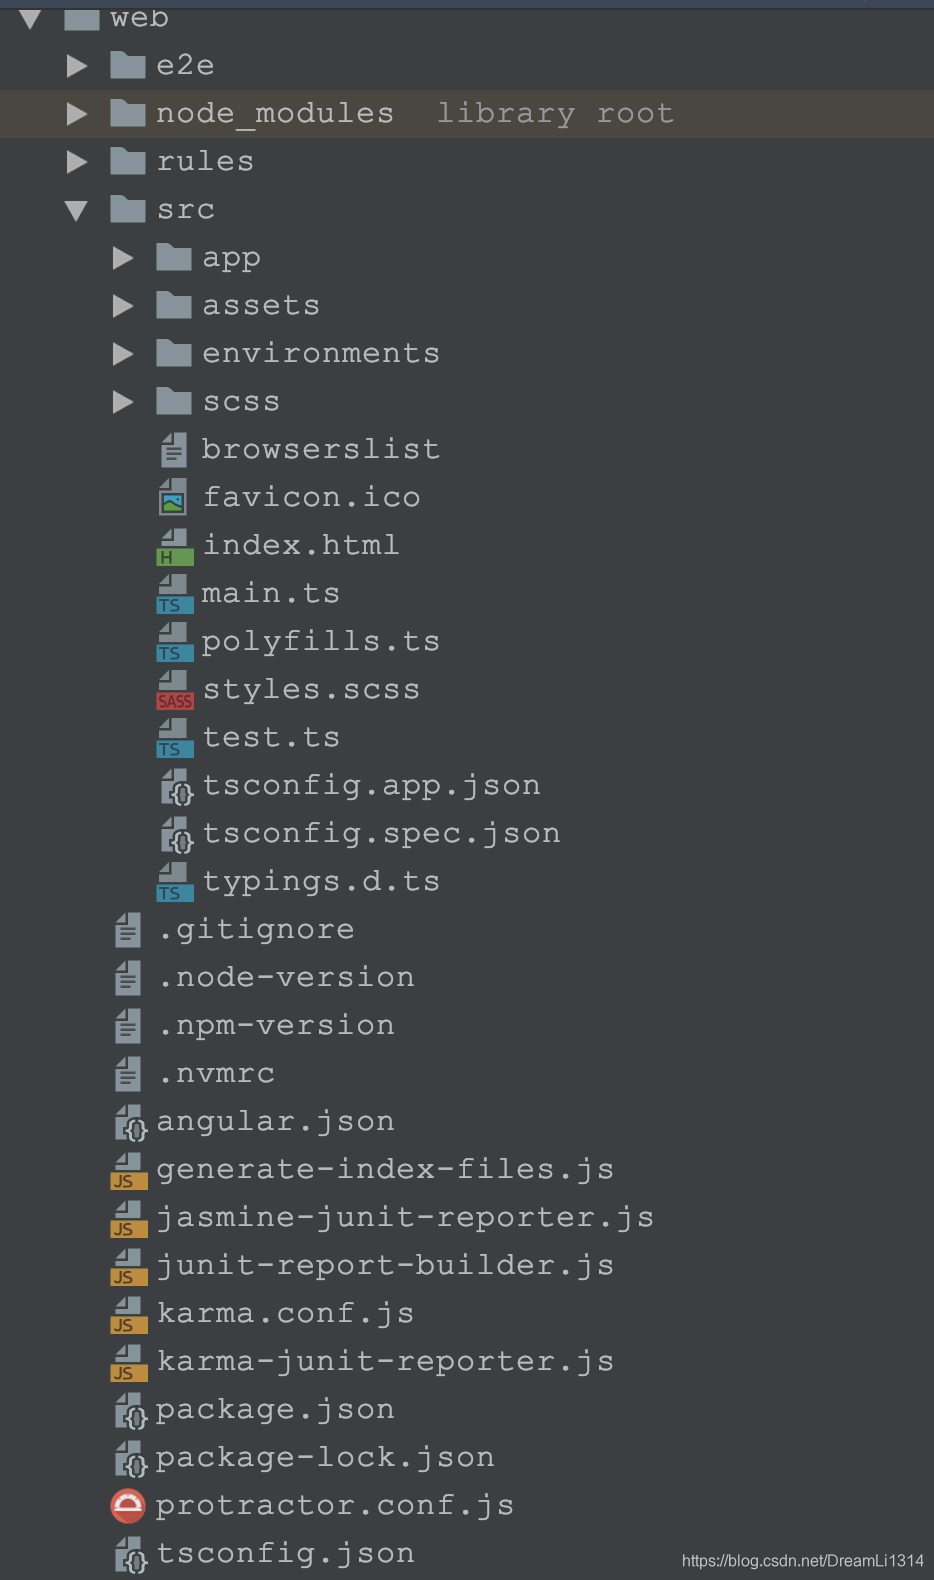
SCSS 目录是笔者项目使用 SCSS 代替了 css 作为首选的样式语言. 这个不影响什么, 看大家喜好就行.
2. 整合 SpringBoot 与 Angular
2.1 Angular 配置
2.1.1 编译输出路径
首先最终项目运行起来是要运行Angular 编译后的 chunk 等 js/html 文件, 所以首先需要将 Angular 的编译输出路径指定到 SpringBoot 的类路径下, 有两种方式:
- 将Angular 编译输出到任意路径下, 添加 SpringBoot 的类路径
- 将 Angular 直接编译输入到 SpringBoot 的默认类路径(static, public, templates 等)下.
笔者这里采用第二种, 即直接将 Angular 编译输出路径指定到 SpringBoot 的默认类路径下, 即 static 文件夹下的 app 目录下.
所以, 修改 angular.json 文件中的 outputPath:
"projects": {
  "angboot-web": {
    "root": "",
    "sourceRoot": "src",
    "projectType": "application",
    "architect": {
      "build": {
        "builder": "@angular-devkit/build-angular:browser",
        "options": {
        // 修改这里
          "outputPath": "../src/main/resources/static/app/",
          "index": "src/index.html",
          "main": "src/main.ts",
          "polyfills": "src/polyfills.ts",
          "tsConfig": "src/tsconfig.app.json",
          "showCircularDependencies": false,
          "assets": [
            "src/favicon.ico",
            "src/assets"
          ],
          "styles": [
            "src/styles.scss"
          ],
          "scripts": []
        },
2.1.2 指定 basehref
修改 web/src/index.html中的 base href 为
<base href="/app/" data-th-href="@{/app/}">
<!doctype html>
<html lang="en">
<head>
  <meta charset="utf-8">
  <title>AngBoot</title>
  <base href="/app/" data-th-href="@{/app/}">

  <meta name="viewport" content="width=device-width, initial-scale=1">
  <link rel="icon" type="image/x-icon" href="favicon.ico">
</head>
<body oncontextmenu="return false">
  <app-root></app-root>
</body>
</html>
由于Angular 的编译输出路径指定在 static 下的 app 文件夹下, 所以 base href 中需要指定 app, 因为 static/ 才是 SpringBoot 的类路径. 这样访问 /app/routerName 才能访问到 angular 中.
2.1.3 配置 Angular 路由
为了便于测试, 在此配置 Angular 的路由, 而且工作中也肯定会有大量的路由存在.
大致配置如下:
项目中声明了两个模块, 使用Angular 懒加载机制进行路由跳转.
const routes: Routes = [
   {
      path: "",
      children: [
         {
            path: "portal",
            loadChildren: "./portal/portal-app.module#PortalAppModule"
         },
         {
            path: "em",
            loadChildren: "./em/em-app.module#EmAppModule"
         },
         {
            path: "**",
            redirectTo: "portal"
         }
      ]}
];
两个子模块的路由配置如下:
const emRoutes: Routes = [
   {
      path: "",
      component: EMAppComponent,
      children: [
         {
            path: "monitor",
            component: EmMonitorComponent
         },
         {
            path: "**",
            redirectTo: "monitor"
         }
      ]
   }
];
const portalRoutes: Routes = [
   {
      path: "",
      component: PortalAppComponent,
      children: [
          {
              path: "welcome",
              component: WelcomeComponent
          },
          {
              path: "**",
              redirectTo: "welcome"
          }
      ]
   }
];
2.2 SpringBoot 配置
由于想要通过
ip:port/contextPath/app/routerPath访问到 Angular 的路由中, 就需要 Server 端(Servlet/SpringMVC/SpringBoot 等等…)指定将 Server 端的 404 全部转发到 angular 编译后的 index.html 页面上, 因为routerPath并没有真正存在于 Server 端的 Controller Mapping 中. 这点可以参考 Angular 官方文档.
SpringBoot 2.x 之后可以通过ErrorPageRegistrar指定ErrorPage:
@Configuration
public class AngBootErrorConfiguration implements ErrorPageRegistrar {

   @Override
   public void registerErrorPages(ErrorPageRegistry registry) {
      ErrorPage[] errorPages = new ErrorPage[1];
      // Angular need server redirect 404 to index of angular.
      errorPages[0] = new ErrorPage(HttpStatus.NOT_FOUND, "/app/index.html");

      registry.addErrorPages(errorPages);
   }
}
将 404 全部重定向到 static/app/index.html(Angular 编译后的输入路径) 下.
这对应于古老的 web.xml 配置中的如下配置:
	<error-page>
		<error-code>404</error-code>
		<location>/app/index.html</location>
	</error-page>
一般来说, 在真实的项目实践中, 在 server 都会存在一个 index.html 作为整个应用程序的首页, 我们在 templates/ 下新建一个 index.html, 并在这个首页上跳转到 angular 的具体模块中.
<!DOCTYPE html>
<html lang="en" xmlns:th="http://www.thymeleaf.org">
<head>
    <meta charset="UTF-8">
    <title>AngBoot</title>
</head>
<body>
    <a href="/app/portal" th:href="@{/app/portal}">Portal</a>
    <br>
    <a href="/app/em" th:href="@{/app/em}">EM</a>
</body>
</html>
3. 测试
首先将 angular 编译, 然后在启动 SpringBoot, 笔者采用 Ant+Maven 的方式自动化编译,构建项目, 如果读者 checkout 笔者的项目 angboot, 可以通过以下步骤启动 server.
- 首先需要读者安装 ant 和 maven, 并配置了环境变量, 即在任意目录下都可以访问 ant/mvn 命令.
- checkout angboot
- 在项目根路径下运行
ant rebuild-all去安装相关 maven 依赖以及 angular 依赖. - 运行
ant server启动服务 - 访问
localhost, 因为 SpringBoot 默认 Contextpath 为/, 而且笔者修改了开发模式下的端口为 80, 因此只需要 ip 就可以访问到 server
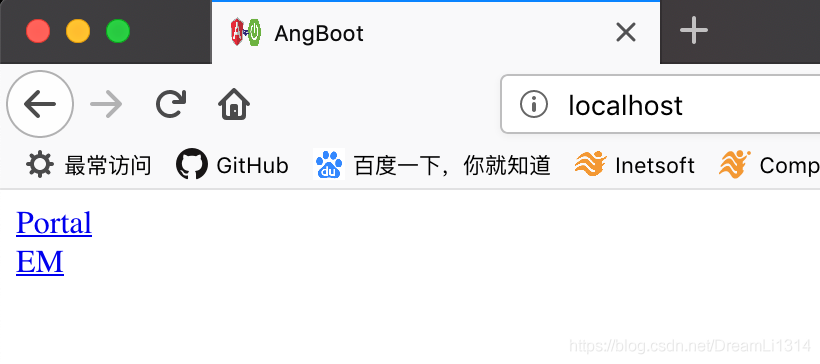
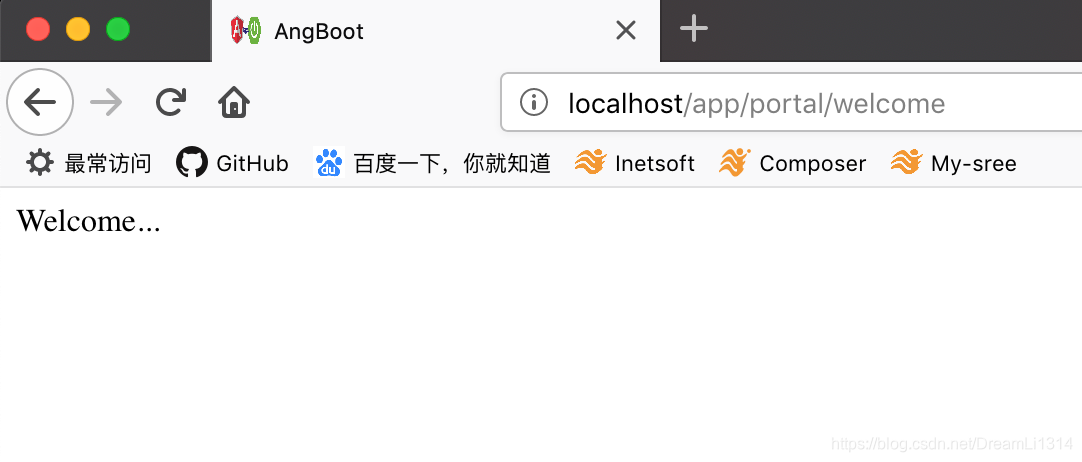
- 点击 portal 的超链接, 就可以看到如下 angular 路由跳转后的界面
关于笔者项目的使用大家可以参考使用手册 angboot document, 改项目笔者会从实际工作开发中不断汲取经验并进行更新, 旨在提供一个开发模板, 聚合必用的功能, 为广大用户提供一个最佳实践架构, 项目刚发布不久, 欢迎大家 star, watch, pull request 提需求, 报 bug, coding 等…
