css引入方式
- 外联式:通过标签的style属性,在标签上直接写样式

在网页存储的文件夹中新建一个样式文件夹css,就跟图片存储一样。
然后写入右边的代码。
div{
	font-size: 32px;
	color: red;
}
在网页文件head模块中利用link嵌入:
<!DOCTYPE html>
<html lang="en">
<head>
	<meta charset="UTF-8">
	<title>Document</title>

<!-- 	引进样式的第一个方法 -->
<link rel="stylesheet" type="text/css" href="css/main.css">
注:这里仅显示部分代码
- 内联式:
直接在head模块里面引入style:
<!DOCTYPE html>
<html lang="en">
<head>
	<meta charset="UTF-8">
	<title>Document</title>

<!-- 	引进样式的第一个方法 -->
<link rel="stylesheet" type="text/css" href="css/main.css">

<!-- 引进样式的第二个方法 -->
	<style type="text/css">
		h1{
			font-size: 20px;
			color:gold
		}
	</style>

</head>
- 嵌入式:在网页上创建嵌入的样式表
<body>
<!-- 第三种方式 :行内样式-->
	<h1>页面标题</h1>
	<div>这是一个css标签</div>
	<a href="http://www.baidu.com" style="font-size: 20px;color: pink" >百度一下</a>

</body>
例如:直接在a标签内添加style样式
css常用样式属性
文本常用样式
-
color 设置文字的颜色,如: color:red;
-
font-size 设置文字的大小,如:font-size:12px;
-
font-family
设置文字的字体,如:font-family:‘微软雅黑’;为了避免中文字不兼容,一般写成:font-family:‘Microsoft Yahei’; -
font-weight 设置文字是否加粗,如:font-weight:bold; 设置加粗 font-weight:normal
设置不加粗 -
line-height 设置文字的行高,如:line-height:24px;表示文字高度加上文字上下的间距是24px,也就是每一行占有的高度是24px
-
text-decoration 设置文字的下划线,如:text-decoration:none; 将文字下划线去掉,一般用于去掉下划线,比如网页链接会有下划线,一般去掉会好看一些。
-
font-style:设置倾斜,后面跟normal表示不倾斜
div{
	font-size: 20px;
	color: blue;
	font-family: 'SimSun';
	line-height: 30px
}
em{
	font-style;
	font-weight: bold;
	color: green;
}
h1{
	font-weight: normal;
}
注:当对文本的字体进行一起设置的时候,要按照顺序来:加粗 字体大小/行高 字体
div{

	font: normal 20px/40px ;
	color: blue;
	line-height: 30px
}
- text-indent: 40px; 首行缩进,可以根据字符大小确定首行缩进几个字符
- text-align:left 选择文本居中(center), 靠左(left),靠右(right)
注:若对网址设置该样式,则该样式不会居中到整个网页中,因为段落的宽度默认是整个网页的宽度,但是链接不会,因为宽度是默认默认文本长度。如果需要居中 的话,需要转换文字类型
css选择器
如果想对同一层级的标签进行分层修改,应该怎样修改,用选择器修改
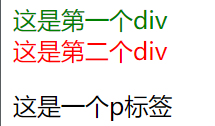
id 选择器
id 是所有标签的属性,所有标签都有id号
<style type="text/css">
		div{
			color: red;
		}
		#div1{
			color: green;
		}
	</style>
<body>
	<div id="div1">这是第一个div</div>
	<div>这是第二个div</div>
	<p>这是一个p标签</p>
</body>
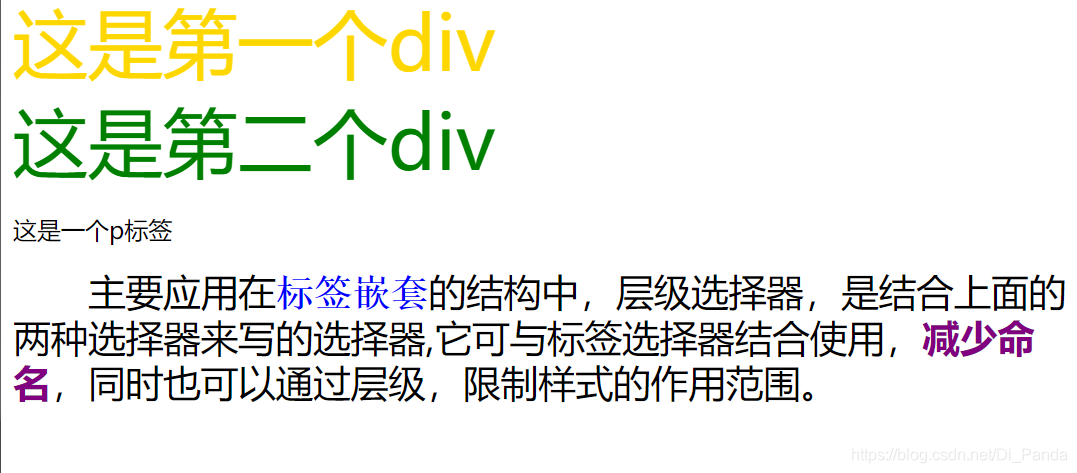
类选择器
定义一个类,多处重合
/* 		定义id选择器 */
		#div1{
			color: gold;
		}
/* 		定义类选择器 */
		.green{
			color: green;
		}
		.big{
			font-size: 50px;
		}
<!-- 	使用id选择器和类的选择器 -->
	<div id="div1" class="big">这是第一个div</div>
	<div class="green big">这是第二个div</div>
	<p>这是一个p标签</p>
注:当id选择器和类选择器冲突的时候,优先选择id选择器
层级选择器
主要应用在标签嵌套的结构中,层级选择器,是结合上面的两种选择器来写的选择器,它可与标签选择器结合使用,减少命名,同时也可以通过层级,限制样式的作用范围。
一般层级选择器不会超过4种,不然会降低网页性能
/* 定义层级选择器:这样的话只会改变“标签嵌套”,而不会改变“第一个” */
		.box span{
			color:purple;
			font-weight: bold;
		}
		.box .box02{
			color: blue;
			font-family: "simsun";
	<div id="div1" class="big">这是<span>第一个</span>div</div>
	<div class="green big">这是第二个div</div>

	<div class="box">主要应用在<span class="box02">标签嵌套</span>的结构中,层级选择器,是结合上面的两种选择器来写的选择器,它可与标签选择器结合使用,<span>减少命名</span>,同时也可以通过层级,限制样式的作用范围。</div>
组合选择器
定义不同选择器种相同的部分,比如有三个选择器,前两种样式都一样,就颜色不一样,可以简化成如下写法:
<style type="text/css">
		.box01,.box02,.box03{
			font-size: 20px;
			text-indent: 40px;
		}
		.box01{
			color: red;
		}
		.box02{
			color: pink;
		}
		.box03{
			color: gold;
		}

	</style>
<!-- 简便写法:.box01+tab -->
	<div class="box01">1</div>
	<div class="box02">2</div>
	<div class="box03">3</div>
伪类及伪元素选择器
伪类:比如设置一个链接,把鼠标放上去就可以实现变色
<a href="http://www.baidu.com" class="link" target="blank">百度一下</a>
.link{
			font-size: 30px;
			text-decoration: none;
			color: green;
		}
		.link:hover{
			color: gold;
			font-weight: bold;
		}
把鼠标放上去就变成黄色了
伪元素:无法选中的元素
.box01,.box02{
			font-size: 20px;
		}
		.box01:before{
			content: "前面文字";
			color: red;
		}
		.box02:after{
			content: '后面文字';
			color: gold;
		}
	<div class="box01">这是一个div</div>
	<div class="box02">这是一个div</div>
~~删除线格式~~ ```
