整体思路:ssm框架整合,以spring为业务层框架,spring MVC为控制层框架,mybatis为持久层框架。
明白了这些,我们就可以创建以下一些包:
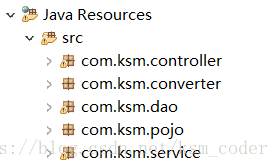
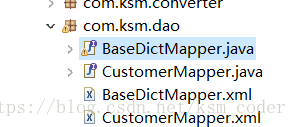
1.我们可以先从持久层开始入手,先对应数据库中的表,创建pojo实体类包,然后再创建mapper接口和对应的mapper配置文件 注意!!!mapper文映射件要和mapper接口放在同一个目录下,(这里我们使用的是接口动态代理的方式,如果不想手动写,可以使用mybatis逆向工程来生成),然后dao层差不多就编写好了。
2.写好dao后,我们就可以编写mybatis的配置文件了。
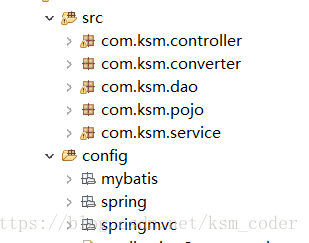
再src目录下创建一个资源文件夹config,为了整洁明了,每一块都创建一个文件架存放配置文件,如下图:
在mybatis文件夹下创建名为sqlMapConfig.xml的配置文件:
<?xml version="1.0" encoding="UTF-8" ?>
<!DOCTYPE configuration
PUBLIC "-//mybatis.org//DTD Config 3.0//EN"
"http://mybatis.org/dtd/mybatis-3-config.dtd">
<configuration>
</configuration>
1).我们了解到mybatis是一个持久层的框架,也是对jdbc的轻量级封装,而jdbc是连接数据库的桥梁,所以我们得先配置数据源,这里使用的是阿里巴巴出品的DruidDataSource连接池。
2)因为我们使用了spring框架进行整合,我们的连接池就不用配置在sqlMapConfig.xml里了,应在config资源目录下的spring文件架中创建一个applicationContext-dao.xml的配置文件,将数据源配置写在里面。
<beans xmlns="http://www.springframework.org/schema/beans"
	xmlns:context="http://www.springframework.org/schema/context" xmlns:p="http://www.springframework.org/schema/p"
	xmlns:aop="http://www.springframework.org/schema/aop" xmlns:tx="http://www.springframework.org/schema/tx"
	xmlns:xsi="http://www.w3.org/2001/XMLSchema-instance"
	xsi:schemaLocation="http://www.springframework.org/schema/beans http://www.springframework.org/schema/beans/spring-beans-4.0.xsd
	http://www.springframework.org/schema/context http://www.springframework.org/schema/context/spring-context-4.0.xsd
	http://www.springframework.org/schema/aop http://www.springframework.org/schema/aop/spring-aop-4.0.xsd http://www.springframework.org/schema/tx http://www.springframework.org/schema/tx/spring-tx-4.0.xsd
	http://www.springframework.org/schema/util http://www.springframework.org/schema/util/spring-util-4.0.xsd">

	<!-- 加载配置文件 -->
	<context:property-placeholder location="classpath:db.properties" />
	<!-- 数据库连接池 -->
	<bean id="dataSource" class="com.alibaba.druid.pool.DruidDataSource"
		destroy-method="close">
		<property name="driverClassName" value="${jdbc.driver}" />
		<property name="url" value="${jdbc.url}" />
		<property name="username" value="${jdbc.username}" />
		<property name="password" value="${jdbc.password}" />
		<property name="maxActive" value="10" />
		<property name="maxIdle" value="5" />
	</bean>
</beans>
这里使用的是用properties文件存放数据库的连接信息,因为数据库信息时常改变,如果在配置文件中写死,不利于后期维护,所以在根目录下创建一个db.properties文件,存放数据库连接信息:
jdbc.driver=com.mysql.jdbc.Driver
jdbc.url=jdbc:mysql://localhost:3306/crm_ssm?characterEncoding=utf-8
jdbc.username=root
jdbc.password=123
数据源准备好后,我们应该想mybatis应该和hibernate一样,有一个会话工厂,给我们创建会话,以便于我们拿到会话对数据库进行crud操作。所以我们现在要来配置sqlSessionFactory工厂了。
3)因为都是和mybatis相关的东西,我们就写在applicationContext-dao.xml 配置文件中了
<!-- 配置会话工厂 将工厂交予spring管理 -->
	<bean id="sqlSessionFactory" class="org.mybatis.spring.SqlSessionFactoryBean">
		<!-- 注入mybatis核心配置文件 -->
		<property name="configLocation" value="classpath:mybatis/sqlMapConfig.xml"></property>
		<!-- 指定会话工厂使用的数据源 -->
		<property name="dataSource" ref="dataSource"></property>
	</bean>
数据源,会话工厂都有了,我们还缺一个东西,那就是加载mapper接口了,这里我使用的是包扫描的方式注入,因为配置文件太多,如果一个一个写的话配置文件会看起来非常笨重,也不符合软件工程的思想。
<!-- 使用包扫描的方式引入mapper对象
		 class:动态代理对象
		 如果有多个包用,号分割
		 需要调用时,bean的id为类名首字母小写,其他不变
	 -->
	<bean class="org.mybatis.spring.mapper.MapperScannerConfigurer">

		<property name="basePackage" value="com.ksm.dao"></property>

	</bean>
配置到这,我们mybatis部分就算是整合完了!
3.接下来就是spring 的部分了,业务层框架,首先我们得创建一个业务层的配置文件applicationContext-service.xml,
在这个文件中,我们不需要写太多东西,只是将写好的service类交予spring管理。这里我们使用的是注解扫描,我们只要在编写好的service类上加上@Service注解

就可以使用注解扫描啦!
<?xml version="1.0" encoding="UTF-8"?>
<beans xmlns="http://www.springframework.org/schema/beans"
	xmlns:context="http://www.springframework.org/schema/context"
	xmlns:p="http://www.springframework.org/schema/p"
	xmlns:aop="http://www.springframework.org/schema/aop"
	xmlns:tx="http://www.springframework.org/schema/tx"
	xmlns:xsi="http://www.w3.org/2001/XMLSchema-instance"
	xsi:schemaLocation="http://www.springframework.org/schema/beans http://www.springframework.org/schema/beans/spring-beans-4.0.xsd
	http://www.springframework.org/schema/context http://www.springframework.org/schema/context/spring-context-4.0.xsd
	http://www.springframework.org/schema/aop http://www.springframework.org/schema/aop/spring-aop-4.0.xsd http://www.springframework.org/schema/tx http://www.springframework.org/schema/tx/spring-tx-4.0.xsd
	http://www.springframework.org/schema/util http://www.springframework.org/schema/util/spring-util-4.0.xsd">

	<!-- 添加service包扫描 -->
	<context:component-scan base-package="com.ksm.service"/>

</beans>
好了 ,这些配置文件都编写好了,我们再想,还有重要的一环,事务管理还没加呢!所以,我在classpath目录下创建了一个applicationContext.xml文件。在里面开始配置事务。
<?xml version="1.0" encoding="UTF-8"?>
<beans xmlns="http://www.springframework.org/schema/beans"
	xmlns:context="http://www.springframework.org/schema/context" xmlns:p="http://www.springframework.org/schema/p"
	xmlns:aop="http://www.springframework.org/schema/aop" xmlns:tx="http://www.springframework.org/schema/tx"
	xmlns:xsi="http://www.w3.org/2001/XMLSchema-instance"
	xsi:schemaLocation="http://www.springframework.org/schema/beans http://www.springframework.org/schema/beans/spring-beans-4.0.xsd
	http://www.springframework.org/schema/context http://www.springframework.org/schema/context/spring-context-4.0.xsd
	http://www.springframework.org/schema/aop http://www.springframework.org/schema/aop/spring-aop-4.0.xsd http://www.springframework.org/schema/tx http://www.springframework.org/schema/tx/spring-tx-4.0.xsd
	http://www.springframework.org/schema/util http://www.springframework.org/schema/util/spring-util-4.0.xsd">


	<!-- 事务管理器 -->
	<bean id="transactionManager"
		class="org.springframework.jdbc.datasource.DataSourceTransactionManager">
		<!-- 数据源 -->
		<property name="dataSource" ref="dataSource"/>
	</bean>
	<!-- 通知 -->
	<tx:advice id="txAdvice" transaction-manager="transactionManager">
		<tx:attributes>
			<!-- 传播行为 -->
			<tx:method name="save*" propagation="REQUIRED"/>
			<tx:method name="insert*" propagation="REQUIRED"/>
			<tx:method name="delete*" propagation="REQUIRED"/>
			<tx:method name="update*" propagation="REQUIRED"/>
			<tx:method name="find*" propagation="SUPPORTS" read-only="true"/>
			<tx:method name="get*" propagation="SUPPORTS" read-only="true"/>
		</tx:attributes>
	</tx:advice>
	<!-- 切面 -->
	<aop:config>
		<aop:advisor advice-ref="txAdvice"
			pointcut="execution(* com.ksm.service.*.*(..))"/>
	</aop:config>
</beans>
1)先配置事务管理器,这个不用多说,然后配置通知,通知其实就是绝对在那些方法名上加事务,事务管理大致都是相同的,需要我们改变的只是切面中的表达式,改成我们对应的事务层。
2)事务我们配置好之后,我们再想,那两个配置文件该如何被加载呢?这里我们使用的是import组装到这个总配置文件中,
<!--组装其它 配置文件-->
	<import resource="classpath:spring/applicationContext-dao.xml"></import>
	<import resource="classpath:spring/applicationContext-service.xml"></import>
这样的话,在applicationContext.xml被加载的时候,这两个配置文件也会被加载。OK,那applicationContext.xml怎么能被加载呢。这时候就得到web.xml中配置了。
3)在web.xml中配置一个文件加载的监听器,在项目启动的时候被加载
 <!--spring配置文件的加载的监听 器-->
    <context-param>
    	<param-name>contextConfigLocation</param-name>
    	<param-value>classpath:applicationContext.xml</param-value>

    </context-param>
    <listener>
    	<listener-class>org.springframework.web.context.ContextLoaderListener</listener-class>

    </listener>
到这里,我们mybatis和spring的整合就完成了!
3.spring MVC和spring整合
1)我们知道spring MVC是一个表现层框架,也是spring的子框架,自带控制反转的功能,所以不需要怎么和spring进行整合,只需要在springmvc下创建一个springmvc.xml配置文件,然后使用注解扫描的方式注入,controlller类只需要加上@Controller注解即可
<?xml version="1.0" encoding="UTF-8"?>
<beans xmlns="http://www.springframework.org/schema/beans"
	xmlns:xsi="http://www.w3.org/2001/XMLSchema-instance"
	xmlns:p="http://www.springframework.org/schema/p"
	xmlns:context="http://www.springframework.org/schema/context"
	xmlns:dubbo="http://code.alibabatech.com/schema/dubbo"
	xmlns:mvc="http://www.springframework.org/schema/mvc"
	xsi:schemaLocation="http://www.springframework.org/schema/beans
		http://www.springframework.org/schema/beans/spring-beans-4.0.xsd
        http://www.springframework.org/schema/mvc
        http://www.springframework.org/schema/mvc/spring-mvc-4.0.xsd
        http://code.alibabatech.com/schema/dubbo
        http://code.alibabatech.com/schema/dubbo/dubbo.xsd
        http://www.springframework.org/schema/context
        http://www.springframework.org/schema/context/spring-context-4.0.xsd">

        <!-- 添加controller包扫描 -->
         <context:component-scan base-package="com.ksm.controller" />

</beans>
2)类已经进来了,那么我们再想,springmvc的工作原理,是使用三大处理器,用户发送请求过来后,spring核心的servlet将请求路径发送到处理器映射器,处理器映射器根据url给我们生成处理器对象,再返回给核心servlet,然后核心servlet再发送给处理器适配器,处理器适配器找到合适的处理器执行操作,并且返回一个ModelAndView对象,然后再通过视图解析器解析,最后返回到核心servlet,核心servlet再渲染视图,并且跳转到view.
3)大概就是如此,那么了解到这些后,我们就想那三大处理器框架如何知道调用呢,这时就需要我们手动来配置了。这里使用的依旧是注解扫描,(注解扫描真的方便)
 <!--
        	配置注解扫描驱动
        	作用:替我们配置最新的处理器映射器和处理器适配器
         -->
         <mvc:annotation-driven conversion-service="conversionService"></mvc:annotation-driven>
其实视图解析器可以不用配置使用默认的即可,但是为了我们在controller写代码方便,我们还是配置一下
<!--
         	配置视图解析器(默认是jsp,为了写代码方便,配上前缀和后缀)
          -->
          <bean class="org.springframework.web.servlet.view.InternalResourceViewResolver">

          <property name="viewClass" value="org.springframework.web.servlet.view.JstlView"/>

          		<!-- 前缀 -->
          		<property name="prefix" value="/WEB-INF/jsp/"></property>
          		<!-- 后缀 -->
          		<property name="suffix" value=".jsp"></property>
          </bean>
到这里,springmvc.xml就算是配置完成了。
4)那么他是如何被加载呢?所以我们要在web.xml中配置他的核心servlet
<!-- 配置springmvc核心控制器 -->
  <servlet>
  	<servlet-name>springmvc</servlet-name>
  	<servlet-class>org.springframework.web.servlet.DispatcherServlet</servlet-class>
  	<init-param>
  		<param-name>contextConfigLocation</param-name>
  		<param-value>classpath:springmvc/springmvc.xml</param-value>
  	</init-param>
  </servlet>
  <servlet-mapping>
  	<servlet-name>springmvc</servlet-name>
  	<!--
  		*.action     拦截所有后缀名为.action的请求
  		/            拦截所有请求 不包括.jsp
  		/*           拦截所有

  	 -->
  	<url-pattern>*.action</url-pattern>
  </servlet-mapping>
到这里 springmvc算是整合完了。
4.存在post请求乱码的问题,我们需要在web.xml中加入以下配置
 <!-- 解决post乱码问题 -->
  <filter>
		<filter-name>CharacterEncodingFilter</filter-name>
		<filter-class>org.springframework.web.filter.CharacterEncodingFilter</filter-class>
		<init-param>
			<param-name>encoding</param-name>
			<param-value>utf-8</param-value>
		</init-param>
	</filter>
	<filter-mapping>
		<filter-name>CharacterEncodingFilter</filter-name>
		<url-pattern>/*</url-pattern>
	</filter-mapping>
5.为了以后调bug方便,我们应在classpath下加入log4j.properties文件
# Global logging configuration
log4j.rootLogger=DEBUG, stdout
# Console output...
log4j.appender.stdout=org.apache.log4j.ConsoleAppender
log4j.appender.stdout.layout=org.apache.log4j.PatternLayout
log4j.appender.stdout.layout.ConversionPattern=%5p [%t] - %m%n
以上,就是我整合ssm的全过程!接下来我还会继续写有关于controller类的编写,mapper接口和对应的配置文件的编写。