为了给一张图片加坐标轴,调用openCV,用了两天的时间写了个简化版的版本,直到我看到了这个:
点击打开链接 以及这个:http://answers.opencv.org/question/73233/how-do-you-plot-graphs-in-opencv-projects/
好吧,两天写的其实没什么用。
为了给一张伪彩图上面加坐标轴,我首先参考了:https://blog.csdn.net/xiaoxiaodongshige/article/details/48134895,实现的功能类似于MATLAB的plot功能,我的程序也是根据这个改编的,在XY轴坐标下画曲线。但是,我是要给一张完整的图片加坐标轴,所以相对而言,要简单些,然后就做了一个简单的类,四个函数包括:1.加载内图及规定大小的外框图;2.添加X轴;3.添加Y轴;4.添加标题。
本程序是在MFC里面调openCV作的图,所以还要涉及如何将Mat显示在MFC里面直接显示的问题。请参考:https://blog.csdn.net/ylj135cool/article/details/45933361,中的第一种方法,很好用的。以下是写的源代码:
CPlot_myy.h
#pragma once
#include <opencv2\opencv.hpp>
#include <cmath>
#include <stdio.h>
#include <stdlib.h>
#include <iostream>
#include <vector>
#include <math.h>

using namespace cv;
using namespace std;

class CPlot_myy
{
public:
	Mat imginside;  //传入的中间的伪彩图
	Mat imgoutside;//整个外框


	//int window_height; //总窗口大小,高
	//int window_width;  //总窗口大小,宽

	int instartcols;//经计算得的内图像宽开始处
	int instartrows;//经计算得的内图像高开始处


	//CvScalar backgroud_color;//背景颜色,未更改
	//CvScalar axis_color;//坐标轴颜色
	//CvScalar text_color;//字体颜色


	//double y_max;//最大值
	//double y_min;//最小值
	//double y_number;//数字个数

	//double x_max;
	//double x_min;
	//double x_number;

	////边界大小
	//int border_size;


	void Inputfigure(Mat insidefigure, Mat outerframe);//把图片及外框大小加载进入大图片,并在大框中放置图片
	void xlabel(string xlabel_name, CvScalar label_color, double x_max, double x_min, const int x_number);//添加x轴
    void ylabel(string ylabel_name, CvScalar label_color, double y_max, double y_min,  const int y_number);//添加y轴
	//清空图片上的数据
	//void clear();

	void title(string title_name, CvScalar title_color = Scalar(0, 0, 0));//添加标题

	CPlot_myy();
	~CPlot_myy();

};
CPlot_myy.cpp
#include "stdafx.h"
#include "Plot_myy.h"
#include <sstream>

CPlot_myy::CPlot_myy()
{
}


CPlot_myy::~CPlot_myy()
{
}

void CPlot_myy::Inputfigure(Mat insidefigure, Mat outerframe)
{
	this->imginside = insidefigure;
	this->imgoutside = outerframe;
	this->instartcols = outerframe.cols - insidefigure.cols - 10;
	this->instartrows = outerframe.rows - insidefigure.rows - 50;
	for (int i = 0; i < insidefigure.rows; i++)
	{
		for (int j = 0; j < insidefigure.cols; j++)
		{
			this->imgoutside.at<Vec3b>(i+ instartrows,j+instartcols)= this->imginside.at<Vec3b>(i,j);
		}

	}

}

void CPlot_myy::ylabel(string ylabel_name, CvScalar label_color, double y_max, double y_min, const int y_number)
{
	line(this->imgoutside, Point(this->instartcols - 1,this->instartrows - 1 ), Point( this->instartcols - 1,this->instartrows + this->imginside.rows ), label_color, 1, 8, 0);
	line(this->imgoutside, Point(this->instartcols + this->imginside.cols ,this->instartrows - 1),  Point(this->instartcols + this->imginside.cols , this->instartrows + this->imginside.rows ), Scalar(0, 0, 0), 1, 8, 0);
	int ylabel_step = this->imginside.rows / y_number;

	for (int y = 0; y <= y_number; y++)
	{
		double y_jhj = double(y*ylabel_step) / double(this->imginside.rows)*(y_max - y_min) + y_min;
		char str[20];
		sprintf_s(str, 19,"%.0lf", y_jhj);
		string result = str;
		line(this->imgoutside, Point(this->instartcols - 10, this->instartrows + this->imginside.rows - y*ylabel_step), Point(this->instartcols - 1, this->instartrows + this->imginside.rows - y*ylabel_step), label_color, 1, 8, 0);
		putText(this->imgoutside, result, Point(this->instartcols - 30, this->instartrows + this->imginside.rows - y*ylabel_step +3), CV_FONT_HERSHEY_SIMPLEX, 0.3, label_color, 1, 8);
	}
	int baseline;
	Size text_size = cv::getTextSize(ylabel_name, CV_FONT_HERSHEY_SIMPLEX, 1, 8, &baseline);

	Mat TextSizeframe = Mat(text_size.height + 5, text_size.width/2, CV_8UC3, Scalar(255, 255, 255));
	putText(TextSizeframe, ylabel_name, Point(0, text_size.height-1), CV_FONT_HERSHEY_SIMPLEX, 0.5, label_color, 1, 8);
	///////////////////////////////
	//cvNamedWindow("hello", 1);
	//imshow("hello", TextSizeframe);
	//cvWaitKey(0);
	///////////////////////////////
	Mat TextSizeframe1, TextSizeframe2;
    transpose(TextSizeframe, TextSizeframe2);
	//transpose(TextSizeframe2, TextSizeframe1);
	flip(TextSizeframe2, TextSizeframe1, 0);
	for (int i = 0; i < TextSizeframe1.rows; i++)
	{
		for (int j = 0; j < TextSizeframe1.cols; j++)
		{
			this->imgoutside.at<Vec3b>(i + instartrows + this->imginside.rows/2 - 80, j + instartcols -60) = TextSizeframe1.at<Vec3b>(i, j);
		}

	}


}

void CPlot_myy::xlabel(string xlabel_name, CvScalar label_color, double x_max, double x_min, const int x_number)
{
	line(this->imgoutside, Point(this->instartcols - 1, this->instartrows - 1), Point(this->instartcols + this->imginside.cols , this->instartrows - 1), Scalar(0, 0, 0), 1, 8, 0);
	line(this->imgoutside, Point(this->instartcols - 1, this->instartrows + this->imginside.rows ), Point(this->instartcols + this->imginside.cols , this->instartrows + this->imginside.rows ), label_color, 1, 8, 0);


	int xlabel_step = this->imginside.cols / x_number;

	for (int x = 0; x <= x_number; x++)
	{
		double x_jhj = double(x*xlabel_step) / double(this->imginside.cols)*(x_max - x_min) + x_min;
		char str[20];
		sprintf_s(str, 19, "%.0lf", x_jhj);
		string result = str;
		line(this->imgoutside, Point(this->instartcols + x*xlabel_step, this->instartrows + this->imginside.rows), Point(this->instartcols + x*xlabel_step, this->instartrows + this->imginside.rows +10), label_color, 1, 8, 0);
		putText(this->imgoutside, result, Point(this->instartcols + x*xlabel_step-10, this->instartrows + this->imginside.rows +20), CV_FONT_HERSHEY_SIMPLEX, 0.3, label_color, 1, 8);
	}
	putText(this->imgoutside, xlabel_name, Point(this->instartcols + this->imginside.cols/2, this->instartrows + this->imginside.rows + 40), CV_FONT_HERSHEY_SIMPLEX, 0.5, label_color, 1, 8);
}

void CPlot_myy::title(string title_name, CvScalar title_color)
{
	putText(this->imgoutside, title_name, Point(this->instartcols + this->imginside.cols / 2 -200, this->instartrows - 20), CV_FONT_HERSHEY_SIMPLEX, 1, title_color, 1, 8);
}
调用方法:
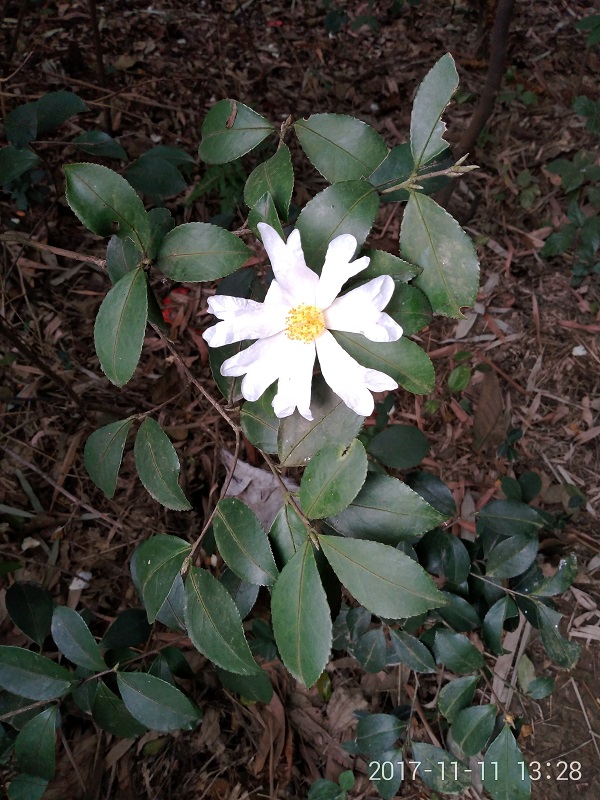
	Mat img = imread("E:\\Files\\花.jpg");
	Mat dst;
	boxFilter(img, dst, IPL_DEPTH_8U, Size(3, 3), Point(-1, -1), true, BORDER_DEFAULT);
	//applyColorMap(myMat, im_color, COLORMAP_JET);//相当好的伪彩图语句?

	Mat kuangjia =Mat(dst.rows+100, dst.cols+70, CV_8UC3, Scalar(255,255,255));

	CPlot_myy outputplot;
	outputplot.Inputfigure(dst, kuangjia);
	string yylabel = "Height";
	string xxlabel = "Width";
	string ttitle_name = "Temperature and strain";
	outputplot.ylabel(yylabel, Scalar(0, 0, 0),500,0,10);
	outputplot.xlabel(xxlabel, Scalar(0, 0, 0), 500, 0, 10);
	outputplot.title(ttitle_name);
	//imshow("view", outputplot.imgoutside);//显示图像
	imshow("view", kuangjia);
结果,原图:
效果图:
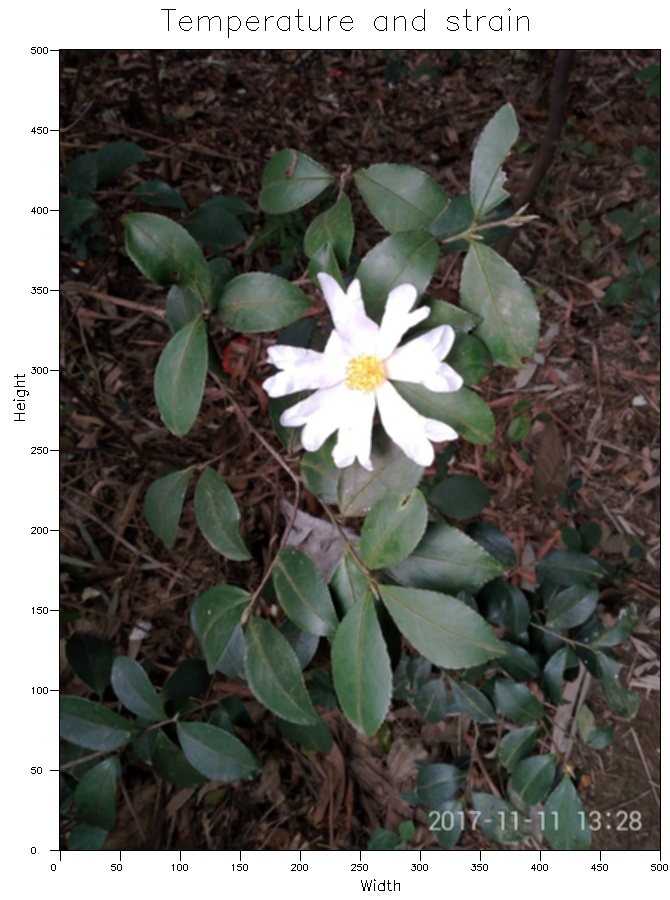
有以下几点说明:
(1)程序先执行以下函数,才规定了Mat的大小,然后再添加X轴,Y轴和标题。
Inputfigure(Mat insidefigure, Mat outerframe)
(2)程序需要根据XY轴及标题大小调整函数的值,才能使标题居中。
(3)类没掌握好,构造析构均没用,应该有Bug。
(4)https://blog.csdn.net/xiaoxiaodongshige/article/details/48134895,与其不同的是,我采用Mat格式,而没有采用IplImage* Figure,