1,你需要申请一个邮箱
1,申请一个 163 的邮箱并登入,这个很简单
2,如下图进入设置
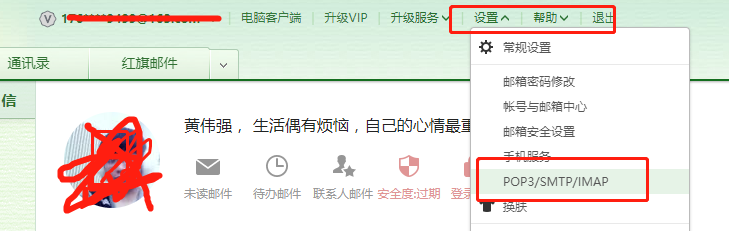
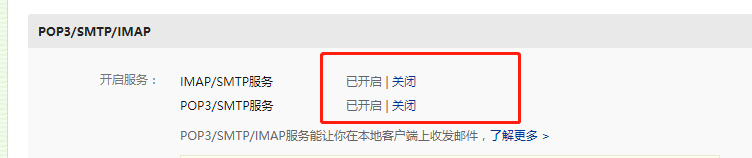
3,确定下图中的选项为开启状态,切记,开启功能的时候,系统会给你分配一个授权码,只会显示一次,一定要记录下来
2,SpringBoot 框架整合
1,pom.xml
<!-- FreeMarker 模板引擎,用于生成邮件内容 -->
<dependency>
    <groupId>org.springframework.boot</groupId>
    <artifactId>spring-boot-starter-freemarker</artifactId>
</dependency>
<!-- 邮件发送的依赖 -->
<dependency>
    <groupId>org.springframework.boot</groupId>
    <artifactId>spring-boot-starter-mail</artifactId>
</dependency>
2,application.yml
spring:
  freemarker:
    enabled: true
    cache: true
    content-type: text/html
    charset: UTF-8
    check-template-location: true
    template-loader-path: classpath:templates
    # prefix:
    suffix: .ftl
    prefer-file-system-access: true
    allow-request-override: false
    allow-session-override: false
    expose-request-attributes: false
    expose-session-attributes: false
    expose-spring-macro-helpers: false
  mail:
    host: smtp.163.com
    username: 你的邮箱账号
    password: 授权码(注意,不是邮箱的密码)
3,封装一个文件类,在发送附件和静态资源的时候使用
package com.hwq.common.vo;

import lombok.Getter;
import lombok.Setter;

import java.io.File;

@Getter
@Setter
public class MailFileVo {

    /**
     * 1,当作为静态资源时,代表资源的唯一标识,可以插入到 html 内容中,如 img 标签的 src 属性
     * 2,当作为附件时,作为附件的名称
     */
    private String name;

    /**
     * 文件对象,可以是附件也可以是静态资源
     */
    private File file;

}
4,封装一个发送邮件的类,
package com.hwq.web.server.service;

import com.hwq.common.vo.MailFileVo;
import org.apache.commons.collections4.CollectionUtils;
import org.springframework.beans.factory.annotation.Autowired;
import org.springframework.beans.factory.annotation.Value;
import org.springframework.mail.javamail.JavaMailSender;
import org.springframework.mail.javamail.MimeMessageHelper;
import org.springframework.stereotype.Service;

import javax.mail.Address;
import javax.mail.Message;
import javax.mail.MessagingException;
import javax.mail.internet.InternetAddress;
import javax.mail.internet.MimeMessage;
import java.util.List;

@Service
public class MailService {

    @Autowired
    private JavaMailSender mailSender;

    @Value("${spring.mail.username}")
    private String fromMail;

    /**
     * 发送邮件的方法
     *
     * 三种收件人模式的解释
     * 1,Message.RecipientType.TO  直接接收人
     * 2,Message.RecipientType.CC  明抄送收件人
     * 3,Message.RecipientType.BCc 暗抄送收件人(不会 被直接收件人 和 明抄送收件人 看见的收件人)
     *
     * @param toAddr  收件人的 邮件地址
     * @param ccAddr  抄送人的 邮件地址
     * @param subject 邮件标题
     * @param html    邮件内容
     * @param srcVos  静态资源类
     * @param athVos  附件资源类
     */
    public void sendMail(String[] toAddr, String[] ccAddr, String subject, String html, List<MailFileVo> srcVos, List<MailFileVo> athVos) {
        try {
            MimeMessage message = mailSender.createMimeMessage();
            MimeMessageHelper helper = new MimeMessageHelper(message, true);
            helper.setFrom(fromMail);
            helper.setSubject(subject);
            helper.setText(html, true);
            if (toAddr != null && toAddr.length > 0) {
                Address[] addresses = new Address[toAddr.length];
                for (int i = 0; i < toAddr.length; i ++) {
                    addresses[i] = new InternetAddress(toAddr[i]);
                }
                message.setRecipients(Message.RecipientType.TO, addresses);
            }
            if (ccAddr != null && ccAddr.length > 0) {
                Address[] addresses = new Address[ccAddr.length];
                for (int i = 0; i < ccAddr.length; i ++) {
                    addresses[i] = new InternetAddress(ccAddr[i]);
                }
                message.setRecipients(Message.RecipientType.CC, addresses);
            }
            if (CollectionUtils.isNotEmpty(srcVos)) {
                for (MailFileVo srcVo : srcVos) {
                    helper.addInline(srcVo.getName(), srcVo.getFile());
                }
            }
            if (CollectionUtils.isNotEmpty(athVos)) {
                for (MailFileVo athVo : athVos) {
                    helper.addAttachment(athVo.getName(), athVo.getFile());
                }
            }
            mailSender.send(message);
        } catch (MessagingException ex) {
            ex.printStackTrace();
            throw new RuntimeException(ex.getMessage());
        }
    }

}
5,准备一个邮件模板,mail.ftl
<style type="text/css">
    .mail-table {
        width: 100%;
        border-top: 1px solid #333;
        border-left: 1px solid #333;
        border-collapse: collapse;
        border-spacing: 0;
    }
    .mail-table tr {

    }
    .mail-table th {
        background: rgb(255, 204, 204);
        height: 40px;
        border-bottom: 1px solid #333;
        border-right: 1px solid #333;
    }
    .mail-table td {
        height: 36px;
        text-indent: 14px;
        border-bottom: 1px solid #333;
        border-right: 1px solid #333;
    }
</style>

<h3>${title}</h3>
<table class="mail-table">
    <tr>
        <th>序号</th>
        <th>账号</th>
        <th>昵称</th>
    </tr>
    <#list users as user>
    <tr>
        <td>${user_index + 1}</td>
        <td>${user.account}</td>
        <td>${user.nickname}</td>
    </tr>
    </#list>
</table>
<!-- 图片地址固定为 cid:封装的 MailFileVo 的 name 属性 -->
<img src="cid:battle-field" />
6,测试,写一个控制器发送邮件
package com.hwq.web.server.controller;

import com.hwq.common.data.entity.User;
import com.hwq.common.util.HttpUtil;
import com.hwq.common.vo.MailFileVo;
import com.hwq.web.server.service.MailService;
import freemarker.template.Configuration;
import freemarker.template.Template;
import freemarker.template.TemplateException;
import org.springframework.beans.factory.annotation.Autowired;
import org.springframework.beans.factory.annotation.Value;
import org.springframework.http.ResponseEntity;
import org.springframework.ui.freemarker.FreeMarkerTemplateUtils;
import org.springframework.web.bind.annotation.RequestMapping;
import org.springframework.web.bind.annotation.RestController;

import java.io.File;
import java.io.IOException;
import java.util.ArrayList;
import java.util.HashMap;
import java.util.List;
import java.util.Map;

@RequestMapping("mail")
@RestController
public class MailController {

    @Autowired
    private MailService mailService;
    @Autowired
    private Configuration configuration;

    @Value("${file.save.location}")
    private String rootPath; // 这是你静态资源存放的根路径,从配置文件读取

    @RequestMapping("/send")
    public ResponseEntity<Object> sendSimpleMail() throws IOException, TemplateException {
        Template template = configuration.getTemplate("mail.ftl");
        Map<String, Object> model = new HashMap<>();
        List<User> users = new ArrayList<>();
        for (int i = 0; i < 10; i ++) {
            User user = new User();
            user.setAccount("102020200" + i);
            user.setNickname("张三李四" + i);

            users.add(user);
        }
        model.put("title", "测试的邮件");
        model.put("users", users);
        String[] toAddr = new String[] {"[email protected]"};
        String[] ccAddr = new String[] {"[email protected]"};
        String subject = "测试邮件,别当真";
        String html = FreeMarkerTemplateUtils.processTemplateIntoString(template, model);


        List<MailFileVo> srcVos = new ArrayList<>();
        MailFileVo mailFileSrc = new MailFileVo();
        mailFileSrc.setName("battle-field");
        mailFileSrc.setFile(new File(rootPath + "/static/battle-field.jpg"));
        srcVos.add(mailFileSrc);

        List<MailFileVo> athVos = new ArrayList<>();
        MailFileVo mailFileAth = new MailFileVo();
        mailFileAth.setName("你的附件.txt");
        mailFileAth.setFile(new File(rootPath + "/static/fu-jian.txt"));
        athVos.add(mailFileAth);

        // return HttpUtil.r200(html);

        mailService.sendMail(toAddr, ccAddr, subject, html, srcVos, athVos);
        return HttpUtil.r200("发送成功");
    }
}
3,浏览器访问 http:ip:port/mail/port