上一篇
将consul作为springboot的配置中心
1.添加依赖
<dependency>
       <groupId>org.springframework.boot</groupId>
       <artifactId>spring-boot-starter-web</artifactId>
</dependency>
<dependency>
       <groupId>org.projectlombok</groupId>
       <artifactId>lombok</artifactId>
</dependency>
<dependency>
      <groupId>org.springframework.cloud</groupId>
      <artifactId>spring-cloud-starter-consul-discovery</artifactId>
</dependency>
<dependency>
      <groupId>org.springframework.cloud</groupId>
      <artifactId>spring-cloud-starter-consul-config</artifactId>
</dependency>
2.启用,配置bootstrap.properties | yml
server.port=8010
spring.application.name=myconsul
spring.cloud.consul.host=192.168.99.100
spring.cloud.consul.port=8500
spring.cloud.consul.discovery.health-check-path=/actuator/health
spring.cloud.consul.discovery.service-name=${spring.application.name}
spring.cloud.consul.discovery.heartbeat.enabled=true
spring.cloud.consul.discovery.prefer-ip-address=true
spring.cloud.consul.config.enabled=true
spring.cloud.consul.config.profile-separator=-
spring.cloud.consul.config.format=properties
spring.cloud.consul.config.prefix = config
spring.cloud.consul.config.data-key = data
# 启用配置自动刷新
spring.cloud.consul.config.watch.enabled=true
# 【疑问】请求 consul api 的延迟,单位:秒
spring.cloud.consul.config.watch.wait-time=1
# 刷新频率,单位:毫秒
spring.cloud.consul.config.watch.delay=10000
3.创建配置文件
使用@ConfigurationProperties 特性,标记类为配置文件

package com.xyz.provider;

import lombok.Data;
import org.springframework.boot.context.properties.ConfigurationProperties;
import org.springframework.cloud.context.config.annotation.RefreshScope;
import org.springframework.stereotype.Component;

@ConfigurationProperties("order")
@RefreshScope
@Data
@Component
public class OrderProperties {
    private Integer discount = 100;
}
4.控制器
package com.xyz.provider.controller;

import com.xyz.provider.OrderProperties;
import org.springframework.beans.factory.annotation.Autowired;
import org.springframework.web.bind.annotation.RequestMapping;
import org.springframework.web.bind.annotation.RestController;

@RestController
public class demoController {
    @Autowired
    private OrderProperties orderProperties;

    @RequestMapping("/search")
    public String searchDiscount() {
        return orderProperties.toString();
    }
}
5.启动类
package com.xyz.provider;

import org.springframework.boot.SpringApplication;
import org.springframework.boot.autoconfigure.SpringBootApplication;
import org.springframework.cloud.client.discovery.EnableDiscoveryClient;

@EnableDiscoveryClient
@SpringBootApplication
public class ProviderApplication {

    public static void main(String[] args) {
        SpringApplication.run(ProviderApplication.class, args);
    }

}
6.测试
启动Consul
启动项目
在浏览器打开Consul页面 http://192.168.99.100:8500
添加配置
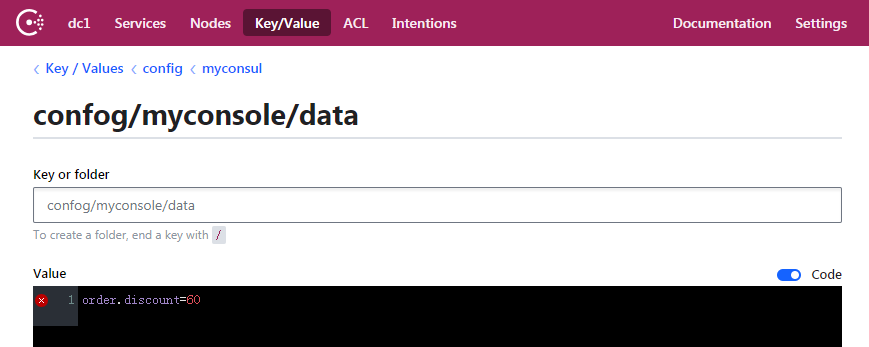
测试 GTE http://172.27.0.17:8010/search
输出
OrderProperties(discount=60)
修改配置,再次执行,会发现配置会自动修改
通过单线程 ThreadPoolTaskScheduler 自动修改配置