概述
1.要求介绍
2.案例参考
3.作品拓展
一、要求介绍
针对《代码本色》第0章编写1个习作,需有不少于2个案例参考,且必须有一定的拓展。报告:写一篇文章,发表为博文/推文等形式,描述运用的规律,若用到了数学/物理/化学等学科中的知识,要用平实易懂的语言介绍原理,尝试运用凝练的数学语言表达(公式、方程、推导等),特别要描述出这些原理如何在作品中呈现的。
二、案例参考
1.案例参考一:均匀分布
(1)随机数的分布:均匀分布
了解Processing的随机数生成器产生的随机数。random()函数中取得的随机数并不是真正随机的,因此它们称为“伪随机数”。它们是由模拟随机的数学函数生成的。随着时间推移,这个函数将呈现出固定的模式,但那段时间很长,所以对我们来说,它的随机性已经足够了。
(2)相关代码:使用柱状图测试均匀分布
//随机数的分布
int [] randomCount;
void setup() {
  size(640, 240);
  randomCount=new int[20];
}
void draw() {
  background(255);
  int index=int(random(randomCount.length));//选择一个随机数,增加计数
  randomCount[index]++;
  stroke(0);
  fill(127);
  int w=width/randomCount.length;

  for (int x=0; x<randomCount.length;x++) {
    fill(random(125,255),random(0,255),random(125,255));
    rect(x*w, height-randomCount[x]*5,w-1,randomCount[x]*5);
  }
}
(3)效果展示

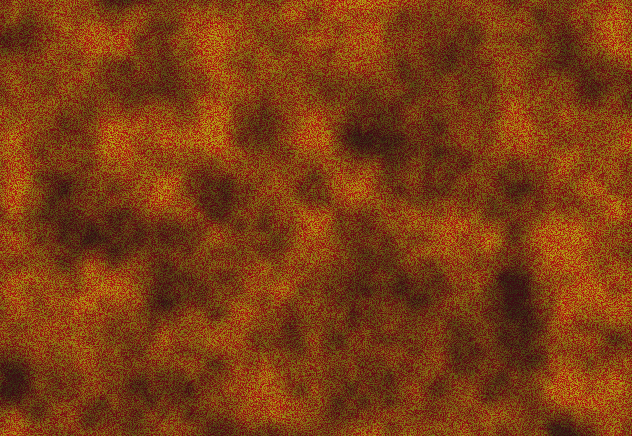
2.案例参考二:Perlin噪声
(1)Perlin噪声介绍:
由Ken Perlin发明的自然噪声生成算法 ,一个噪声函数基本上是一个种子随机发生器。它需要一个整数作为参数,然后根据这个参数返回一个随机数。如果你两次都传同一个参数进来,它就会产生两次相同的数。这条规律非常重要,否则柏林函数只是生成一堆垃圾。
(2)processing中关于Perlin噪声的使用
在Processing中使用noise()函数生成Perlin噪声,其中有一、二、三个参数可选,分别代表一维、二维、三维的噪声。

(2)相关代码:利用perlin噪声生成云彩
public void drawCloud() {
    for (int x=0; x<width; x++) {
      for (int y=0; y<height; y++) {
        float n=noise(0.02*x, 0.02*y, 0.02*t)*255;
        set(x, y, color(n));
      }
    }
(3)效果展示
三、作品拓展
(1)作品一:利用随机数生成树枝
- 效果展示
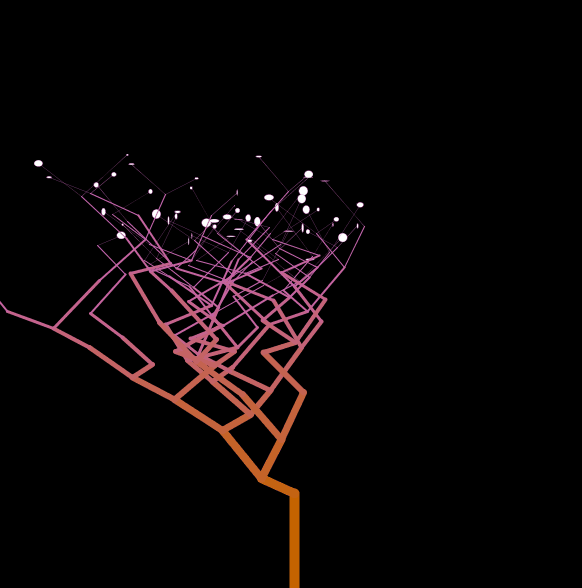
- 介绍
总体介绍:该作品由自定义的概率生成每一个树枝,树枝的生成利用了递归,之前尝试过每一个树枝给它定义过三个枝丫,但是那样子由于层级太多,导致生成的枝丫全堆积在了一起。于是设置了自定的概率,通过概率控制枝丫的个数,比如分支为一的概率为0.5,同时分支为一时,枝丫是向左分支还是向右分支的概率相等。分支为二的概率为0.3.分支为3的概率为0.2.这样子就可以将树枝的枝丫分割开来,能够实现比较好的效果。

- 代码展示
ArrayList<Twig> twig = new ArrayList<Twig>();//存放所有的树枝
int maxHight =10;//树的最大层级
void setup() {
  size(600,600);
  float rootLength = random(80.0, 150.0);
  twig.add(new Twig(width/2, height, width/2, height-rootLength, 0));
  ///递归生成整个树
  recursion(twig.get(0));
}
void draw() {
  background(0);
  for (int i = 0; i < twig.size(); i++) {
    Twig branch = twig.get(i);
    branch.drawTwig();
    if(!branch.judgeLevel()){
      ellipse(branch.end.x,branch.end.y,random(0,10),random(0,10));
    }
  }
}
int red=0;
void mouseClicked()
{
  twig.clear();
  float rootLength = random(80.0, 150.0);
  twig.add(new Twig(width/2, height, width/2, height-rootLength, 0));
  red=int(random(0,255));
  recursion(twig.get(0));
}
////****************递归生成树枝******************
void recursion(Twig twigFather) {
  ArrayList<Twig> sonTwig = new ArrayList<Twig>();//存放新生成的子树枝
  PVector beginSon=twigFather.end;//子树枝的开始点
  float probel=random(0,1);
  if(probel<0.25){
    sonTwig.add(new Twig(beginSon.x, beginSon.y, beginSon.x+random(20, 50), beginSon.y-random(10, 50), twigFather.level+1));
  }else if (probel<0.5){
    sonTwig.add(new Twig(beginSon.x, beginSon.y, beginSon.x-random(20, 50), beginSon.y-random(10, 50), twigFather.level+1));
  }else if(probel<0.8){
    sonTwig.add(new Twig(beginSon.x, beginSon.y, beginSon.x-random(20, 50), beginSon.y-random(10, 50), twigFather.level+1));
    sonTwig.add(new Twig(beginSon.x, beginSon.y, beginSon.x+random(20, 20), beginSon.y-random(10, 50), twigFather.level+1));
  }else{
     sonTwig.add(new Twig(beginSon.x, beginSon.y, beginSon.x+random(20, 50), beginSon.y-random(10, 50), twigFather.level+1));
    sonTwig.add(new Twig(beginSon.x, beginSon.y, beginSon.x-random(20, 50), beginSon.y-random(10, 50), twigFather.level+1));
  }
  // 将新生成的树枝加入总的树枝
  for (Twig sonTwigone : sonTwig) {
    twig.add(sonTwigone);
    if (sonTwigone.level < maxHight) {
      // 如果不是最大的深度,那么就继续生成树枝
      recursion(sonTwigone);
    }
  }
}
//******************树枝类**********************
class Twig {
  private PVector start;//树枝绘制的起点
  private PVector end;//树枝绘制的终点
  private int level;//树枝的层级
  //**********构造函数***********
  public Twig(float x1, float y1, float x2, float y2, int level) {
    this.start=new PVector(x1, y1);
    this.end=new PVector(x2, y2);
    this.level=level;//树的层级

  }
  //**********绘制树枝***********
  public void drawTwig() {
    strokeWeight(10-level);
    stroke(red,100,this.level*20);
    line(start.x, start.y, end.x, end.y);
  }
  //**********判断层级是否小于最大层数***********
  public boolean judgeLevel(){
    if(this.level<maxHight)return true;
    else return false;
  }
}
(2)作品二:伪随机数之均匀分布实现油漆飞溅效果
-
流程展示

1.map:实现颜色的映射 -
代码展示
void setup() {
  size(800, 500);
  background(255);
}

void draw() {
}

//鼠标按下执行的操作
void mousePressed() {
  drawManyCircle();
}
void drawManyCircle() {
  pushMatrix();
  translate(mouseX, mouseY);
  fill(random(125, 255), random(255), random(255));
  noStroke();
  int circleNum = int(map(random(1), 0, 1, 400, 500));
  //print(map(random(1), 0, 1, 700, 1000));
  //循环生成很多大小不同的圆形
  for (int i = 0; i < circleNum; i++) {
    float diameter = random(1);
    float dis = pow(random(1), 4);
    //圆的半径控制在1—15大小范围内
    //各个圆之间的距离控制在0—150的范围内
    float circleDiameter = map(diameter, 0, 1.5, 1, 15);
    float circleDistance = map(dis, 0, 1, 0, 150);
    float radians = random(TWO_PI);
    ellipse(circleDistance * sin(radians), circleDistance * cos(radians), circleDiameter, circleDiameter);
  }
  popMatrix();
}
- 效果展示
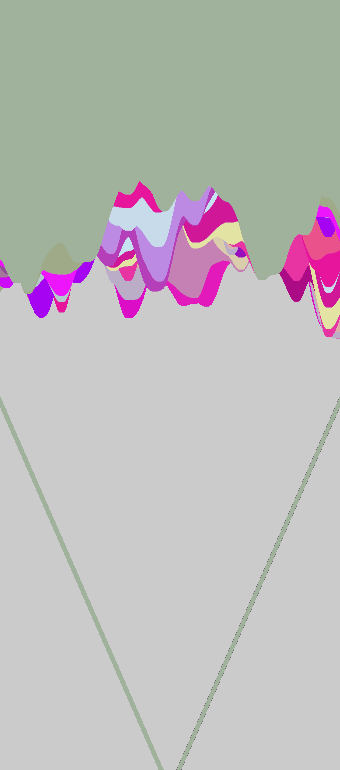
(3)作品三:使用Perlin噪声生成流动的冰淇淋
- 相关实现介绍:
- noiseDetail():noiseDetail以指定细节程度
- noiseSeed():指定噪声种子,同样的种子每次产生相同的噪声
- 使用一维Perlin噪声,使用两个参数的输入,一个输入与x有关,另一个输入与y有关。
- 代码展示
Perlin perlin1=new Perlin();
int t=0;
void setup()
{
  size(350, 800, P3D);
  noiseSeed(4);
  noiseDetail(3);
}
void draw() {
  ++t;
  perlin1.drawMoutain();
  strokeWeight(4);
  perlin1.drawLine();
}
class Perlin {
  public Perlin() {
    super();
  }
  public void drawMoutain() {
    if (frameCount%20==0)stroke(random(125, 255), random(0, 255), random(125, 255));
    for (float x=0; x<width; x++) {
      float n=noise(0.015*x, 0.01*t)*(height/2);
      line(x, 0, x, height/2-n);
    }
  }
   public void drawLine(){
    line(0,height/2,width/2,height);
    line(width,height/2,width/2,height);
  }
- 效果展示