Row和Column是flutter中最基础的容器组件,Row用来水平放置子组件,Column用来垂直放置子组件。它们都可以设置子组件的对齐方式。重点需要了解它们有哪些对齐方式,以及如何对齐的。
布局行为
Row默认行为:在水平方向会尽可能大,大到会撑满parent;在垂直方向会尽可能小,小到能包裹住children。children在水平居左,垂直方向上居中。
Column默认行为:在垂直方向上会尽可能大,大到会撑满parent;在水平方向会尽可能小,小到能包裹住children。children在垂直居上,水平方向上居中。
构造函数
Row(
	{Key key,
	MainAxisAlignment mainAxisAlignment: MainAxisAlignment.start,
	MainAxisSize mainAxisSize: MainAxisSize.max,
	CrossAxisAlignment crossAxisAlignment: CrossAxisAlignment.center,
	TextDirection textDirection,
	VerticalDirection verticalDirection: VerticalDirection.down,
	TextBaseline textBaseline,
	List<Widget> children: const []}
)
Column(
	{Key key,
	MainAxisAlignment mainAxisAlignment: MainAxisAlignment.start,
	MainAxisSize mainAxisSize: MainAxisSize.max,
	CrossAxisAlignment crossAxisAlignment: CrossAxisAlignment.center,
	TextDirection textDirection,
	VerticalDirection verticalDirection: VerticalDirection.down,
	TextBaseline textBaseline,
	List<Widget> children: const []}
)
属性
children → List<Widget>
设置子组件,是一个List类型。
mainAxisAlignment → MainAxisAlignment
主轴对齐方式,对于Row是水平方向上对齐方式,对于Column是垂直方向上对齐方式。可以设置成以下值:
- center → const MainAxisAlignment
将孩子放置在尽可能靠近主轴中心的位置。 - end → const MainAxisAlignment
将孩子放置在尽可能靠近主轴末端的位置。
如果在水平方向上使用此值,则必须使用TextDirection来确定末端是左侧还是右侧。
如果在垂直方向上使用此值,则必须使用VerticalDirection来确定末端是顶部还是底部。 - spaceAround → const MainAxisAlignment
在孩子之间以及第一个和最后一个孩子之前和之后的一半空间之间均匀地放置可用空间。 - spaceBetween →const MainAxisAlignment
将空闲空间均匀地放在孩子之间。 - spaceEvenly →const MainAxisAlignment
将空闲空间均匀地放在孩子之间包括第一个和最后一个孩子之前和之后。 - start → const MainAxisAlignment
将孩子放置在尽可能靠近主轴起点的位置。
如果在水平方向上使用此值,则必须使用TextDirection来确定起点是左侧还是右侧。
如果在垂直方向上使用此值,则VerticalDirection必须可用以确定起点是顶部还是底部。 - values → const List
此枚举中的值的常量列表,按其声明顺序。
crossAxisAlignment → CrossAxisAlignment
纵轴对齐方式,对于Row是垂直方向上对齐方式,对于Column是水平方向上对齐方式。可以设置成以下值:
- baseline → const CrossAxisAlignment
沿交叉轴放置孩子,使其基线匹配。
如果主轴是垂直的,则将此值视为开始 (因为基线始终是水平的)。 - center → const CrossAxisAlignment
放置孩子,使其中心与十字轴的中心对齐。
这是默认的横轴对齐方式。 - end → const CrossAxisAlignment
将孩子放置在尽可能靠近横轴末端的位置。
例如,在TextDirection为TextDirection.ltr的列(具有垂直轴的弹性)中 ,这将使子元素的右边缘沿该列的右边缘对齐。
如果在水平方向上使用此值,则必须使用TextDirection来确定末端是左侧还是右侧。
如果在垂直方向上使用此值,则必须使用VerticalDirection来确定末端是顶部还是底部。 - start → const CrossAxisAlignment
将子项的起始边缘与交叉轴的起始侧对齐。
例如,在TextDirection为TextDirection.ltr的列(具有垂直轴的弹性)中 ,这会将子元素的左边缘沿该列的左边缘对齐。
如果在水平方向上使用此值,则必须使用TextDirection来确定起点是左侧还是右侧。
如果在垂直方向上使用此值,则VerticalDirection必须可用以确定起点是顶部还是底部。 - stretch → const CrossAxisAlignment
要求孩子填满交叉轴。
这导致传递给子代的约束在交叉轴上很紧。 - values → const List
此枚举中的值的常量列表,按其声明顺序。
mainAxisSize → MainAxisSize
主轴上应占用多少空间。可以设置成以下值:
- max →const MainAxisSize
根据传入的布局约束,最大化主轴上的可用空间。
如果传入的布局约束的BoxConstraints.maxWidth或BoxConstraints.maxHeight足够小 ,则可能仍然没有可用空间。
如果传入的布局约束是无限的,则RenderFlex将声明,因为将有无限的剩余可用空间,并且框不能具有无限的大小。 - min →const MainAxisSize
根据传入的布局约束,将主轴上的可用空间最小化。
如果传入的布局约束具有足够大的 BoxConstraints.minWidth或BoxConstraints.minHeight,则可能仍有非零的可用空间量。
如果传入的布局约束不受限制,并且任何子代具有非零的FlexParentData.flex和FlexFit.tight拟合(如Expanded所应用 ),则RenderFlex将声明,因为将有无限的剩余可用空间,并且无法给出框无限大小。 - values → const List
此枚举中的值的常量列表,按其声明顺序。
textDirection → TextDirection
文字流动的方向。
有些语言是从左到右书写的(例如,英语,泰米尔语或中文),而其他语言是从右到左书写的(例如,阿拉姆语,希伯来语或乌尔都语)。有些也以混合方式书写,例如阿拉伯语大多是从右到左书写,而数字则是从左到右书写。
必须将文本方向提供给水平呈现文本或水平放置框的API,以便它们可以确定从哪个方向开始:
从右到左,TextDirection.rtl (right to left);或从左到右的 TextDirection.ltr (left to right)。
textBaseline → TextBaseline
如果根据项目的基线对齐项目,则使用哪个基线。用于对齐文本的水平线。可以设置成以下值:
- alphabetic → const TextBaseline
用于对齐字母字符的字形底部的水平线。 - ideographic → const TextBaseline
用于对齐表意字符的水平线。 - values → const List
此枚举中的值的常量列表,按其声明顺序。
verticalDirection → VerticalDirection
盒子垂直流动的方向。flex算法(例如Column)使用它来决定绘制框的方向。这也用于消除歧义start和end取值(例如 MainAxisAlignment.start或CrossAxisAlignment.end)。可以设置成以下值:
- down → const VerticalDirection
盒子应从顶部开始,并垂直向下堆叠。
“开始”在顶部,“结束”在底部。 - up → const VerticalDirection
盒子应从底部开始,并垂直向上堆叠。
“开始”在底部,“结束”在顶部。 - values → const List
此枚举中的值的常量列表,按其声明顺序。
Row构造函数实现:
  Row({
    Key key,
    MainAxisAlignment mainAxisAlignment = MainAxisAlignment.start,
    MainAxisSize mainAxisSize = MainAxisSize.max,
    CrossAxisAlignment crossAxisAlignment = CrossAxisAlignment.center,
    TextDirection textDirection,
    VerticalDirection verticalDirection = VerticalDirection.down,
    TextBaseline textBaseline,
    List<Widget> children = const <Widget>[],
  }) : super(
    children: children,
    key: key,
    direction: Axis.horizontal,
    mainAxisAlignment: mainAxisAlignment,
    mainAxisSize: mainAxisSize,
    crossAxisAlignment: crossAxisAlignment,
    textDirection: textDirection,
    verticalDirection: verticalDirection,
    textBaseline: textBaseline,
  );
可以看到mainAxisAlignment默认值是:MainAxisAlignment.start,mainAxisSize默认值是:MainAxisSize.max,
crossAxisAlignment默认值是 CrossAxisAlignment.center,verticalDirection默认值是VerticalDirection.down。
下面的示例会验证以上情况。
示例一:不使用Row或column的时候:
import 'package:flutter/material.dart';

void main() => runApp(MaterialApp(
    home: Scaffold(
        appBar: AppBar(title: Text("Row demo")),
        body: Container(
            color: Colors.red,
            child: Image.asset(
              "graphyics/face.jpg",
              width: 100,
              height: 100,
              fit: BoxFit.cover,
            )))));
运行效果
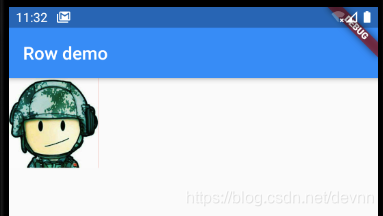
如果不明白为什么颜色没有显示,可以看看我的另一篇文章:flutter Container组件
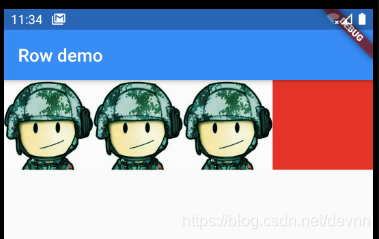
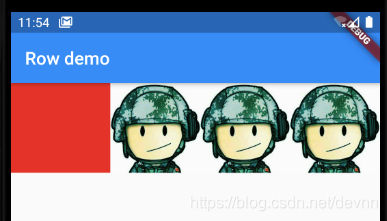
示例二:使用Row后,主轴(水平)方向上默认会撑满父组件空间,children默认居左。
row的column的默认主轴对齐方式是: MainAxisAlignment.start
import 'package:flutter/material.dart';

void main() => runApp(MaterialApp(
    home: Scaffold(
        appBar: AppBar(title: Text("Row demo")),
        body: Container(
            color: Colors.red,
            child: Row(children: <Widget>[
              Image.asset(
                "graphyics/face.jpg",
                width: 100,
                height: 100,
                fit: BoxFit.cover,
              ),
              Image.asset(
                "graphyics/face.jpg",
                width: 100,
                height: 100,
                fit: BoxFit.cover,
              ),
              Image.asset(
                "graphyics/face.jpg",
                width: 100,
                height: 100,
                fit: BoxFit.cover,
              ),
            ])))));
运行效果:
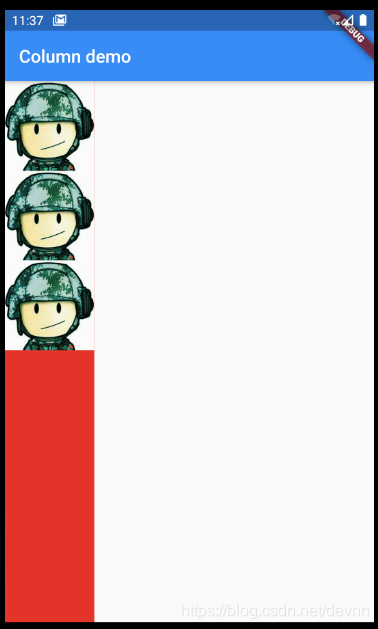
示例三:使用Column后,主轴(垂直)方向上默认会撑满父组件空间,children默认居上。
import 'package:flutter/material.dart';

void main() => runApp(MaterialApp(
    home: Scaffold(
        appBar: AppBar(title: Text("Column demo")),
        body: Container(
            color: Colors.red,
            child: Column(children: <Widget>[
              Image.asset(
                "graphyics/face.jpg",
                width: 100,
                height: 100,
                fit: BoxFit.cover,
              ),
              Image.asset(
                "graphyics/face.jpg",
                width: 100,
                height: 100,
                fit: BoxFit.cover,
              ),
              Image.asset(
                "graphyics/face.jpg",
                width: 100,
                height: 100,
                fit: BoxFit.cover,
              ),
            ])))));
运行效果:
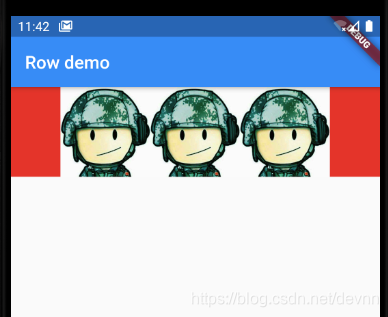
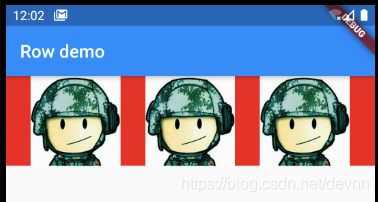
示例四,Row设置主轴居中排列—MainAxisAlignment.center
对于column来说就是垂直居中就不举例了。
import 'package:flutter/material.dart';

void main() => runApp(MaterialApp(
    home: Scaffold(
        appBar: AppBar(title: Text("Row demo")),
        body: Container(
            color: Colors.red,
            child: Row(
              children: <Widget>[
                Image.asset(
                  "graphyics/face.jpg",
                  width: 100,
                  height: 100,
                  fit: BoxFit.cover,
                ),
                Image.asset(
                  "graphyics/face.jpg",
                  width: 100,
                  height: 100,
                  fit: BoxFit.cover,
                ),
                Image.asset(
                  "graphyics/face.jpg",
                  width: 100,
                  height: 100,
                  fit: BoxFit.cover,
                ),
              ],
              mainAxisAlignment: MainAxisAlignment.center,
            )))));
运行效果:
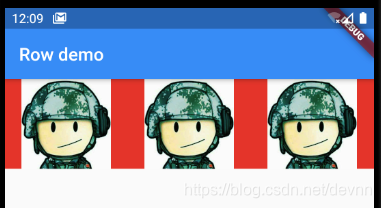
示例五,Row设置主轴靠右排列—MainAxisAlignment.end
对于column来说就是靠下排列就不举例了。
import 'package:flutter/material.dart';

void main() => runApp(MaterialApp(
    home: Scaffold(
        appBar: AppBar(title: Text("Row demo")),
        body: Container(
            color: Colors.red,
            child: Row(
              children: <Widget>[
                Image.asset(
                  "graphyics/face.jpg",
                  width: 100,
                  height: 100,
                  fit: BoxFit.cover,
                ),
                Image.asset(
                  "graphyics/face.jpg",
                  width: 100,
                  height: 100,
                  fit: BoxFit.cover,
                ),
                Image.asset(
                  "graphyics/face.jpg",
                  width: 100,
                  height: 100,
                  fit: BoxFit.cover,
                ),
              ],
              mainAxisAlignment:MainAxisAlignment.end
            )))));
运行效果:
示例六,Row设置主轴平均分配空间—MainAxisAlignment.spaceEvenly
import 'package:flutter/material.dart';

void main() => runApp(MaterialApp(
    home: Scaffold(
        appBar: AppBar(title: Text("Row demo")),
        body: Container(
            color: Colors.red,
            child: Row(
              children: <Widget>[
                Image.asset(
                  "graphyics/face.jpg",
                  width: 100,
                  height: 100,
                  fit: BoxFit.cover,
                ),
                Image.asset(
                  "graphyics/face.jpg",
                  width: 100,
                  height: 100,
                  fit: BoxFit.cover,
                ),
                Image.asset(
                  "graphyics/face.jpg",
                  width: 100,
                  height: 100,
                  fit: BoxFit.cover,
                ),
              ],
              mainAxisAlignment:MainAxisAlignment.spaceEvenly
            )))));
运行效果:
示例七,Row设置主轴spaceAround—MainAxisAlignment.spaceAround
import 'package:flutter/material.dart';

void main() => runApp(MaterialApp(
    home: Scaffold(
        appBar: AppBar(title: Text("Row demo")),
        body: Container(
            color: Colors.red,
            child: Row(
              children: <Widget>[
                Image.asset(
                  "graphyics/face.jpg",
                  width: 100,
                  height: 100,
                  fit: BoxFit.cover,
                ),
                Image.asset(
                  "graphyics/face.jpg",
                  width: 100,
                  height: 100,
                  fit: BoxFit.cover,
                ),
                Image.asset(
                  "graphyics/face.jpg",
                  width: 100,
                  height: 100,
                  fit: BoxFit.cover,
                ),
              ],
              mainAxisAlignment:MainAxisAlignment.spaceAround
            )))));
运行效果:
示例八,Row设置主轴对齐spaceBetween—MainAxisAlignment.spaceBetween
对spaceAround的区别就是左右两边没有边距。
import 'package:flutter/material.dart';

void main() => runApp(MaterialApp(
    home: Scaffold(
        appBar: AppBar(title: Text("Row demo")),
        body: Container(
            color: Colors.red,
            child: Row(
              children: <Widget>[
                Image.asset(
                  "graphyics/face.jpg",
                  width: 100,
                  height: 100,
                  fit: BoxFit.cover,
                ),
                Image.asset(
                  "graphyics/face.jpg",
                  width: 100,
                  height: 100,
                  fit: BoxFit.cover,
                ),
                Image.asset(
                  "graphyics/face.jpg",
                  width: 100,
                  height: 100,
                  fit: BoxFit.cover,
                ),
              ],
              mainAxisAlignment:MainAxisAlignment.spaceBetween
            )))));
运行效果:

示例九,Row设置主轴size最大—MainAxisSize.max
这是默认值,即撑满parent空间。
import 'package:flutter/material.dart';

void main() => runApp(MaterialApp(
    home: Scaffold(
        appBar: AppBar(title: Text("Row demo")),
        body: Container(
            color: Colors.red,
            child: Row(
              children: <Widget>[
                Image.asset(
                  "graphyics/face.jpg",
                  width: 100,
                  height: 100,
                  fit: BoxFit.cover,
                ),
                Image.asset(
                  "graphyics/face.jpg",
                  width: 100,
                  height: 100,
                  fit: BoxFit.cover,
                ),
                Image.asset(
                  "graphyics/face.jpg",
                  width: 100,
                  height: 100,
                  fit: BoxFit.cover,
                ),
              ],
              mainAxisAlignment:MainAxisAlignment.start,
              mainAxisSize: MainAxisSize.min,
            )))));
运行效果:

示例十,Row设置主轴size最小—MainAxisSize.min
import 'package:flutter/material.dart';

void main() => runApp(MaterialApp(
    home: Scaffold(
        appBar: AppBar(title: Text("Row demo")),
        body: Container(
            color: Colors.red,
            child: Row(
              children: <Widget>[
                Image.asset(
                  "graphyics/face.jpg",
                  width: 100,
                  height: 100,
                  fit: BoxFit.cover,
                ),
                Image.asset(
                  "graphyics/face.jpg",
                  width: 100,
                  height: 100,
                  fit: BoxFit.cover,
                ),
                Image.asset(
                  "graphyics/face.jpg",
                  width: 100,
                  height: 100,
                  fit: BoxFit.cover,
                ),
              ],
              mainAxisAlignment:MainAxisAlignment.start,
              mainAxisSize: MainAxisSize.min,
            )))));
运行效果:可以看到红色背景没有了。

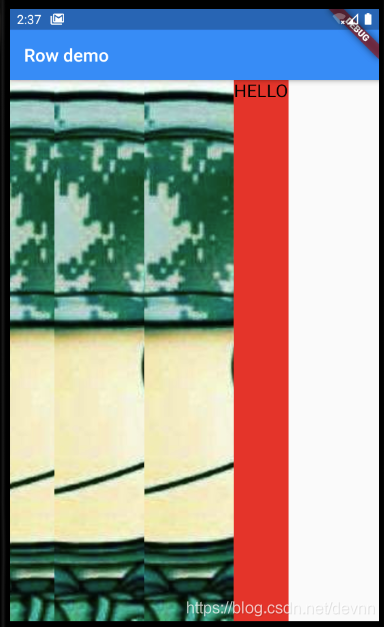
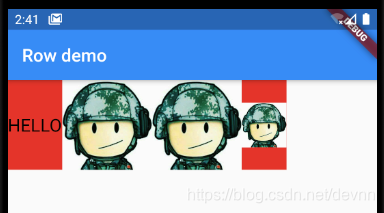
示例十一,Row设置纵轴居中对齐—CrossAxisAlignment.center
接着上一个示例代码,添加一个属性:crossAxisAlignment: CrossAxisAlignment.center 这也是默认值,上面示例中图片都是一样大,下面将第一个图片改成原来的一半大小,再添加一个Text感受一下效果。
import 'package:flutter/material.dart';

void main() => runApp(MaterialApp(
    home: Scaffold(
        appBar: AppBar(title: Text("Row demo")),
        body: Container(
            color: Colors.red,
            child: Row(
              children: <Widget>[
                Image.asset(
                  "graphyics/face.jpg",
                  width: 50,
                  height: 50,
                  fit: BoxFit.cover,
                ),
                Image.asset(
                  "graphyics/face.jpg",
                  width: 100,
                  height: 100,
                  fit: BoxFit.cover,
                ),
                Image.asset(
                  "graphyics/face.jpg",
                  width: 100,
                  height: 100,
                  fit: BoxFit.cover,
                ),
                Text(
                  "HELLO",
                  style: TextStyle(fontSize: 20, color: Colors.black),
                )
              ],
              mainAxisAlignment: MainAxisAlignment.start,
              crossAxisAlignment: CrossAxisAlignment.center,
              mainAxisSize: MainAxisSize.min,
            )))));
运行效果:

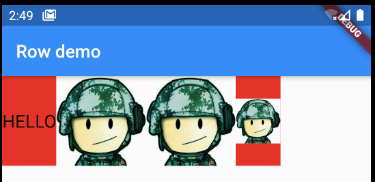
示例十二,Row设置纵轴居上对齐—CrossAxisAlignment.start
import 'package:flutter/material.dart';

void main() => runApp(MaterialApp(
    home: Scaffold(
        appBar: AppBar(title: Text("Row demo")),
        body: Container(
            color: Colors.red,
            child: Row(
              children: <Widget>[
                Image.asset(
                  "graphyics/face.jpg",
                  width: 50,
                  height: 50,
                  fit: BoxFit.cover,
                ),
                Image.asset(
                  "graphyics/face.jpg",
                  width: 100,
                  height: 100,
                  fit: BoxFit.cover,
                ),
                Image.asset(
                  "graphyics/face.jpg",
                  width: 100,
                  height: 100,
                  fit: BoxFit.cover,
                ),
                Text(
                  "HELLO",
                  style: TextStyle(fontSize: 20, color: Colors.black),
                )
              ],
              mainAxisAlignment: MainAxisAlignment.start,
              crossAxisAlignment: CrossAxisAlignment.start,
              mainAxisSize: MainAxisSize.min,
            )))));
运行效果:

示例十三,Row设置纵轴拉长对齐—CrossAxisAlignment.stretch
import 'package:flutter/material.dart';

void main() => runApp(MaterialApp(
    home: Scaffold(
        appBar: AppBar(title: Text("Row demo")),
        body: Container(
            color: Colors.red,
            child: Row(
              children: <Widget>[
                Image.asset(
                  "graphyics/face.jpg",
                  width: 50,
                  height: 50,
                  fit: BoxFit.cover,
                ),
                Image.asset(
                  "graphyics/face.jpg",
                  width: 100,
                  height: 100,
                  fit: BoxFit.cover,
                ),
                Image.asset(
                  "graphyics/face.jpg",
                  width: 100,
                  height: 100,
                  fit: BoxFit.cover,
                ),
                Text(
                  "HELLO",
                  style: TextStyle(fontSize: 20, color: Colors.black),
                )
              ],
              mainAxisAlignment: MainAxisAlignment.start,
              crossAxisAlignment: CrossAxisAlignment.stretch,
              mainAxisSize: MainAxisSize.min,
            )))));
运行效果:
可能有人会好奇为什么Text没有拉长呢?我也想知道,如果有人知道可以留言告诉我~
示例十四,给Row设置文字流动方向从右向左— TextDirection.rtl
这样设置后,Text的文字会不会换成从右向左呢?试试。
import 'package:flutter/material.dart';

void main() => runApp(MaterialApp(
    home: Scaffold(
        appBar: AppBar(title: Text("Row demo")),
        body: Container(
            color: Colors.red,
            child: Row(
              children: <Widget>[
                Image.asset(
                  "graphyics/face.jpg",
                  width: 50,
                  height: 50,
                  fit: BoxFit.cover,
                ),
                Image.asset(
                  "graphyics/face.jpg",
                  width: 100,
                  height: 100,
                  fit: BoxFit.cover,
                ),
                Image.asset(
                  "graphyics/face.jpg",
                  width: 100,
                  height: 100,
                  fit: BoxFit.cover,
                ),
                Text(
                  "HELLO",
                  style: TextStyle(fontSize: 20, color: Colors.black),
                )
              ],
              mainAxisAlignment: MainAxisAlignment.start,
              crossAxisAlignment: CrossAxisAlignment.center,
              mainAxisSize: MainAxisSize.min,
              textDirection: TextDirection.rtl,
            )))));
运行效果:
为什么会是这样的呢?看上去 textDirection 这个属性,并不是设置文字方向,而是子组件的排列方向?
或者给Text直接设置textDirection: TextDirection.rtl会改变文字方向吗?看下面一个示例来验证。
示例十五,给Text设置文字方向从右向左— TextDirection.rtl
import 'package:flutter/material.dart';

void main() => runApp(MaterialApp(
    home: Scaffold(
        appBar: AppBar(title: Text("Row demo")),
        body: Container(
            color: Colors.red,
            child: Row(
              children: <Widget>[
                Image.asset(
                  "graphyics/face.jpg",
                  width: 50,
                  height: 50,
                  fit: BoxFit.cover,
                ),
                Image.asset(
                  "graphyics/face.jpg",
                  width: 100,
                  height: 100,
                  fit: BoxFit.cover,
                ),
                Image.asset(
                  "graphyics/face.jpg",
                  width: 100,
                  height: 100,
                  fit: BoxFit.cover,
                ),
                Text(
                  "HELLO",
                  textDirection: TextDirection.rtl,
                  style: TextStyle(fontSize: 20, color: Colors.black),
                )
              ],
              mainAxisAlignment: MainAxisAlignment.start,
              crossAxisAlignment: CrossAxisAlignment.center,
              mainAxisSize: MainAxisSize.min,
              textDirection: TextDirection.rtl,
            )))));
运行效果:
效果还是一样的,试试换成中文会怎样。
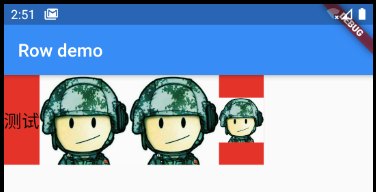
中文也是一样的。官方说对于少数语言有用,我们换成阿拉姆语试试。
import 'package:flutter/material.dart';

void main() => runApp(MaterialApp(
    home: Scaffold(
        appBar: AppBar(title: Text("Row demo")),
        body: Container(
            color: Colors.red,
            child: Row(
              children: <Widget>[
                Image.asset(
                  "graphyics/face.jpg",
                  width: 50,
                  height: 50,
                  fit: BoxFit.cover,
                ),
                Image.asset(
                  "graphyics/face.jpg",
                  width: 100,
                  height: 100,
                  fit: BoxFit.cover,
                ),
                Image.asset(
                  "graphyics/face.jpg",
                  width: 100,
                  height: 100,
                  fit: BoxFit.cover,
                ),
                Text(
                  "Mayko hatt?",
                  textDirection: TextDirection.rtl,
                  style: TextStyle(fontSize: 20, color: Colors.black),
                )
              ],
              mainAxisAlignment: MainAxisAlignment.start,
              crossAxisAlignment: CrossAxisAlignment.center,
              mainAxisSize: MainAxisSize.min,
              textDirection: TextDirection.rtl,
            )))));
运行效果:

换成阿拉姆语后,文字方向从右向左生效了。看来textDirection: TextDirection.rtl仅对少数语言管用。
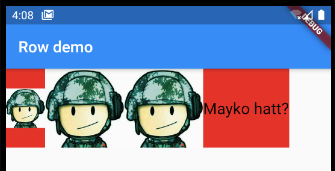
不知读者是否有一个疑问,上面的代码中Text和Row都设置了textDirection: TextDirection.rtl,究竟是哪个设置生效的呢?
下面将Text的textDirection: TextDirection.rtl删除,看看效果。
import 'package:flutter/material.dart';

void main() => runApp(MaterialApp(
    home: Scaffold(
        appBar: AppBar(title: Text("Row demo")),
        body: Container(
            color: Colors.red,
            child: Row(
              children: <Widget>[
                Image.asset(
                  "graphyics/face.jpg",
                  width: 50,
                  height: 50,
                  fit: BoxFit.cover,
                ),
                Image.asset(
                  "graphyics/face.jpg",
                  width: 100,
                  height: 100,
                  fit: BoxFit.cover,
                ),
                Image.asset(
                  "graphyics/face.jpg",
                  width: 100,
                  height: 100,
                  fit: BoxFit.cover,
                ),
                Text(
                  "Mayko hatt?",
                  style: TextStyle(fontSize: 20, color: Colors.black),
                )
              ],
              mainAxisAlignment: MainAxisAlignment.start,
              crossAxisAlignment: CrossAxisAlignment.center,
              mainAxisSize: MainAxisSize.min,
              textDirection: TextDirection.rtl,
            )))));
运行效果:

显然textDirection这个属性值并不能传递给子组件。
综合上述textDirection的示例,可以总结如下:
给Text设置textDirection,仅针对少数语言有效。
给Row或Column设置textDirection,是改变子组件的排列顺序。
示例十六,给Row设置verticalDirection: VerticalDirection.up
接着上面的代码,添加属性:verticalDirection: VerticalDirection.up
import 'package:flutter/material.dart';

void main() => runApp(MaterialApp(
    home: Scaffold(
        appBar: AppBar(title: Text("Row demo")),
        body: Container(
            color: Colors.red,
            child: Row(
              children: <Widget>[
                Image.asset(
                  "graphyics/face.jpg",
                  width: 50,
                  height: 50,
                  fit: BoxFit.cover,
                ),
                Image.asset(
                  "graphyics/face.jpg",
                  width: 100,
                  height: 100,
                  fit: BoxFit.cover,
                ),
                Image.asset(
                  "graphyics/face.jpg",
                  width: 100,
                  height: 100,
                  fit: BoxFit.cover,
                ),
                Text(
                  "Mayko hatt?",
                  style: TextStyle(fontSize: 20, color: Colors.black),
                )
              ],
              mainAxisAlignment: MainAxisAlignment.start,
              crossAxisAlignment: CrossAxisAlignment.center,
              mainAxisSize: MainAxisSize.min,
              verticalDirection: VerticalDirection.up,
            )))));
运行效果:

似乎没有用。
示例十七,给Row设置verticalDirection: VerticalDirection.down
import 'package:flutter/material.dart';

void main() => runApp(MaterialApp(
    home: Scaffold(
        appBar: AppBar(title: Text("Row demo")),
        body: Container(
            color: Colors.red,
            child: Row(
              children: <Widget>[
                Image.asset(
                  "graphyics/face.jpg",
                  width: 50,
                  height: 50,
                  fit: BoxFit.cover,
                ),
                Image.asset(
                  "graphyics/face.jpg",
                  width: 100,
                  height: 100,
                  fit: BoxFit.cover,
                ),
                Image.asset(
                  "graphyics/face.jpg",
                  width: 100,
                  height: 100,
                  fit: BoxFit.cover,
                ),
                Text(
                  "Mayko hatt?",
                  style: TextStyle(fontSize: 20, color: Colors.black),
                )
              ],
              mainAxisAlignment: MainAxisAlignment.start,
              crossAxisAlignment: CrossAxisAlignment.center,
              mainAxisSize: MainAxisSize.min,
              verticalDirection: VerticalDirection.down,
            )))));
运行效果:
似乎还是没有变化。关于verticalDirection这个属性读者如果有什么见解可以留言讨论。
以前举例基本都是拿Row来举例,Column的属性跟Row是一样的,就不重复举例了。
关于Row和Column的主要作用、属性都已经讲完了,不知道读者有没有领悟?
