一、前提
AlertDialog可以在当前的界面上显示一个对话框,这个对话框是置顶于所有界面元素之上的,能够屏蔽掉其他控件的交互能力,因此AlertDialog一般是用于提示一些非常重要的内容或者警告信息。
二、目标
AlertDialog对话提示框
三、内容
进行编码前还是需要对xnl文件进行布局
<?xml version="1.0" encoding="utf-8"?>
<LinearLayout xmlns:android="http://schemas.android.com/apk/res/android"
    xmlns:app="http://schemas.android.com/apk/res-auto"
    xmlns:tools="http://schemas.android.com/tools"
    android:layout_width="match_parent"
    android:layout_height="match_parent"
    android:orientation="vertical"
    >
    <Button
        android:id="@+id/bt1"
        android:layout_width="match_parent"
        android:layout_height="wrap_content"
        android:text="默认"
        />
    <Button
        android:id="@+id/bt2"
        android:layout_width="match_parent"
        android:layout_height="wrap_content"
        android:text="单选1"
        />
    <Button
        android:id="@+id/bt3"
        android:layout_width="match_parent"
        android:layout_height="wrap_content"
        android:text="单选2"
        />
    <Button
        android:id="@+id/bt4"
        android:layout_width="match_parent"
        android:layout_height="wrap_content"
        android:text="多选"
        />
    <Button
        android:id="@+id/bt5"
        android:layout_width="match_parent"
        android:layout_height="wrap_content"
        android:text="自定义"
        />

</LinearLayout>
在MainActivity中添加
package com.example.sunny.alertdialog;

import android.app.AlertDialog;
import android.content.DialogInterface;
import android.os.Bundle;
import android.support.design.widget.FloatingActionButton;
import android.support.design.widget.Snackbar;
import android.support.v7.app.AppCompatActivity;
import android.support.v7.widget.Toolbar;
import android.view.LayoutInflater;
import android.view.View;
import android.view.Menu;
import android.view.MenuItem;
import android.widget.Button;
import android.widget.EditText;
import android.widget.Toast;

public class MainActivity extends AppCompatActivity {
    private Button button1,button2,button3,button4,button5;
    @Override
    protected void onCreate(Bundle savedInstanceState) {
        super.onCreate(savedInstanceState);
        setContentView(R.layout.activity_main);
        button1= (Button) findViewById(R.id.bt1);
        button2= (Button) findViewById(R.id.bt2);
        button3= (Button) findViewById(R.id.bt3);
        button4= (Button) findViewById(R.id.bt4);
        button5= (Button) findViewById(R.id.bt5);

        OnClick onClick=new OnClick();
        button1.setOnClickListener(onClick);
        button2.setOnClickListener(onClick);
        button3.setOnClickListener(onClick);
        button4.setOnClickListener(onClick);
        button5.setOnClickListener(onClick);

    }
    class OnClick implements View.OnClickListener{
        @Override
        public void onClick(View v) {
            switch(v.getId()){
                case R.id.bt1:
                    break;
                case R.id.bt2:
                    break;
                case R.id.bt3:
                    break;
                case R.id.bt4:
                    break;
                case R.id.bt5:
                    break;
            }
        }
    }
}
与Toast添加的代码差不多
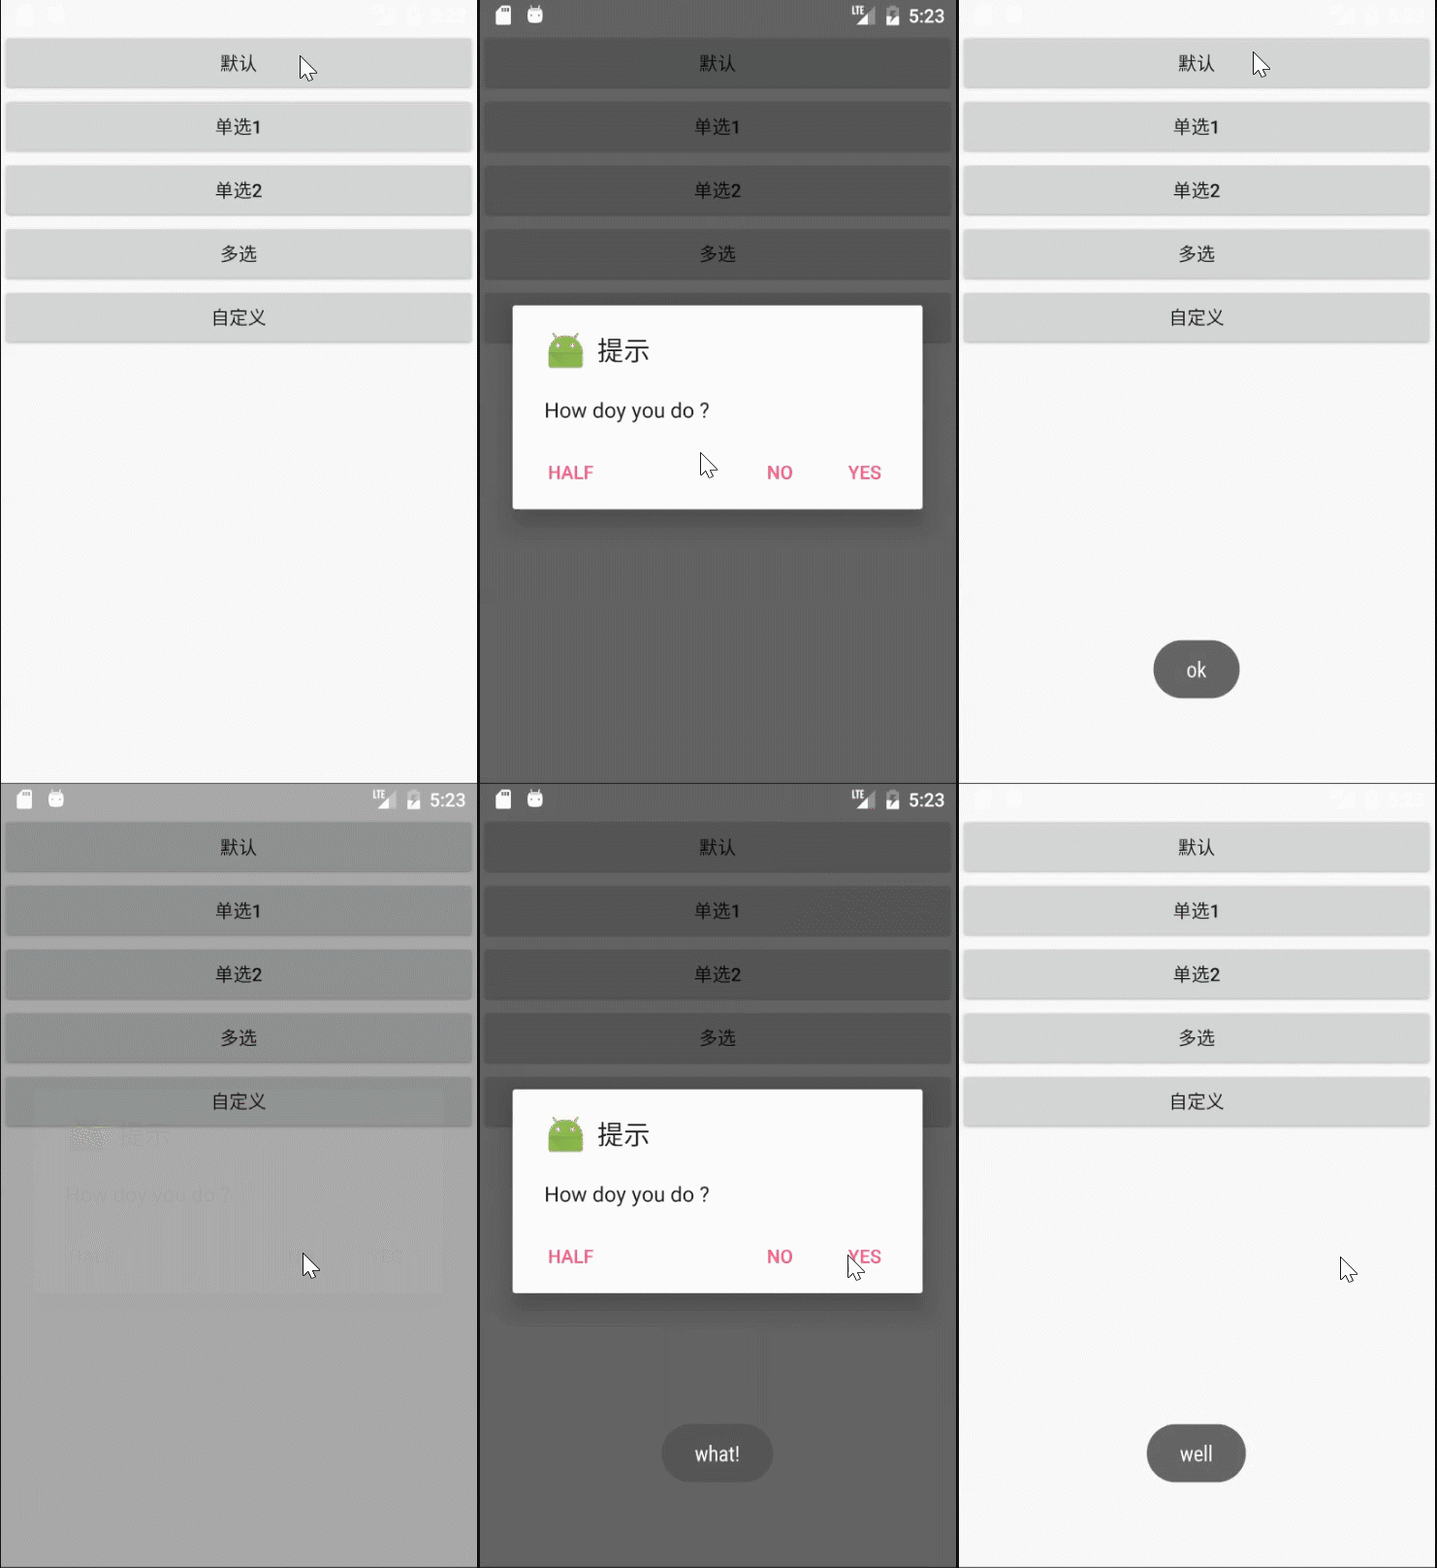
1、默认样式
在case R.id.btn1下添加
AlertDialog.Builder builder=new AlertDialog.Builder(MainActivity.this);
builder.setTitle("提示").setMessage("How doy you do ?").setIcon(R.mipmap.ic_launcher)
                            .setPositiveButton("yes", new DialogInterface.OnClickListener() {
                                @Override
                                public void onClick(DialogInterface dialog, int which) {
                                    ToastUtil.showMsg(MainActivity.this, "well");
                                }
                            }).setNeutralButton("half", new DialogInterface.OnClickListener() {
                        @Override
                        public void onClick(DialogInterface dialog, int which) {
                            ToastUtil.showMsg(MainActivity.this,"ok");
                        }
                    }).setNegativeButton("no", new DialogInterface.OnClickListener() {
                        @Override
                        public void onClick(DialogInterface dialog, int which) {
                            ToastUtil.showMsg(MainActivity.this,"what!");
                        }
                    }).show();
我们发现代码很长很乱,其实就几个方法下面我将一一列出
首先AlertDialog.Builder是必不可少的,且定义AlertDialog必须定义的设计模式,目的是为了把对话框的构建和表示分离开来,使得同样的构建过程可以创建不同的表示
setTitle() 方法用来显示标题
setMessage() 方法用来显示提示内容
setIcon() 方法用来显示一张图片
setPositiveButton() 方法表示将侦听器设置为在按下对话框的 “确定” 按钮时调用,参数为提示语,以及点击事件,点击后提示信息。
setNeutralButton() 方法表示将侦听器设置为在按下对话框的 “中立” 按钮时调用。
setNegativeButton() 方法表示将侦听器设置为在按下对话框的 “否定” 按钮时调用。
最后show()方法用来实现
2、单选样式
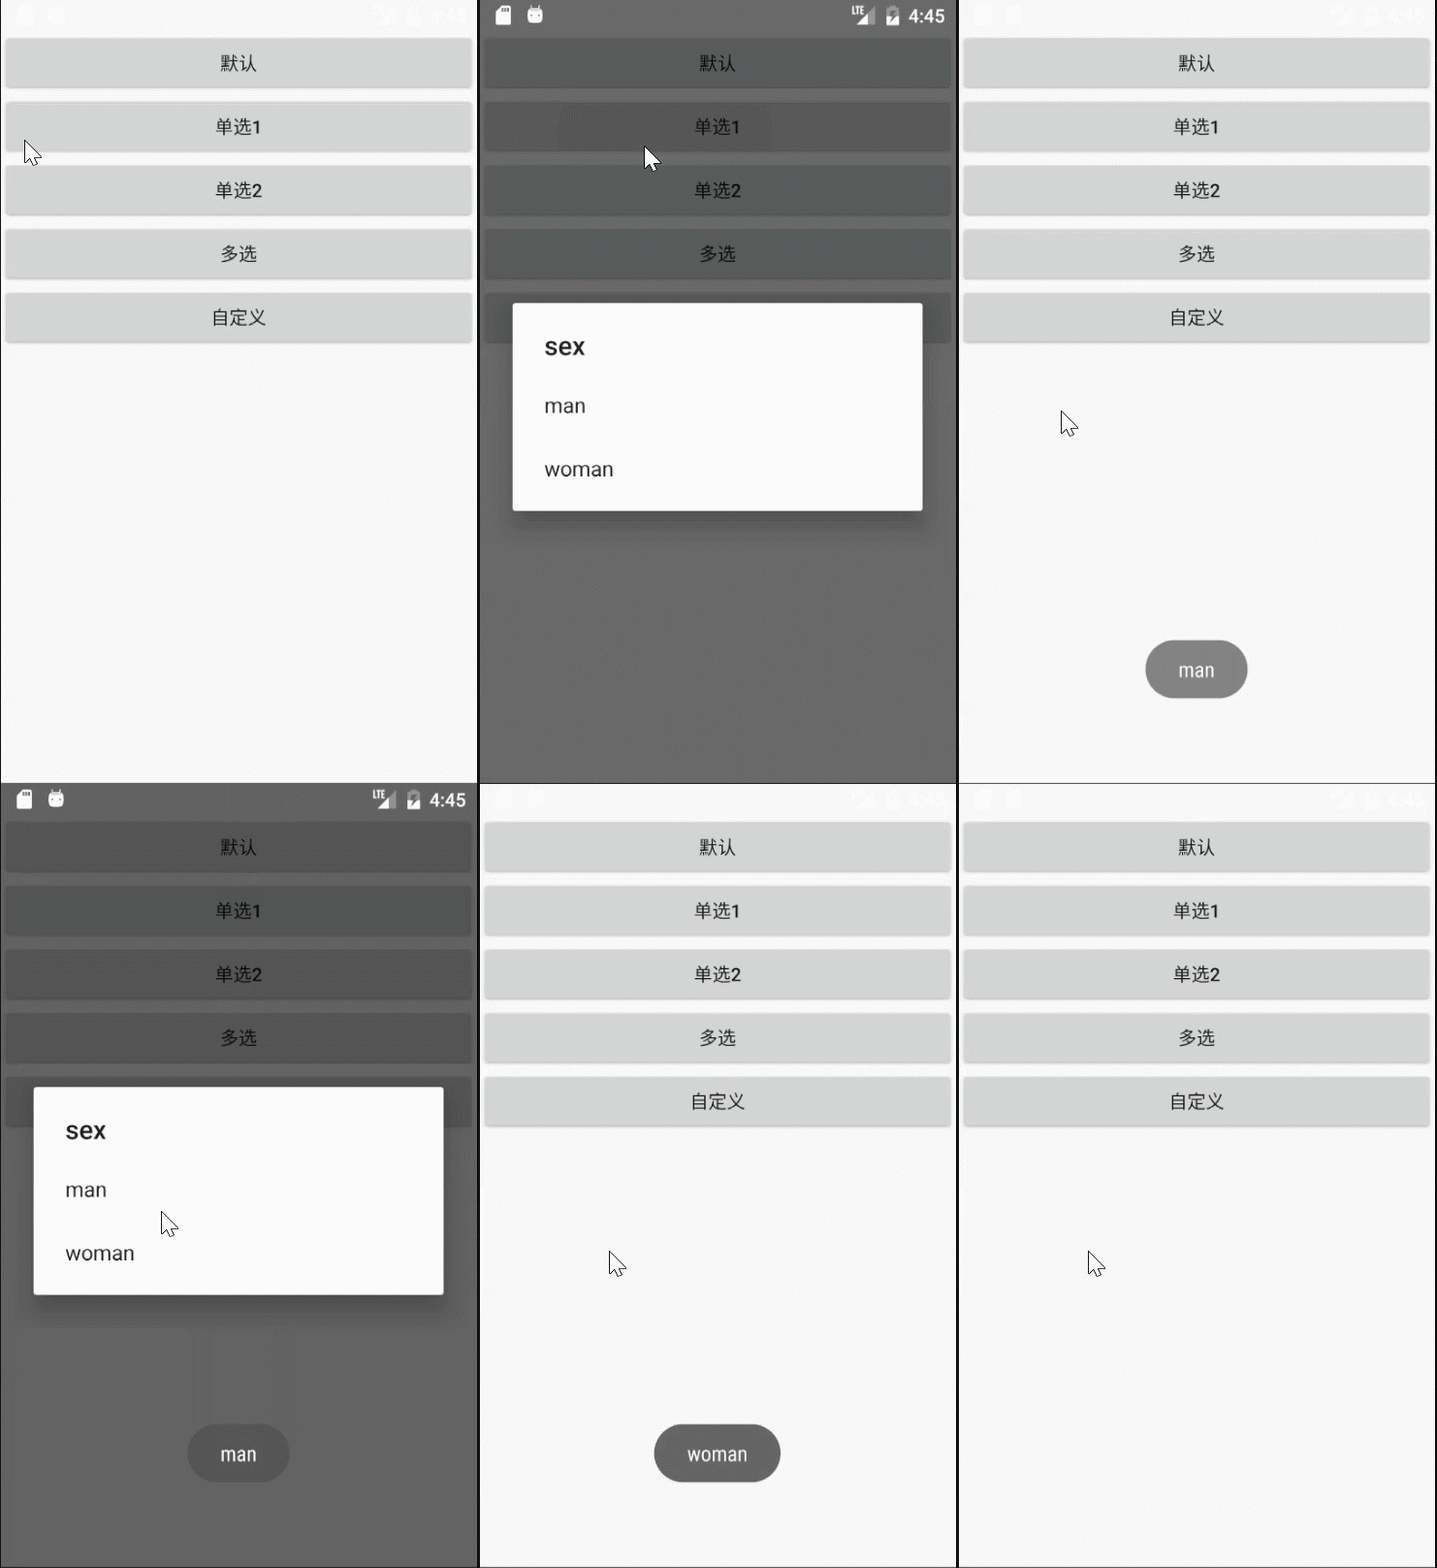
(1)在case R.id.btn2下添加
final String[] array= new String[]{"man","woman"};
AlertDialog.Builder builder1=new AlertDialog.Builder(MainActivity.this);
builder1.setTitle("sex").setItems(array, new DialogInterface.OnClickListener() {
                        @Override
                        public void onClick(DialogInterface dialog, int which) {
                            ToastUtil.showMsg(MainActivity.this, array[which]);
                        }
                    }).show();
这里要注意的是,使用的setItems()方法中参数为一个数组对象和一个点击事件,所以要提前建立数组,很容易理解
(2)在case R.id.btn3下添加
final String[] array3= new String[]{"man","woman"};
AlertDialog.Builder builder3=new AlertDialog.Builder(MainActivity.this);
builder3.setTitle("sex").setSingleChoiceItems(array3, 0, new DialogInterface.OnClickListener() {//0是默认选择的
                        @Override
                        public void onClick(DialogInterface dialog, int which) {
                            ToastUtil.showMsg(MainActivity.this, array3[which]);
                        }
                    }).show();
setSingleChoice()方法是单选方法的选择,三个参数分别是数组对象,默认选择的选项,点击事件
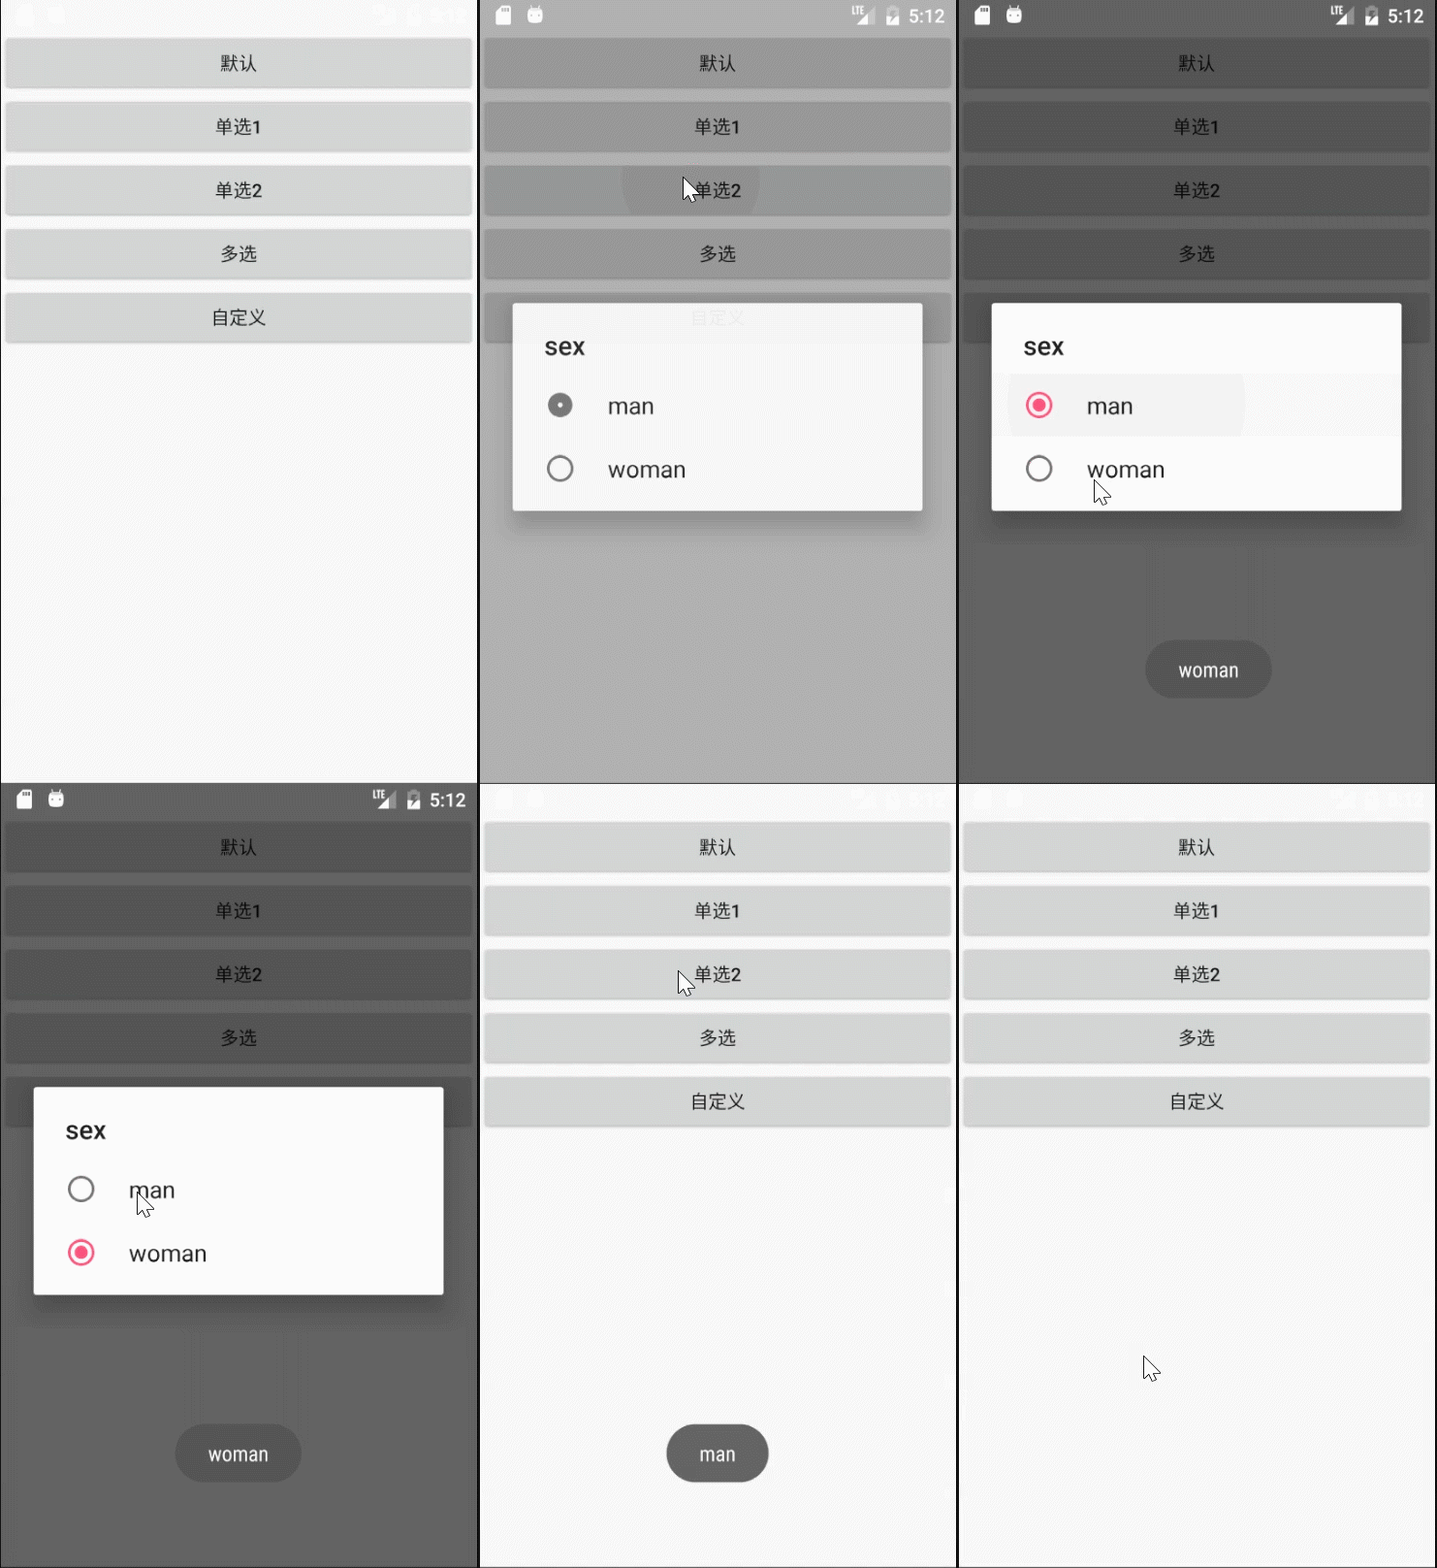
我们可以发现,当我们点击时提示框不会消失,且点击外部时,提示框会消失,为了避免这一问题,可修改代码
final String[] array3= new String[]{"man","woman"};
AlertDialog.Builder builder3=new AlertDialog.Builder(MainActivity.this);
builder3.setTitle("sex").setSingleChoiceItems(array3, 0, new DialogInterface.OnClickListener() {//0是默认选择的
                        @Override
                        public void onClick(DialogInterface dialog, int which) {
                            ToastUtil.showMsg(MainActivity.this, array3[which]);
                            dialog.dismiss();//选中后提示框消失
                        }
                    }).setCancelable(false).show();//点其他地方不会消失
                    break;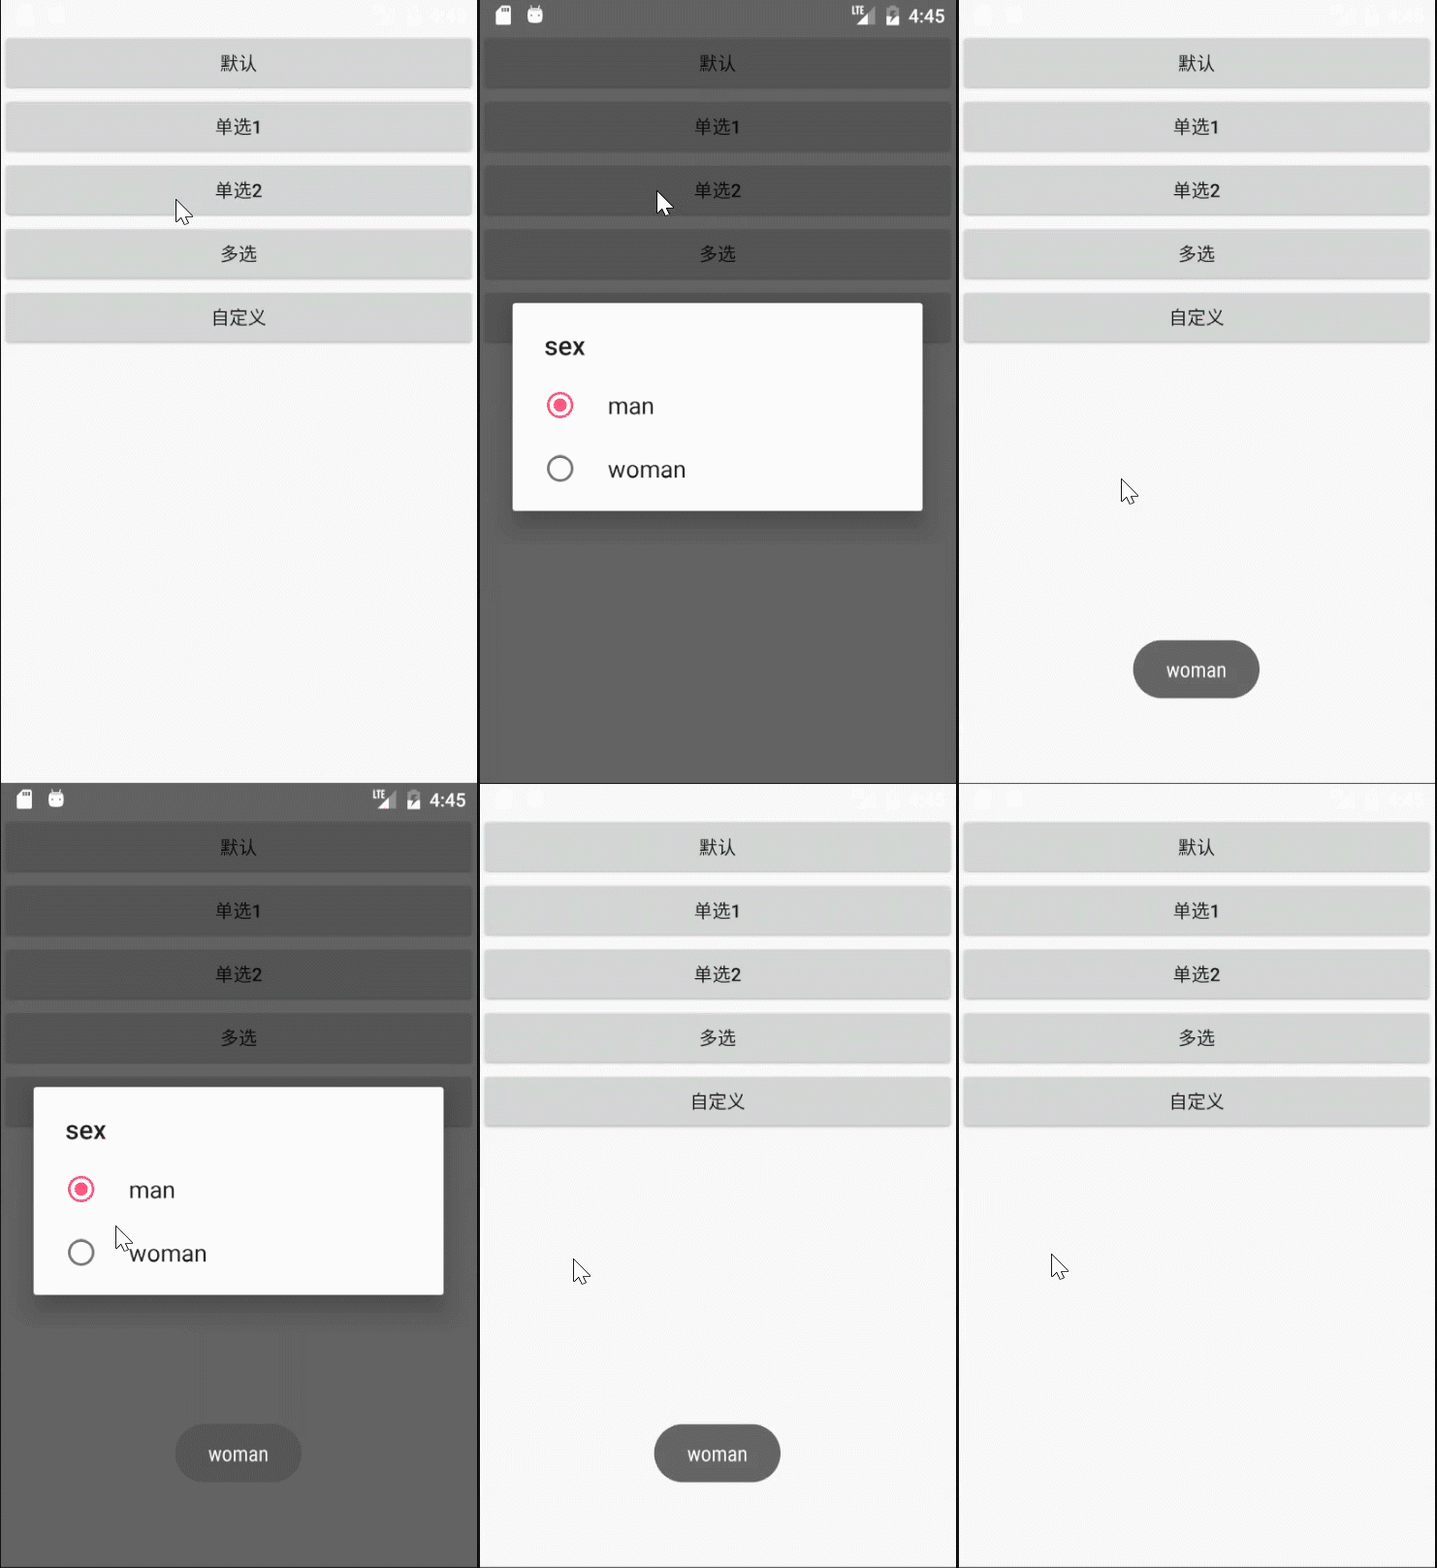
3、多选样式
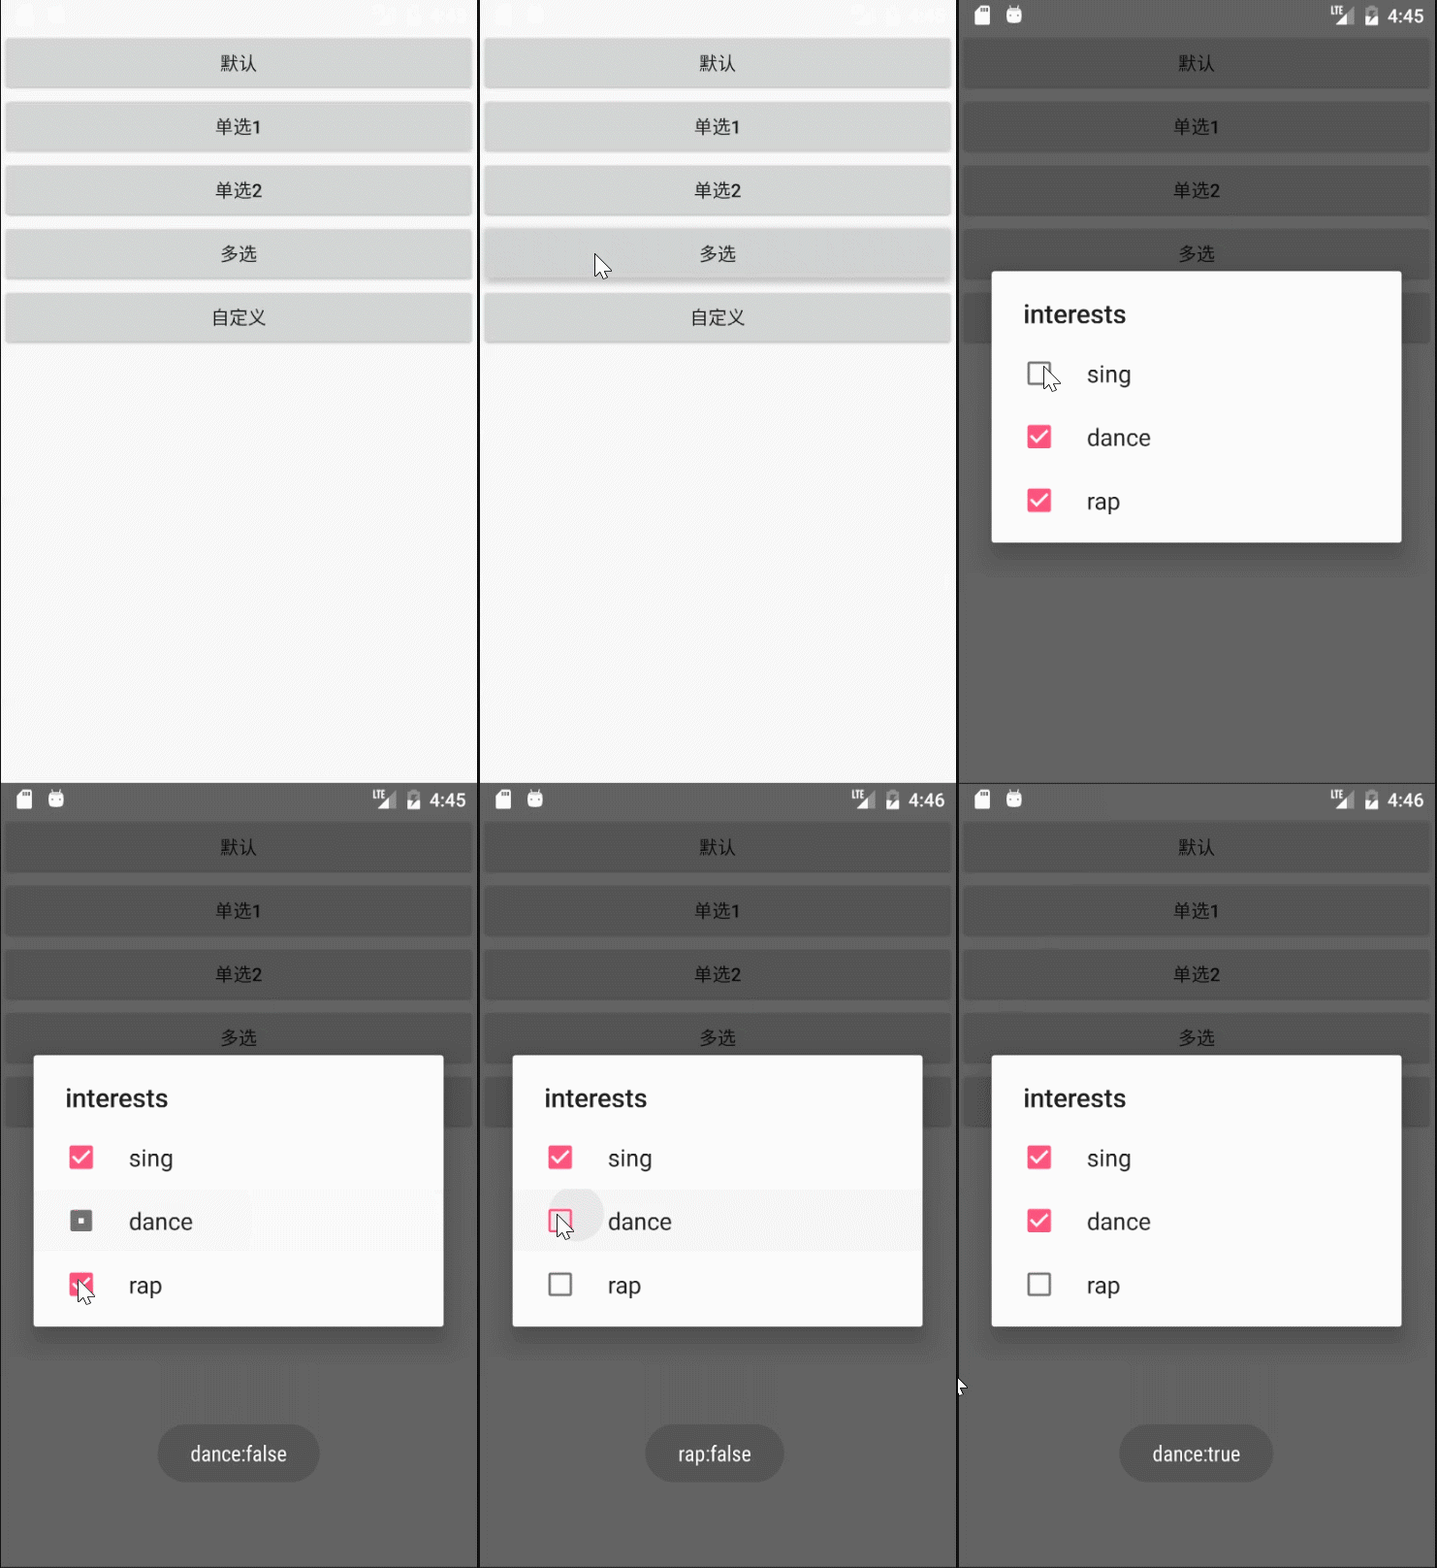
在case R.id.btn4下添加
final String[] array4= new String[]{"sing","dance","rap"};
boolean[] isSelected=new boolean[]{false,true,true};
AlertDialog.Builder builder4=new AlertDialog.Builder(MainActivity.this);
builder4.setTitle("interests").setMultiChoiceItems(array4, isSelected, new DialogInterface.OnMultiChoiceClickListener() {
                        @Override
                        public void onClick(DialogInterface dialog, int which, boolean isChecked) {
                            ToastUtil.showMsg(MainActivity.this, array4[which] + ":" + isChecked);
                        }
                    }).show();
setMultiChoiceItems()方法是多选方法的选择,三个参数分别是数组对象,默认选择的选项,点击事件;其中因为是多选事件,所以在默认选择时可能存在多选,所以要提前定义哪个被选择
4、自定义
首先定义一个新的xml文件
<?xml version="1.0" encoding="utf-8"?>
<LinearLayout xmlns:android="http://schemas.android.com/apk/res/android"
    android:orientation="vertical" android:layout_width="match_parent"
    android:padding="10dp"
    android:layout_height="match_parent">

    <EditText
        android:id="@+id/et1"
        android:layout_width="match_parent"
        android:layout_height="wrap_content"
        android:hint="username"
        android:maxLines="1"
        />

    <EditText
        android:id="@+id/et2"
        android:layout_width="match_parent"
        android:layout_height="wrap_content"
        android:hint="password"
        android:inputType="textPassword"
        android:maxLines="1"
        />

    <Button
        android:id="@+id/button"
        android:layout_width="match_parent"
        android:layout_height="wrap_content"
        android:text="login"
        android:textAllCaps="false"
        />

</LinearLayout>
在case R.id.btn5下添加
AlertDialog.Builder builder5=new AlertDialog.Builder(MainActivity.this);
View view=LayoutInflater.from(MainActivity.this).inflate(R.layout.dialog,null);
EditText editText1= (EditText) view.findViewById(R.id.et1);
EditText editText2= (EditText) view.findViewById(R.id.et2);
 Button button= (Button) view.findViewById(R.id.button);
  button.setOnClickListener(new View.OnClickListener() {
                        @Override
                        public void onClick(View v) {
                            //
                        }
                    });
builder5.setTitle("please login").setView(view).show();
代码语Toast中自定义的代码大同小异,在这里不做过多的解释

四、总结
AlertDialog很常用,也不难,很容易理解,在这里只是开了个头,里面的代码还可以添加按钮,可自行实验。
