原文链接:A blockchain in 200 lines of code
The basic concept of blockchain is quite simple: a distributed database that maintains a continuously growing list of ordered records. However, it is easy to get mixed up as usually when we talk about blockchains we also talk about the problems we are trying to solve with them. This is the case in the popular blockchain-based projects such as Bitcoin and Ethereum . The term “blockchain” is usually strongly tied to concepts like transactions, smart contracts or cryptocurrencies.
This makes understanding blockchains a necessarily harder task, than it must be. Especially source-code-wisely. Here I will go through a super-simple blockchain I implemented in 200 lines of Javascript called NaiveChain.
Block structure
The first logical step is to decide the block structure. To keep things as simple as possible we include only the most necessary: index, timestamp, data, hash and previous hash.

class Block {
    constructor(index, previousHash, timestamp, data, hash) {
        this.index = index;
        this.previousHash = previousHash.toString();
        this.timestamp = timestamp;
        this.data = data;
        this.hash = hash.toString();
    }
}
Block hash
The block needs to be hashed to keep the integrity of the data. A SHA-256 is taken over the content of the block. It should be noted that this hash has nothing to do with “mining”, since there is no Proof Of Work problem to solve.
var calculateHash = (index, previousHash, timestamp, data) => {
    return CryptoJS.SHA256(index + previousHash + timestamp + data).toString();
};
Generating a block
To generate a block we must know the hash of the previous block and create the rest of the required content (= index, hash, data and timestamp). Block data is something that is provided by the end-user.
var generateNextBlock = (blockData) => {
    var previousBlock = getLatestBlock();
    var nextIndex = previousBlock.index + 1;
    var nextTimestamp = new Date().getTime() / 1000;
    var nextHash = calculateHash(nextIndex, previousBlock.hash, nextTimestamp, blockData);
    return new Block(nextIndex, previousBlock.hash, nextTimestamp, blockData, nextHash);
};
Storing the blocks
A in-memory Javascript array is used to store the blockchain. The first block of the blockchain is always a so-called “genesis-block”, which is hard coded.
var getGenesisBlock = () => {
    return new Block(0, "0", 1465154705, "my genesis block!!", "816534932c2b7154836da6afc367695e6337db8a921823784c14378abed4f7d7");
};

var blockchain = [getGenesisBlock()];
Validating the integrity of blocks
At any given time we must be able to validate if a block or a chain of blocks are valid in terms of integrity. This is true especially when we receive new blocks from other nodes and must decide whether to accept them or not.
var isValidNewBlock = (newBlock, previousBlock) => {
if (previousBlock.index + 1 !== newBlock.index) {
console.log('invalid index');
return false;
} else if (previousBlock.hash !== newBlock.previousHash) {
console.log('invalid previoushash');
return false;
} else if (calculateHashForBlock(newBlock) !== newBlock.hash) {
console.log('invalid hash: ' + calculateHashForBlock(newBlock) + ' ' + newBlock.hash);
return false;
}
return true;
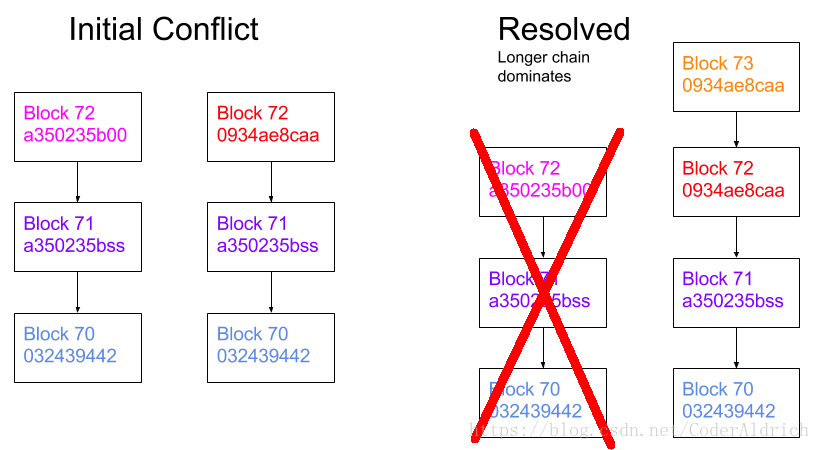
};Choosing the longest chain
There should always be only one explicit set of blocks in the chain at a given time. In case of conflicts (e.g. two nodes both generate block number 72) we choose the chain that has the longest number of blocks.
var replaceChain = (newBlocks) => {
    if (isValidChain(newBlocks) && newBlocks.length > blockchain.length) {
        console.log('Received blockchain is valid. Replacing current blockchain with received blockchain');
        blockchain = newBlocks;
        broadcast(responseLatestMsg());
    } else {
        console.log('Received blockchain invalid');
    }
};
Communicating with other nodes
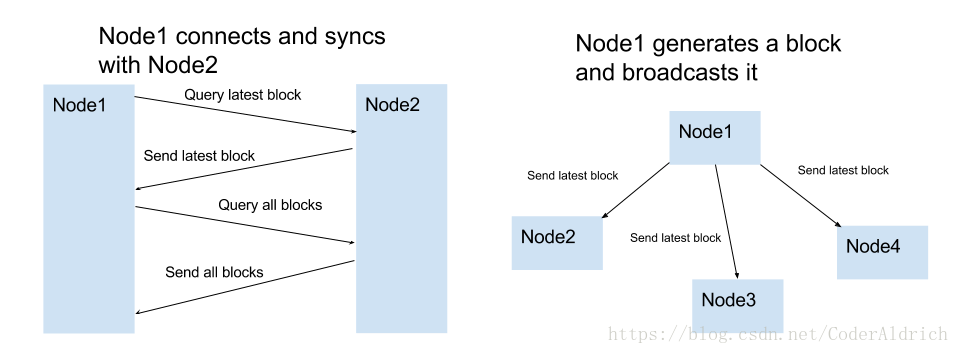
An essential part of a node is to share and sync the blockchain with other nodes. The following rules are used to keep the network in sync.
- When a node generates a new block, it broadcasts it to the network
- When a node connects to a new peer it querys for the latest block
- When a node encounters a block that has an index larger than the current known block, it either adds the block the its current chain or querys for the full blockchain.
No automatic peer discovery is used. The location (=URLs) of peers must be manually added.
Controlling the node
The user must be able to control the node in some way. This is done by setting up a HTTP server.
var initHttpServer = () => {
    var app = express();
    app.use(bodyParser.json());

    app.get('/blocks', (req, res) => res.send(JSON.stringify(blockchain)));
    app.post('/mineBlock', (req, res) => {
        var newBlock = generateNextBlock(req.body.data);
        addBlock(newBlock);
        broadcast(responseLatestMsg());
        console.log('block added: ' + JSON.stringify(newBlock));
        res.send();
    });
    app.get('/peers', (req, res) => {
        res.send(sockets.map(s => s._socket.remoteAddress + ':' + s._socket.remotePort));
    });
    app.post('/addPeer', (req, res) => {
        connectToPeers([req.body.peer]);
        res.send();
    });
    app.listen(http_port, () => console.log('Listening http on port: ' + http_port));
};
As seen, the user is able to interact with the node in the following ways:
- List all blocks
- Create a new block with a content given by the user
- List or add peers
The most straightforward way to control the node is e.g. with Curl:
#get all blocks from the node
curl http://localhost:3001/blocks
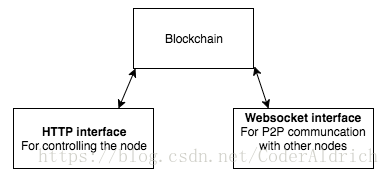
Architecture
It should be noted that the node actually exposes two web servers: One for the user to control the node (HTTP server) and one for the peer-to-peer communication between the nodes.(Websocket HTTP server)
Conlusions
The NaiveChain was created for demonstration and learning purposes. Since it does not have a “mining” algorithm (PoS of PoW) it cannot used in a public network. It nonetheless implements the basic features for a functioning blockchain.
You can check the Github repository for more technical details.
If you want to understand more about blockchains, I suggest you to check out Naivecoin: a tutorial for building a cryptocurrency. In this tutorial we will talk more about e.g. mining (proof-of-work), transactions and wallets.