Spring Boot 提供了spring-boot-starter-web来为Web开发予以支持,spring-boot-starter-web为我们提供了嵌入的Tomcat以及SpringMVC的依赖。我们还用到模板引擎,主要使用Thymeleaf作为模板引擎,事实上,Spring Boot提供了大量的模板引擎,包括FreeMarker、Groovy、Thymeleaf、Mustache等等,但springboot官方推荐使用Thymeleaf。Thymeleaf在使用的过程中通过ThymeleafAutoConfiguration类对集成所需要的Bean进行自动配置,通过ThymeleafProperties来配置Thymeleaf,包括前缀后缀的,下面是ThymeleafProperties一段源码:
@ConfigurationProperties("spring.thymeleaf")
public class ThymeleafProperties {
    private static final Charset DEFAULT_ENCODING = Charset.forName("UTF-8");
    private static final MimeType DEFAULT_CONTENT_TYPE = MimeType.valueOf("text/html");
    public static final String DEFAULT_PREFIX = "classpath:/templates/";
    public static final String DEFAULT_SUFFIX = ".html";
    private boolean checkTemplate = true;
    private boolean checkTemplateLocation = true;
    private String prefix = "classpath:/templates/";
    private String suffix = ".html";
    private String mode = "HTML5";
}
源码中看到默认的页面后缀名为.html,前缀为classpath:/templates/,实际上也就是我们需要把html页面放到resources文件夹下的templates文件夹中。同时我们也看到了要如何修改这个配置,在application.properties文件中以spring.thymeleaf为前缀来配置相关属性。
接下来我们开始一个项目的创建:
一、创建项目:
注意创建的时候要选择Thymeleaf作为依赖,这样创建成功的Project中将自动包含spring-boot-starter-web,如下图:

二、创建JavaBean
从后台传递数据给前台页面,数据的载体就是这个JavaBean,如下:
/**
 * @Author:dyz Date:21:31 2019/5/13
 */
public class Student {
    private String name;
    private Integer age;

    public Student() {
        super();
    }

    public Student(String name, Integer age) {
        super();
        this.name = name;
        this.age = age;
    }

    public String getName() {
        return name;
    }

    public void setName(String name) {
        this.name = name;
    }

    public Integer getAge() {
        return age;
    }

    public void setAge(Integer age) {
        this.age = age;
    }
}
三、后台数据构造
在入口类中添加如下代码,由后台向前台页面返回两条数据,一个单个的Student对象,还有一个Student对象是一个List集合,集合中放了3个Student对象,代码如下:
@Controller
@SpringBootApplication
public class SpringbootwebApplication {

    public static void main(String[] args) {
        SpringApplication.run(SpringbootwebApplication.class, args);
    }


    @RequestMapping
    public String index(Model model) {
        Student student = new Student("aa", 11);
        List<Student> studentList = new ArrayList<>();
        Student s1 = new Student("zhangsan", 11);
        Student s2 = new Student("lisi", 22);
        Student s3 = new Student("wangwu", 33);
        studentList.add(s1);
        studentList.add(s2);
        studentList.add(s3);
        model.addAttribute("student", student);
        model.addAttribute("studentList", studentList);
        return "index";
    }

}
就是返回给前台页面两个对象,一个student,一个studentList,另外,我们的前台页面叫做index.html。
四、引入相关的静态文件
这里使用到了Bootstrap和jQuery,静态文件我们要放在src/main/resources/static目录下。
五、前台展示
之前说过,thymeleaf源码要求默认情况下前台页面要放在src/main/resources/templates目录下,所以在该目录下新建文件叫index.html,如下:
<html lang="en" xmlns:th="http://www.thymeleaf.org">
<head>
    <meta charset="UTF-8" />
    <title>Test20</title>
    <link th:href="@{bootstrap/css/bootstrap.min.css}" rel="stylesheet" />
    <link th:href="@{bootstrap/css/bootstrap-theme.min.css}" rel="stylesheet" />
</head>
<body>
<div class="panel panel-primary">
    <div class="panel-heading">
        <h3 class="panel-title">访问Model</h3>
    </div>
    <div class="panel-body">
        <span th:text="${student.name}"></span>
    </div>
</div>
<div th:if="${not #lists.isEmpty(studentList)}">
    <div class="panel panel-primary">
        <div class="panel-heading">
            <h3 class="panel-title">列表</h3>
        </div>
        <div class="panel-body">
            <ul class="list-group">
                <li class="list-group-item" th:each="student:${studentList}">
                    <span th:text="${student.name}"></span>
                    <span th:text="${student.age}"></span>
                    <button class="btn" th:onclick="'getName(\''+${student.name}+'\');'">获得名字</button>
                </li>
            </ul>
        </div>
    </div>
</div>
<script th:src="@{jquery-3.1.1.js}" type="text/javascript"></script>
<script th:src="@{bootstrap/js/bootstrap.min.js}" type="text/javascript"></script>
<script th:inline="javascript">
    var single = [[${student}]];
    console.log(single.name+"/"+single.age);
    function getName(name) {
        console.log(name);
    }
</script>
</body>
</html>首先通过xmlns:th="http://www.thymeleaf.org"导入命名空间,由于html本身是静态视图,在使用相关属性的时候加上th:前缀可以使之变为动态视图。
th:href="@{bootstrap/css/bootstrap.min.css}"表示引用Web静态资源。
th:text="${student.name}"表示访问model中student的name属性,
th:if="${not #lists.isEmpty(student)}"表示判断model中的student集合是否为空,
th:each="student:${studentList}"表示遍历studentList中的元素,student表示迭代元素。
th:onclick="'getName(\''+${student.name}+'\');'"表示添加点击事件,点击事件由JavaScript来处理。
th:inline="javascript"这样添加到的script标签可以通过[[${student}]]访问model中的属性。
现在就可以运行项目了,然后在浏览器中访问:
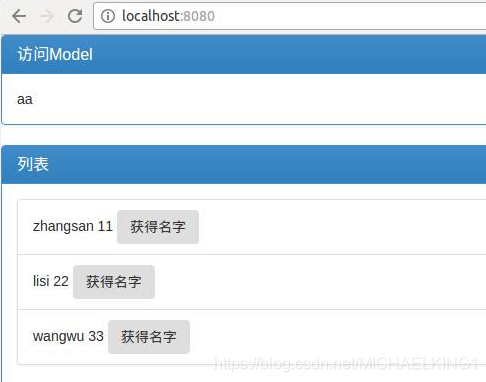
如果想要自定义favicon,我们只需要将自己的favicon.ico文件放置到src/main/resources目录下即可,重新运行项目,再看浏览器左上角的标签图标就会变了 。
