.NET Core & Docker & RabbitMQ
Prerequisites: Visual Studio Code and .NET Core 2.2 SDK and Docker Desktop
.NET Core
dotnet new webapi -o "publisher_api"
dotnet new sln
dotnet sln add publisher_api/publisher_api.csproj
dotnet new console -o "worker"
dotnet sln add worker/worker.csproj

cd worker
dotnet add package Newtonsoft.Json
In VS Code, open task.json, this is where our build task is defined. Modify it to build the entire solution by changing the argument we pass to 'build' to from a specific project to ${workspaceFolder}. It looks like this:
# task.json
{
            "label": "build",
            "command": "dotnet",
            "type": "process",
            "args": [
                "build",
                "${workspaceFolder}",
                "/property:GenerateFullPaths=true",
                "/consoleloggerparameters:NoSummary"
            ],
            "problemMatcher": "$msCompile"
        }
Next, open launch.json, this is where we debug and run configurations are stored. We need to add a launch configuration for the console app. There is a wizard in VS Code to assist with this, or you can simply open launch.json and paste the below snippet with the array of configurations:
# launch.json
{
    // Use IntelliSense to learn about possible attributes.
    // Hover to view descriptions of existing attributes.
    // For more information, visit: https://go.microsoft.com/fwlink/?linkid=830387
    "version": "0.2.0",
    "configurations": [
        {
            "name": ".NET Core Launch (console)",
            "type": "coreclr",
            "request": "launch",
            "preLaunchTask": "build",
            "program": "${workspaceFolder}/worker/bin/Debug/netcoreap2.2/worker.dll",
            "args": [],
            "cwd": "${workspaceFolder}/worker",
            "console": "internalConsole",
            "stopAtEntry": false
        },
        {
            "name": ".NET Core Attach",
            "type": "coreclr",
            "request": "attach",
            "processId": "${command:pickProcess}"
        }
    ]
}
Go back to ValuesController.cs. Replace the existing POST method with the code below:
        [HttpPost]
        public void Post([FromBody] string value)
        {
            return Ok("{\"success\":\"true\"}");
        }
Modify our console app to communicate with our WebAPI. Open worker/Program.cs. We'll need to import types from other namespaces, so add the following lines to the top of the file:
using System.Net.Http;
using Newtonsoft.Json;
using System.Threading.Tasks;
using System.Net.Http.Headers;
using System.Text;
Define a new method PostMessage, to send messages to our WebAPI.
        public static async Task PostMessage(string postData)
        {
            var json = JsonConvert.SerializeObject(postData);
            var content = new StringContent(json, UnicodeEncoding.UTF8, "application/json");

            using (var httpClientHandler = new HttpClientHandler())
            {
                httpClientHandler.ServerCertificateCustomValidationCallback = (message, cert, chain, errors) => { return true; };
                using (var client = new HttpClient(httpClientHandler))
                {
                    var result = await client.PostAsync("https://localhost:5001/api/Values", content);
                    string resultContent = await result.Content.ReadAsStringAsync();
                    Console.WriteLine("server returned: " + resultContent);
                }
            }
        }
The last thing we need to do is modify Main() method to invoke PostMessage(), and wait for it return.
Console.WriteLine("Posting a message...");
PostMessage("test message").Wait();
From the VS Code Debug Panel, launch the web app first, then launch the console app. Add some breakpoints to trace the request from the console app.
Docker
In this project, we'll use Docker, an open-source project for automating the deployment of applications as portable, self sufficient containers that can run almost anywhere. Before start, let's walk through some of its benefits of containerization.
Note: use
RabbitMQ.Client:5.1.1. Only version 5.1.1 works fine.
Consistency & Portability
How do you replicate the software you've built on your local machine somewhere else, perhaps on another physical machine or on a virtual machine in the cloud? Are all the run time dependencies (including any specific version requirements) in place? When dependencies change, how do you apply the change across all relevant machines and environments? A frequent symptom of this problem is when you hear "it works fine on my machine" or "why does it work in QA but not in Production?"
Once a container is created, you can run it basically anywhere and it will behave the same way. Because the application and all of its dependencies (including the OS) are encapsulated within the container, there will be no difference in execution between your local machine, another physical machine, or a virtual machine in the cloud. This approach also helps to simplify deployments.
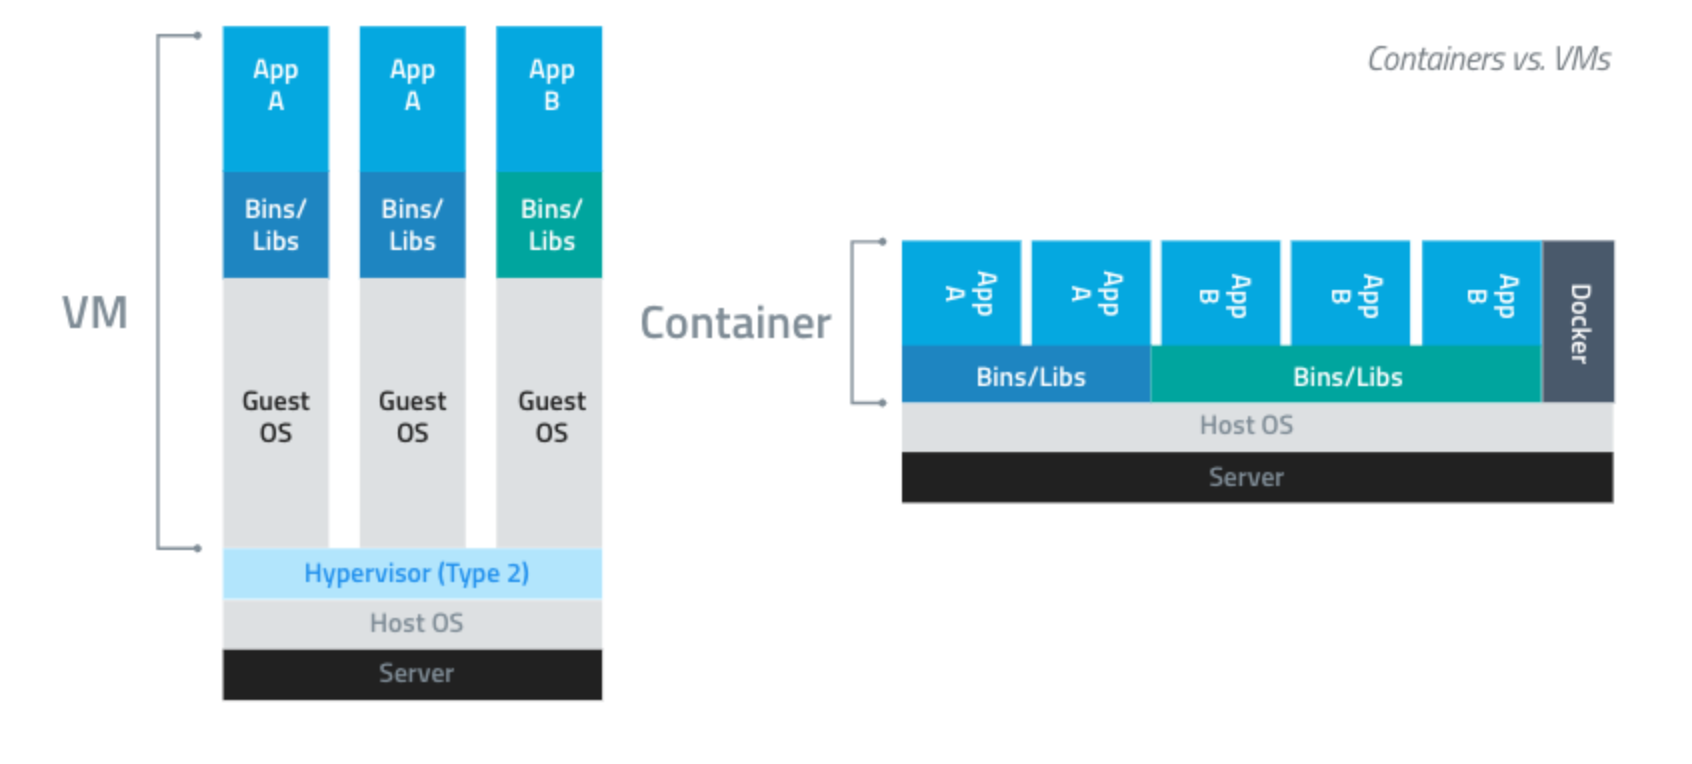
Isolation & Efficiency
Another common problem is VM utilization. To maximize efficiency and minimize cost, you may want to host multiple apps on a single VM. In that scenario, there is no local boundary between the apps. Containers isolate each application, preventing dependency conflicts. Containers also allow resource limits to be set for each service, preventing a service on a shared VM from consuming all available RAM and staving other critical services. These silos provide more security because your applications aren't running within a shared operating system.
A container also requires fewer resources than a virtual machine (containers don't have any direct interface with hardware, for example). This enables them to launch faster, and allows your application scales quickly in response to heavy traffic.
We're going to modify our project to run the WebAPI and console app with individual containers, and then use a tool called Docker-Compose to launch them together. The only additional software you need installed is Docker Community Edition. I'm working on Windows machine, so that's Docker Desktop for Windows.
The first step in introducing Docker to our project is to add a Dockerfile. A Dockerfile is a text file that contains all of the commands that will be executed to create a Docker image. An image is basically a package with all the dependencies and information needed to create a container. Images are composed of layers; you typically start with an operating system (maybe your container will run Linux or Windows server core), then install dependencies (such as the .NET Core SDK), and then install your application.
# Dockerfile

FROM microsoft/dotnet:3.1-sdk AS build
WORKDIR /app

# Copy csproj and restore as distinct layers
COPY *.csproj ./
RUN dotnet restore

# Copy everything else and build
COPY . ./
RUN dotnet publish -c Release -o out

# Build runtime image
FROM microsoft/dotnet:3.1-aspnetcore-runtime AS runtime

WORKDIR /app

COPY --from=build /app/out .

ENTRYPOINT ["dotnet","publisher_api.dll"]
The first line declares the base image we're building our new image from; in this case, it contains the .NET Core SDK and is optimized for local development and debugging.
Line 2 declares our working directory within the container (future COPY and RUN commands will execute within this directory.
Line 5 and 6 copy our project file into the WORKDIR, and then execute a dotnet restore to pull down required dependencies.
Line 9 and 10 copy the rest of the files in our project directory into the WORKDIR, and then actually build the application.
On line 13, it looks like we start over, building an image from a different base image. What we're actually doing here is taking advantage of a Docker feature called multistage builds. The short of it is that we want to build and run our application in a container, but building the app requires a lot more overhead than running it. So what happens here is that when we declare another FROM statement in our Dockerfile, we're starting the next stage of our build from a clean image. But we still have access to all of the artifacts from the previous stage. So the final image will only contain the results of the last stage of the build.
So getting back to line 13, we're creating a clean image from Microsoft's .NET core 'runtime' image (it's leaner than the image we used for the first stage of the build).
Line 15 declares our working directory in this image, and line 17 copies the binaries from our build image into this new image.
Line 19 declares the ENTRYPOINT for the container, which basically allows the container to run like an executable; when the container launches, it will launch the process declared here.
That's all we need to containerize our publisher_api application. What we've done is actually more complex than the most basic example we could create, because we are using a multistage build.
Navigate to the publisher_api directory in a command prompt, and run the following command:
docker build -t my_publisher_api .
Output should be similar to this:

You can use docker images to view your new images:

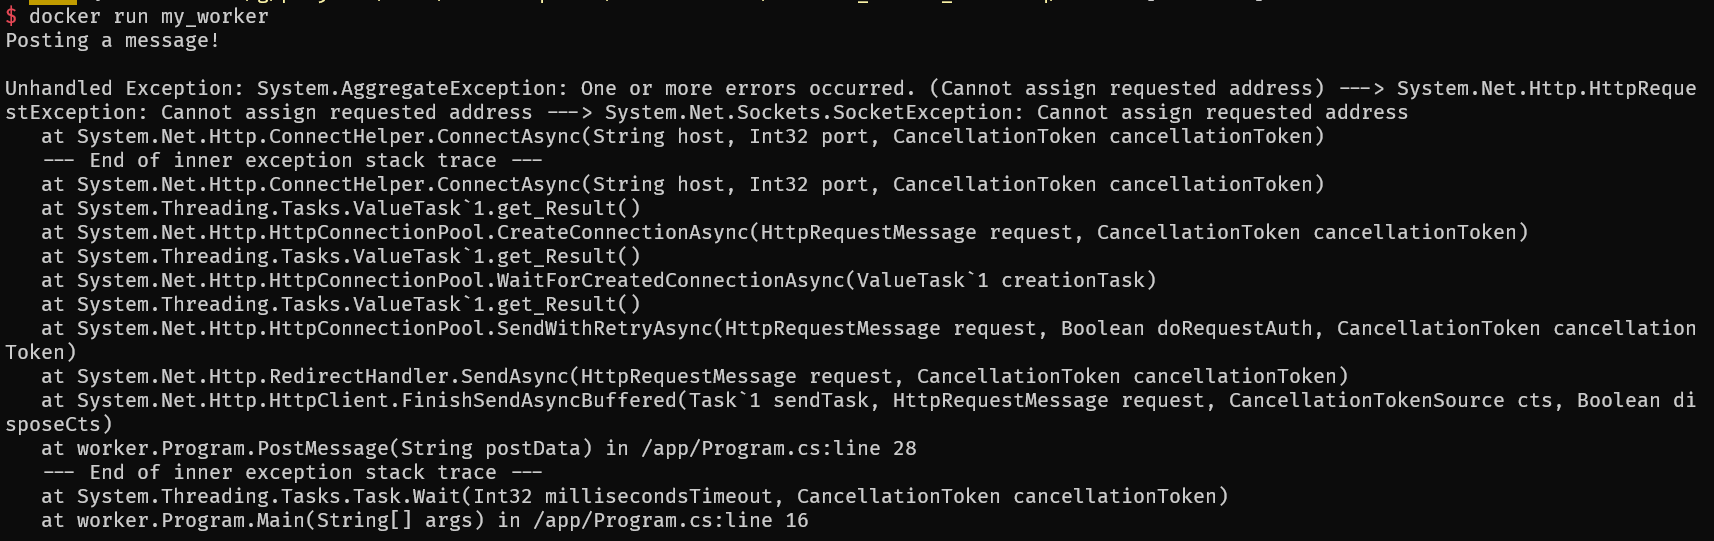
And docker run my_publisher_api to start the container:

And docker run my_worker to start my_worker container:
Use Docker-Compose
Docker-Compose is basically orchestration for containers. It allows you to define and run multi-container applications. Create a docker-compose.yml file in our root directory (at same level as our worker and publisher_api folders). The contents of our implementation are below:
# docker-compose.yml

version: '3.4'

services:
  publisher_api:
    image: my_publisher_api:latest
    build:
      context: ./publisher_api
      dockerfile: Dockerfile

  worker:
    image: my_worker:latest
    depends_on:
      - "publisher_api"
    build:
      context: ./worker
      dockerfile: Dockerfile
First we define the version of docker-compose that we'll use (3 is the latest major version). Then we declare our services; a service is basically a single container, encapsulating an isolated piece of our application. We have two services - one for our WebAPI and one for our console app.
The first service, which we've named publisher_api, is pretty straightforward. All we have to do is specify the build context, which is the directory where the Dockerfile for the project can be found.
The other service is exactly the same, except we express the dependency between our services using depends_on. We don't want the worker to start up until the publisher_api is running.
docker-compose up --build
Output should be similar as below image:
Currently, the worker sends a POST to https://localhost:5001/api/values, and this worked because we were running both the WebAPI and the worker on our local machine. But now that they are in separate containers, we need a way for the worker to discover and communicate with the publisher_api.
Since we're using docker-compose to launch our application, by default a single network is created for our application. Each container for a service joins the default network and is both reachable by other containers on that network, and discoverable by them at a hostname identical to the container name.
Understanding docker-compose networking, we need to modify the URL the worker is trying to reach. Replace localhost with the desired container name (publisher_api) and change the port to 80 (5001 was where Visual Studio Code hosted the debugger).
...
var result = await client.PostAsync("http://publisher_api:80/api/values", content);
...
Launch the app again using the same command docker-compose up --build (make sure you use --build flag so our code changes are picked up). This time, the worker should successfully reach the publisher_api, and the response (success:true) should be logged to the console.

RabbitMQ
Use RabbitMQ to decouple
Let's continue our application, we're going to add a new component - a message queue. The specifics of this example will seem bit contrived, but the goal is to decouple our publisher and worker, use Docker to launch a RabbitMQ container, and use Docker Compose to orchestrate the system.

Why use a message queue?
Microservices are all the rage in today's distributed systems. But an unfortunate side effect of breaking down monolithic applications into multiple single-purpose services is high coupling between the new services. What appears to a client as a single RESTful API call may actually become many calls between interdependent services behind the scenes. If one critical service goes down, the negative effects (latency and more failure) will quickly be felt throughout a highly coupled system.
This is where message queue comes into play. Instead of direct HTTP connections between services, we introduce a middleman. Services can publish messages to a queue, and consumers will pull messages from that queue and process them. This can allow asynchronous communication for long-running tasks (enqueue and forget), or the caller can enqueue the message and wait for a consumer to return a response (Remote Procedure Call pattern). Either way, we've decoupled the two services, in the sense that if one goes down, the message still persists in the queue, and as long as we've scaled horizontally (multiple copies of the services) on both sides of the queue, we don't have a single point of failure (besides the queue itself, but there are ways to ensure the queue is highly available).
We're going to add a RabbitMQ container to our project by modifying docker-compose.yml. Here is the update file:
# add a RabbitMQ

version: '3.4'

services:
  publisher_api:
    build: ./publisher_api
    restart: always

  worker:
    build: ./worker
    restart: always
    depends_on:
      - "publisher_api"
      - "rabbitmq"

  rabbitmq: # login guest:guest
    image: rabbitmq:3-management
    hostname: "rabbitmq"
    labels:
      NAME: "rabbitmq"
    ports:
      - "4369:4369"
      - "5671:5671"
      - "5672:5672"
      - "25672:25672"
      - "15671:15671"
      - "15672:15672"
What we've done above is tell docker-compose to add a new service to our application, named rabbitmq. It pulls an existing image (rabbit:3-management) from the public Docker repository; this image includes the message queue and the management console that you can access in a web server. We've also exposed the ports RabbitMQ operates on and told our other services to always restart on shutdown or failure. Docker-compose doesn't manage the startup order of services terribly well, so we'll just keep restarting our worker/publisher until the queue is in place.
Next, we modify our code to use the message queue. Let's import the NuGet package for the RabbitMQ client. Navigate to the publisher_api directory in a command prompt, and run the following command:
# only RabbitMQ.Client 5.1.1 works fine
dotnet add package RabbitMQ.Client
Now we will create a class to post messages to RabbitMQ. Create a new folder inside the publisher_api directory called services, and a new file called MessageService.cs. Here is code:
using System;
using System.Text;
using RabbitMQ.Client;

namespace publisher_api.Services
{

    public interface IMessageService
    {
        bool Enqueue(string message);
    }

    public class MessageService : IMessageService
    {
        private readonly ConnectionFactory _factory;
        private readonly IConnection _conn;
        private readonly IModel _channel;

        public MessageService()
        {
            _factory = new ConnectionFactory
            {
                HostName = "rabbitmq",
                Port = 5672,
                UserName = "guest",
                Password = "guest"
            };

            _conn = _factory.CreateConnection();
            _channel = _conn.CreateModel();

            _channel.QueueDeclare(
                queue: "hello",
                durable: false,
                exclusive: false,
                autoDelete: false,
                arguments: null
            );
        }

        public bool Enqueue(string message)
        {
            var body = Encoding.UTF8.GetBytes("server processed " + message);
            _channel.BasicPublish(
                exchange: "",
                routingKey: "hello",
                basicProperties: null,
                body: body
            );
            Console.WriteLine(" [x] Published {0} to RabbitMQ", message);
            return true;
        }
    }
}
Now, we want to modify the POST handler in ValuesController.cs to publish to our message queue. But how do we access MessageService from ValuesController? We don't want to create a new instance of MessageService every time a POST request comes in - that's not going to scale well. This is where we need Dependency Injection. In short, Dependency Injection is a pattern that allows you to decouple pieces of your application and helps up archive the Dependency Injection Principle (Higher-level modules should not depend on lower-level modules, and modules should depend on abstractions rather than on concrete details).
To configure our application to access MessageService via Dependency Injection, we have to modify Startup.cs. Add a using directive to reference Publisher_api.Services to the top of the file. Then look for the ConfigureServices method, and add the following line to the end of the method, after AddMvc is invoked:
services.AddSingleton<IMessageService, MessageService>();
What we're doing is basically telling our program that if anyone requests an instance of type IMessageService, they will be given a reference to a singleton MessageService object. This means our MessageService class will only be instantiated once, no matter how many times it is referenced.
Now let's modify ValuesController.cs to take advantage of Dependency Injection and enqueue our message via our MessageService. Again, add the using directive for publisher_api.Services to the top of the file. Then, modify the class and it's constructor to inject an instance of IMessageService, and store a reference to it in a private member variable:
private readonly IMessageService _messageService;

public ValuesController(IMessageService messageService)
{
    _messageService = messageService;
}
All we have to do now is modify the POST method to invoke Enqueue on our MessageService member variable:
# ValuesController.cs
[HttpPost]
public void Post([FromBody] string value)
{
    Console.WriteLine("received a Post: " + value);
    _messageService.Enqueue(value);
}
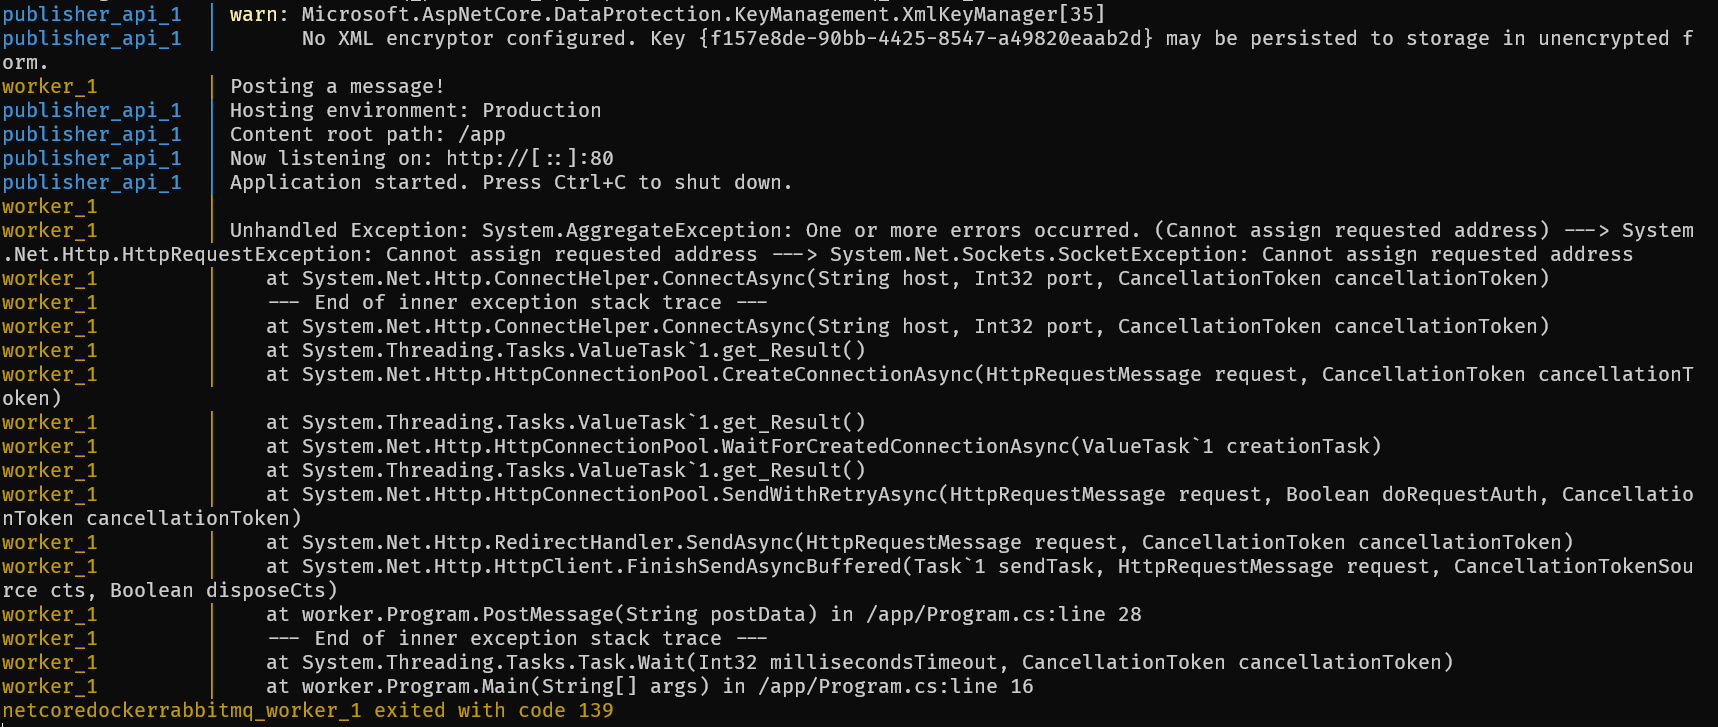
If you want to test the application now, you can run docker-compose up --build from our solution directory, and you should see output similar to this:

The key items there are:
- rabbitmq_1 container completes initialization successfully
- worker posts a message to the publisher
- publisher_api receives a message and publishes it to RabbitMQ
Once we verify that works, let's kill the docker-compose process by ctrl+c and modify the worker to poll our message queue for responses. We'll need to import the NuGet package for the RabbitMQ client, just as we did for the publisher_api. Navigate to the worker directory in a command prompt, and run the following command:
# only RabbitMQ.Client 5.1.1 works
dotnet add package RabbitMQ.Client
In Worker/Program.cs, add a couple of using directives from the RabbitMQ package:
# Program.cs
using RabbitMQ.Client;
using RabbitMQ.Client.Events;
Our PostMessage method will remain the same, we'll just modify the Main method to post 5 messages, then listen to our MessageQueue and await the responses:
        static void Main(string[] args)
        {
            string[] testStrings = new string[] { "one", "two", "three", "four", "five" };
            Console.WriteLine("Sleeping to wait for Rabbit");

            Task.Delay(1000).Wait();

            Console.WriteLine("Posting message to WebAPI");
            for (var i = 0; i < testStrings.Length; i++)
            {
                PostMessage(testStrings[i]).Wait();
            }

            Task.Delay(1000).Wait();
            Console.WriteLine("Consuming Queue now...");

            ConnectionFactory factory = new ConnectionFactory
            {
                HostName = "rabbitmq",
                Port = 5672,
                UserName = "guest",
                Password = "guest"
            };

            IConnection connection = factory.CreateConnection();
            IModel channel = connection.CreateModel();

            channel.QueueDeclare(
                queue: "hello",
                durable: false,
                exclusive: false,
                autoDelete: false,
                arguments: null
            );

            var consumer = new EventingBasicConsumer(channel);

            consumer.Received += (model, ea) =>
            {
                var body = ea.Body.ToArray();
                var message = Encoding.UTF8.GetString(body);
                Console.WriteLine(" [x] Recieved from Rabbit: {0}", message);
            };

            channel.BasicConsume(
                queue: "hello",
                autoAck: true,
                consumer: consumer
            );
        }
The Wait() call at the start of the function is a hack to give the RabbitMQ container more time to initialize before we start sending messages. Then we loop, sending each of our test strings to the publisher_api. After that, it's time to poll the message queue and retrieve the responses.
First, we set up a connection to the queue, in the same fashion that we did for the publisher_api. The major difference is that we set up an EventingBasicConsumer object. This class exposes RabbitMQ's message handling functions as events. We add a handler to the "Received" event where we retrieve the message body and print it to the console. Then we call the BasicConsume method on our channel object, supplying the name of the queue to poll and the EventingBasicConsumer object we just created.
Head back to the cmd prompt and run command docker-compose up --build again. The output should be similar to this:

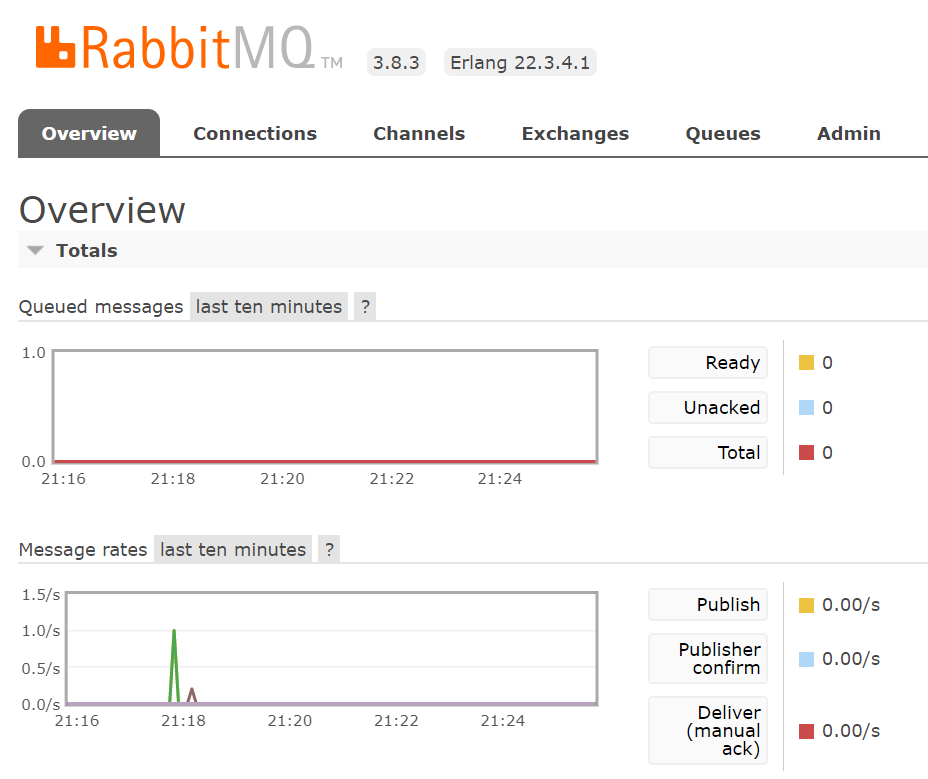
You should see the publisher_api received five POSTs, and the worker consume the message queue, printing out five messages it retrieved. Another way you can verify the queue is functional is to visit http://localhost:15672 in your web browser. This site will only be accessible while your docker-compose is running because it is hosted in the RabbitMQ container.
Once you login to the site with username: guest and password: guest, you should see some statistics. The clearest indication of activity is the message rates chart; as you can see below, there was a small spike in activity when our worker posted the five messages.