主要参考:http://tutorials.jenkov.com/java-nio/buffers.html
一、Java NIO Buffer
Java NIO Buffers are used when interacting with NIO Channels. As you know, data is read from channels into buffers, and written from buffers into channels.
A buffer is essentially a block of memory into which you can write data, which you can then later read again. This memory block is wrapped in a NIO Buffer object, which provides a set of methods that makes it easier to work with the memory block.
Basic Buffer Usage
Using a Buffer to read and write data typically follows this little 4-step process:
- Write data into the Buffer
- Call
buffer.flip() - Read data out of the Buffer
- Call
buffer.clear()orbuffer.compact()
When you write data into a buffer, the buffer keeps track of how much data you have written. Once you need to read the data, you need to switch the buffer from writing mode into reading mode using the flip() method call. In reading mode the buffer lets you read all the data written into the buffer.
Once you have read all the data, you need to clear the buffer, to make it ready for writing again. You can do this in two ways: By calling clear() or by calling compact(). The clear() method clears the whole buffer. The compact() method only clears the data which you have already read. Any unread data is moved to the beginning of the buffer, and data will now be written into the buffer after the unread data.
Here is a simple Buffer usage example, with the write, flip, read and clear operations maked in bold:
 1 RandomAccessFile aFile = new RandomAccessFile("data/nio-data.txt", "rw");
 2 FileChannel inChannel = aFile.getChannel();
 3
 4 //create buffer with capacity of 48 bytes
 5 ByteBuffer buf = ByteBuffer.allocate(48);
 6
 7 int bytesRead = inChannel.read(buf); //read into buffer.
 8 while (bytesRead != -1) {
 9
10   buf.flip();  //make buffer ready for read
11
12   while(buf.hasRemaining()){
13       System.out.print((char) buf.get()); // read 1 byte at a time
14   }
15
16   buf.clear(); //make buffer ready for writing
17   bytesRead = inChannel.read(buf);
18 }
19 aFile.close();
Buffer Capacity, Position and Limit
A buffer is essentially a block of memory into which you can write data, which you can then later read again. This memory block is wrapped in a NIO Buffer object, which provides a set of methods that makes it easier to work with the memory block.
A Buffer has three properties you need to be familiar with, in order to understand how a Buffer works. These are:
- capacity
- position
- limit
The meaning of position and limit depends on whether the Buffer is in read or write mode. Capacity always means the same, no matter the buffer mode.
Here is an illustration of capacity, position and limit in write and read modes. The explanation follows in the sections after the illustration.
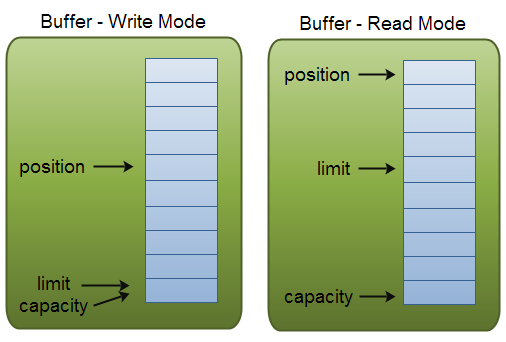 |
| Buffer capacity, position and limit in write and read mode. |
Capacity
Being a memory block, a Buffer has a certain fixed size, also called its "capacity". You can only write capacity bytes, longs, chars etc. into the Buffer. Once the Buffer is full, you need to empty it (read the data, or clear it) before you can write more data into it.
Position
When you write data into the Buffer, you do so at a certain position. Initially the position is 0. When a byte, long etc. has been written into the Buffer the position is advanced to point to the next cell in the buffer to insert data into. Position can maximally become capacity - 1.
When you read data from a Buffer you also do so from a given position. When you flip a Buffer from writing mode to reading mode, the position is reset back to 0. As you read data from the Buffer you do so from position, and position is advanced to next position to read.
Limit
In write mode the limit of a Buffer is the limit of how much data you can write into the buffer. In write mode the limit is equal to the capacity of the Buffer.
When flipping the Buffer into read mode, limit means the limit of how much data you can read from the data. Therefore, when flipping a Buffer into read mode, limit is set to write position of the write mode. In other words, you can read as many bytes as were written (limit is set to the number of bytes written, which is marked by position).
Buffer Types
Java NIO comes with the following Buffer types:
- ByteBuffer
- MappedByteBuffer
- CharBuffer
- DoubleBuffer
- FloatBuffer
- IntBuffer
- LongBuffer
- ShortBuffer
As you can see, these Buffer types represent different data types. In other words, they let you work with the bytes in the buffer as char, short, int, long, float or double instead.
The MappedByteBuffer is a bit special, and will be covered in its own text.
Allocating a Buffer
To obtain a Buffer object you must first allocate it. Every Buffer class has an allocate() method that does this. Here is an example showing the allocation of a ByteBuffer, with a capacity of 48 bytes:
1 ByteBuffer buf = ByteBuffer.allocate(48);
Here is an example allocating a CharBuffer with space for 1024 characters:
1 CharBuffer buf = CharBuffer.allocate(1024);
Writing Data to a Buffer
You can write data into a Buffer in two ways:
- Write data from a
Channelinto aBuffer - Write data into the
Bufferyourself, via the buffer'sput()methods.
Here is an example showing how a Channel can write data into a Buffer:
int bytesRead = inChannel.read(buf); //read into buffer.
Here is an example that writes data into a Buffer via the put() method:
buf.put(127);
There are many other versions of the put() method, allowing you to write data into the Buffer in many different ways. For instance, writing at specific positions, or writing an array of bytes into the buffer. See the JavaDoc for the concrete buffer implementation for more details.
flip()
The flip() method switches a Buffer from writing mode to reading mode. Calling flip() sets the position back to 0, and sets the limit to where position just was.
In other words, position now marks the reading position, and limit marks how many bytes, chars etc. were written into the buffer - the limit of how many bytes, chars etc. that can be read.
Reading Data from a Buffer
There are two ways you can read data from a Buffer.
- Read data from the buffer into a channel.
- Read data from the buffer yourself, using one of the get() methods.
Here is an example of how you can read data from a buffer into a channel:
//read from buffer into channel.
int bytesWritten = inChannel.write(buf);
Here is an example that reads data from a Buffer using the get() method:
byte aByte = buf.get();
There are many other versions of the get() method, allowing you to read data from the Buffer in many different ways. For instance, reading at specific positions, or reading an array of bytes from the buffer. See the JavaDoc for the concrete buffer implementation for more details.
rewind()
The Buffer.rewind() sets the position back to 0, so you can reread all the data in the buffer. The limit remains untouched, thus still marking how many elements (bytes, chars etc.) that can be read from the Buffer.
clear() and compact()
Once you are done reading data out of the Buffer you have to make the Buffer ready for writing again. You can do so either by calling clear() or by calling compact().
If you call clear() the position is set back to 0 and the limit to capacity. In other words, the Buffer is cleared. The data in the Buffer is not cleared. Only the markers telling where you can write data into the Buffer are.
If there is any unread data in the Buffer when you call clear() that data will be "forgotten", meaning you no longer have any markers telling what data has been read, and what has not been read.
If there is still unread data in the Buffer, and you want to read it later, but you need to do some writing first, call compact() instead of clear().
compact() copies all unread data to the beginning of the Buffer. Then it sets position to right after the last unread element. The limit property is still set to capacity, just like clear() does. Now the Buffer is ready for writing, but you will not overwrite the unread data.
mark() and reset()
You can mark a given position in a Buffer by calling the Buffer.mark() method. You can then later reset the position back to the marked position by calling the Buffer.reset() method. Here is an example:
1 buffer.mark();
2
3 //call buffer.get() a couple of times, e.g. during parsing.
4
5 buffer.reset();  //set position back to mark.
二、Java NIO Channel
Java NIO Channels are similar to streams with a few differences:
- You can both read and write to a Channels. Streams are typically one-way (read or write).
- Channels can be read and written asynchronously.
- Channels always read to, or write from, a Buffer.
As mentioned above, you read data from a channel into a buffer, and write data from a buffer into a channel. Here is an illustration of that:
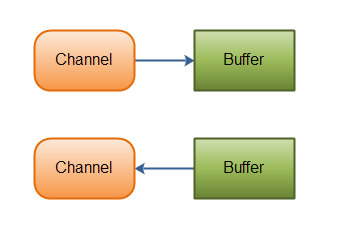 |
| Java NIO: Channels read data into Buffers, and Buffers write data into Channels |
Channel Implementations
Here are the most important Channel implementations in Java NIO:
- FileChannel
- DatagramChannel
- SocketChannel
- ServerSocketChannel
The FileChannel reads data from and to files.
The DatagramChannel can read and write data over the network via UDP.
The SocketChannel can read and write data over the network via TCP.
The ServerSocketChannel allows you to listen for incoming TCP connections, like a web server does. For each incoming connection a SocketChannel is created.
Basic Channel Example
Here is a basic example that uses a FileChannel to read some data into a Buffer:
 1     RandomAccessFile aFile = new RandomAccessFile("data/nio-data.txt", "rw");
 2     FileChannel inChannel = aFile.getChannel();
 3
 4     ByteBuffer buf = ByteBuffer.allocate(48);
 5
 6     int bytesRead = inChannel.read(buf);
 7     while (bytesRead != -1) {
 8
 9       System.out.println("Read " + bytesRead);
10       buf.flip();
11
12       while(buf.hasRemaining()){
13           System.out.print((char) buf.get());
14       }
15
16       buf.clear();
17       bytesRead = inChannel.read(buf);
18     }
19     aFile.close();
Notice the buf.flip() call. First you read into a Buffer. Then you flip it. Then you read out of it. I'll get into more detail about that in the next text about Buffer's.
SocketChannel和ServerSocketChannel的使用
利用SocketChannel和ServerSocketChannel实现客户端与服务器端简单通信:
SocketChannel 用于创建基于tcp协议的客户端对象,因为SocketChannel中不存在accept()方法,所以,它不能成为一个服务端程序。通过 connect()方法 ,SocketChannel对象可以连接到其他tcp服务器程序。
客户端:
 1 package socketchannel;
 2 import java.io.IOException;
 3 import java.net.InetSocketAddress;
 4 import java.nio.ByteBuffer;
 5 import java.nio.channels.SocketChannel;
 6
 7 public class WebClient {
 8    public static void main(String[] args) throws IOException {
 9        //1.通过SocketChannel的open()方法创建一个SocketChannel对象
10        SocketChannel socketChannel = SocketChannel.open();
11        //2.连接到远程服务器(连接此通道的socket)
12        socketChannel.connect(new InetSocketAddress("127.0.0.1", 3333));
13        // 3.创建写数据缓存区对象
14        ByteBuffer writeBuffer = ByteBuffer.allocate(128);
15        writeBuffer.put("hello WebServer this is from WebClient".getBytes());
16        writeBuffer.flip();
17        socketChannel.write(writeBuffer);
18        //创建读数据缓存区对象
19        ByteBuffer readBuffer = ByteBuffer.allocate(128);
20        socketChannel.read(readBuffer);
21        //String 字符串常量,不可变;StringBuffer 字符串变量(线程安全),可变;StringBuilder 字符串变量(非线程安全),可变
22        StringBuilder stringBuffer=new StringBuilder();
23        //4.将Buffer从写模式变为可读模式
24        readBuffer.flip();
25        while (readBuffer.hasRemaining()) {
26            stringBuffer.append((char) readBuffer.get());
27        }
28        System.out.println("从服务端接收到的数据:"+stringBuffer);
29        socketChannel.close();
30    }
31 }
ServerSocketChannel 允许我们监听TCP链接请求,通过ServerSocketChannelImpl的 accept()方法 可以创建一个SocketChannel对象用户从客户端读/写数据。
服务端:
 1 package socketchannel;
 2
 3 import java.io.IOException;
 4 import java.net.InetSocketAddress;
 5 import java.nio.ByteBuffer;
 6 import java.nio.channels.ServerSocketChannel;
 7 import java.nio.channels.SocketChannel;
 8
 9 public class WebServer {
10    public static void main(String args[]) throws IOException {
11        try {
12            //1.通过ServerSocketChannel 的open()方法创建一个ServerSocketChannel对象,open方法的作用:打开套接字通道
13            ServerSocketChannel ssc = ServerSocketChannel.open();
14            //2.通过ServerSocketChannel绑定ip地址和port(端口号)
15            ssc.socket().bind(new InetSocketAddress("127.0.0.1", 3333));
16            //通过ServerSocketChannelImpl的accept()方法创建一个SocketChannel对象用户从客户端读/写数据
17            SocketChannel socketChannel = ssc.accept();
18            //3.创建写数据的缓存区对象
19            ByteBuffer writeBuffer = ByteBuffer.allocate(128);
20            writeBuffer.put("hello WebClient this is from WebServer".getBytes());
21            writeBuffer.flip();
22            socketChannel.write(writeBuffer);
23            //创建读数据的缓存区对象
24            ByteBuffer readBuffer = ByteBuffer.allocate(128);
25            //读取缓存区数据
26            socketChannel.read(readBuffer);
27            StringBuilder stringBuffer=new StringBuilder();
28            //4.将Buffer从写模式变为可读模式
29            readBuffer.flip();
30            while (readBuffer.hasRemaining()) {
31                stringBuffer.append((char) readBuffer.get());
32            }
33            System.out.println("从客户端接收到的数据:"+stringBuffer);
34            socketChannel.close();
35            ssc.close();
36        } catch (IOException e) {
37            e.printStackTrace();
38        }
39    }
40 }
通过上述实例代码,我们可以大概总结出SocketChannel和ServerSocketChannel的使用的一般使用规则:
客户端
-
1.通过SocketChannel连接到远程服务器
-
2.创建读数据/写数据缓冲区对象来读取服务端数据或向服务端发送数据
-
3.关闭SocketChannel
服务端
-
1.通过ServerSocketChannel 绑定ip地址和端口号
-
2.通过ServerSocketChannelImpl的accept()方法创建一个SocketChannel对象用户从客户端读/写数据
-
3.创建读数据/写数据缓冲区对象来读取客户端数据或向客户端发送数据
-
4. 关闭SocketChannel和ServerSocketChannel
三、Java NIO Selector
The Java NIO Selector is a component which can examine one or more Java NIO Channel instances, and determine which channels are ready for e.g. reading or writing. This way a single thread can manage multiple channels, and thus multiple network connections.
Why Use a Selector?
The advantage of using just a single thread to handle multiple channels is that you need less threads to handle the channels. Actually, you can use just one thread to handle all of your channels. Switching between threads is expensive for an operating system, and each thread takes up some resources (memory) in the operating system too. Therefore, the less threads you use, the better.
Keep in mind though, that modern operating systems and CPU's become better and better at multitasking, so the overheads of multithreading becomes smaller over time. In fact, if a CPU has multiple cores, you might be wasting CPU power by not multitasking. Anyways, that design discussion belongs in a different text. It suffices to say here, that you can handle multiple channels with a single thread, using a Selector.
Here is an illustration of a thread using a Selector to handle 3 Channel's:
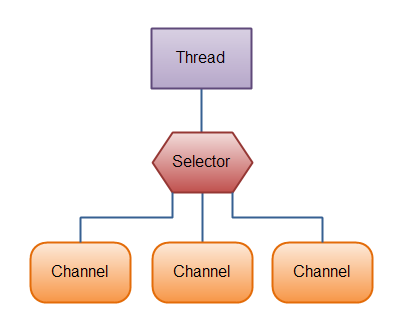 |
| Java NIO: A Thread uses a Selector to handle 3 Channel's |
Creating a Selector
You create a Selector by calling the Selector.open() method, like this:
1 Selector selector = Selector.open();
Registering Channels with the Selector
In order to use a Channel with a Selector you must register the Channel with the Selector. This is done using the SelectableChannel.register() method, like this:
channel.configureBlocking(false);

SelectionKey key = channel.register(selector, SelectionKey.OP_READ);
The Channel must be in non-blocking mode to be used with a Selector. This means that you cannot use FileChannel's with a Selector since FileChannel's cannot be switched into non-blocking mode. Socket channels will work fine though.
Notice the second parameter of the register() method. This is an "interest set", meaning what events you are interested in listening for in the Channel, via the Selector. There are four different events you can listen for:
- Connect
- Accept
- Read
- Write
A channel that "fires an event" is also said to be "ready" for that event. So, a channel that has connected successfully to another server is "connect ready". A server socket channel which accepts an incoming connection is "accept" ready. A channel that has data ready to be read is "read" ready. A channel that is ready for you to write data to it, is "write" ready.
These four events are represented by the four SelectionKey constants:
- SelectionKey.OP_CONNECT
- SelectionKey.OP_ACCEPT
- SelectionKey.OP_READ
- SelectionKey.OP_WRITE
If you are interested in more than one event, OR the constants together, like this:
1 int interestSet = SelectionKey.OP_READ | SelectionKey.OP_WRITE;
I'll return to the interest set a bit further down in this text.
SelectionKey
As you saw in the previous section, when you register a Channel with a Selector the register() method returns a SelectionKey objects. This SelectionKey object contains a few interesting properties:
- The interest set
- The ready set
- The Channel
- The Selector
- An attached object (optional)
I'll describe these properties below.
Interest Set
The interest set is the set of events you are interested in "selecting", as described in the section "Registering Channels with the Selector". You can read and write that interest set via the SelectionKey like this:
1 int interestSet = selectionKey.interestOps();
2
3 boolean isInterestedInAccept  = interestSet & SelectionKey.OP_ACCEPT;
4 boolean isInterestedInConnect = interestSet & SelectionKey.OP_CONNECT;
5 boolean isInterestedInRead    = interestSet & SelectionKey.OP_READ;
6 boolean isInterestedInWrite   = interestSet & SelectionKey.OP_WRITE;
As you can see, you can AND the interest set with the given SelectionKey constant to find out if a certain event is in the interest set.
Ready Set
The ready set is the set of operations the channel is ready for. You will primarily be accessing the ready set after a selection. Selection is explained in a later section. You access the ready set like this:
int readySet = selectionKey.readyOps();
You can test in the same way as with the interest set, what events / operations the channel is ready for. But, you can also use these four methods instead, which all reaturn a boolean:
1 selectionKey.isAcceptable();
2 selectionKey.isConnectable();
3 selectionKey.isReadable();
4 selectionKey.isWritable();
Channel + Selector
Accessing the channel + selector from the SelectionKey is trivial. Here is how it's done:
Channel  channel  = selectionKey.channel();

Selector selector = selectionKey.selector();
Selecting Channels via a Selector
Once you have register one or more channels with a Selector you can call one of the select() methods. These methods return the channels that are "ready" for the events you are interested in (connect, accept, read or write). In other words, if you are interested in channels that are ready for reading, you will receive the channels that are ready for reading from the select() methods.
Here are the select() methods:
- int select()
- int select(long timeout)
- int selectNow()
select() blocks until at least one channel is ready for the events you registered for.
select(long timeout) does the same as select() except it blocks for a maximum of timeout milliseconds (the parameter).
selectNow() doesn't block at all. It returns immediately with whatever channels are ready.
The int returned by the select() methods tells how many channels are ready. That is, how many channels that became ready since last time you called select(). If you call select() and it returns 1 because one channel has become ready, and you call select() one more time, and one more channel has become ready, it will return 1 again. If you have done nothing with the first channel that was ready, you now have 2 ready channels, but only one channel had become ready between each select() call.
selectedKeys()
Once you have called one of the select() methods and its return value has indicated that one or more channels are ready, you can access the ready channels via the "selected key set", by calling the selectors selectedKeys() method. Here is how that looks:
1 Set<SelectionKey> selectedKeys = selector.selectedKeys();
When you register a channel with a Selector the Channel.register() method returns a SelectionKey object. This key represents that channels registration with that selector. It is these keys you can access via the selectedKeySet() method. From the SelectionKey.
You can iterate this selected key set to access the ready channels. Here is how that looks:
 1 Set<SelectionKey> selectedKeys = selector.selectedKeys();
 2
 3 Iterator<SelectionKey> keyIterator = selectedKeys.iterator();
 4
 5 while(keyIterator.hasNext()) {
 6
 7     SelectionKey key = keyIterator.next();
 8
 9     if(key.isAcceptable()) {
10         // a connection was accepted by a ServerSocketChannel.
11
12     } else if (key.isConnectable()) {
13         // a connection was established with a remote server.
14
15     } else if (key.isReadable()) {
16         // a channel is ready for reading
17
18     } else if (key.isWritable()) {
19         // a channel is ready for writing
20     }
21
22     keyIterator.remove();
23 }
This loop iterates the keys in the selected key set. For each key it tests the key to determine what the channel referenced by the key is ready for.
Notice the keyIterator.remove() call at the end of each iteration. The Selector does not remove the SelectionKey instances from the selected key set itself. You have to do this, when you are done processing the channel. The next time the channel becomes "ready" the Selector will add it to the selected key set again.
The channel returned by the SelectionKey.channel() method should be cast to the channel you need to work with, e.g a ServerSocketChannel or SocketChannel etc.
wakeUp()
A thread that has called the select() method which is blocked, can be made to leave the select() method, even if no channels are yet ready. This is done by having a different thread call the Selector.wakeup() method on the Selector which the first thread has called select() on. The thread waiting inside select() will then return immediately.
If a different thread calls wakeup() and no thread is currently blocked inside select(), the next thread that calls select() will "wake up" immediately.
close()
When you are finished with the Selector you call its close() method. This closes the Selector and invalidates all SelectionKey instances registered with this Selector. The channels themselves are not closed.
Full Selector Example
Here is a full example which opens a Selector, registers a channel with it (the channel instantiation is left out), and keeps monitoring the Selector for "readiness" of the four events (accept, connect, read, write).
 1 Selector selector = Selector.open();
 2
 3 channel.configureBlocking(false);
 4
 5 SelectionKey key = channel.register(selector, SelectionKey.OP_READ);
 6
 7
 8 while(true) {
 9
10   int readyChannels = selector.selectNow();
11
12   if(readyChannels == 0) continue;
13
14
15   Set<SelectionKey> selectedKeys = selector.selectedKeys();
16
17   Iterator<SelectionKey> keyIterator = selectedKeys.iterator();
18
19   while(keyIterator.hasNext()) {
20
21     SelectionKey key = keyIterator.next();
22
23     if(key.isAcceptable()) {
24         // a connection was accepted by a ServerSocketChannel.
25
26     } else if (key.isConnectable()) {
27         // a connection was established with a remote server.
28
29     } else if (key.isReadable()) {
30         // a channel is ready for reading
31
32     } else if (key.isWritable()) {
33         // a channel is ready for writing
34     }
35
36     keyIterator.remove();
37   }
38 }
四、Java NIO 原理
Selector.open()实现原理
注意:以下源代码皆来源于openjdk8
Selector.open()可以得到一个Selector实例
 1 public static Selector open() throws IOException {
 2     // 首先找到provider,然后再打开Selector
 3     return SelectorProvider.provider().openSelector();
 4 }
 5 // java.nio.channels.spi.SelectorProvider
 6     public static SelectorProvider provider() {
 7     synchronized (lock) {
 8         if (provider != null)
 9             return provider;
10         return AccessController.doPrivileged(
11             new PrivilegedAction<SelectorProvider>() {
12                 public SelectorProvider run() {
13                         if (loadProviderFromProperty())
14                             return provider;
15                         if (loadProviderAsService())
16                             return provider;
17                             // 实际创建SelectorProvider的方法
18                         provider = sun.nio.ch.DefaultSelectorProvider.create();
19                         return provider;
20                     }
21                 });
22     }
23 }
sun.nio.ch.DefaultSelectorProvider
不同系统对应着不同的sun.nio.ch.DefaultSelectorProvider,
 1 /**
 2  * Returns the default SelectorProvider.
 3  */
 4 public static SelectorProvider create() {
 5     // 获取OS名称
 6     String osname = AccessController
 7         .doPrivileged(new GetPropertyAction("os.name"));
 8     // 根据名称来创建不同的Selctor
 9     if (osname.equals("SunOS"))
10         return createProvider("sun.nio.ch.DevPollSelectorProvider");
11     if (osname.equals("Linux"))
12         return createProvider("sun.nio.ch.EPollSelectorProvider");
13     return new sun.nio.ch.PollSelectorProvider();
14 }
以Linux为例:sun.nio.ch.DefaultSelectorProvider
1 // EPollSelectorProvider.openSelector()
2 public AbstractSelector openSelector() throws IOException {
3     return new EPollSelectorImpl(this);
4 }
如果系统名称是Linux的话,真正创建的是sun.nio.ch.EPollSelectorProvider
Linux最终的Selector实现:sun.nio.ch.EPollSelectorImpl
EPollSelectorImpl.select()实现原理
epoll系统调用主要分为3个函数: epoll_create, epoll_ctl, epoll_wait
epoll_create:创建一个epoll fd
 1 // class EPollSelectorImpl extends SelectorImpl
 2 EPollSelectorImpl(SelectorProvider sp) throws IOException {
 3         super(sp);
 4         // makePipe返回管道的2个文件描述符,编码在一个long类型的变量中
 5         // 高32位代表读 低32位代表写
 6         // 使用pipe为了实现Selector的wakeup逻辑
 7         long pipeFds = IOUtil.makePipe(false);
 8         fd0 = (int) (pipeFds >>> 32);
 9         fd1 = (int) pipeFds;
10         // 创建一个EPollArrayWrapper
11         pollWrapper = new EPollArrayWrapper();
12         pollWrapper.initInterrupt(fd0, fd1);
13         fdToKey = new HashMap<>();
14     }
创建一个EPollArrayWrapper 初始化
1 EPollArrayWrapper() throws IOException {
2     // 创建epoll fd
3     epfd = epollCreate();
4 }
5 private native int epollCreate();
在初始化过程中调用了native epollCreate方法。
1 Java_sun_nio_ch_EPollArrayWrapper_epollCreate(JNIEnv *env, jobject this)
2 {
3      //从Linux2.6.8之后,改用了红黑树结构,指定了大小也没用
4     int epfd = epoll_create(256);
5     if (epfd < 0) {
6        JNU_ThrowIOExceptionWithLastError(env, "epoll_create failed");
7     }
8     return epfd;
9 }
Epoll wait:等待内核IO事件epoll_create: 内核系统调用,创建一个epoll fd, 并且开辟epoll自己的内核高速cache区,建立红黑树分配初始size的内存对象,同时建立一个list链表,用于存储准备就绪的事件
调用Selector.select(),最后会委托给EPollSelectorImpl的doSelect()方法
 1 protected int doSelect(long timeout) throws IOException {
 2     if (closed)
 3         throw new ClosedSelectorException();
 4     processDeregisterQueue();
 5     try {
 6         begin();
 7         // 等待事件到来,收集事件到来的fd并用来处理
 8         pollWrapper.poll(timeout);
 9     } finally {
10         end();
11     }
12     processDeregisterQueue();
13     int numKeysUpdated = updateSelectedKeys();
14
15     if (pollWrapper.interrupted()) {
16         // Clear the wakeup pipe
17         pollWrapper.putEventOps(pollWrapper.interruptedIndex(), 0);
18         synchronized (interruptLock) {
19             pollWrapper.clearInterrupted();
20             IOUtil.drain(fd0);
21             interruptTriggered = false;
22         }
23     }
24     return numKeysUpdated;
25 }
实际执行EPollArrayWrapper.poll(timeout);
 1 int poll(long timeout) throws IOException {
 2     // 看下文
 3     updateRegistrations();
 4     // 调用native方法,发起系统内核调用
 5     updated = epollWait(pollArrayAddress, NUM_EPOLLEVENTS, timeout, epfd);
 6     for (int i=0; i<updated; i++) {
 7         if (getDescriptor(i) == incomingInterruptFD) {
 8             interruptedIndex = i;
 9             interrupted = true;
10             break;
11         }
12     }
13     return updated;
14 }
15 private native int epollWait(long pollAddress, int numfds, long timeout,
16                              int epfd) throws IOException;
epollWait也是个native方法:
 1 Java_sun_nio_ch_EPollArrayWrapper_epollWait(JNIEnv *env, jobject this,
 2                                             jlong address, jint numfds,
 3                                             jlong timeout, jint epfd)
 4 {
 5     struct epoll_event *events = jlong_to_ptr(address);
 6     int res;
 7     if (timeout <= 0) {
 8         // 发起epoll_wait系统调用等待内核事件
 9         RESTARTABLE(epoll_wait(epfd, events, numfds, timeout), res);
10     } else {
11         res = iepoll(epfd, events, numfds, timeout);
12     }
13     if (res < 0) {
14         JNU_ThrowIOExceptionWithLastError(env, "epoll_wait failed");
15     }
16     return res;
17 }
epoll_ctlepoll_wait: 内核系统调用, 等待内核返回IO事件
注册到Selector上的IO事件是使用SelectionKey来表示,代表了Channel感兴趣的事件,如Read,Write,Connect,Accept.
调用Selector.register()完成IO事件注册,实际执行EPollSelectorImpl.implRegister()方法
1 protected void implRegister(SelectionKeyImpl ski) {
2        if (closed)
3            throw new ClosedSelectorException();
4        SelChImpl ch = ski.channel;
5        int fd = Integer.valueOf(ch.getFDVal());
6        fdToKey.put(fd, ski);
7        pollWrapper.add(fd);
8        keys.add(ski);
9    }
调用Selector.register()时均会将事件存储到EpollArrayWrapper的成员变量eventsLow和eventsHigh中
 1 // 使用数组保存事件变更, 数组的最大长度是MAX_UPDATE_ARRAY_SIZE, 最大64*1024
 2 private final byte[] eventsLow = new byte[MAX_UPDATE_ARRAY_SIZE];
 3 // 超过数组长度的事件会缓存到这个map中,等待下次处理
 4 private Map<Integer,Byte> eventsHigh;
 5 // 添加文件描述符fd
 6 void add(int fd) {
 7         // force the initial update events to 0 as it may be KILLED by a
 8         // previous registration.
 9         synchronized (updateLock) {
10             assert !registered.get(fd);
11             setUpdateEvents(fd, (byte)0, true);
12         }
13 }
14 private void setUpdateEvents(int fd, byte events, boolean force) {
15     // 判断fd和数组长度
16     if (fd < MAX_UPDATE_ARRAY_SIZE) {
17         if ((eventsLow[fd] != KILLED) || force) {
18             eventsLow[fd] = events;
19         }
20     } else {
21         Integer key = Integer.valueOf(fd);
22         if (!isEventsHighKilled(key) || force) {
23             eventsHigh.put(key, Byte.valueOf(events));
24         }
25     }
26 }
执行EpollArrayWrapper.poll()的时候, 首先会调用updateRegistrations()
 1 /**
 2  * Returns the pending update events for the given file descriptor.
 3  */
 4 private byte getUpdateEvents(int fd) {
 5     if (fd < MAX_UPDATE_ARRAY_SIZE) {
 6         return eventsLow[fd];
 7     } else {
 8         Byte result = eventsHigh.get(Integer.valueOf(fd));
 9         // result should never be null
10         return result.byteValue();
11     }
12 }
13 private void updateRegistrations() {
14     synchronized (updateLock) {
15         int j = 0;
16         while (j < updateCount) {
17             int fd = updateDescriptors[j];
18             // 从保存的eventsLow和eventsHigh里取出事件
19             short events = getUpdateEvents(fd);
20             boolean isRegistered = registered.get(fd);
21             int opcode = 0;
22             if (events != KILLED) {
23                 // 判断操作类型以传给epoll_ctl
24                 // 没有指定EPOLLET事件类型
25                 if (isRegistered) {
26                     // 如果已经注册过,不需要调用epollCtl去内核红黑树新增节点
27                     opcode = (events != 0) ? EPOLL_CTL_MOD : EPOLL_CTL_DEL;
28                 } else {
29                     opcode = (events != 0) ? EPOLL_CTL_ADD : 0;
30                 }
31                 if (opcode != 0) {
32                     // 熟悉的epoll_ctl
33                     epollCtl(epfd, opcode, fd, events);
34                     if (opcode == EPOLL_CTL_ADD) {
35                         registered.set(fd);
36                     } else if (opcode == EPOLL_CTL_DEL) {
37                         registered.clear(fd);
38                     }
39                 }
40             }
41             j++;
42         }
43         updateCount = 0;
44     }
45 }
46 private native void epollCtl(int epfd, int opcode, int fd, int events);
在获取到事件之后将操作委托给了epollCtl,这又是个native方法:
 1 Java_sun_nio_ch_EPollArrayWrapper_epollCtl(JNIEnv *env, jobject this, jint epfd,
 2                                            jint opcode, jint fd, jint events)
 3 {
 4     struct epoll_event event;
 5     int res;
 6     event.events = events;
 7     event.data.fd = fd;
 8     // 发起epoll_ctl调用来进行IO事件的管理
 9     RESTARTABLE(epoll_ctl(epfd, (int)opcode, (int)fd, &event), res);
10     if (res < 0 && errno != EBADF && errno != ENOENT && errno != EPERM) {
11         JNU_ThrowIOExceptionWithLastError(env, "epoll_ctl failed");
12     }
13 }
注意:jdk nio没有指定ET(边缘触发)还是LT(水平触发), 所以默认会用LT, 而Netty epoll transport使用ET触发

通过channel就能不断的获取客户端socket数据,实现后端业务处理
五、客户端与服务端简单交互实例
服务端:
 1 package selector;
 2
 3 import java.io.IOException;
 4 import java.net.InetSocketAddress;
 5 import java.nio.ByteBuffer;
 6 import java.nio.channels.SelectionKey;
 7 import java.nio.channels.Selector;
 8 import java.nio.channels.ServerSocketChannel;
 9 import java.nio.channels.SocketChannel;
10 import java.util.Iterator;
11 import java.util.Set;
12
13 public class WebServer {
14     public static void main(String[] args) {
15         try {
16             ServerSocketChannel ssc = ServerSocketChannel.open();
17             ssc.socket().bind(new InetSocketAddress("127.0.0.1", 8000));
18             ssc.configureBlocking(false);
19
20             Selector selector = Selector.open();
21             // 注册 channel,并且指定感兴趣的事件是 Accept
22             ssc.register(selector, SelectionKey.OP_ACCEPT);
23
24             ByteBuffer readBuff = ByteBuffer.allocate(1024);
25             ByteBuffer writeBuff = ByteBuffer.allocate(128);
26             writeBuff.put("received".getBytes());
27             writeBuff.flip();
28
29             while (true) {
30                 int nReady = selector.select();
31                 Set<SelectionKey> keys = selector.selectedKeys();
32                 Iterator<SelectionKey> it = keys.iterator();
33
34                 while (it.hasNext()) {
35                     SelectionKey key = it.next();
36                     it.remove();
37
38                     if (key.isAcceptable()) {
39                         // 创建新的连接,并且把连接注册到selector上,而且,
40                         // 声明这个channel只对读操作感兴趣。
41                         SocketChannel socketChannel = ssc.accept();
42                         socketChannel.configureBlocking(false);
43                         socketChannel.register(selector, SelectionKey.OP_READ);
44                     }
45                     else if (key.isReadable()) {
46                         SocketChannel socketChannel = (SocketChannel) key.channel();
47                         readBuff.clear();
48                         socketChannel.read(readBuff);
49
50                         readBuff.flip();
51                         System.out.println("received : " + new String(readBuff.array()));
52                         key.interestOps(SelectionKey.OP_WRITE);
53                     }
54                     else if (key.isWritable()) {
55                         writeBuff.rewind();
56                         SocketChannel socketChannel = (SocketChannel) key.channel();
57                         socketChannel.write(writeBuff);
58                         key.interestOps(SelectionKey.OP_READ);
59                     }
60                 }
61             }
62         } catch (IOException e) {
63             e.printStackTrace();
64         }
65     }
66 }
客户端:
 1 package selector;
 2
 3 import java.io.IOException;
 4 import java.net.InetSocketAddress;
 5 import java.nio.ByteBuffer;
 6 import java.nio.channels.SocketChannel;
 7
 8 public class WebClient {
 9     public static void main(String[] args) throws IOException {
10         try {
11             SocketChannel socketChannel = SocketChannel.open();
12             socketChannel.connect(new InetSocketAddress("127.0.0.1", 8000));
13
14             ByteBuffer writeBuffer = ByteBuffer.allocate(32);
15             ByteBuffer readBuffer = ByteBuffer.allocate(32);
16
17             writeBuffer.put("hello".getBytes());
18             writeBuffer.flip();
19
20             while (true) {
21                 writeBuffer.rewind();
22                 socketChannel.write(writeBuffer);
23                 readBuffer.clear();
24                 socketChannel.read(readBuffer);
25             }
26         } catch (IOException e) {
27         }
28     }
29 }
运行结果: