文章目录
一、为什么需要进行MYSQL的主从同步复制、读写分离?
对于当下的一些大型网站,仅仅一个数据库服务器已经不足以处理大量的数据库连接操作。而且仅仅拥有一个数据库服务器,容易造成数据丢失,非常不安全。
部署主从服务器,实现主从数据的同步,并实现读写分离,减轻主服务器的压力,也缓解了数据丢失的问题。
主从服务器,实际是指一主多从,在主服务器上进行写操作,而所有的读操作都在从服务器上进行。
主从服务器实现模型:

从以上模型可以看出,从服务器的日志文件相对于主服务器的日志文件而言,存在着延迟。
二、主从同步复制的方式
在这里将主服务器比喻为1,从服务器比喻为0。
1、同步复制
同步复制的形式为:1000 1000 1000
即每一个在主服务器上的数据库操作,都需要等待从服务器复制完成,主服务器才会进行下一个数据库操作。
2、异步复制
异步复制的形式为:
1111....
00000.....
即主服务器上一直不停的做数据库操作,而从服务器就一直复制日志实现同步。
三、主从数据库实现
环境配置:
服务器系统:
[root@master-server 桌面]# cat /etc/redhat-release
Red Hat Enterprise Linux Server release 7.0 (Maipo)
两台主机都能连接外网。并且:
主服务器IP地址:192.168.43.166
从服务器IP地址:192.168.43.30
1、安装mysql数据库
1. 下载
MYSQL下载链接:MYSQL5.7
在win10上下载该软件包,上传到虚拟机中。这里提供两种方式上传:
①下载winscp软件然后上传。(首选)Winscp下载


②配置samba服务,共享linux主机的一个目录,再上传。
2. 安装MYSQL
2.1 解压
通过winscp已经将安装包上传到linux系统了。
# 先删除原先的mysql目录或文件
root@master ~]# rpm -qa | grep mysql
[root@master ~]# find / -name mysql
/usr/lib64/mysql
/usr/share/mysql
[root@master ~]# rm -rf /usr/lib64/mysql
[root@master ~]# rm -rf /usr/share/mysql
#为了方便,把压缩包放到这个目录下
[root@master ~]# mv ./Desktop/mysql-5.7.23-linux-glibc2.12-x86_64.tar.gz /usr/local/
[root@master ~]# cd /usr/local
[root@master local]# pwd
/usr/local
[root@master local]# ls
bin    include  libexec                                     share
etc    lib      mysql-5.7.23-linux-glibc2.12-x86_64.tar.gz  src
games  lib64    sbin
[root@master local]#
#解压,并重命名文件夹
[root@master local]# tar xzvf mysql-5.7.23-linux-glibc2.12-x86_64.tar.gz
#这里省略解压过程
[root@master local]# ls
bin    include  libexec                                     sbin
etc    lib      mysql-5.7.23-linux-glibc2.12-x86_64         share
games  lib64    mysql-5.7.23-linux-glibc2.12-x86_64.tar.gz  src
[root@master local]# mv mysql-5.7.23-linux-glibc2.12-x86_64 mysql
[root@master local]# ls
bin    include  libexec                                     sbin
etc    lib      mysql                                       share
games  lib64    mysql-5.7.23-linux-glibc2.12-x86_64.tar.gz  src
[root@master local]#
2.1 配置初始化mysql
[root@master local]# echo "" > /etc/my.cnf
[root@master local]# vim /etc/my.cnf
# /etc/my.cnf清空后添加以下部分内容
[mysql]
default-character-set=utf8

[mysqld]
default-storage-engine=INNODB
character_set_server=utf8
# 创建一个mysql数据目录
[root@master local]# mkdir /usr/local/mysql/data/
[root@master local]# cd /usr/local/mysql/support-files/
[root@master support-files]# cp mysql.server /etc/init.d/mysql
[root@master support-files]# vim /etc/init.d/mysql
#修改以下内容:
basedir=/usr/local/mysql
datadir=/usr/local/mysql/data
# 创建一个用户用于初始化
[root@master support-files]# cd
[root@master ~]# useradd mysql
[root@master ~]# echo 123456 | passwd --stdin mysql
Changing password for user mysql.
passwd: all authentication tokens updated successfully.
[root@master ~]#

# 初始化mysql
[root@master ~]# cd /usr/local/mysql/bin/
[root@master bin]# ./mysqld --initialize --user=mysql --basedir=/usr/local/mysql/ --datadir=/usr/local/mysql/data/
2020-05-31T02:42:14.560417Z 0 [Warning] TIMESTAMP with implicit DEFAULT value is deprecated. Please use --explicit_defaults_for_timestamp server option (see documentation for more details).
2020-05-31T02:42:14.756536Z 0 [Warning] InnoDB: New log files created, LSN=45790
2020-05-31T02:42:14.782061Z 0 [Warning] InnoDB: Creating foreign key constraint system tables.
2020-05-31T02:42:14.845101Z 0 [Warning] No existing UUID has been found, so we assume that this is the first time that this server has been started. Generating a new UUID: 56137141-a2e8-11ea-ae47-000c29aa3134.
2020-05-31T02:42:14.846351Z 0 [Warning] Gtid table is not ready to be used. Table 'mysql.gtid_executed' cannot be opened.
2020-05-31T02:42:14.848085Z 1 [Note] A temporary password is generated for root@localhost: dvsae4ehql=B
[root@master bin]#

# root用户登录的临时密码
dvsae4ehql=B
#数据目录加密
[root@master bin]# ./mysql_ssl_rsa_setup --datadir=/usr/local/mysql/data/
Generating a 2048 bit RSA private key
..........+++
.....................................................+++
writing new private key to 'ca-key.pem'
-----
Generating a 2048 bit RSA private key
...+++
...........................+++
writing new private key to 'server-key.pem'
-----
Generating a 2048 bit RSA private key
....+++
.......+++
writing new private key to 'client-key.pem'
-----
[root@master bin]#


#启动mysql
[root@master bin]# ./mysqld_safe --user=mysql &
[1] 4575
[root@master bin]# Logging to '/usr/local/mysql/data/master.err'.
2020-05-31T02:43:39.950747Z mysqld_safe Starting mysqld daemon with databases from /usr/local/mysql/data

[root@master bin]# systemctl restart mysql
[root@master bin]# systemctl status mysql
mysql.service - LSB: start and stop MySQL
   Loaded: loaded (/etc/rc.d/init.d/mysql)
   Active: active (exited) since Sat 2020-05-30 22:43:48 EDT; 5s ago
  Process: 4705 ExecStart=/etc/rc.d/init.d/mysql start (code=exited, status=0/SUCCESS)

May 30 22:43:48 master systemd[1]: Starting LSB: start and stop MySQL...
May 30 22:43:48 master mysql[4705]: Starting MySQL SUCCESS!
May 30 22:43:48 master systemd[1]: Started LSB: start and stop MySQL.
May 30 22:43:48 master mysql[4705]: 2020-05-31T02:43:48.632168Z mysq...s
Hint: Some lines were ellipsized, use -l to show in full.
[root@master bin]#


# 查看mysql有没有启动
[root@master bin]# ps -ef | grep mysql

# 开通防火墙的3260端口
[root@master bin]# cd
[root@master ~]# firewall-cmd --permanent --zone=public --add-port=3306/tcp
success
[root@master ~]# firewall-cmd --reload
success

#用临时密码登录数据库,并修改root用户密码
[root@master ~]# cd /usr/local/mysql/bin/
[root@master bin]# ./mysql -uroot -p
Enter password:
Welcome to the MySQL monitor.  Commands end with ; or \g.
Your MySQL connection id is 2
Server version: 5.7.23

Copyright (c) 2000, 2018, Oracle and/or its affiliates. All rights reserved.

Oracle is a registered trademark of Oracle Corporation and/or its
affiliates. Other names may be trademarks of their respective
owners.

Type 'help;' or '\h' for help. Type '\c' to clear the current input statement.

mysql> set password=password('123456');
Query OK, 0 rows affected, 1 warning (0.01 sec)

mysql> grant all privileges on *.* to root@'%' identified by '123456';
Query OK, 0 rows affected, 1 warning (0.01 sec)

mysql> flush privileges;
Query OK, 0 rows affected (0.00 sec)

mysql> exit
Bye

# 添加mysql服务,并设置开机自启
[root@master bin]# chkconfig --add mysql
[root@master bin]# chkconfig mysql on


#设置环境变量,在/etc/profile文件的末尾加上这句话
[root@master bin]# vim /etc/profile
export PATH=/usr/local/mysql/bin:$PATH
# 让环境变量立即生效
[root@master bin]# source /etc/profile
至此,mysql数据库已经安装完毕。
# 创建一个测试数据库
[root@master ~]# mysql -uroot -p123456
mysql: [Warning] Using a password on the command line interface can be insecure.
Welcome to the MySQL monitor.  Commands end with ; or \g.
Your MySQL connection id is 3
Server version: 5.7.23 MySQL Community Server (GPL)

Copyright (c) 2000, 2018, Oracle and/or its affiliates. All rights reserved.

Oracle is a registered trademark of Oracle Corporation and/or its
affiliates. Other names may be trademarks of their respective
owners.

Type 'help;' or '\h' for help. Type '\c' to clear the current input statement.

mysql> show databases;
+--------------------+
| Database           |
+--------------------+
| information_schema |
| mysql              |
| performance_schema |
| sys                |
+--------------------+
4 rows in set (0.00 sec)

mysql> create database test;
Query OK, 1 row affected (0.00 sec)

mysql> exit
Bye
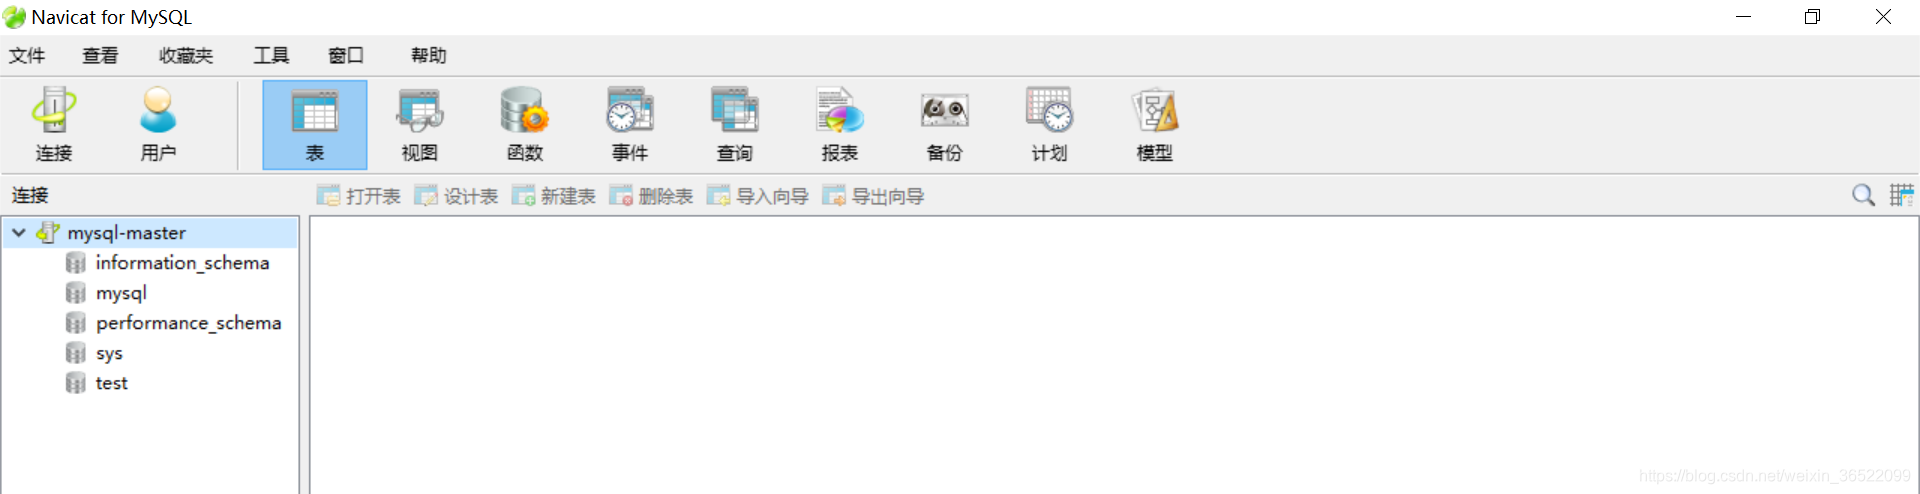
通过Navicat for MySQL连接主服务器,可以看到连接成功。
通过以上安装,mysql已经在master安装成功了。用同样的方法在slave上安装mysql,创建test数据库。
# slave-server的临时密码
2020-05-31T02:59:11.397333Z 1 [Note] A temporary password is generated for root@localhost: %P>zwYx:9Tsg
可以看到,slave上也安装成功了。
# mysql在不知道root密码的情况下重设root密码,编辑/etc/my.cnf文件,添加以下内容。
[mysqld]
skip-grant-tables
# 重启mysql数据库
# 此时可以无密码进行登录
[root@master ~]# mysql -uroot -p
Enter password:
Welcome to the MySQL monitor.  Commands end with ; or \g.
Your MySQL connection id is 3
Server version: 5.7.23 MySQL Community Server (GPL)

Copyright (c) 2000, 2018, Oracle and/or its affiliates. All rights reserved.

Oracle is a registered trademark of Oracle Corporation and/or its
affiliates. Other names may be trademarks of their respective
owners.

Type 'help;' or '\h' for help. Type '\c' to clear the current input statement.

mysql> flush privileges;
Query OK, 0 rows affected (0.00 sec)

mysql> set password for root@localhost = password('123456');
Query OK, 0 rows affected, 1 warning (0.00 sec)

mysql> exit
Bye

# 最后再编辑/etc/my.cnf文件,注释掉skip-grant-tables
# 重启mysql数据库即可用刚设置的新密码进行登录了。
2、修改master主服务器配置
# 修改/etc/my.cnf如下:
[mysql]
default-character-set=utf8

[mysqld]
default-storage-engine=INNODB
character_set_server=utf8

server-id = 1
log_bin = master-bin
binlog_format = ROW
binlog_do_db = test

#server-id 服务器唯一标识。
#log_bin 主服务器的mysql二进制日志,提供给从服务器用于同步数据。只用需要同步的数据库的操作才会记录在日志里。
#binlog_format  二进制日志文件格式
#以下二选一:
#binlog_do_db 指定同步的数据库名
#binlog_ignore_db 指定不同步的数据库名
# 授予主服务器上root用户连接从服务器的权限
[root@master ~]# mysql -uroot -p123456
mysql: [Warning] Using a password on the command line interface can be insecure.
Welcome to the MySQL monitor.  Commands end with ; or \g.
Your MySQL connection id is 4
Server version: 5.7.23 MySQL Community Server (GPL)

Copyright (c) 2000, 2018, Oracle and/or its affiliates. All rights reserved.

Oracle is a registered trademark of Oracle Corporation and/or its
affiliates. Other names may be trademarks of their respective
owners.

Type 'help;' or '\h' for help. Type '\c' to clear the current input statement.

mysql> grant replication slave on *.* to [email protected] identified by '123456';
Query OK, 0 rows affected, 1 warning (0.05 sec)

mysql> flush privileges;
Query OK, 0 rows affected (0.00 sec)

mysql> exit
Bye
# 查看主服务器的状态
[root@master ~]# systemctl restart mysql
[root@master ~]# mysql -uroot -p123456
mysql: [Warning] Using a password on the command line interface can be insecure.
Welcome to the MySQL monitor.  Commands end with ; or \g.
Your MySQL connection id is 2
Server version: 5.7.23-log MySQL Community Server (GPL)

Copyright (c) 2000, 2018, Oracle and/or its affiliates. All rights reserved.

Oracle is a registered trademark of Oracle Corporation and/or its
affiliates. Other names may be trademarks of their respective
owners.

Type 'help;' or '\h' for help. Type '\c' to clear the current input statement.

mysql> show master status;
+-------------------+----------+--------------+------------------+-------------------+
| File              | Position | Binlog_Do_DB | Binlog_Ignore_DB | Executed_Gtid_Set |
+-------------------+----------+--------------+------------------+-------------------+
| master-bin.000001 |      154 | test         |                  |                   |
+-------------------+----------+--------------+------------------+-------------------+
1 row in set (0.00 sec)
3、修改slave从服务器配置
# 修改/etc/my.cnf如下:
[mysql]
default-character-set=utf8

[mysqld]
default-storage-engine=INNODB
character_set_server=utf8

server-id = 2
log-bin=master-bin
binlog_format = ROW

#relay-log=slave-relay-bin
#relay-log-index = slave-relay-bin.index
#replicate-do-db=test
#server-id 服务器唯一标识。
#relay-log 从服务器的mysql二进制日志,用于数据恢复和备份。当主服务器崩了,提供给其他从服务器作为主服务器是用。
#以下二选一:
#replicate-do-db 指定同步的数据库名
#replicate-ignore-db 指定不同步的数据库名
[root@slave-server ~]# systemctl restart mysql
[root@slave-server ~]# mysql -uroot -p123456
mysql: [Warning] Using a password on the command line interface can be insecure.
Welcome to the MySQL monitor.  Commands end with ; or \g.
Your MySQL connection id is 2
Server version: 5.7.30 MySQL Community Server (GPL)

Copyright (c) 2000, 2020, Oracle and/or its affiliates. All rights reserved.

Oracle is a registered trademark of Oracle Corporation and/or its
affiliates. Other names may be trademarks of their respective
owners.

Type 'help;' or '\h' for help. Type '\c' to clear the current input statement.

mysql> change master to master_host='192.168.43.166',master_port=3306,master_user='root',master_password='123456',master_log_file='master-bin.000001',master_log_pos= 154;
#master_host  【主服务器的IP地址】
#master_port  【主服务器的端口】
#master_log_file   【show master status显示的File列:master-bin.000001】
#master_log_pos    【show master status显示的Position列:154】
Query OK, 0 rows affected, 2 warnings (0.02 sec)

mysql> start slave;  #启动从服务器
Query OK, 0 rows affected (0.00 sec)

mysql> show slave status\G;   #查看从服务器状态
*************************** 1. row ***************************
               Slave_IO_State: Connecting to master
                  Master_Host: 192.168.43.123
                  Master_User: salve_server
                  Master_Port: 3306
                Connect_Retry: 60
              Master_Log_File: master-bin.000001
          Read_Master_Log_Pos: 154
               Relay_Log_File: slave-relay-bin.000001
                Relay_Log_Pos: 4
        Relay_Master_Log_File: master-bin.000001
             Slave_IO_Running: Connecting
            Slave_SQL_Running: Yes
              Replicate_Do_DB: test
          Replicate_Ignore_DB:
           Replicate_Do_Table:
       Replicate_Ignore_Table:
      Replicate_Wild_Do_Table:
  Replicate_Wild_Ignore_Table:
                   Last_Errno: 0
                   Last_Error:
                 Skip_Counter: 0
          Exec_Master_Log_Pos: 154
              Relay_Log_Space: 154
              Until_Condition: None
               Until_Log_File:
                Until_Log_Pos: 0
           Master_SSL_Allowed: No
           Master_SSL_CA_File:
           Master_SSL_CA_Path:
              Master_SSL_Cert:
            Master_SSL_Cipher:
               Master_SSL_Key:
        Seconds_Behind_Master: NULL
Master_SSL_Verify_Server_Cert: No
                Last_IO_Errno: 1045
                Last_IO_Error: error connecting to master '[email protected]:3306' - retry-time: 60  retries: 1
               Last_SQL_Errno: 0
               Last_SQL_Error:
  Replicate_Ignore_Server_Ids:
             Master_Server_Id: 0
                  Master_UUID:
             Master_Info_File: /usr/local/mysql/data/master.info
                    SQL_Delay: 0
          SQL_Remaining_Delay: NULL
      Slave_SQL_Running_State: Slave has read all relay log; waiting for more updates
           Master_Retry_Count: 86400
                  Master_Bind:
      Last_IO_Error_Timestamp: 200516 15:29:13
     Last_SQL_Error_Timestamp:
               Master_SSL_Crl:
           Master_SSL_Crlpath:
           Retrieved_Gtid_Set:
            Executed_Gtid_Set:
                Auto_Position: 0
         Replicate_Rewrite_DB:
                 Channel_Name:
           Master_TLS_Version:
1 row in set (0.00 sec)

ERROR:
No query specified

mysql>
# 针对Slave_IO_Running处于连接中状态的解决方法:
             Slave_IO_Running: Connecting
            Slave_SQL_Running: Yes
# 授予root所有权限all privileges
grant all privileges on *.* to [email protected] identified by '123456' with grant option;
# 刷新权限
flush privileges;
4、测试主从服务器工作情况
主服务器IP地址:192.168.43.166
从服务器IP地址:192.168.43.30
测试:在主服务器上创建表,并插入数据。看从服务器是否会进行同步。
①主服务器上建数据
DROP TABLE IF EXISTS `user`;
CREATE TABLE `user` (
  `id` varchar(10) NOT NULL,
  `name` varchar(10) DEFAULT NULL,
  PRIMARY KEY (`id`)
) ENGINE=InnoDB DEFAULT CHARSET=utf8;

INSERT INTO `user` VALUES ('1', 'abong');
INSERT INTO `user` VALUES ('2', 'zhang');

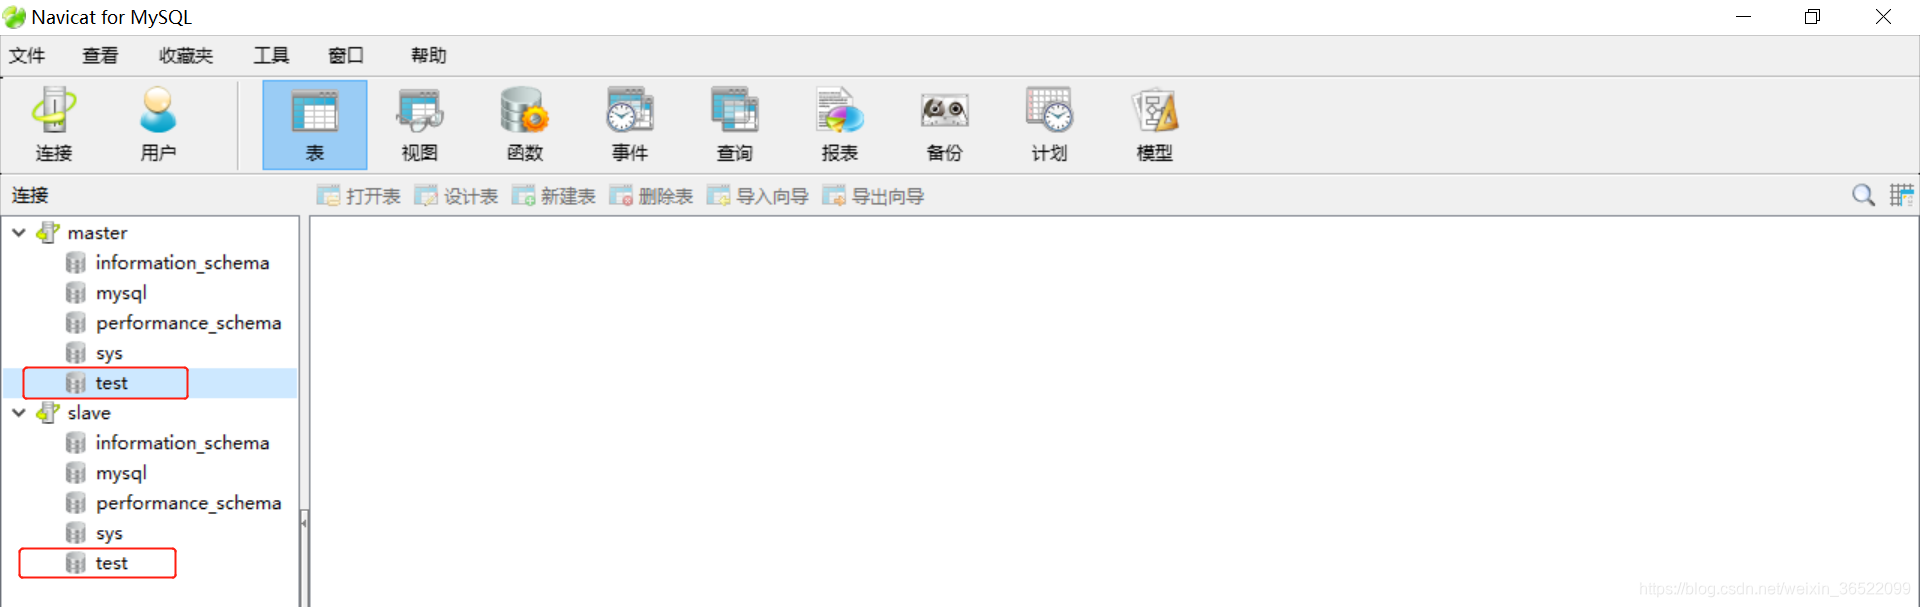
②检验从服务器是否同步。从下图可以看到,在从服务器上已经有了user表,并且数据也是正确的。

③从库上修改数据

④主库上看数据是否被修改。可以看到,数据并没有被修改。

四、读写分离
在MYSQL数据库主从同步、读写分离这项技术中,最主要的是如何做到主从同步,而读写分离可以通过数据库用户的权限进行配置。从上面的测试结果可以看出,将主库作为写库,而从库作为读库,可以将数据库的读写操作分离开,减轻数据库的压力,还能保持数据库的一致性。
在主库上,创建一个mysql用户,赋予读写权限。
在从库上,创建一个mysql用户,赋予只读权限。
以上就是MYSQL主从同步和读写分离的全部内容了,感兴趣的同学可以自行测试下,有不清楚的可以留言评论,一起探讨。