ELK是日志分析平台,不是一款软件,而是一整套解决方案,是三个软件产品的首字母缩写,ELK分别代表:
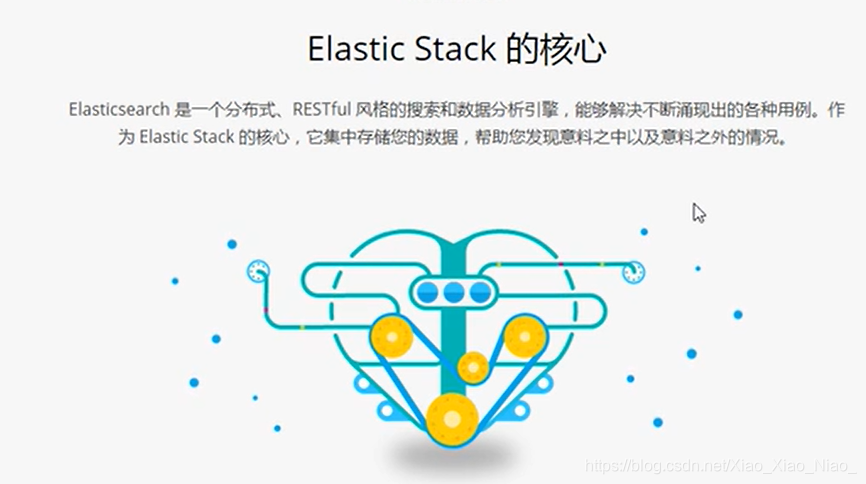
Elasticsearch:负责日志检索和储存 (ELK的核心)
Logstash:负责日志的收集和分析、处理
Kibana:负责日志的可视化
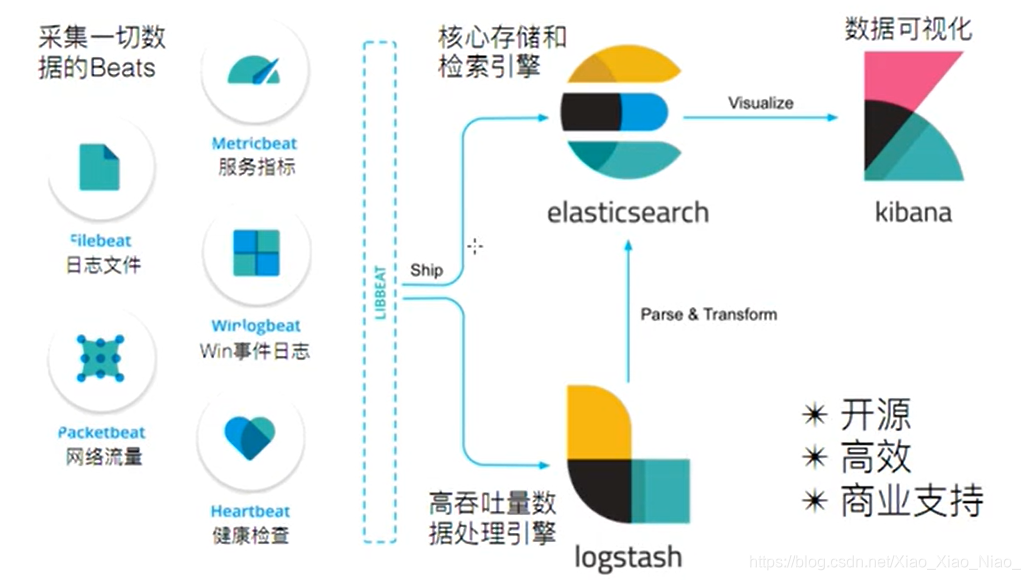
beats是elastic公司开源的一款采集系统监控数据的代理agent,是在被监控服务器上以客户端形式运行的数据收集器的统称,可以直接把数据发送给Elasticsearch或者通过Logstash发送给Elasticsearch,然后进行后续的数据分析活动
beats由如下组成:
packetbeat:是一个网络数据包分析器,用于监控,收集网络流量信息,packetbeat嗅探服务器之间的流量,解析应用层协议,并关联到消息的处理,其支持ICMP · DNS · HTTP · Mysql · postgresql · redis · mongDB · Memcache 等协议
filebeat: 用于监控,收集服务器日志文件,其已取代logstash forwarder;
Metricbeat:可定期获取外部系统的监控指示信息,其可以监控收集Apache· Haporxy · MongoDB · mysql · nginx · postgresql · redis · system · zookeeper 等服务;
winlogbeat:用于监控,收集windows系统日志信息
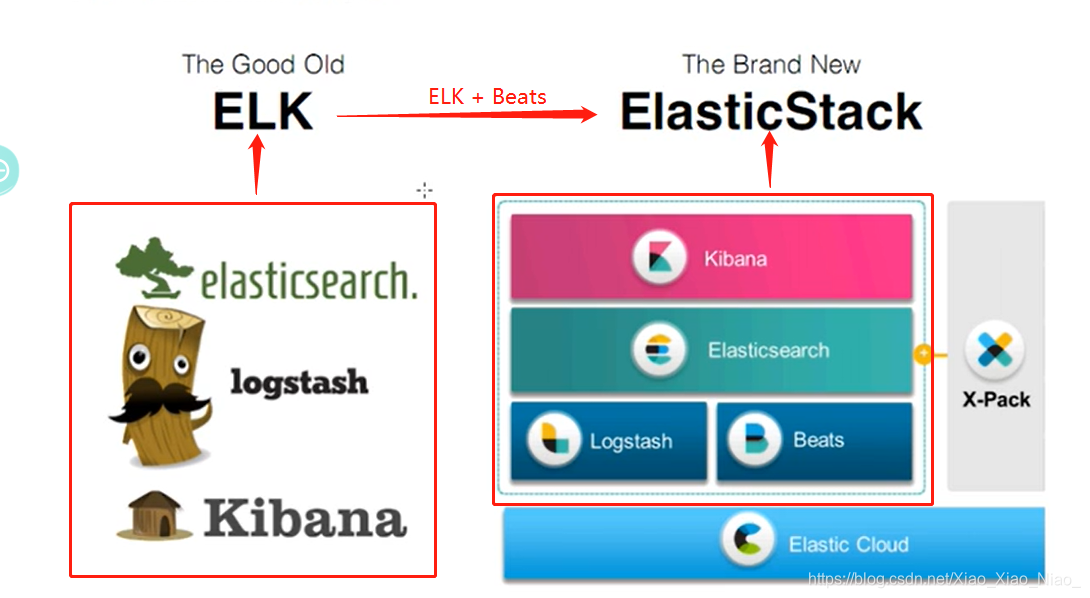
全系的Elastic Stack 技术栈包括:
Elasticsearch 搭建
首先要安装JDK环境,这里不做过多阐述。
Elasticsearch单机版安装
官方下载地址:https://www.elastic.co/cn/downloads/
Elasticsearch有多种安装方式,也可在官方地址进行下载。
特别说明这里的yum安装方式是从官方文档查阅,由于官方更新速度快,建议搭建之前多参考官方提供的文档。
++++++++++++++++++++++++++++++++++++++++++++++++++++++++++++++++++++++++++++++++
YUM安装方式
++++++++++++++++++++++++++++++++++++++++++++++++++++++++++++++++++++++++++++++++
导入Elasticsearch PGP密钥
下载并安装公共签名密钥:
[root@ELK ~]# rpm --import https://artifacts.elastic.co/GPG-KEY-elasticsearch  //报错了
curl: (7) Failed to connect to 2a04:4e42:1a::734: 网络不可达
错误:https://artifacts.elastic.co/GPG-KEY-elasticsearch: import read failed(2).

[root@ELK ~]# yum update curl    //刷新下yum源,重新执行一下上边操作
elasticsearch.repo在/etc/yum.repos.d/基于RedHat的发行版的/etc/zypp/repos.d/目录中或在基于OpenSuSE的发行版的目录中创建一个文件,其中包含:
[elasticsearch]
name=Elasticsearch repository for 7.x packages
baseurl=https://artifacts.elastic.co/packages/7.x/yum
gpgcheck=1
gpgkey=https://artifacts.elastic.co/GPG-KEY-elasticsearch
enabled=0
autorefresh=1
type=rpm-md
存储库就可以使用了。可以使用以下命令安装Elasticsearch:
[root@ELK ~]# yum install --enablerepo=elasticsearch elasticsearch //下载有点慢
安装
Yum安装过之后修改配置文件
vim /etc/elasticsearch/elasticsearch.yml
network.host: 0.0.0.0         //让所有IP地址都可以访问
path.data: /path/to/data      //指定数据路径
path.logs: /path/to/logs      //指定日志文件路径
cluster.initial_master_nodes: ["node-1"]          //最后一行加上这句话
network.host: 0.0.0.0 没改之前可以启动,改过之后无法启动可参考我的另一篇文章 《解决elasticsearch配置network.host: 0.0.0.0导致elasticsearch服务启动不成功的问题》
mkdir -p /path/to/data
mkdir -p /path/to/logs
chmod 777 -R /path
说明:在Elasticsearch中如果,network.host不是localhost或者127.0.0.1的话,就会认为是生产环境,会对环境的要求比较高。测试环境的话可以修改如下配置
vim /etc/elasticsearch/jvm.options
-Xms1g     //初始的堆内存 (可以根据自己的机子配置)    -Xms200m
-Xmx1g     //最大的堆内存                             -Xms200m  (我的选择)
一个进程在VMAS(虚拟内存区域)创建内存映射最大数量
vim /etc/sysctl.conf
vm.max_map_count=655360
[root@ELK ~]# sysctl -p   //配置生效
vm.max_map_count = 655360
配置limits.conf
vim /etc/security/limits.conf
* hard nofile 65536
* soft nofile 65536                    //*代表所有用户
* soft nproc 4096
* hard nproc 4096
要将Elasticsearch配置为在系统启动时自动启动,请运行以下命令:
/bin/systemctl daemon-reload
/bin/systemctl enable elasticsearch.service
Elasticsearch可以按以下方式启动和停止:
systemctl start elasticsearch.service       //启动
systemctl stop elasticsearch.service         //停止
systemctl status elasticsearch.service       //查看状态
通过浏览器访问
192.168.10.50:9200 //这是个json数据,看到这个恭喜你已经搭建成功。
{
  "name" : "ELK",
  "cluster_name" : "elasticsearch",
  "cluster_uuid" : "08BIZlsBRtGvnz6LUAWZ0w",
  "version" : {
    "number" : "7.7.1",
    "build_flavor" : "default",
    "build_type" : "rpm",
    "build_hash" : "ad56dce891c901a492bb1ee393f12dfff473a423",
    "build_date" : "2020-05-28T16:30:01.040088Z",
    "build_snapshot" : false,
    "lucene_version" : "8.5.1",
    "minimum_wire_compatibility_version" : "6.8.0",
    "minimum_index_compatibility_version" : "6.0.0-beta1"
  },
  "tagline" : "You Know, for Search"
}
+++++++++++++++++++++++++++++++++++++++++++++++++++++++++++++++++++++++++++
tar包安装方式
+++++++++++++++++++++++++++++++++++++++++++++++++++++++++++++++++++++++++++
1.前期准备
[root@ELK ~]# useradd elsearch     //创建用户,Elasticsearch不支持root用户运行
[root@ELK ~]# mkdir -p /data/ES    //创建目录
[root@ELK ~]# chown -R elsearch:elsearch /data/ES     //改变属性
[root@ELK ~]# tar -zxvf elasticsearch-7.7.1-linux-x86_64.tar.gz -C /data/ES/   //解压到目录
2.修改配置文件
[root@ELK config]# vim /data/ES/elasticsearch-7.7.1/config/elasticsearch.yml
network.host: 0.0.0.0         //让所有IP地址都可以访问
path.data: /path/to/data      //指定数据路径
path.logs: /path/to/logs      //指定日志文件路径
cluster.initial_master_nodes: ["node-1"]       //最后加上这句话
说明:在Elasticsearch中如果,network.host不是localhost或者127.0.0.1的话,就会认为是生产环境,会对环境的要求比较高。测试环境的话可以修改如下配置
vim /data/ES/elasticsearch-7.7.1/config/jvm.options     //修改jvm启动参数
-Xms1g     //初始的堆内存 (可以根据自己的机子配置)    -Xms200m
-Xmx1g     //最大的堆内存                             -Xms200m  (我的选择)
一个进程在VMAS(虚拟内存区域)创建内存映射最大数量
vim /etc/sysctl.conf
vm.max_map_count=655360
[root@ELK ~]# sysctl -p   //配置生效
vm.max_map_count = 655360
配置limits.conf
vim /etc/security/limits.conf
* hard nofile 65536
* soft nofile 65536                    //*代表所有用户
* soft nproc 4096
* hard nproc 4096
启动ES服务
su elsearch              //不能用root用户启动服务,不然会报错
cd /data/ES/elasticsearch-7.7.1/bin
./elasticsearch        //前台运行
./elasticsearch -d     //后台运行
// 启动过程中非常慢,耐心等待
[elsearch@ELK bin]$ ./elasticsearch -d       //启动之后会有下边两句话,提示之后的版本要用 jdk11版本。
future versions of Elasticsearch will require Java 11; your Java version from [/usr/local/jdk1.8.0_211/jre] does not meet this requirement
future versions of Elasticsearch will require Java 11; your Java version from [/usr/local/jdk1.8.0_211/jre] does not meet this requirement
启动速度超级慢,可以用查看 9300 9200 端口起来没。起来就 OK 了 !!!!
++++++++++++++++++++++++++++++++++++++++++++++++++++++++++++++++++++++++++++