1.选择连接点
Spring是方法级别的AOP框架,我们主要是以某个类的某个方法作为连接点,用动态代理的理论来说,就是要拦截哪个方法织入对应的AOP通知。
(1)建立接口
package com.xhbjava.service;

import com.xhbjava.pojo.Account;

/**
 * 账户的业务层接口
 *
 * @author mr.wang
 *
 */
public interface IAccountService {
    public void printAccount(Account account);


}
(2)定义实现类
package com.xhbjava.service.impl;

import org.springframework.stereotype.Component;

import com.xhbjava.pojo.Account;
import com.xhbjava.service.IAccountService;

/**
 * 账户业务层接口实现类
 *
 * @author mr.wang
 *
 */
@Component
public class AccountServiceImpl implements IAccountService {

    @Override
    public void printAccount(Account account) {
        System.out.println("{id:" + account.getId() + "," + "accountName:" + account.getName() + "," + "accountMoney:"
                + account.getMoney() + "}");
    }

}
(3)选择连接点
我们在上面的实现类中把printAccount作为AOP的连接点,那么在用动态代理的时候就是要为类AccountServiceImpl生成代理对象,然后拦截 printAccount方法,于是可以产生AOP的通知方法。
2.创建切面
(1)创建切面
我们在选择好了连接点后就可以创建切面了,对于动态代理的概念而言,它如同一个拦截器,在Spring中只要使用@Aspect注解一个类就表示Spring IoC容器就会认为这是一个切面,切面定义如下:
pom.xml添加:
        <dependency>
            <groupId>org.aspectj</groupId>
            <artifactId>aspectjweaver</artifactId>
            <version>1.9.4</version>
        </dependency>
package com.xhbjava.aspect;

import org.aspectj.lang.annotation.After;
import org.aspectj.lang.annotation.AfterReturning;
import org.aspectj.lang.annotation.AfterThrowing;
import org.aspectj.lang.annotation.Aspect;
import org.aspectj.lang.annotation.Before;

@Aspect
public class AccountAspect {

    @Before("execution(*com.xhbjava.service.impl.AccountServiceImpl.printAccount(..))")
    public void before() {
        System.out.println("Before....");
    }
    @After("execution(*com.xhbjava.service.impl.AccountServiceImpl.printAccount(..))")
    public void after() {
        System.out.println("After....");
    }
    @AfterReturning("execution(*com.xhbjava.service.impl.AccountServiceImpl.printAccount(..))")
    public void afterReturning() {
        System.out.println("afterReturning....");
    }
    @AfterThrowing("execution(*com.xhbjava.service.impl.AccountServiceImpl.printAccount(..))")
    public void afterThrowing() {
        System.out.println("afterThrowing...");
    }
}
(2)AspectJ注解
| 注解 | 通知 | 备注 |
| @Before | 在被代理的对象方法前调用 | 前置通知 |
| @Around | 将被代理对象的方法封装起来,并用环绕通知取代它 | 环绕通知,它将覆盖原有方法,但是允许通过反射调用原有方法 |
| @After | 在被代理对象的方法后调用 | 后置通知 |
| @AfterReturning | 在被代理对象的方法正常返回后调用 | 返回通知,要求被代理对象的方法执行过程中没有发生异常 |
| @AfterThrowing | 在被代理对象的方法抛出异常后调用 | 异常通知,要求被代理对象的方法执行过程中产生异常 |
根据该表我们可以知道各个方法执行顺序,上面创建切面我们使用了注解对应的正则表达式,这些正则式是切点的问题,也就是我们需要拦截什么对象的什么方法。

3.定义切点
(1)学习Spring AOP明确的事
a 、开发阶段(我们做的)
编写核心业务代码(开发主线):大部分程序员来做,要求熟悉业务需求。
把公用代码抽取出来,制作成通知。(开发阶段最后再做):AOP 编程人员来做。
在配置文件中,声明切入点与通知间的关系,即切面。:AOP 编程人员来做。
b 、运行阶段(Spring 框架完成的)
Spring 框架监控切入点方法的执行。一旦监控到切入点方法被运行,使用代理机制,动态创建目标对象的代理对象,根据通知类别,在代理对象的对应位置,将通知对应的功能织入,完成完整的代码逻辑运行。
(2)execution的正则表达式
上面我们没有详细讨论Spring如何判断那些方法需要进行拦截,并不是所有方法都需要使用AOP编程,这就是连接点的问题。前面的创建切面我们使用正则表达式,Spring通过这个正则表达式判断是否需要拦截我们的方法。
execution(*com.xhbjava.service.impl.AccountServiceImpl.printAccount(..))
表达式分析:
- execution:代表执行方法的时候会触发
- *:代表任意返回类型的方法
-
com.xhbjava.service.impl.AccountServiceImpl:代表限定类名
-
printAccount:被拦截的方法名称
- (..):任意的参数
通过对表达式分析我们可以看出限定类名为com.xhbjava.service.impl.AccountServiceImpl的类的printAccount方法被拦截了,这样就按照AOP通知的规则将该方法织入流程中了,我们这只是简单的描述,详细配置分析如下:
| AspectJ指示器 | 描述 |
| arg() | 限制连接点匹配参数为指定类型的方法 |
| @args() | 限定连接点匹配参数为制定注解标注的执行方法 |
| execution | 用于匹配连接点的执行方法,这是最常见的匹配,可以通过正则表达式进行匹配 |
| this() | 限制连接点匹配AOP代理的Bean,引用为指定类型的类 |
| target | 限制连接点匹配被代理对象为指定的类型 |
| @target() | 限制连接点匹配特定的执行对象,这些对象要符合指定的注解类型 |
| within | 限制连接点匹配指定的包 |
| @within() | 限制连接点匹配指定的类型 |
| @annotation | 限定匹配带有指定注解的连接点 |
注意:Spring只能支持上面列出的AspectJ的指示器,如果使用了非上面的指示器,那么会抛出IllegalArgumentException异常。
在上面的代码中我们正则表达式重复写了多次,比较麻烦,下面我们引入@Pointcut定义一个切点就可以解决问题。代码如下:
package com.xhbjava.aop.aspect;

import org.aspectj.lang.annotation.After;
import org.aspectj.lang.annotation.AfterReturning;
import org.aspectj.lang.annotation.AfterThrowing;
import org.aspectj.lang.annotation.Aspect;
import org.aspectj.lang.annotation.Before;
import org.aspectj.lang.annotation.DeclareParents;
import org.aspectj.lang.annotation.Pointcut;

import com.xhbjava.service.IAccountService;
import com.xhbjava.service.impl.AccountServiceImpl;

@Aspect
public class AccountAspect {

    @DeclareParents(value= "com.xhbjava.service.impl.AccountServiceImpl+", defaultImpl=AccountServiceImpl.class)
    public IAccountService accountService;


    @Pointcut ("execution(* com.xhbjava.service.impl.AccountServiceImpl.printAccount(..))")
    public void print(){}

    @Before("printAccount")
    public void before() {
        System.out.println("Before....");
    }
    @After("printAccount")
    public void after() {
        System.out.println("After....");
    }
    @AfterReturning("printAccount")
    public void afterReturning() {
        System.out.println("afterReturning....");
    }
    @AfterThrowing("printAccount")
    public void afterThrowing() {
        System.out.println("afterThrowing...");
    }
}
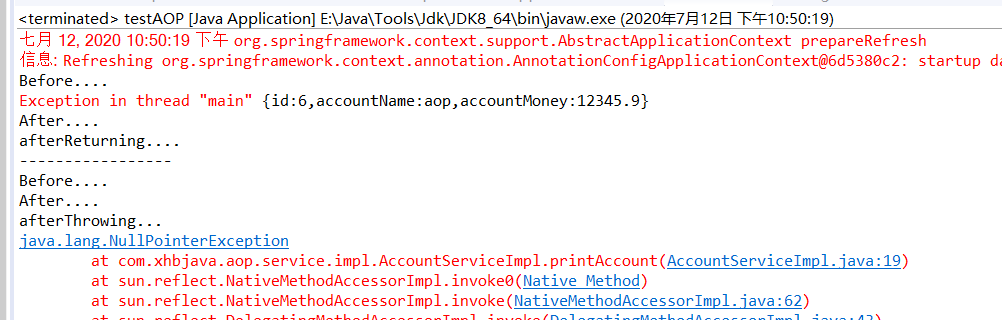
4.测试AOP
代码如下:
package com.xhbjava.test;

import org.springframework.context.annotation.Bean;
import org.springframework.context.annotation.ComponentScan;
import org.springframework.context.annotation.Configuration;
import org.springframework.context.annotation.EnableAspectJAutoProxy;

import com.xhbjava.aop.aspect.AccountAspect;

@Configuration
@EnableAspectJAutoProxy
@ComponentScan("com.xhbjava.aop")
public class AopConfig {
    @Bean
    public AccountAspect getAccountAspect() {
        return new AccountAspect();
    }

}
@EnableAspectJAutoProxy表示启动AspectJ框架的自动代理,这时Spring自动生成代理对象,进而使用AOP,getAccountAspect方法生成一个切面实例。
测试类:
package com.xhbjava.test;

import org.springframework.context.ApplicationContext;
import org.springframework.context.annotation.AnnotationConfigApplicationContext;

import com.xhbjava.pojo.Account;
import com.xhbjava.service.IAccountService;

public class testAOP {

	private static ApplicationContext contxt;

	public static void main(String[] args) {
		contxt = new AnnotationConfigApplicationContext(AopConfig.class);
		IAccountService accountService = (IAccountService)contxt.getBean(IAccountService.class);
		Account ac  = new Account();
		ac.setId(6);
		ac.setName("aop");
		ac.setMoney(12345.90f);
		accountService.printAccount(ac);
		System.out.println("-----------------");
		ac = null;
		accountService.printAccount(ac);

	}

}
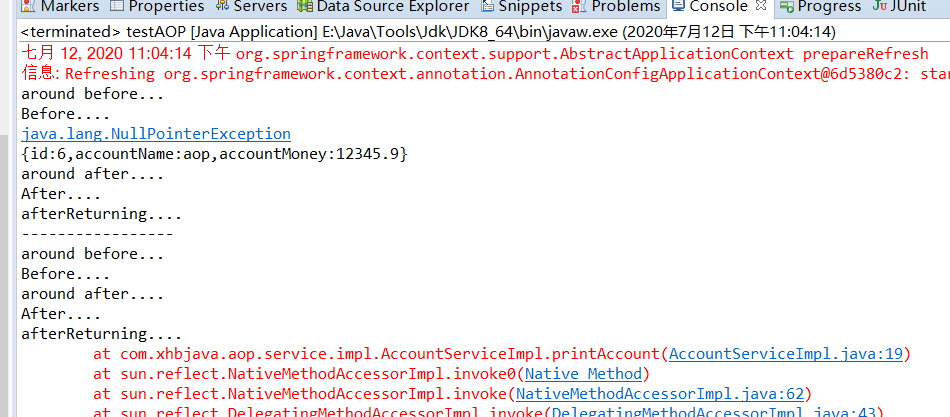
5.环绕通知
环绕通知是Spring AOP中最强大的通知,它可以同时实现前置通知和后置通知,由于保留了调度代理对象的原有方法的功能,因此它即强大又灵活。由于强大,环绕同时的可控性不那么强,如果需要大量改变业务逻辑,一般就不需要使用环绕通知了。
我们在上面的切面中加入环绕通知,代码示例如下:
@Around("print()")
    public void around(ProceedingJoinPoint jp) {
        System.out.println("around before...");
        try {
            jp.proceed();
        } catch (Throwable e) {
            e.printStackTrace();
        }
        System.out.println("around after....");
    }
@Around注解表示加入了切面的环绕通知,通知里面的参数ProceedingJoinPoint由Spring提供,通过这个参数我们可以反射到连接点的方法,我们加入反射连接点后测试结果如下:
6.织入
织入是生成代理对象的过程,Spring AOP中,使用类org.springframework.aop.framework.ProxyFactory作为织入器。Spring AOP是基于代理模式的AOP实现,织入过程完成后,会返回织入了横切逻辑的目标对象的代理对象。
使用ProxyFactory只需要指定如下两个最基本的东西:
1,要对其进行织入的目标对象。可以通过构造方法直接传入,也可以构造完后,通过setter方法设置。
2,将要应用到目标对象的Advisor。
Spring AOP在使用代理模式实现AOP的过程中采用了JDK动态代理和CGLIB两种机制,分别对实现了某些接口的目标类和没有实现任何接口的目标类进行代理,所以,在使用ProxyFactory对目标类进行代理的时候,会通过ProxyFactory的某些行为控制属性对这两种情况进行区分。如果满足以下列出的三种情况中的任何一种,ProxyFactory将对目标类进行基于类的代理。
1,如果目标类没有实现任何接口,不管proxyTargetClass的值是什么,ProxyFactory会采用基于类的代理。
2,如果ProxyFactory的proxyTargetClass属性值被设置为true,ProxyFactory会采用基于类的代理。
3,如果ProxyFactory的optimize属性设置为true,ProxyFactory会采用基于类的代理。
动态代理对象是由Spring IOC容器根据描述生成的,一般不需要修改,在实际编程中建议使用接口编程,这样便于使定义和实现向分离,有利于实现变化和替代,更为灵活。
7.给通知传递参数
在Spring AOP各类通知中,除了环绕通知外,并没有讨论参数的传递,有时候需要进行参数传递,在这我们学习参数传递。
@Override
    public void printAccount(Account account, int sort) {
        System.out.println("{id:" + account.getId() + "," + "accountName:" + account.getName() + "," + "accountMoney:"
                + account.getMoney() + "}");
    System.out.println("sort:"+sort);

    }
@Pointcut ("execution(* com.xhbjava.aop.service.impl.AccountServiceImpl.printAccount(..))"
            +"&& args(account,sort)")
    public void print(){}
package com.xhbjava.aop.aspect;

import org.aspectj.lang.ProceedingJoinPoint;
import org.aspectj.lang.annotation.After;
import org.aspectj.lang.annotation.AfterReturning;
import org.aspectj.lang.annotation.AfterThrowing;
import org.aspectj.lang.annotation.Around;
import org.aspectj.lang.annotation.Aspect;
import org.aspectj.lang.annotation.Before;
import org.aspectj.lang.annotation.DeclareParents;
import org.aspectj.lang.annotation.Pointcut;

import com.xhbjava.aop.verifier.AccountVerifier;
import com.xhbjava.aop.verifier.impl.AccountVerifierImpl;
import com.xhbjava.pojo.Account;

@Aspect
public class AccountAspect {

    @DeclareParents(value= "com.xhbjava.aop.service.impl.AccountServiceImpl+", defaultImpl=AccountVerifierImpl.class)
    public AccountVerifier accountVerifier;


        @Pointcut ("execution(* com.xhbjava.aop.service.impl.AccountServiceImpl.printAccount(..))")
        public void print(){}

    @Before("execution(* com.xhbjava.aop.service.impl.AccountServiceImpl.printAccount(..))"
            +"&& args(account,sort)")
    public void before(Account account,int sort) {
        System.out.println("Before....");
    }
    @After("print()")
    public void after() {
        System.out.println("After....");
    }
    @AfterReturning("print()")
    public void afterReturning() {
        System.out.println("afterReturning....");
    }
    @AfterThrowing("print()")
    public void afterThrowing() {
        System.out.println("afterThrowing...");
    }
    @Around("print()")
    public void around(ProceedingJoinPoint jp) {
        System.out.println("around before...");
        try {
            jp.proceed();
        } catch (Throwable e) {
            e.printStackTrace();
        }
        System.out.println("around after....");
    }
}
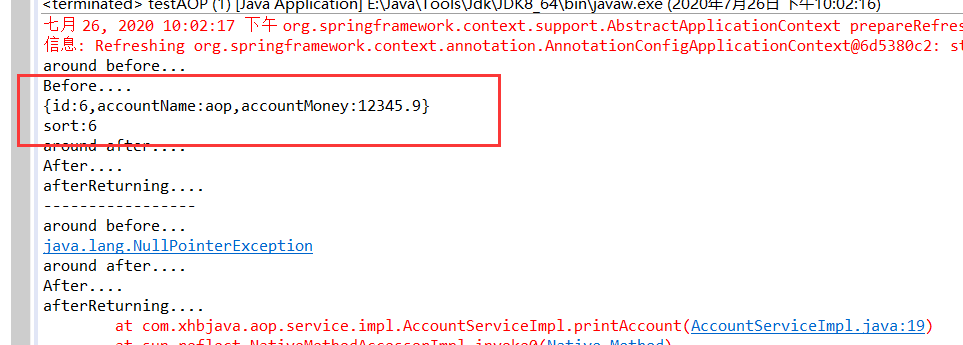
从测试结果看,参数传递是成功的,对于其他通知我们也可以像前置通知那样去传递。
8.引入
Spring AOP只是通过JDK动态代理技术把各类通知织入到它约定的流程中,但是有时我们需要引入其他类型的方法得到更好的实现,比如在printAccount方法中,如果要求账户为空我们不进行打印,那么我们需要引入一个新的检测器对其进行检查,代码示例如下:
package com.xhbjava.aop.verifier;

import com.xhbjava.pojo.Account;

public interface AccountVerifier {
    public boolean verify(Account account);
}
package com.xhbjava.aop.verifier.impl;

import com.xhbjava.aop.verifier.AccountVerifier;
import com.xhbjava.pojo.Account;

public class AccountVerifierImpl implements AccountVerifier {
    @Override
    public boolean verify(Account account) {
        System.out.println("------------");
        return account != null;
    }
}
在AccountAspect切面中我们加入如下代码:
    @DeclareParents(value= "com.xhbjava.aop.service.impl.AccountServiceImpl+", defaultImpl=AccountVerifierImpl.class)
    public AccountVerifier accountVerifier;
@DeclareParents中,value= "com.xhbjava.aop.service.impl.AccountServiceImpl+",表示对AccountServiceImpl类进行增强,也就是在AccountServiceImpl中引入一个新的接口。
defaultImpl:表示默认实现的类,这里是AccountVerifierImpl,下面我们就可以使用这个方法了。
package com.xhbjava.aop.test;

import org.springframework.context.ApplicationContext;
import org.springframework.context.annotation.AnnotationConfigApplicationContext;

import com.xhbjava.aop.service.IAccountService;
import com.xhbjava.aop.verifier.AccountVerifier;
import com.xhbjava.pojo.Account;

public class testAOP {

    private static ApplicationContext contxt;

    public static void main(String[] args) {
        contxt = new AnnotationConfigApplicationContext(AopConfig.class);
        IAccountService accountService = (IAccountService)contxt.getBean(IAccountService.class);
        AccountVerifier accountVerifier = (AccountVerifier)accountService;

        Account ac  = new Account();
        ac.setId(6);
        ac.setName("aop");
        ac.setMoney(12345.90f);
        if(accountVerifier.verify(ac)) {
            accountService.printAccount(ac,6);
        }

        System.out.println("-----------------");
        ac = null;
        if(accountVerifier.verify(ac)) {
            accountService.printAccount(ac,6);
        }
        //accountService.printAccount(ac);

    }

}
