1、普通线程sleep的方式,可用于一般的轮询Polling
       new Thread(new Runnable() {
            @Override
            public void run() {
                while (true) {
                    //todo

                    try {
                        Thread.sleep(iDelay);
                    } catch (InterruptedException e) {
                        e.printStackTrace();
                    }
                }
            }
        }).start();
- 优点:非常简单的实现,逻辑清晰明了,也是最常见的写法
- 缺点:在sleep结束后,并不能保证竞争到cpu资源,这也就导致了下次执行时间必定>=iDelay,存在时间精度问题
2、Timer定时器
    //Timer + TimerTask结合的方法
    private final Timer timer = new Timer();
    private TimerTask timerTask = new TimerTask() {
        @Override
        public void run() {
            //todo
        }
    };
启动定时器方法:
timer.schedule(TimerTask task, long delay, long period)
- 立即执行
timer.schedule(timerTask, 0, 1000); //立刻执行,间隔1秒循环执行 - 延时执行
timer.schedule(timerTask, 2000, 1000); //等待2秒后再执行,间隔1秒循环执行
关闭定时器方法:timer.cancel();
- 优点:纯正的定时任务,纯java SDK,单独线程执行,比较安全,而且还可以在运行过程中取消执行
- 缺点:基于单线程执行,多个任务之间会相互影响,多个任务的执行是串行的,性能较低,而且timer也无法保证时间精确度,是因为手机休眠的时候,无法唤醒cpu,不适合后台任务的定时
3、ScheduledExecutorService
    private Runnable runnable2 = new Runnable() {
        @Override
        public void run() {
            //todo
        }
    };

    ScheduledExecutorService executor = Executors.newScheduledThreadPool(1);
    executor.scheduleAtFixedRate(runnable2, 0, 1, TimeUnit.SECONDS);
关于scheduleAtFixedRate(Runnable command, long initialDelay, long period, TimeUnit unit) 方法说明:
- command:需要执行的线程
- initialDelay:第一次执行需要延时的时间,如若立即执行,则initialDelay = 0
- period:固定频率,周期性执行的时间
- unit:时间单位,常用的有MILLISECONDS、SECONDS和MINUTES等,需要注意的是,这个单位会影响initialDelay和period,如果unit = MILLISECONDS,则initialDelay和period传入的是毫秒,如果unit = SECONDS,则initialDelay和period传入的是秒
补充一下: 还有一个方法跟上面的很相似:scheduleWithFixedDelay(Runnable command, long initialDelay, long delay, TimeUnit unit),这个也是带延迟时间的调度,并且也是循环执行,唯一的不同就是固定延迟时间循环执行,上面的是固定频率的循环执行。那这两者的区别?
举例子:
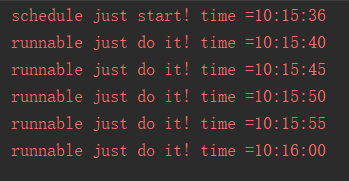
- 使用scheduleAtFixedRate,任务初始延迟3秒,任务执行3秒,任务执行间隔为5秒:
        ScheduledExecutorService executor = Executors.newScheduledThreadPool(1);
        Log.e(TAG, "schedule just start! time =" +  simpleDateFormat.format(System.currentTimeMillis()));
        executor.scheduleAtFixedRate(new Runnable() {
            @Override
            public void run() {
                SystemClock.sleep(3000L);
                Log.e(TAG, "runnable just do it! time =" +  simpleDateFormat.format(System.currentTimeMillis()));
            }
        }, 3, 5, TimeUnit.SECONDS);
执行结果截图:
- 使用scheduleWithFixedDelay,任务初始延迟3秒,任务执行3秒,任务执行延迟为5秒:
        ScheduledExecutorService executor = Executors.newScheduledThreadPool(1);
        Log.e(TAG, "schedule just start! time =" +  simpleDateFormat.format(System.currentTimeMillis()));
        executor.scheduleWithFixedDelay(new Runnable() {
            @Override
            public void run() {
                SystemClock.sleep(3000L);
                Log.e(TAG, "runnable just do it! time =" +  simpleDateFormat.format(System.currentTimeMillis()));
            }
        }, 3, 5, TimeUnit.SECONDS);
执行结果截图:
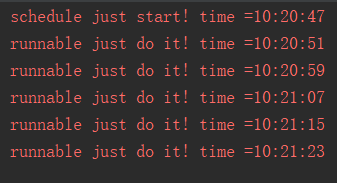
从这两者的运行结果就可以看到区别了:scheduleAtFixedRate是相对于任务执行的开始时间,而scheduleWithFixedDelay是相对于任务执行的结束时间。
- 优点:ScheduledExecutorService是一个线程池,其内部使用的延迟队列,本身就是基于等待/唤醒机制实现的,所以CPU并不会一直繁忙。解决了Timer&TimerTask存在的问题,多任务处理时效率高
- 缺点:取消时需要打断线程池的运行,而且和外界的通信不太好处理
4、使用Handler中的postDelayed方法
    private Handler mHandler = new Handler();
    private Runnable runnable = new Runnable() {
        @Override
        public void run() {
            //todo
            mHandler.postDelayed(this, iDelay);
        }
    };

    mHandler.post(runnable); //立即执行
    mHandler.postDelayed(runnable, iDelay); //延时执行
    mHandler.removeCallbacks(runnable); //取消执行
- 优点:比较简单的android实现,适用UI线程
- 缺点:没想到,手动捂脸。。。。我估计是使用不当会造成内存泄露吧
5、Service + AlarmManger + BroadcastReceiver
本人非常推荐使用这种方式,适用于长期或者有精确要求的定时任务。我专门为这部分内容写过一篇博客,传送门:Android 定时任务之Service + AlarmManger + BroadcastReceiver