前面我们用户数据都保存在内存中,今天来介绍如何存入数据库。
传送门:
Spring Security初使用
Spring Security自定义表单登录详解
Spring Security 做前后端分离的数据交
Spring Security用户授权
我这里引入 Spring Data Jpa 来帮助我们完成数据库操作,数据库使用MySql。
首先在mysql中创建数据库test,什么也不用添加。
然后创建springboot项目,在项目中引入Spring Security和Spring Data Jpa还有mysql依赖
<dependency>
    <groupId>org.springframework.boot</groupId>
    <artifactId>spring-boot-starter-security</artifactId>
</dependency>

<dependency>
    <groupId>org.springframework.boot</groupId>
    <artifactId>spring-boot-starter-data-jpa</artifactId>
</dependency>

<dependency>
    <groupId>mysql</groupId>
    <artifactId>mysql-connector-java</artifactId>
    <scope>runtime</scope>
</dependency>
在application.properties中添加配置如下:
spring.datasource.username=root
spring.datasource.password=root
spring.datasource.url=jdbc:mysql://127.0.0.1:3306/test?serverTimezone=UTC&useUnicode=true&characterEncoding=utf-8&useSSL=true
spring.datasource.driver-class-name=com.mysql.cj.jdbc.Driver
# jpa
spring.jpa.database=mysql
spring.jpa.database-platform=mysql
spring.jpa.hibernate.ddl-auto=update
spring.jpa.show-sql=true
spring.jpa.properties.hibernate.dialect=org.hibernate.dialect.MySQL8Dialect
创建用户角色实体类
import javax.persistence.Entity;
import javax.persistence.GeneratedValue;
import javax.persistence.GenerationType;
import javax.persistence.Id;

@Entity(name = "t_role")
public class Role {
    @Id
    @GeneratedValue(strategy = GenerationType.IDENTITY)
    private Long id;
    private String name;
    private String nameZh;

    //省略其他 get/set 方法
}
创建用户实体类
@Entity(name = "t_user")
public class User implements UserDetails {
    @Id
    @GeneratedValue(strategy = GenerationType.IDENTITY)
    private Long id;
    private String username;
    private String password;
    private boolean accountNonExpired;
    private boolean accountNonLocked;
    private boolean credentialsNonExpired;
    private boolean enabled;
    @ManyToMany(fetch = FetchType.EAGER, cascade = CascadeType.PERSIST)
    private List<Role> roles;

    @Override
    public Collection<? extends GrantedAuthority> getAuthorities() {
        List<SimpleGrantedAuthority> authorities = new ArrayList<>();
        for (Role role : getRoles()) {
            authorities.add(new SimpleGrantedAuthority(role.getName()));
        }
        return authorities;
    }

    @Override
    public String getPassword() {
        return password;
    }

    @Override
    public String getUsername() {
        return username;
    }

    @Override
    public boolean isAccountNonExpired() {
        return accountNonExpired;
    }

    @Override
    public boolean isAccountNonLocked() {
        return accountNonLocked;
    }

    @Override
    public boolean isCredentialsNonExpired() {
        return credentialsNonExpired;
    }

    @Override
    public boolean isEnabled() {`在这里插入代码片`
        return enabled;
    }

    //省略其他 get/set 方法
}
- accountNonExpired、accountNonLocked、credentialsNonExpired、enabled 这四个属性分别用来描述用户的状态,表示账户是否没有过期、账户是否没有被锁定、密码是否没有过期、以及账户是否可用。
- roles 属性表示用户的角色,User 和 Role 是多对多关系,用一个 @ManyToMany 注解来描述。
- getAuthorities 方法返回用户的角色信息,我们在这个方法中把自己的 Role 稍微转化一下即可。
创建UserDao继承JpaRepository
import com.example.domain.User;
import org.springframework.data.jpa.repository.JpaRepository;

public interface UserDao extends JpaRepository<User, Long> {
    User findUserByUsername(String username);
}
创建UserService实现UserDetailsService
import com.example.dao.UserDao;
import com.example.domain.User;
import org.springframework.beans.factory.annotation.Autowired;
import org.springframework.security.core.userdetails.UserDetails;
import org.springframework.security.core.userdetails.UserDetailsService;
import org.springframework.security.core.userdetails.UsernameNotFoundException;
import org.springframework.stereotype.Service;

@Service
public class UserService implements UserDetailsService {
    @Autowired
    private UserDao userDao;

    @Override
    public UserDetails loadUserByUsername(String username) throws UsernameNotFoundException {
        User user = userDao.findUserByUsername(username);
        if (user == null) {
            throw new UsernameNotFoundException("用户不存在");
        }
        return user;
    }
}
创建SecurityConfig
import com.example.service.UserService;
import com.fasterxml.jackson.databind.ObjectMapper;
import org.springframework.beans.factory.annotation.Autowired;
import org.springframework.context.annotation.Bean;
import org.springframework.context.annotation.Configuration;
import org.springframework.security.config.annotation.authentication.builders.AuthenticationManagerBuilder;
import org.springframework.security.config.annotation.web.builders.HttpSecurity;
import org.springframework.security.config.annotation.web.builders.WebSecurity;
import org.springframework.security.config.annotation.web.configuration.WebSecurityConfigurerAdapter;
import org.springframework.security.crypto.password.NoOpPasswordEncoder;
import org.springframework.security.crypto.password.PasswordEncoder;

import java.io.PrintWriter;

@Configuration
public class SecurityConfig extends WebSecurityConfigurerAdapter {

    @Autowired
    private UserService userService;

    @Override
    protected void configure(AuthenticationManagerBuilder auth) throws Exception {
        auth.userDetailsService(userService);
    }

    @Bean
    PasswordEncoder passwordEncoder() {
        return NoOpPasswordEncoder.getInstance();
    }


    @Override
    public void configure(WebSecurity web) {
        //用来配置忽略掉的 URL 地址,一般对于静态文件,我们可以采用此操作。
        web.ignoring().antMatchers("/js/**", "/css/**", "/images/**");
    }

    @Override
    protected void configure(HttpSecurity http) throws Exception {
        http.authorizeRequests()
                .antMatchers("/admin/**").hasRole("admin")
                .antMatchers("/user/**").hasRole("user")
                .anyRequest().authenticated()
                .and()//结束当前标签,上下文回到HttpSecurity,开启新一轮的配置。
                .formLogin()
                .loginPage("/login.html")//登录页
                .loginProcessingUrl("/doLogin")
                .successHandler((req, resp, authentication) -> {
                    Object principal = authentication.getPrincipal();
                    resp.setContentType("application/json;charset=utf-8");
                    PrintWriter out = resp.getWriter();
                    out.write(new ObjectMapper().writeValueAsString(principal));
                    out.flush();
                    out.close();
                })
                .failureHandler((req, resp, e) -> {
                    resp.setContentType("application/json;charset=utf-8");
                    PrintWriter out = resp.getWriter();
                    out.write(e.getMessage());
                    out.flush();
                    out.close();
                })
                .permitAll()
                .and()
                .logout()
                .logoutUrl("/logout")
                .logoutSuccessHandler((req, resp, authentication) -> {
                    resp.setContentType("application/json;charset=utf-8");
                    PrintWriter out = resp.getWriter();
                    out.write("注销成功");
                    out.flush();
                    out.close();
                })
                .permitAll()
                .and()
                .csrf().disable().exceptionHandling()
                .authenticationEntryPoint((req, resp, authException) -> {
                            resp.setContentType("application/json;charset=utf-8");
                            PrintWriter out = resp.getWriter();
                            out.write("尚未登录,请先登录");
                            out.flush();
                            out.close();
                        }
                );
    }
}
重写了configure(AuthenticationManagerBuilder auth),使用自定义的 UserService
创建UserDaoTest测试类
import com.example.domain.Role;
import com.example.domain.User;
import org.junit.Test;
import org.junit.runner.RunWith;
import org.springframework.beans.factory.annotation.Autowired;
import org.springframework.boot.test.context.SpringBootTest;
import org.springframework.test.context.junit4.SpringRunner;

import java.util.ArrayList;
import java.util.List;

@RunWith(SpringRunner.class)
@SpringBootTest
public class UserDaoTest {
    @Autowired
    private UserDao userDao;

    @Test
    public void insertUser() {
        User u1 = new User();
        u1.setUsername("admin");
        u1.setPassword("admin123");
        u1.setAccountNonExpired(true);
        u1.setAccountNonLocked(true);
        u1.setCredentialsNonExpired(true);
        u1.setEnabled(true);
        List<Role> rs1 = new ArrayList<>();
        Role r1 = new Role();
        r1.setName("ROLE_admin");
        r1.setNameZh("管理员");
        rs1.add(r1);
        u1.setRoles(rs1);
        userDao.save(u1);
        User u2 = new User();
        u2.setUsername("user");
        u2.setPassword("user123");
        u2.setAccountNonExpired(true);
        u2.setAccountNonLocked(true);
        u2.setCredentialsNonExpired(true);
        u2.setEnabled(true);
        List<Role> rs2 = new ArrayList<>();
        Role r2 = new Role();
        r2.setName("ROLE_user");
        r2.setNameZh("普通用户");
        rs2.add(r2);
        u2.setRoles(rs2);
        userDao.save(u2);
    }
}
执行insertUser方法,查看数据库会看到表和数据都已经创建好了。
创建测试接口HelloController
import org.springframework.web.bind.annotation.GetMapping;
import org.springframework.web.bind.annotation.RestController;

@RestController
public class HelloController {

    @GetMapping("/hello")
    public String hello() {
        return "hello";
    }

    @GetMapping("/admin/hello")
    public String admin() {
        return "admin";
    }

    @GetMapping("/user/hello")
    public String user() {
        return "user";
    }
}
然后启动项目执行登录就可以对三个接口分别进行权限测试。
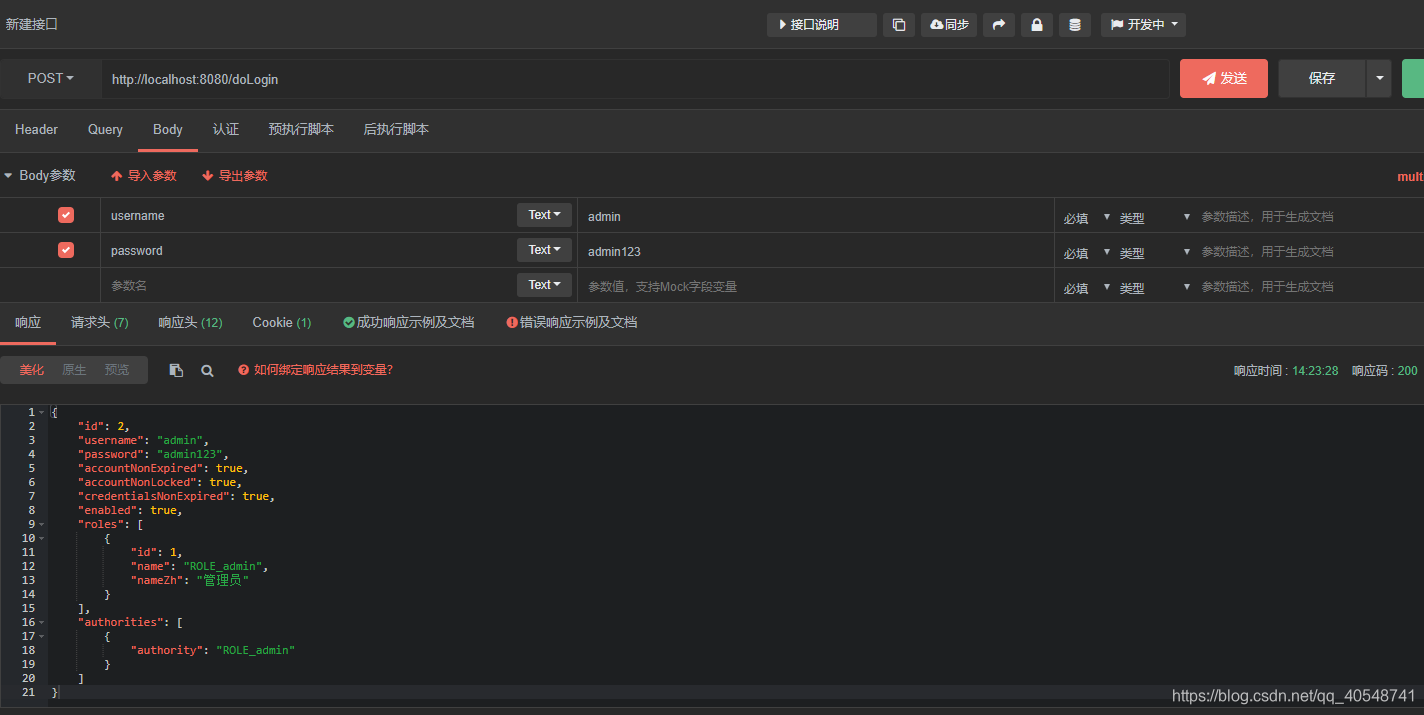
/hello 登录后就可以访问
/admin/hello 需要 admin 身份
/user/hello 需要 user 身份
在数据库中将用户的 enabled 属性设置为 false,表示禁用该账户,此时再使用该账户登录就会登录失败。