远程访问及控制
文章目录
一、ssh基本配置
[root@localhost ttyy]# cd /etc/ssh/
[root@localhost ssh]# ll
总用量 604
-rw-r--r--. 1 root root     581843 4月  11 2018 moduli
-rw-r--r--. 1 root root       2276 4月  11 2018 ssh_config
-rw-------. 1 root root       3907 4月  11 2018 sshd_config
-rw-r-----. 1 root ssh_keys    227 6月  20 00:15 ssh_host_ecdsa_key
-rw-r--r--. 1 root root        162 6月  20 00:15 ssh_host_ecdsa_key.pub
-rw-r-----. 1 root ssh_keys    387 6月  20 00:15 ssh_host_ed25519_key
-rw-r--r--. 1 root root         82 6月  20 00:15 ssh_host_ed25519_key.pub
-rw-r-----. 1 root ssh_keys   1679 6月  20 00:15 ssh_host_rsa_key
-rw-r--r--. 1 root root        382 6月  20 00:15 ssh_host_rsa_key.pub
[root@localhost ssh]# vi sshd_config
[root@localhost ssh]# systemctl restart sshd
1. 允许root登录
[root@localhost ~]# ssh tom1@192.168.75.134   //切换到192.168.75.134服务器tom1用户
The authenticity of host '192.168.75.134 (192.168.75.134)' can't be established.
ECDSA key fingerprint is SHA256:bU1FwZbMBoEUpA1iqsRfqnbPi177StbfmKB0vk38WTM.
ECDSA key fingerprint is MD5:2c:bd:95:89:e2:b7:dc:db:43:a8:dc:60:e0:2c:bb:74.
Are you sure you want to continue connecting (yes/no)? y
Please type 'yes' or 'no': yes
Warning: Permanently added '192.168.75.134' (ECDSA) to the list of known hosts.
tom1@192.168.75.134's password:
Last login: Sun Jul  5 22:22:02 2020
[tom1@localhost data]$ ll
总用量 0
-rwxr-x--x. 1 ttyy root 0 6月  29 19:20 3.txt
[tom1@localhost data]$ df -Th      //成功切换到192.168.74.134服务器的Tom1用户
文件系统       类型      容量  已用  可用 已用% 挂载点
/dev/sda3      xfs       182G  5.3G  177G    3% /
devtmpfs       devtmpfs  2.0G     0  2.0G    0% /dev
tmpfs          tmpfs     2.0G     0  2.0G    0% /dev/shm
tmpfs          tmpfs     2.0G   11M  2.0G    1% /run
tmpfs          tmpfs     2.0G     0  2.0G    0% /sys/fs/cgroup
/dev/sda1      xfs      1014M  174M  841M   18% /boot
tmpfs          tmpfs     406M  8.0K  406M    1% /run/user/42
tmpfs          tmpfs     406M   32K  406M    1% /run/user/1000
tmpfs          tmpfs     406M     0  406M    0% /run/user/1505
[tom1@localhost data]$ su   //Tom1用户成功切换到root用户
密码:
[root@localhost data]#
[root@localhost data]# touch 111.txt
[root@localhost data]# ll
总用量 0
-rw-r--r--. 1 root root 0 7月   8 19:04 111.txt
-rwxr-x--x. 1 ttyy root 0 6月  29 19:20 3.txt
[root@localhost data]#
[root@localhost data]# exit       //退出当前终端
exit
[tom1@localhost data]$ exit    //退出当前终端用户
登出
Connection to 192.168.75.134 closed
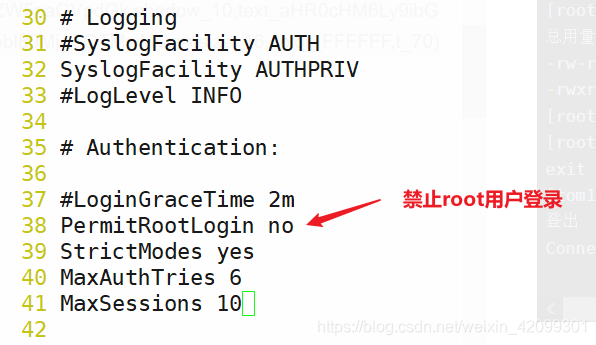
2. 禁止root远程登录
vi /etc/sshd.conf
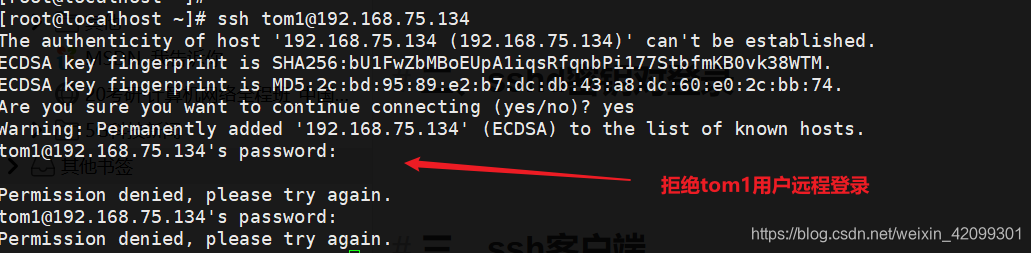
[root@localhost ~]# ssh root@192.168.75.134
root@192.168.75.134's password:

Permission denied, please try again.           //验证root账号无法登录
root@192.168.75.134's password:
Permission denied, please try again.
root@192.168.75.134's password:
**注意
一般在sshd.conf配置文件中禁止PermitRootLogin no 并不能绝对的禁止root登录,也有一些wheel组的用户,可以切换到root账号,所以这个方法并不是完全安全性。**
vi /etc/pam.d/su
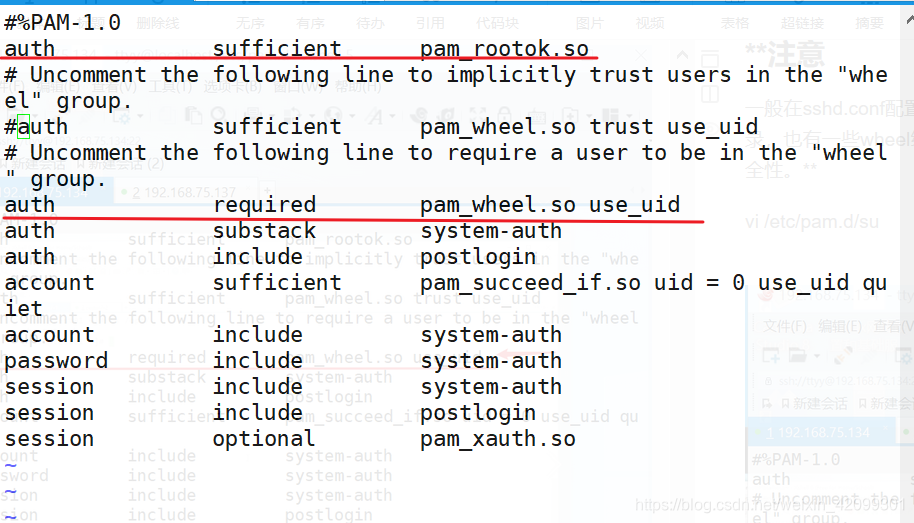 [root@localhost pam.d]# gpasswd -a tom1 wheel
正在将用户“tom1”加入到“wheel”组中
开启这个功能之后,只有指定的用户在wheel组中才能切换root账号。
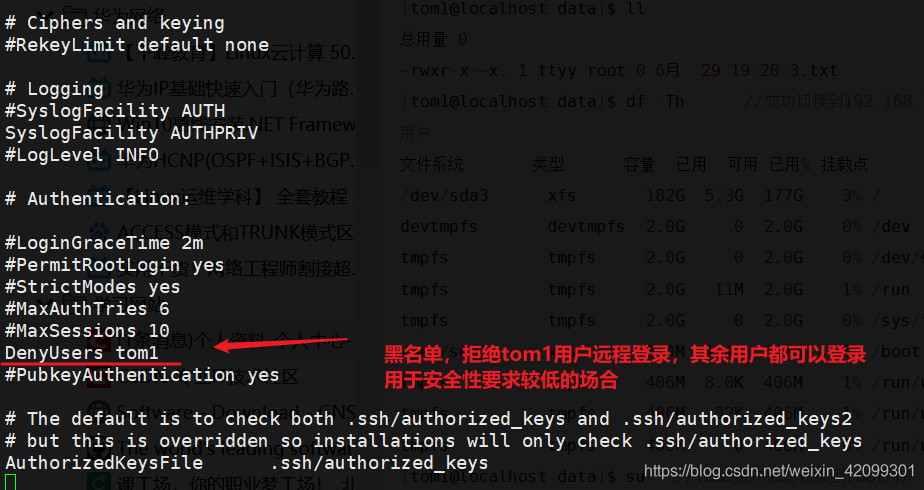
3. DenyUsers 黑名单的使用
[root@localhost ~]# vi /etc/ssh/sshd_config
[root@localhost ~]# systemctl reload sshd
使用服务器192.168.75.137验证如下
4. AllowUsers 白名单使用
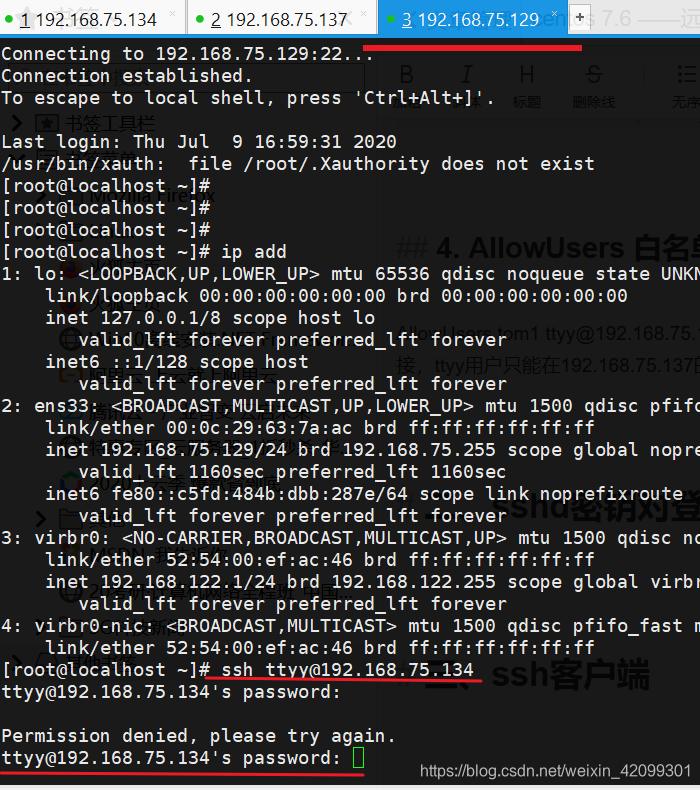
AllowUsers tom1 [email protected] //白名单只允许tom1在所有终端远程连接,ttyy用户只能在192.168.75.137的终端远程连接过来
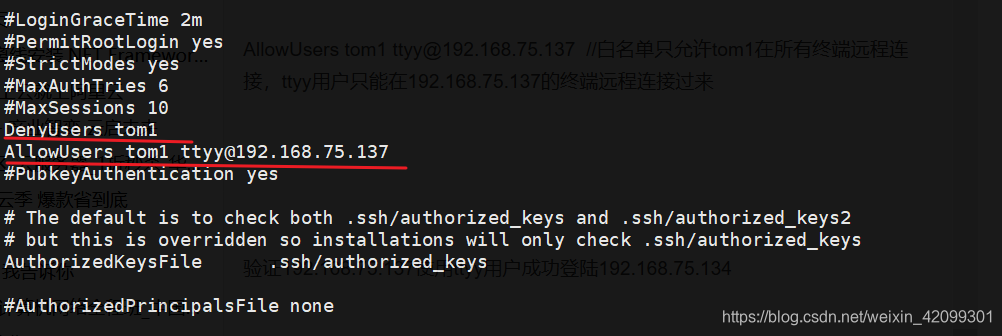
验证192.168.75.137使用ttyy用户成功登陆192.168.75.134
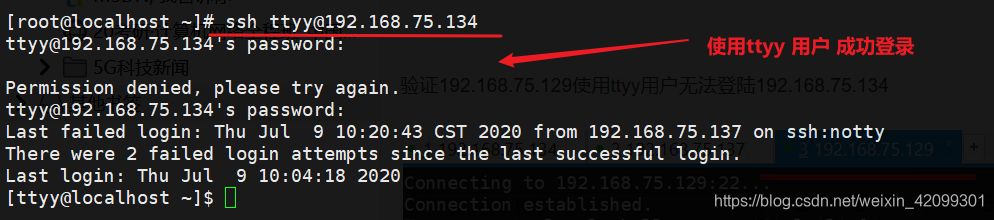
验证192.168.75.129使用ttyy用户无法登陆192.168.75.134
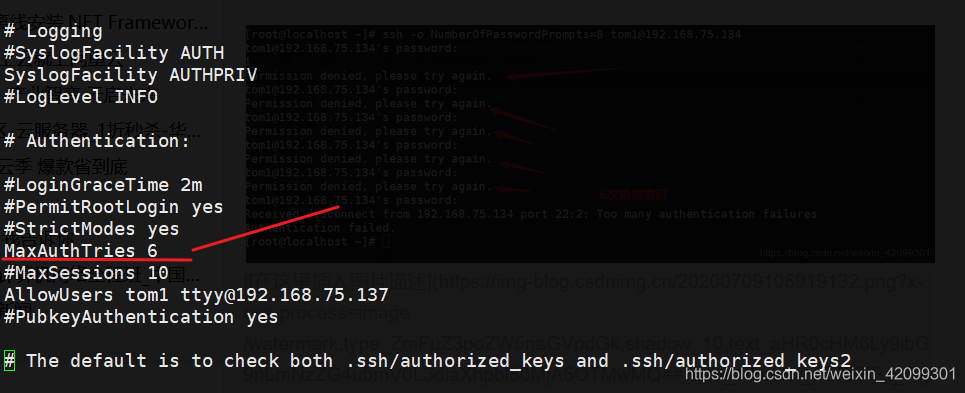
5. 设置输错密码次数
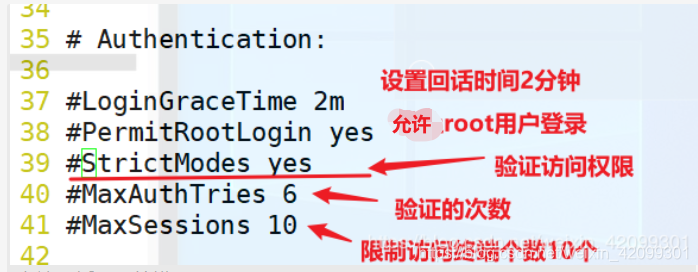
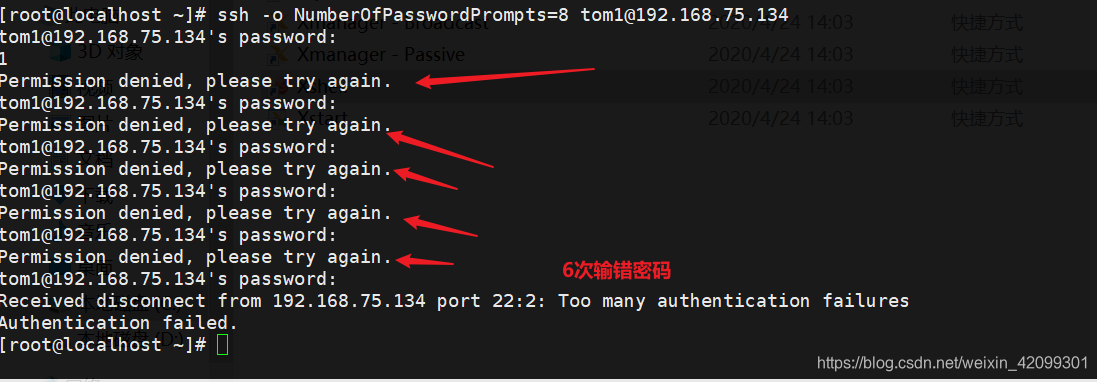
MaxAuthTries 6 //是指登录连接的次数,不是输错密码的次数。默认输错密码的次数是3次
添加输错密码的错误: 在连接方服务器输入:
ssh -o NumberOfPasswordPrompts=8 [email protected]
注:这里添加的是允许输错密码的次数。
192.168.75.134是被连接的服务器ip地址,zhangsan用户也是被连接的用户
MaxAuthTries 6 是输入次数但是默认是输错密码次数是3。
所以一般改这个参数只是连接次数不是输错密码的次数。
二、sshd密钥对登录
实验:使用加密 ecdsa 算法进行加密验证登录
加密登录过程
第一步:
第二步:
第三步:
第四步:
vi /etc/sshd/sshd_conf
AuthorizedKeysFile .ssh/authorized_keys //存放密钥文件
步骤一:服务器192.168.75.134 配置
[caiwu@localhost root]$ ssh-keygen -t ecdsa //客户机生产密钥文件放到家目录下 密码设置为6个
Generating public/private ecdsa key pair.
Enter file in which to save the key (/home/caiwu/.ssh/id_ecdsa):
Enter passphrase (empty for no passphrase):
Enter same passphrase again:
Your identification has been saved in /home/caiwu/.ssh/id_ecdsa.
Your public key has been saved in /home/caiwu/.ssh/id_ecdsa.pub.
The key fingerprint is:
SHA256:T/yHHv3X6AhOEQ8pLtw/LmFHWkn2/X34kDNhsZPI6D8 caiwu@localhost.localdomain
The key's randomart image is:
+---[ECDSA 256]---+
| |
| o. . |
| .o+= o + |
| . o o=++ B |
| o S=+ .. *.|
| .++oo o* +|
| . o*.+ o*o|
| .+ +E+..+|
| .o oo. o|
+----[SHA256]-----+
[caiwu@localhost root]$
[caiwu@localhost root]$ cd /home/
[caiwu@localhost home]$ ll
总用量 4
drwx------. 6 caiwu caiwu 119 7月 9 11:07 caiwu
drwx------. 15 ttyy ttyy 4096 7月 9 10:04 ttyy
[caiwu@localhost home]$ ls -a
. .. caiwu ttyy
[caiwu@localhost home]$ ll
总用量 4
drwx------. 6 caiwu caiwu 119 7月 9 11:07 caiwu
drwx------. 15 ttyy ttyy 4096 7月 9 10:04 ttyy
[caiwu@localhost home]$ cd caiwu/
[caiwu@localhost ~]$ ll
总用量 0
[caiwu@localhost ~]$ ls -a
. .bash_logout .bashrc .config .ssh
.. .bash_profile .cache .mozilla
[caiwu@localhost ~]$
[caiwu@localhost ~]$ cd .ssh/
[caiwu@localhost .ssh]$ ll
总用量 8
-rw-------. 1 caiwu caiwu 314 7月 9 11:08 id_ecdsa
-rw-r--r--. 1 caiwu caiwu 189 7月 9 11:08 id_ecdsa.pub
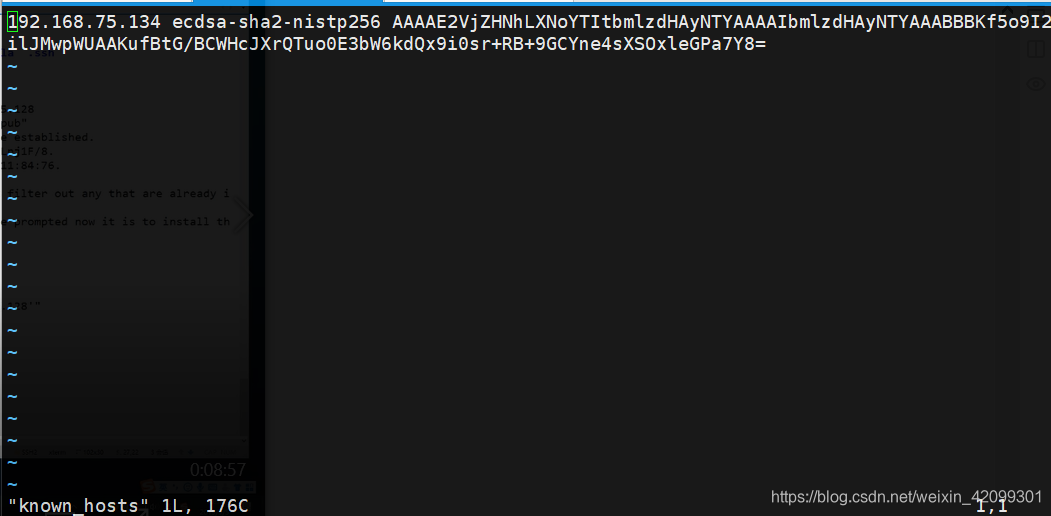
[caiwu@localhost .ssh]$ ssh-copy-id -i id_ecdsa.pub tom2@192.168.75.134 //将客户机的密钥复制到连接端中
/usr/bin/ssh-copy-id: INFO: Source of key(s) to be installed: "id_ecdsa.pub"
/usr/bin/ssh-copy-id: INFO: attempting to log in with the new key(s), to filter out any that are already installed
/usr/bin/ssh-copy-id: INFO: 1 key(s) remain to be installed -- if you are prompted now it is to install the new keys
tom2@192.168.75.134's password: //输入tom2的登录密码不是caiwu 用户的登录密码
Number of key(s) added: 1
Now try logging into the machine, with: "ssh '[email protected]'"
and check to make sure that only the key(s) you wanted were added.
[caiwu@localhost .ssh]$ ll
总用量 12
-rw-------. 1 caiwu caiwu 314 7月 9 11:08 id_ecdsa
-rw-r--r--. 1 caiwu caiwu 189 7月 9 11:08 id_ecdsa.pub
-rw-r--r--. 1 caiwu caiwu 176 7月 9 11:14 known_hosts //本机私钥
[caiwu@localhost .ssh]$ vi known_hosts
步骤二: 被连接的服务器 192.168.75.134
[root@localhost home]# cd /home/tom2      //查看家目录的文件
[root@localhost tom2]# ll
总用量 0
[root@localhost tom2]# ls -a
.  ..  .bash_history  .bash_logout  .bash_profile  .bashrc  .cache  .config  .mozilla  .ssh    //192.168.75.137服务器caiwu用户复制过来的公钥数据
[root@localhost tom2]# cd .ssh/
[root@localhost .ssh]# ll -s
总用量 4
4 -rw-------. 1 tom2 tom2 189 7月   9 11:16 authorized_keys //192.168.75.137服务器caiwu用户复制过来的公钥数据
[root@localhost .ssh]#
[root@localhost .ssh]# cat authorized_keys
ecdsa-sha2-nistp256 AAAAE2VjZHNhLXNoYTItbmlzdHAyNTYAAAAIbmlzdHAyNTYAAABBBNuyyIZsMeV2/GUqH2w75D/RF77pp0DnX4QU5xZFOMW7rvfVs+J1wHv3Rps57bIzqQUQxl7SP0f+3C5nUPHixFs= caiwu@localhost.localdomain    ////192.168.75.137服务器caiwu用户复制过来的公钥数据
步骤三:客户端服务器配置
[caiwu@localhost .ssh]$ whoami
caiwu
[caiwu@localhost .ssh]$ ssh tom2@192.168.75.134
Enter passphrase for key '/home/caiwu/.ssh/id_ecdsa':            //这边输入的密码是设置的ecdsa的加密 密码
Last login: Wed Jul  1 14:59:01 2020
[tom2@localhost ~]$       //成功登录tom2用户
设置
[tom2@localhost ~]$ exit
登出
Connection to 192.168.75.134 closed.
设置ecdsa加密算法的免登陆,首先要退到caiwu用户状态
[caiwu@localhost .ssh]$ ssh-agent bash
[caiwu@localhost .ssh]$ ssh-add
Enter passphrase for /home/caiwu/.ssh/id_ecdsa:       //输入ecdsa 密码
Identity added: /home/caiwu/.ssh/id_ecdsa (/home/caiwu/.ssh/id_ecdsa)
[caiwu@localhost .ssh]$
[caiwu@localhost .ssh]$ ssh tom2@192.168.75.134      //验证免密码登录,这个方法不适合公共电脑,没有安全性
Last login: Thu Jul  9 11:29:03 2020 from 192.168.75.137
[tom2@localhost ~]$
三、ssh客户端 (scp 、sftp)
3.1 不同终端登录情况
如果sshd的配置文件中 /ssh/sshd_conf 中的port 22改为123终端号,那么远程连接的时候需要输入
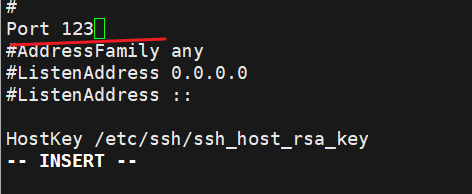
ssh -p 123 [email protected]
3.2 scp 远程复制文件和目录
注:提前将ssh服务器端的权限放空。允许root账号登录
客户端配置
[root@localhost opt]# cd data/
[root@localhost data]# echo "this is ssh_client" > ssh_client  //新建文件
[root@localhost data]# ll
总用量 4
-rw-r--r--. 1 root root 19 7月   9 11:55 ssh_client
[root@localhost data]# mkdir test  //新建目录
[root@localhost data]# ll
总用量 4
-rw-r--r--. 1 root root 19 7月   9 11:55 ssh_client
drwxr-xr-x. 2 root root  6 7月   9 11:55 test
[root@localhost data]# scp ssh_client root@192.168.75.134:/home/    //客户端远程复制文件 ssh_client 文件的ssh服务器家目录中
root@192.168.75.134's password:    //输入root密码
ssh_client                                                                                                                               100%   19    10.2KB/s   00:00
[root@localhost data]#
[root@localhost data]# scp -r test/ root@192.168.75.134:/home/     //客户端远程递归复制目录 test的ssh服务器家目录中
root@192.168.75.134's password:
[root@localhost data]#
ssh服务端查看复制的ssh_client 文件
[root@localhost data]# cd /home/
[root@localhost home]# ll
总用量 8
drwx------.  3 kgc  kgc    78 6月  24 11:11 kgc
drwx------.  3 lisi lisi   78 6月  24 11:18 lisi
-rw-r--r--.  1 root root   19 7月   9 11:58 ssh_client    //客户端成功远程复制成功
drwx------.  6 tom2 tom2  140 7月   9 11:16 tom2
drwxr-xr-x.  2 root root    6 7月   9 12:04 test      //客户端成功远程复制成功
drwx------. 15 ttyy ttyy 4096 7月   9 10:04 ttyy
[root@localhost home]#
3.3 sftp远程文件传输
下载服务端文件到本地
[root@localhost data]# sftp root@192.168.75.134     //远程登录ssh服务端
root@192.168.75.134's password:
Connected to 192.168.75.134.
sftp> cd /opt
sftp> touch 1.txt   //在服务器端opt目录下新建一个1.txt文件
sftp> cd /
sftp> get 1.txt /opt/data/   //将服务端的1.TXT文件下载到客户端/opt/data目录下
Fetching /1.txt to /opt/data/1.txt
/1.txt                                    100%    4     1.5KB/s   00:00
sftp> bye  //退出服务端
[root@localhost data]# ll
总用量 8
-rw-r--r--. 1 root root  4 7月   9 12:12 1.txt    //成功下载到客户端
-rw-r--r--. 1 root root 19 7月   9 12:10 ssh_client
drwxr-xr-x. 2 root root  6 7月   9 11:55 test
上传本地文件到服务端
[root@localhost opt]# cd data/
[root@localhost data]# ll
总用量 8
-rw-r--r--. 1 root root  4 7月   9 12:12 1.txt
-rwxrwxrwx. 1 root root  0 7月   9 12:18 777.txt
-rw-r--r--. 1 root root 19 7月   9 12:10 ssh_client
drwxr-xr-x. 2 root root  6 7月   9 11:55 test
[root@localhost data]# sftp root@192.168.75.134
root@192.168.75.134's password:
Connected to 192.168.75.134.
sftp> put 777.txt
Uploading 777.txt to /root/777.txt   //本地的文件上传到服务器root家目录中
777.txt                                   100%    0     0.0KB/s   00:00
sftp>
服务端
[root@localhost /]# cd ~
[root@localhost ~]# ll
总用量 12
-rw-r--r--. 1 root root    0 7月   9 12:32 777.txt  //服务端上传文件成功
-rw-------. 1 root root 1762 6月  20 00:13 anaconda-ks.cfg
-rw-r--r--. 1 root root 1810 6月  20 00:15 initial-setup-ks.cfg
----------. 1 root root 1526 6月  22 19:53 shadow.txt
-rw-r--r--. 1 root root    0 7月   9 12:25 to
drwxr-xr-x. 2 root root    6 6月  20 00:15 公共
drwxr-xr-x. 2 root root    6 6月  20 00:15 模板
drwxr-xr-x. 2 root root    6 6月  20 00:15 视频
drwxr-xr-x. 2 root root    6 6月  20 00:15 图片
drwxr-xr-x. 2 root root    6 6月  20 00:15 文档
drwxr-xr-x. 2 root root    6 6月  20 00:15 下载
drwxr-xr-x. 2 root root    6 6月  20 00:15 音乐
drwxr-xr-x. 2 root root    6 6月  20 00:15 桌面
[root@localhost ~]#
四、TCP Wrappers