文章目录
前言
inux系统一般是作为服务器的,分区采用lvm分区。
通常划分分区工具我们用的比较多是fdisk命令,但是现在由于磁盘越来越廉价,而且磁盘空间越来越大。而fdisk工具他对分区是有大小限制的,它只能划分小于2T的磁盘。现在的磁盘空间已经远远大于2T,有两个方法来解决这个问题:其一是通过卷管理来实现,其二就是通过Parted工具来实现对2T以上磁盘进行分区操作。GPT格式的磁盘相当于原来MBR磁盘中原来保留4个partition table的4*16个字节,只留第一个16个字节,类似于扩展分区,真正的partition table在512字节之后,GPT分区方式没有四个主分区的限制,最多可达到128个主分区。
一 .parted 交互命令的使用
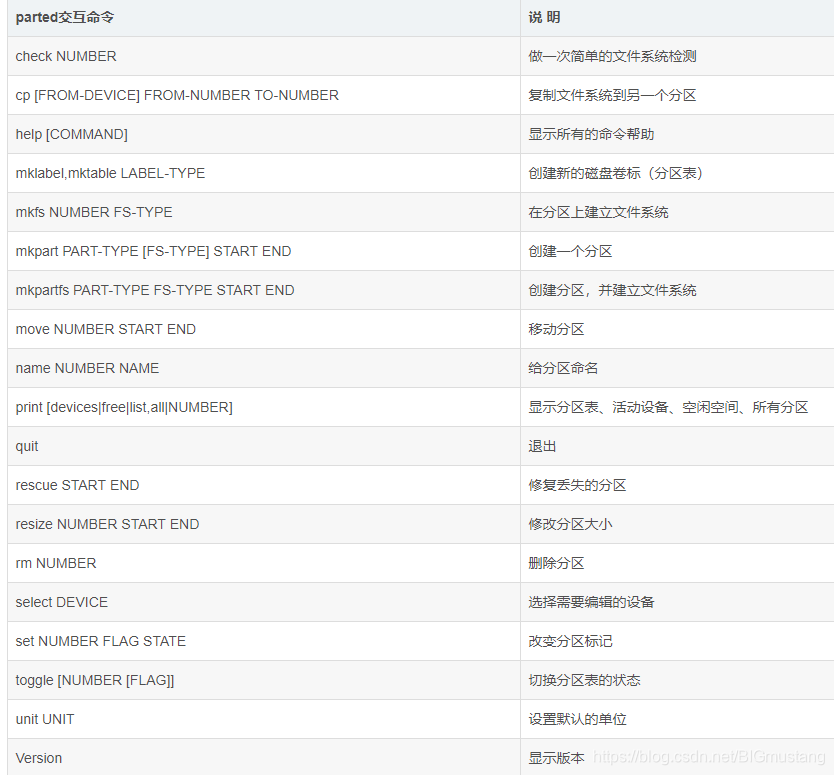
使用 print 命令可以査看分区表信息,包括硬盘参数、硬盘大小、扇区大小、分区表类型和分区信息。分区信息共有 7 列,分别如下:
Number:分区号。
Start:分区起始位置。这里不再像fdisk那样用柱面表示,使用字节表示更加直观。
End:分区结束位置。
Size:分区大小。
Type:分区类型。
Filesystem:文件系统类型。
标志:分区的标记。
二 .新增硬盘用Parted分区并打上LVM标志
[root@shanan ~]# parted /dev/sdf
GNU Parted 3.1
Using /dev/sdf
Welcome to GNU Parted! Type 'help' to view a list of commands.
(parted) mklabel gpt                        // 设置分区类型为gpt
Warning: The existing disk label on /dev/sdf will be destroyed and all data on
this disk will be lost. Do you want to continue?
Yes/No? yes
(parted) print
Model: VMware, VMware Virtual S (scsi)
Disk /dev/sdf: 4398GB
Sector size (logical/physical): 512B/512B
Partition Table: gpt
Disk Flags:

Number  Start  End  Size  File system  Name  Flags

(parted) mkpart primary 0 2T         //primary指分区类型为主分区,0是分区开始位置  2T是结束位置,或者100% 类型做结束位置也可以
Warning: The resulting partition is not properly aligned for best performance.

Ignore/Cancel? ignore
(parted) mkpart primary 2T 4T
(parted) toggle 1 lvm                       //          标记成lvm
(parted) toggle 2 lvm                        //          标记成lvm
(parted) print                         // 打印当前分区,查看分区设置是否正确
Model: VMware, VMware Virtual S (scsi)
Disk /dev/sdf: 4398GB
Sector size (logical/physical): 512B/512B
Partition Table: gpt
Disk Flags:

Number  Start   End     Size    File system  Name     Flags
 1      17.4kB  2000GB  2000GB               primary  lvm
 2      2000GB  4398GB  2398GB               primary  lvm

(parted) quit                   //   完成后用quit命令退出
Information: You may need to update /etc/fstab.


Disk /dev/sdf: 4398.0 GB, 4398046511104 bytes, 8589934592 sectors
Units = sectors of 1 * 512 = 512 bytes
Sector size (logical/physical): 512 bytes / 512 bytes
I/O size (minimum/optimal): 512 bytes / 512 bytes
Disk label type: gpt
Disk identifier: D3AD40B6-CC44-4C2E-8398-E1AC9FECFFB5


#         Start          End    Size  Type            Name
 1           34   3906250000    1.8T  Linux LVM       primary
 2   3906250752   8589932543    2.2T  Linux LVM       primary
三. 创建pv ,vg , lv ,并设置磁盘配额
3.1格式化分区为xfs文件系统
注意:xfs被创建后,其size将无法缩小,但可以通过xfs_growfs来增大
[root@shanan ~]# pvcreate /dev/sdf1 /dev/sdf2
  Physical volume "/dev/sdf1" successfully created.
  Physical volume "/dev/sdf2" successfully created.
[root@shanan ~]# vgcreate vg01 /dev/sdf1 /dev/sdf2
  Volume group "vg01" successfully created
[root@shanan ~]# lvcreate -n lv01 -L 3T vg01
  Logical volume "lv01" created.


[root@shanan ~]# mkfs.xfs -f /dev/vg01/lv01                 // 初始化成xfs文件系统
meta-data=/dev/vg01/lv01         isize=512    agcount=4, agsize=201326592 blks
         =                       sectsz=512   attr=2, projid32bit=1
         =                       crc=1        finobt=0, sparse=0
data     =                       bsize=4096   blocks=805306368, imaxpct=5
         =                       sunit=0      swidth=0 blks
naming   =version 2              bsize=4096   ascii-ci=0 ftype=1
log      =internal log           bsize=4096   blocks=393216, version=2
         =                       sectsz=512   sunit=0 blks, lazy-count=1
realtime =none                   extsz=4096   blocks=0, rtextents=0
3.2 挂载xfs系统分区到指定目录,并通过参数uquota,gquota开启文件系统配额。
创建用户,挂载lv
[root@shanan /]# useradd test1
[root@shanan /]# passwd test1
Changing password for user test1.
New password:
BAD PASSWORD: The password fails the dictionary check - it is too simplistic/systematic
Retype new password:
passwd: all authentication tokens updated successfully.
[root@shanan /]# groupadd zhangsan
[root@shanan /]# mount -o uquota,gquota /dev/vg01/lv01 /mnt  //带参数挂载
[root@shanan /]# chmod 777 /mnt             //为文件夹增加权限,方便测试
[root@shanan /]# mount|grep lv01         //确认参数生效
/dev/mapper/vg01-lv01 on /mnt type xfs (rw,relatime,seclabel,attr2,inode64,usrquota,grpquota)
3.3 xfs_quota 命令的使用
限制值设定方式(配额方案)
命令格式:xfs_quota  -x  -c  "指令"  [挂载点]
-x :专家模式,后续才能加入-c的指定参数
-c :后面加指令

xfs_quota -x -c "limit [-ug] b[soft|hard]=N i[soft|hard]=N name"
xfs_quota -x -c "timer [-ug] [-bir] Ndays"
选项与参数:
limit :实际限制的项目,可以针对 user/group 来限制,限制的项目有
bsoft/bhard : block 的 soft/hard 限制值,可以加单位
isoft/ihard : inode 的 soft/hard 限制值
name: 就是用户/群组的名称
timer :用来设定 grace time 的项目喔,也是可以针对 user/group 以及 block/inode 设定

xfs_quota查询命令
列出目前系统的各的文件系统,以及文件系统的 quota 挂载参数支持
xfs_quota   -x   -c  "print"     显示状态信息
列出目前 目录 的所有用户的 quota 限制值
   xfs_quota -x -c "report -ubih"  目录名
列出目前支持的 quota 文件系统是否有起动了 quota 功能?
       xfs_quota  -x  -c  "state"
project 的限制 (针对目录限制)
 1,规范目录、项目名称(project)与项目 ID
 echo "11(ID标识符):/xfsquota/myquota(目录)" >> /etc/projects
 echo "myquotaproject(项目名称自取):11(ID标识符)" >> /etc/projid
 2,初始化专案名称
 xfs_quota -x -c "project -s myquotaproject(项目名称)"
注:
    u > 用户user
    g > 组group
    i > inode限制数量
    b > block限制大小
    h > 人性化human
    p > 对象proj
3.4 设置磁盘配额,容量文件限制参数
设置磁盘容量软限制为80M,硬限制为100M,文件软限制为80个,硬限制为100个
[root@shanan /]# xfs_quota -x -c 'limit  -u bsoft=80M bhard=100M isoft=80  ihard=100 test1 ' /mnt

查看磁盘容量对于用户是否受限制
[root@shanan /]# xfs_quota -c 'quota -uv test1 '  /mnt
Disk quotas for User test1 (1000)
Filesystem              Blocks      Quota      Limit  Warn/Time      Mounted on
/dev/mapper/vg01-lv01
                             0      81920     102400   00 [--------] /mnt
查看文件数量是否受限制:[root@shanan /]# xfs_quota -c 'quota -i -uv test1 ' /mnt
Disk quotas for User test1 (1000)
Filesystem               Files      Quota      Limit  Warn/Time      Mounted on
/dev/mapper/vg01-lv01
                             0         80        100   00 [--------] /mnt
3.5 切换test1 测试是否磁盘配额成功
[test1@shanan ~]$ dd if=/dev/zero of=/mnt/aa bs=1M count=80```//写入80M文件成功
83886080 bytes (84 MB) copied, 0.0428921 s, 2.0 GB/s
[test1@shanan ~]$ dd if=/dev/zero of=/mnt/ab bs=1M count=80     //在另一个文件写入80M失败,只写入了21M ,就提示磁盘空间不足了,测试成功
dd: error writing ‘/mnt/ab’: Disk quota exceeded
21+0 records in
20+0 records out
20971520 bytes (21 MB) copied, 0.0151652 s, 1.4 GB/s
[test1@shanan ~]$
[test1@shanan mnt]$ touch 1
touch: cannot touch ‘1’: Disk quota exceeded  // 为什么文件夹造不了,原来是没有存储空间导致文件也造不了
[test1@shanan mnt]$ id test1
uid=1000(test1) gid=1000(test1) groups=1000(test1)

[test1@shanan mnt]$ rm -rf *    // 清除空间
[test1@shanan mnt]$ touch {1..100}.txt      //重新开始创建文件
[test1@shanan mnt]$ ls
100.txt  14.txt  19.txt  23.txt  28.txt  32.txt  37.txt  41.txt  46.txt  50.txt  55.txt  5.txt   64.txt  69.txt  73.txt  78.txt  82.txt  87.txt  91.txt  96.txt
10.txt   15.txt  1.txt   24.txt  29.txt  33.txt  38.txt  42.txt  47.txt  51.txt  56.txt  60.txt  65.txt  6.txt   74.txt  79.txt  83.txt  88.txt  92.txt  97.txt
11.txt   16.txt  20.txt  25.txt  2.txt   34.txt  39.txt  43.txt  48.txt  52.txt  57.txt  61.txt  66.txt  70.txt  75.txt  7.txt   84.txt  89.txt  93.txt  98.txt
12.txt   17.txt  21.txt  26.txt  30.txt  35.txt  3.txt   44.txt  49.txt  53.txt  58.txt  62.txt  67.txt  71.txt  76.txt  80.txt  85.txt  8.txt   94.txt  99.txt
13.txt   18.txt  22.txt  27.txt  31.txt  36.txt  40.txt  45.txt  4.txt   54.txt  59.txt  63.txt  68.txt  72.txt  77.txt  81.txt  86.txt  90.txt  95.txt  9.txt
[test1@shanan mnt]$ rm -rf *
[test1@shanan mnt]$ touch {1..101}.txt
touch: cannot touch ‘101.txt’: Disk quota exceeded   // 提示第101个文件造不了 ,测试成功
[test1@shanan mnt]$ ls
100.txt  14.txt  19.txt  23.txt  28.txt  32.txt  37.txt  41.txt  46.txt  50.txt  55.txt  5.txt   64.txt  69.txt  73.txt  78.txt  82.txt  87.txt  91.txt  96.txt
10.txt   15.txt  1.txt   24.txt  29.txt  33.txt  38.txt  42.txt  47.txt  51.txt  56.txt  60.txt  65.txt  6.txt   74.txt  79.txt  83.txt  88.txt  92.txt  97.txt
11.txt   16.txt  20.txt  25.txt  2.txt   34.txt  39.txt  43.txt  48.txt  52.txt  57.txt  61.txt  66.txt  70.txt  75.txt  7.txt   84.txt  89.txt  93.txt  98.txt
12.txt   17.txt  21.txt  26.txt  30.txt  35.txt  3.txt   44.txt  49.txt  53.txt  58.txt  62.txt  67.txt  71.txt  76.txt  80.txt  85.txt  8.txt   94.txt  99.txt
13.txt   18.txt  22.txt  27.txt  31.txt  36.txt  40.txt  45.txt  4.txt   54.txt  59.txt  63.txt  68.txt  72.txt  77.txt  81.txt  86.txt  90.txt  95.txt  9.txt
[test1@shanan mnt]$
四 .为xfs文件系统扩容
4.1 使用命令lvextend为lv 扩容
先使用命令lvextend将LV扩展为3.5G(初始容量是3G),然后使用命令xfs_growfs来对xfs文件系统扩容(这里以block计数)
  --- Logical volume ---
  LV Path                /dev/vg01/lv01
  LV Name                lv01
  VG Name                vg01
  LV UUID                YGTMn3-bgqe-jvi2-I7Lb-tvrl-9ihq-fnX9xp
  LV Write Access        read/write
  LV Creation host, time shanan, 2020-06-30 10:39:09 -0400
  LV Status              available
  # open                 0
  LV Size                3.00 TiB
  Current LE             786432
  Segments               2
  Allocation             inherit
  Read ahead sectors     auto
  - currently set to     8192
  Block device           253:2
[root@shanan ~]# lvextend -L +0.5T /dev/vg01/lv01
  Size of logical volume vg01/lv01 changed from 3.00 TiB (786432 extents) to 3.50 TiB (917504 extents).
  Logical volume vg01/lv01 successfully resized.
[root@shanan ~]# lvdisplay
  --- Logical volume ---
  LV Path                /dev/centos/swap
  LV Name                swap
  VG Name                centos
  LV UUID                xqescb-ES3e-vPQs-47Et-HWtu-0ZVH-aM5ChU
  LV Write Access        read/write
  LV Creation host, time localhost, 2020-06-18 08:18:05 -0400
  LV Status              available
  # open                 2
  LV Size                3.62 GiB
  Current LE             928
  Segments               1
  Allocation             inherit
  Read ahead sectors     auto
  - currently set to     8192
  Block device           253:1

  --- Logical volume ---
  LV Path                /dev/centos/home
  LV Name                home
  VG Name                centos
  LV UUID                rgILsR-Q4Jl-dm6s-DoeZ-O18c-kKU2-61NOkG

  --- Logical volume ---
  LV Path                /dev/vg01/lv01
  LV Name                lv01
  VG Name                vg01
  LV UUID                YGTMn3-bgqe-jvi2-I7Lb-tvrl-9ihq-fnX9xp
  LV Write Access        read/write
  LV Creation host, time shanan, 2020-06-30 10:39:09 -0400
  LV Status              available
  # open                 0
  LV Size                3.50 TiB
  Current LE             917504
  Segments               2
  Allocation             inherit
  Read ahead sectors     auto
  - currently set to     8192
  Block device           253:2

[root@shanan ~]# mount /dev/vg01/lv01 /mnt
[root@shanan ~]# df -h
Filesystem               Size  Used Avail Use% Mounted on
/dev/mapper/centos-root   50G  2.2G   48G   5% /
devtmpfs                 1.7G     0  1.7G   0% /dev
tmpfs                    1.8G     0  1.8G   0% /dev/shm
tmpfs                    1.8G  9.7M  1.8G   1% /run
tmpfs                    1.8G     0  1.8G   0% /sys/fs/cgroup
/dev/sda1               1014M  146M  869M  15% /boot
/dev/mapper/centos-home  246G   33M  246G   1% /home
tmpfs                    351M     0  351M   0% /run/user/0
/dev/mapper/vg01-lv01    3.0T   33M  3.0T   1% /mnt
4.2 使用命令xfs_growfs来对xfs文件系统扩容(这里以block计数)
[root@shanan ~]# xfs_growfs /dev/vg01/lv01 -D 0.5T
meta-data=/dev/mapper/vg01-lv01  isize=512    agcount=4, agsize=201326592 blks
         =                       sectsz=512   attr=2, projid32bit=1
         =                       crc=1        finobt=0 spinodes=0
data     =                       bsize=4096   blocks=805306368, imaxpct=5
         =                       sunit=0      swidth=0 blks
naming   =version 2              bsize=4096   ascii-ci=0 ftype=1
log      =internal               bsize=4096   blocks=393216, version=2
         =                       sectsz=512   sunit=0 blks, lazy-count=1
realtime =none                   extsz=4096   blocks=0, rtextents=0
data blocks changed from 805306368 to 939524096
[root@shanan ~]# df -h          //  经查看成功扩容到3.5T
Filesystem               Size  Used Avail Use% Mounted on
/dev/mapper/centos-root   50G  2.2G   48G   5% /
devtmpfs                 1.7G     0  1.7G   0% /dev
tmpfs                    1.8G     0  1.8G   0% /dev/shm
tmpfs                    1.8G  9.7M  1.8G   1% /run
tmpfs                    1.8G     0  1.8G   0% /sys/fs/cgroup
/dev/sda1               1014M  146M  869M  15% /boot
/dev/mapper/centos-home  246G   33M  246G   1% /home
tmpfs                    351M     0  351M   0% /run/user/0
/dev/mapper/vg01-lv01    3.5T   33M  3.5T   1% /mnt