文章目录
一、TensorFlow数据集模式
TensorFlow 的数据读取一共有如下三种方式:
| 名称 | 解释 |
|---|---|
| 供给数据(Feeding) | TensorFlow直接将图像喂入网络,最简单的数据喂入格式,占用磁盘内存较高,数据集喂入容易出现瓶颈 |
| 官方接口(tf.data API) | 是 TensorFlow 推荐的喂入方式,也是 TensorFlow2.x 主打方式 |
| 队列输入(tfrecord) | 将图像数据保存为二进制的 tfrecord 形式,提高数据读入性能 |
| 预加载(Preloaded data) | 用一个constant常量将数据集加载到计算图中(主要用于小数据集) |
二、TensorFlow官网文档
TensorFlow 对每一种数据读入方式都具有相应的文档,tfrecord 数据格式文档地址:TFRecord and tf.Example

可以直接下载,英文解释模糊难懂,我已将其重写为 tfrecord_toturial.ipynb,完成整个系列后我将上传至我的 GitHub,目前已上传至 CSDN下载列表
三、tfrecord_toturial.ipynb要点解读
1.tfrecord 是 TensorFlow 为了高效读入数据而推出的,在 TensorFlow1.x 中,大多数据集都转为 tfrecord 再输入网络进行训练
2.tfrecord 的制作主要分为如下几步:
①:对应图像与标签,为每一个图像设置相应的标签,可以在程序中读入时设置,及保存为列表,也可以用一个 CSV 文件进行保存,读入时读取图像并读取相应的标签
②:将图像与标签转为二进制,TensorFlow 提供了对应函数用于将不同类型的数据转换成二进制的 Bytes 文件
| 函数 | 作用 |
|---|---|
| tf.train.BytesList | 以下类型可以被强制)string - byte |
| tf.train.FloatList | 以下类型可以被强制) float (float32) - double (float64) |
| tf.train.Int64List | 以下类型可以被强制)bool - enum - int32 - uint32 - int64 - uint64 |
③:创建写入序列,写入文件即可
④:可以在下方选择你的运行方式
| |
|
 View source on GitHub View source on GitHub |
|
四、下载地址
tfrecord_toturial
##### Copyright 2019 The TensorFlow Authors and reviewed by GuoQuanhao
# @title根据Apache许可2.0版(“许可”)许可;
# 除非遵守许可,否则不得使用此文件。
# 您可以在以下位置获得许可的副本:

# https://www.apache.org/licenses/LICENSE-2.0

# 除非适用法律要求或书面同意,否则软件
# 根据许可分发的内容按“原样”分发,
# 没有任何明示或暗示的保证或条件。
# 有关特定语言的管理权限,请参阅许可证。
# 许可中的限制。
TFRecord and tf.Example
| |
|
View source on GitHub |
|
为了有效地读取数据,对数据进行序列化并将其存储在一组可以线性读取的文件中(每个文件可以100-200MB),这是很有帮助的。如果数据正在通过网络流传输,则尤其如此。这对于缓存任何数据预处理也很有用。
TFRecord格式是一种用于存储二进制记录序列的简单格式。
Protocol buffers(协议缓冲区)是用于有效序列化结构化数据的跨平台,跨语言的库。
协议消息由 .proto 文件定义,这些通常是了解消息类型的最简单方法。(proto 是protocol简写)
tf.Example 消息(或 protobuf)是一种灵活的消息类型,它表示 {"string": value} 映射。它旨在与TensorFlow一起使用,并在诸如 TFX 之类的更高级别的API中使用。
本笔记本将演示如何创建,解析和使用 tf.Example 消息,然后在 .tfrecord 文件之间进行序列化,写入和读取 tf.Example 消息。
注意:虽然有用,但这些结构是可选的。除非您正在使用 tf.data 并且读取数据仍然是训练的瓶颈,否则无需将现有代码转换为使用TFRecords。有关数据集性能提示,请参见 Data Input Pipeline Performance 。
Setup
参考我的 csdn blog 安装 TensorFlow
直接安装编译完成的 TensorFlow: NO.1 Tensorflow在win10下实现object detection
自行从源码编译安装 TensorFlow: Win10系统下从tensorflow源码编译tensorflow-gpu 1.15
由于我安装的 TensorFlow 1.x 的版本,好在提供的 Eager execution 可以解决 TensorFlow 1.x 与 TensorFlow 2.x 的不兼容
from __future__ import absolute_import
from __future__ import division
from __future__ import print_function
from __future__ import unicode_literals
import tensorflow as tf

tf.enable_eager_execution()

import numpy as np
import IPython.display as display
tf.Example
Data types for tf.Example
从根本上讲,tf.Example 是 {"string":tf.train.Feature}映射,在后面创建的 feature 字典可以看出来
tf.train.Feature 消息类型可以接受以下三种类型之一(请参见.proto文件)大多数其它泛型类型可以强制为以下类型之一:
1.tf.train.BytesList(以下类型可以被强制)
stringbyte
1.tf.train.FloatList(以下类型可以被强制)
float(float32)double(float64)
1.tf.train.Int64List(以下类型可以被强制)
boolenumint32uint32int64uint64
为了将标准 TensorFlow 类型转换为与 tf.Example 兼容的 tf.train.Feature,您可以使用下面的快捷功能。 请注意,每个函数都采用标量输入值,并返回包含上述三种 list 类型之一的tf.train.Feature:
第一段代码解析
'''

源码部分

'''
# 以下函数可用于将值转换为与 tf.Example 兼容的类型

def _bytes_feature(value):
  """Returns a bytes_list from a string / byte."""
  if isinstance(value, type(tf.constant(0))):
        value = value.numpy() # BytesList 不会从 Eager 张量(tensor)解包字符串,所以字符串输入前应加 b 转换为 bytes 类型
        print(type(value))
  return tf.train.Feature(bytes_list=tf.train.BytesList(value=[value]))

def _float_feature(value):
  """Returns a float_list from a float / double."""
  return tf.train.Feature(float_list=tf.train.FloatList(value=[value]))

def _int64_feature(value):
  """Returns an int64_list from a bool / enum / int / uint."""
  return tf.train.Feature(int64_list=tf.train.Int64List(value=[value]))
注意: 为简单起见,本示例仅使用标量输入。 处理非标量特征的最简单方法是使用 tf.serialize_tensor 将张量转换为二进制字符串。 字符串是张量流中的标量。 使用 tf.parse_tensor 将二进制字符串转换回张量。
以下是这些功能如何工作的一些示例。 注意变化的输入类型和标准化的输出类型。 如果函数的输入类型与上述强制类型之一不匹配,则该函数将引发异常(例如,_int64_feature(1.0) 会出错,因为 1.0 是浮点型,因此使用 _float_feature函数):
'''

解析部分

'''
# isinstance 与 type 函数类似,属于获取值类型的函数,isinstance 可用于判断输入的两个值的 type 是否相同,前一个参数为值,后一个参数为值类型
print(isinstance(1, type(1.0))) # eg.int 与 float
print(isinstance(b'string', type(tf.constant(0))))  # eg.str 与 TensorFlow 常量

# .numpy()是 TensorFlow 2.x 的操作,需要加入 tf.enable_eager_execution()
# 下面是定义计算 sin(pi/2),初始类型为 tensor,使用 .numpy 后类型发生改变

from math import pi


def f(x):
  return tf.square(tf.sin(x))

print(f(pi/2).numpy())
print(type(f(pi/2).numpy()))
print(f(pi/2))
print(type(f(pi/2)))
False
False
1.0
<class 'numpy.float32'>
tf.Tensor(1.0, shape=(), dtype=float32)
<class 'tensorflow.python.framework.ops.EagerTensor'>
# 应用示例
print(_bytes_feature(b'test_string')) # bytes

print(_bytes_feature(u'test_bytes'.encode('utf-8'))) # bytes

print(_float_feature(np.exp(1))) # float

print(_int64_feature(True)) # bool 能被强制 int64

print(_int64_feature(1)) # int
bytes_list {
  value: "test_string"
}

bytes_list {
  value: "test_bytes"
}

float_list {
  value: 2.7182817459106445
}

int64_list {
  value: 1
}

int64_list {
  value: 1
}
注意,使用 print(_bytes_feature(tf.constant(1000))) 会报类型错误,按理第一个输入类型与 tf.constant(0) 相同,应该不会报错,我猜测这应该是 TensorFlow 1.x 的 bug,在 TensorFlow 1.x 我们可以如此解决,但你需要重启 kernel 并注释掉 eager,如下两个 cell:
# def _bytes_feature_tf_one(value):
#   if isinstance(value, type(tf.constant(0))):
#     with tf.Session() as sess:
#       value = value.eval()
#       value = value.tostring()
#   return tf.train.Feature(bytes_list=tf.train.BytesList(value=[value]))
# print(_bytes_feature_tf_one(tf.constant(1000)))
可以使用以下 .SerializeToString 方法将所有原始消息序列化为二进制字符串:
feature = _float_feature(np.exp(1))
print(feature.SerializeToString())

feature = _bytes_feature(b'test_string')
print(feature.SerializeToString())

feature = _bytes_feature(u'test_bytes'.encode('utf-8'))
print(feature.SerializeToString())

feature = _float_feature(np.exp(1))
print(feature.SerializeToString())

feature = _int64_feature(True)
print(feature.SerializeToString())

feature = _int64_feature(1)
print(feature.SerializeToString())

# feature = _bytes_feature_tf_one(tf.constant(1000)) # 如上注意部分所示,此条注释掉
# print(feature.SerializeToString())
b'\x12\x06\n\x04T\xf8-@'
b'\n\r\n\x0btest_string'
b'\n\x0c\n\ntest_bytes'
b'\x12\x06\n\x04T\xf8-@'
b'\x1a\x03\n\x01\x01'
b'\x1a\x03\n\x01\x01'
Creating a tf.Example message
假设您要根据现有数据集创建 tf.Example 消息。 实际上,数据集可能来自任何地方,但是从单个观察角度来看创建 tf.Example 消息的过程是相同的:
1.在每次观察中,需要使用上述功能之一将每个值转换为包含3种兼容类型之一的 tf.train.Feature
2.创建一个从第1步中生成从特征名到编码值的映射(map),留意后面的 feature,它是以字典形式展现
3.将第2步中生成的映射(map)转换为Features message.
在此笔记本中,您将使用 NumPy 创建数据集。
该数据集将具有4个功能:
- 布尔功能,
False或True,概率均等 - 从
[0,5]中统一随机选择的整数特征 - 通过使用整数特征作为索引,从字符串表生成的字符串特征
- 来自标准正态分布的浮动特征
考虑一个样本,其中包含来自上述每个分布的10,000个独立且分布相同的观测值:
# 数据集中数据量 10000
n_observations = int(1e4)

# 布尔特征,编码为 False 或 True
feature0 = np.random.choice([False, True], n_observations)

# 整数特征,[0-4]的随机数
feature1 = np.random.randint(0, 5, n_observations)

# 字符串特征
strings = np.array([b'cat', b'dog', b'chicken', b'horse', b'goat'])
feature2 = strings[feature1]

# 浮点数特征,,服从标准正态分布
feature3 = np.random.randn(n_observations)
print(feature0)

print(feature1)

print(feature2)

print(feature3)
[ True  True False ...  True False False]
[4 0 1 ... 4 1 3]
[b'goat' b'cat' b'dog' ... b'goat' b'dog' b'horse']
[-1.93038278 -0.32858724 -0.22358169 ... -0.22297831 -0.15315195
 -0.43933415]
第二段代码解析
从前面两个 cell 看,创建了 4 个 features,类似于输入数据的特征,对于输入图像则类似于图像的名称,标签,尺寸等特征
这些特征的每一个都可以被强制转换为 tf.Example ,因为它们的类型总是可以被 _bytes_feature,_float_feature,_int64_feature 兼容。然后,可以根据以下编码功能创建 tf.Example 消息:
进入序列化操作
def serialize_example(feature0, feature1, feature2, feature3):
  """
  创建一个准备写入文件的 tf.Example 消息
  """
  # 创建将功能名称映射到 tf 的字典
  # 数据类型
  feature = {
      'feature0': _int64_feature(feature0), # feature0 全是 bool 类型,可强制为 int64
      'feature1': _int64_feature(feature1), # feature1 全是 int  类型,可直接用 int64
      'feature2': _bytes_feature(feature2), # feature2 全是 bytes类型,可直接用 bytes
      'feature3': _float_feature(feature3), # feature3 全是 float类型,可直接用 float
  }

  # 使用tf.train.Example创建功能消息

  example_proto = tf.train.Example(features=tf.train.Features(feature=feature))
  return example_proto.SerializeToString()
例如,假设您从数据集中获得了一组观测值 [False, 4, bytes('goat'), 0.9876]。您可以使用 create_message() 创建和打印 tf.Example 消息。每个观察结果都将按照上述内容写为一条 Features 消息。请注意,该tf.Example message只是 Features 消息的包装:
# 这是来自数据集的示例

example_observation = []

serialized_example = serialize_example(False, 4, b'goat', 0.9876)
serialized_example # 序列化结果
b'\nR\n\x11\n\x08feature0\x12\x05\x1a\x03\n\x01\x00\n\x11\n\x08feature1\x12\x05\x1a\x03\n\x01\x04\n\x14\n\x08feature2\x12\x08\n\x06\n\x04goat\n\x14\n\x08feature3\x12\x08\x12\x06\n\x04[\xd3|?'
要解码消息,请使用 tf.train.Example.FromString 方法。
example_proto = tf.train.Example.FromString(serialized_example)
example_proto # 反序列化
features {
  feature {
    key: "feature0"
    value {
      int64_list {
        value: 0
      }
    }
  }
  feature {
    key: "feature1"
    value {
      int64_list {
        value: 4
      }
    }
  }
  feature {
    key: "feature2"
    value {
      bytes_list {
        value: "goat"
      }
    }
  }
  feature {
    key: "feature3"
    value {
      float_list {
        value: 0.9876000285148621
      }
    }
  }
}
TFRecords format details
TFRecord文件包含一系列记录。 该文件只能顺序读取。
每条记录包含一个字节字符串(用于数据有效负载),数据长度以及用于完整性检查的 CRC32C(使用 Castagnoli 多项式的 32 位 CRC)哈希。
每条记录以以下格式存储:
uint64 length
uint32 masked_crc32_of_length
byte   data[length]
uint32 masked_crc32_of_data
记录被串联在一起以产生文件。 CRC是
在此处描述,以及
CRC的掩码为:
masked_crc = ((crc >> 15) | (crc << 17)) + 0xa282ead8ul
注意:不需要在TFRecord文件中使用 tf.Example。tf.Example 只是将字典序列化为字节串的一种方法。 文本行,编码的图像数据或序列化张量(使用tf.io.serialize_tensor,以及 tf.io.parse_tensor加载)。有关更多选项,请参见 tf.io 模块。
TFRecord files using tf.data
tf.data 模块还提供用于在 TensorFlow 中读写数据的工具
Writing a TFRecord file
将数据获取到数据集中的最简单方法是使用 from_tensor_slices 方法。
应用于数组,它返回标量数据集:
feature1 # 显示原始数据
array([4, 0, 1, ..., 4, 1, 3])
tf.data.Dataset.from_tensor_slices(feature1)
<DatasetV1Adapter shapes: (), types: tf.int32>
应用于数组的元组,它返回元组的数据集:
features_dataset = tf.data.Dataset.from_tensor_slices((feature0, feature1, feature2, feature3))
features_dataset
<DatasetV1Adapter shapes: ((), (), (), ()), types: (tf.bool, tf.int32, tf.string, tf.float64)>
# `take(1)` 表示取出一组数据,修改里面的数字可以选择获取几组数据
for f0,f1,f2,f3 in features_dataset.take(1):
  print(f0)
  print(f1)
  print(f2)
  print(f3)
tf.Tensor(True, shape=(), dtype=bool)
tf.Tensor(4, shape=(), dtype=int32)
tf.Tensor(b'goat', shape=(), dtype=string)
tf.Tensor(-1.930382783539359, shape=(), dtype=float64)
使用该 tf.data.Dataset.map 方法将函数应用于 Dataset 的每个元素
映射函数必须在TensorFlow图模式下,并且必须在 tf.Tensors 运行并返回 tf.Tensors。像 serialize_example 这种非张量函数可以用tf.py_function 打包并兼容
使用 tf.py_function 需要指定形状和类型信息,否则该信息将不可用:
serialize_example # 这是一个前面定义的函数,在前面定义序列化操作下
<function __main__.serialize_example(feature0, feature1, feature2, feature3)>
第三段代码解析
如下方这个 cell 前面定义的 serialize_example 函数是非张量函数,输入的是单个标量值,从上个 cell 说明可以看出 tf.py_function 具有很好的适配性,这里抄写前面定义的 serialize_example 函数
def serialize_example(feature0, feature1, feature2, feature3):
feature = {
  'feature0': _int64_feature(feature0), # feature0 全是 bool 类型,可强制为 int64

  'feature1': _int64_feature(feature1), # feature1 全是 int  类型,可直接用 int64

  'feature2': _bytes_feature(feature2), # feature2 全是 bytes类型,可直接用 bytes

  'feature3': _float_feature(feature3), # feature3 全是 float类型,可直接用 float
}
example_proto = tf.train.Example(features=tf.train.Features(feature=feature))
return example_proto.SerializeToString()
def tf_serialize_example(f0,f1,f2,f3):
  tf_string = tf.py_function(
    serialize_example,
    (f0,f1,f2,f3),  # 将这些参数传递给上面的函数
    tf.string)      # 返回类型为 `tf.string`
  return tf.reshape(tf_string, ()) # 结果是一个标量
f0,f1,f2,f3 为前面提取的变量值
print(f0)
print(f1)
print(f2)
print(f3)
tf.Tensor(True, shape=(), dtype=bool)
tf.Tensor(4, shape=(), dtype=int32)
tf.Tensor(b'goat', shape=(), dtype=string)
tf.Tensor(-1.930382783539359, shape=(), dtype=float64)
tf_serialize_example(f0,f1,f2,f3)
<class 'bytes'>

<tf.Tensor: id=45, shape=(), dtype=string, numpy=b'\nR\n\x11\n\x08feature0\x12\x05\x1a\x03\n\x01\x01\n\x11\n\x08feature1\x12\x05\x1a\x03\n\x01\x04\n\x14\n\x08feature2\x12\x08\n\x06\n\x04goat\n\x14\n\x08feature3\x12\x08\x12\x06\n\x04\xc8\x16\xf7\xbf'>
将此函数应用于数据集中的每个元素: features_dataset 打包所有数据的数据集,由前方 应用于数组的元组,它返回元组的数据集: 处定义
serialized_features_dataset = features_dataset.map(tf_serialize_example)
serialized_features_dataset

# TensorFlow 2.x 输出为 <MapDataset shapes: (), types: tf.string>
<DatasetV1Adapter shapes: (), types: tf.string>
建立一个提取器,提取数据集每一行数据,将数据集平坦化方便写入
def generator():
  for features in features_dataset:
    yield serialize_example(*features)
serialized_features_dataset = tf.data.Dataset.from_generator(
    generator, output_types=tf.string, output_shapes=())
serialized_features_dataset

# TensorFlow 2.x 输出为 <FlatMapDataset shapes: (), types: tf.string>
<DatasetV1Adapter shapes: (), types: tf.string>
并将它们写入TFRecord文件:
filename = 'test.tfrecord'
writer = tf.data.experimental.TFRecordWriter(filename)
writer.write(serialized_features_dataset)
<class 'bytes'>
<class 'bytes'>
<class 'bytes'>
<class 'bytes'>
<class 'bytes'>
中间省略...
<class 'bytes'>
<class 'bytes'>
<class 'bytes'>
<class 'bytes'>
<class 'bytes'>
<class 'bytes'>
Reading a TFRecord file
您也可以使用 tf.data.TFRecordDataset 类读取TFRecord文件
可以在 here 中找到有关使用 tf.data 使用TFRecord文件的更多信息
使用 TFRecordDatasets 可以使输入数据标准化并且优化性能
filenames = [filename] # 或 filename = `test.tfrecord`
raw_dataset = tf.data.TFRecordDataset(filenames)
raw_dataset
<TFRecordDatasetV1 shapes: (), types: tf.string>
此时,数据集包含序列化的 tf.train.Example 消息。 迭代时,将其作为标量字符串张量返回
使用 .take 方法仅显示前10条记录。
注意: 遍历 tf.data.Dataset 仅在启用了 eager 执行的情况下有效。
for raw_record in raw_dataset.take(10):
  print(repr(raw_record))
<tf.Tensor: id=50107, shape=(), dtype=string, numpy=b'\nR\n\x11\n\x08feature0\x12\x05\x1a\x03\n\x01\x01\n\x11\n\x08feature1\x12\x05\x1a\x03\n\x01\x04\n\x14\n\x08feature2\x12\x08\n\x06\n\x04goat\n\x14\n\x08feature3\x12\x08\x12\x06\n\x04\xc8\x16\xf7\xbf'>
<tf.Tensor: id=50108, shape=(), dtype=string, numpy=b'\nQ\n\x11\n\x08feature0\x12\x05\x1a\x03\n\x01\x01\n\x11\n\x08feature1\x12\x05\x1a\x03\n\x01\x00\n\x13\n\x08feature2\x12\x07\n\x05\n\x03cat\n\x14\n\x08feature3\x12\x08\x12\x06\n\x04\x96<\xa8\xbe'>
<tf.Tensor: id=50109, shape=(), dtype=string, numpy=b'\nQ\n\x11\n\x08feature0\x12\x05\x1a\x03\n\x01\x00\n\x11\n\x08feature1\x12\x05\x1a\x03\n\x01\x01\n\x13\n\x08feature2\x12\x07\n\x05\n\x03dog\n\x14\n\x08feature3\x12\x08\x12\x06\n\x04\x99\xf2d\xbe'>
<tf.Tensor: id=50110, shape=(), dtype=string, numpy=b'\nR\n\x11\n\x08feature0\x12\x05\x1a\x03\n\x01\x00\n\x11\n\x08feature1\x12\x05\x1a\x03\n\x01\x04\n\x14\n\x08feature2\x12\x08\n\x06\n\x04goat\n\x14\n\x08feature3\x12\x08\x12\x06\n\x047]\x07\xbf'>
<tf.Tensor: id=50111, shape=(), dtype=string, numpy=b'\nS\n\x11\n\x08feature0\x12\x05\x1a\x03\n\x01\x01\n\x11\n\x08feature1\x12\x05\x1a\x03\n\x01\x03\n\x15\n\x08feature2\x12\t\n\x07\n\x05horse\n\x14\n\x08feature3\x12\x08\x12\x06\n\x04\xd3\xed\xdf>'>
<tf.Tensor: id=50112, shape=(), dtype=string, numpy=b'\nQ\n\x11\n\x08feature0\x12\x05\x1a\x03\n\x01\x00\n\x11\n\x08feature1\x12\x05\x1a\x03\n\x01\x01\n\x13\n\x08feature2\x12\x07\n\x05\n\x03dog\n\x14\n\x08feature3\x12\x08\x12\x06\n\x04n\x95\xb3>'>
<tf.Tensor: id=50113, shape=(), dtype=string, numpy=b'\nR\n\x11\n\x08feature0\x12\x05\x1a\x03\n\x01\x00\n\x11\n\x08feature1\x12\x05\x1a\x03\n\x01\x04\n\x14\n\x08feature2\x12\x08\n\x06\n\x04goat\n\x14\n\x08feature3\x12\x08\x12\x06\n\x04\xa2\xbb\xa6>'>
<tf.Tensor: id=50114, shape=(), dtype=string, numpy=b'\nQ\n\x11\n\x08feature0\x12\x05\x1a\x03\n\x01\x00\n\x11\n\x08feature1\x12\x05\x1a\x03\n\x01\x01\n\x13\n\x08feature2\x12\x07\n\x05\n\x03dog\n\x14\n\x08feature3\x12\x08\x12\x06\n\x04\xf7\xb1\x95>'>
<tf.Tensor: id=50115, shape=(), dtype=string, numpy=b'\nR\n\x11\n\x08feature0\x12\x05\x1a\x03\n\x01\x00\n\x11\n\x08feature1\x12\x05\x1a\x03\n\x01\x04\n\x14\n\x08feature2\x12\x08\n\x06\n\x04goat\n\x14\n\x08feature3\x12\x08\x12\x06\n\x04\xd3\xbf]?'>
<tf.Tensor: id=50116, shape=(), dtype=string, numpy=b'\nS\n\x11\n\x08feature0\x12\x05\x1a\x03\n\x01\x01\n\x11\n\x08feature1\x12\x05\x1a\x03\n\x01\x03\n\x15\n\x08feature2\x12\t\n\x07\n\x05horse\n\x14\n\x08feature3\x12\x08\x12\x06\n\x04V\xb3N?'>
可以使用下面的函数来解析这些张量。 请注意,此处必须使用 feature_description,因为数据集使用图形执行,并且需要以下描述来构建形状和类型签名:
# 创建特征描述字典
feature_description = {
    'feature0': tf.io.FixedLenFeature([], tf.int64, default_value=0),
    'feature1': tf.io.FixedLenFeature([], tf.int64, default_value=0),
    'feature2': tf.io.FixedLenFeature([], tf.string, default_value=''),
    'feature3': tf.io.FixedLenFeature([], tf.float32, default_value=0.0),
}

def _parse_function(example_proto):
  # 使用上面的字典解析输入的 `tf.Example` 协议
  return tf.io.parse_single_example(example_proto, feature_description)
或者,使用 tf.parse example 一次解析整个批处理。 使用 tf.data.Dataset.map 方法将此函数应用于数据集中的每个项目,raw_dataset 是前面读入的整个数据 test.tfrecord:
parsed_dataset = raw_dataset.map(_parse_function)
parsed_dataset
<DatasetV1Adapter shapes: {feature0: (), feature1: (), feature2: (), feature3: ()}, types: {feature0: tf.int64, feature1: tf.int64, feature2: tf.string, feature3: tf.float32}>
使用 eager 执行在数据集中显示观测值。 此数据集中有10,000个观测值,但您只会显示前10个观测值。数据显示为特征字典。 每个项目都是一个 tf.Tensor,并且这个张量的 numpy 元素显示特征的值:
for parsed_record in parsed_dataset.take(10):
  print(repr(parsed_record))
{'feature0': <tf.Tensor: id=50148, shape=(), dtype=int64, numpy=1>, 'feature1': <tf.Tensor: id=50149, shape=(), dtype=int64, numpy=4>, 'feature2': <tf.Tensor: id=50150, shape=(), dtype=string, numpy=b'goat'>, 'feature3': <tf.Tensor: id=50151, shape=(), dtype=float32, numpy=-1.9303827>}
{'feature0': <tf.Tensor: id=50152, shape=(), dtype=int64, numpy=1>, 'feature1': <tf.Tensor: id=50153, shape=(), dtype=int64, numpy=0>, 'feature2': <tf.Tensor: id=50154, shape=(), dtype=string, numpy=b'cat'>, 'feature3': <tf.Tensor: id=50155, shape=(), dtype=float32, numpy=-0.32858723>}
{'feature0': <tf.Tensor: id=50156, shape=(), dtype=int64, numpy=0>, 'feature1': <tf.Tensor: id=50157, shape=(), dtype=int64, numpy=1>, 'feature2': <tf.Tensor: id=50158, shape=(), dtype=string, numpy=b'dog'>, 'feature3': <tf.Tensor: id=50159, shape=(), dtype=float32, numpy=-0.22358169>}
{'feature0': <tf.Tensor: id=50160, shape=(), dtype=int64, numpy=0>, 'feature1': <tf.Tensor: id=50161, shape=(), dtype=int64, numpy=4>, 'feature2': <tf.Tensor: id=50162, shape=(), dtype=string, numpy=b'goat'>, 'feature3': <tf.Tensor: id=50163, shape=(), dtype=float32, numpy=-0.5287661>}
{'feature0': <tf.Tensor: id=50164, shape=(), dtype=int64, numpy=1>, 'feature1': <tf.Tensor: id=50165, shape=(), dtype=int64, numpy=3>, 'feature2': <tf.Tensor: id=50166, shape=(), dtype=string, numpy=b'horse'>, 'feature3': <tf.Tensor: id=50167, shape=(), dtype=float32, numpy=0.43736133>}
{'feature0': <tf.Tensor: id=50168, shape=(), dtype=int64, numpy=0>, 'feature1': <tf.Tensor: id=50169, shape=(), dtype=int64, numpy=1>, 'feature2': <tf.Tensor: id=50170, shape=(), dtype=string, numpy=b'dog'>, 'feature3': <tf.Tensor: id=50171, shape=(), dtype=float32, numpy=0.35074943>}
{'feature0': <tf.Tensor: id=50172, shape=(), dtype=int64, numpy=0>, 'feature1': <tf.Tensor: id=50173, shape=(), dtype=int64, numpy=4>, 'feature2': <tf.Tensor: id=50174, shape=(), dtype=string, numpy=b'goat'>, 'feature3': <tf.Tensor: id=50175, shape=(), dtype=float32, numpy=0.32565027>}
{'feature0': <tf.Tensor: id=50176, shape=(), dtype=int64, numpy=0>, 'feature1': <tf.Tensor: id=50177, shape=(), dtype=int64, numpy=1>, 'feature2': <tf.Tensor: id=50178, shape=(), dtype=string, numpy=b'dog'>, 'feature3': <tf.Tensor: id=50179, shape=(), dtype=float32, numpy=0.2923734>}
{'feature0': <tf.Tensor: id=50180, shape=(), dtype=int64, numpy=0>, 'feature1': <tf.Tensor: id=50181, shape=(), dtype=int64, numpy=4>, 'feature2': <tf.Tensor: id=50182, shape=(), dtype=string, numpy=b'goat'>, 'feature3': <tf.Tensor: id=50183, shape=(), dtype=float32, numpy=0.86620826>}
{'feature0': <tf.Tensor: id=50184, shape=(), dtype=int64, numpy=1>, 'feature1': <tf.Tensor: id=50185, shape=(), dtype=int64, numpy=3>, 'feature2': <tf.Tensor: id=50186, shape=(), dtype=string, numpy=b'horse'>, 'feature3': <tf.Tensor: id=50187, shape=(), dtype=float32, numpy=0.80742395>}
这里,tf.parse_example 函数将 tf.Example 字段解压缩为标准张量
TFRecord files in Python
tf.io 模块还包含用于读取和写入 TFRecord 文件的纯 Python 函数。
Writing a TFRecord file
接下来,将10,000个观测值写入文件 test.tfrecord。 每个观察结果都将转换为 tf.Example 消息,然后写入文件。 然后您可以验证是否已创建文件 test.tfrecord:
# 将 `tf.Example` 观察结果写入文件 n_observations = 1e4
with tf.io.TFRecordWriter(filename) as writer:
  for i in range(n_observations):
    example = serialize_example(feature0[i], feature1[i], feature2[i], feature3[i])
    writer.write(example)
# 获取文件大小的命令,特指占用空间大小
!du -sh {filename}
984K test.tfrecord
Reading a TFRecord file
这些序列化的张量可以使用 tf.train.Example.ParseFromString 轻松解析:
filenames = [filename] # 或 filename = `test.tfrecord`
raw_dataset = tf.data.TFRecordDataset(filenames)
raw_dataset
<TFRecordDatasetV1 shapes: (), types: tf.string>
for raw_record in raw_dataset.take(1):
  example = tf.train.Example()
  example.ParseFromString(raw_record.numpy())
  print(example)
features {
  feature {
    key: "feature0"
    value {
      int64_list {
        value: 1
      }
    }
  }
  feature {
    key: "feature1"
    value {
      int64_list {
        value: 4
      }
    }
  }
  feature {
    key: "feature2"
    value {
      bytes_list {
        value: "goat"
      }
    }
  }
  feature {
    key: "feature3"
    value {
      float_list {
        value: -1.9303827285766602
      }
    }
  }
}
Walkthrough: Reading and writing image data
这是有关如何使用 TFRecords 读取和写入图像数据的端到端示例。 使用图像作为输入数据,您将把数据写为 TFRecord 文件,然后读回文件并显示图像。
例如,如果您想在同一输入数据集上使用多个模型,这将很有用。 可以将其预处理为 TFRecords 格式,而不是存储原始图像数据,并且可以将其用于所有进一步的处理和建模中
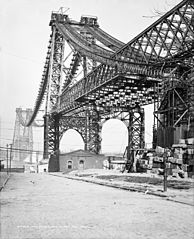
首先,让我们下载雪中一只猫和建设中的纽约威廉斯堡大桥
Fetch the images
cat_in_snow  = tf.keras.utils.get_file('320px-Felis_catus-cat_on_snow.jpg', 'https://storage.googleapis.com/download.tensorflow.org/example_images/320px-Felis_catus-cat_on_snow.jpg')
williamsburg_bridge = tf.keras.utils.get_file('194px-New_East_River_Bridge_from_Brooklyn_det.4a09796u.jpg','https://storage.googleapis.com/download.tensorflow.org/example_images/194px-New_East_River_Bridge_from_Brooklyn_det.4a09796u.jpg')
display.display(display.Image(filename=cat_in_snow))
display.display(display.HTML('<a "href=https://commons.wikimedia.org/wiki/File:Felis_catus-cat_on_snow.jpg">Von.grzanka 供图</a>'))

display.display(display.Image(filename=williamsburg_bridge))
display.display(display.HTML('<a "href=https://commons.wikimedia.org/wiki/File:New_East_River_Bridge_from_Brooklyn_det.4a09796u.jpg">维基百科供图</a>'))
Write the TFRecord file
如前所述,将特征编码为与 tf.Example 兼容的类型。 它存储原始图像字符串功能,以及高度,宽度,深度和任意 label 功能特征。 后者在您编写文件以区分猫图像和桥图像时使用。 将 0 用于猫图像,将 1 用于桥图像:
image_labels = {
    cat_in_snow : 0,
    williamsburg_bridge : 1,
}
# 这是一个仅使用猫的图像示例
image_string = open(cat_in_snow, 'rb').read()

label = image_labels[cat_in_snow]

# 创建具有相关特征的字典
def image_example(image_string, label):
  image_shape = tf.image.decode_jpeg(image_string).shape

  feature = {
      'height': _int64_feature(image_shape[0]),
      'width': _int64_feature(image_shape[1]),
      'depth': _int64_feature(image_shape[2]),
      'label': _int64_feature(label),
      'image_raw': _bytes_feature(image_string),
  }

  return tf.train.Example(features=tf.train.Features(feature=feature))

for line in str(image_example(image_string, label)).split('\n')[:15]:
  print(line)
print('...')
features {
  feature {
    key: "depth"
    value {
      int64_list {
        value: 3
      }
    }
  }
  feature {
    key: "height"
    value {
      int64_list {
        value: 213
      }
...
注意,所有特征现在都存储在 tf.Example 消息中。 接下来,对上面的代码进行功能化,并将示例消息写入名为 images.tfrecords 的文件中:
# 将原始图像文件写入 `images.tfrecords`
# 首先,将两个图像处理为 `tf.Example` 消息
# 然后,写入 `.tfrecords` 文件
record_file = 'images.tfrecords'
with tf.io.TFRecordWriter(record_file) as writer:
  for filename, label in image_labels.items():
    image_string = open(filename, 'rb').read()
    tf_example = image_example(image_string, label)
    writer.write(tf_example.SerializeToString())
# 获取文件大小的命令
!du -sh {record_file}
36K images.tfrecords
Read the TFRecord file
现在,您有了 images.tfrecords 文件,并且可以遍历其中的记录以读回您编写的内容。 鉴于在此示例中,您将仅复制图像,所以唯一需要的功能就是原始图像字符串。 使用上述 getters 将其提取出来,即 example.features.feature['image_raw'].bytes_list.value[0]。您还可以使用标签来确定哪个记录是猫,哪个记录是桥:
raw_image_dataset = tf.data.TFRecordDataset('images.tfrecords')

# 创建描述特征的字典
image_feature_description = {
    'height': tf.io.FixedLenFeature([], tf.int64),
    'width': tf.io.FixedLenFeature([], tf.int64),
    'depth': tf.io.FixedLenFeature([], tf.int64),
    'label': tf.io.FixedLenFeature([], tf.int64),
    'image_raw': tf.io.FixedLenFeature([], tf.string),
}

def _parse_image_function(example_proto):
  # 使用上面的字典解析输入的 `tf.Example proto`
  return tf.io.parse_single_example(example_proto, image_feature_description)

parsed_image_dataset = raw_image_dataset.map(_parse_image_function)
parsed_image_dataset
<DatasetV1Adapter shapes: {depth: (), height: (), image_raw: (), label: (), width: ()}, types: {depth: tf.int64, height: tf.int64, image_raw: tf.string, label: tf.int64, width: tf.int64}>
从 TFRecord 文件中恢复图像:
for image_features in parsed_image_dataset:
  image_raw = image_features['image_raw'].numpy()
  print(type(image_raw))
  display.display(display.Image(data=image_raw))
<class 'bytes'>

<class 'bytes'>

结束语
到此对 TensorFlow 推出的高效数据读入格式 tfrecord 就有所掌握,后面将详细介绍 faster_cnn 的数据集格式生成,图像识别数据集格式生成,并进行训练