vue基础2的听课笔记
文章目录
前言
时长:3h
顺一遍vue基础1的知识点:
1vue的基本使用:数据驱动视图 {{插值}}
2vue的指令系统:v-if与v-show;v-on绑定事件、v-bind绑定标签上的属性、v-for = "item,index) in menuLists .自定义指令。
3vue的双向数据绑定:v-model只用用于UI控件,是v-bind 和 v-on的结合。
4局部组件的创建:声子、挂子、用子(子组件)。组件化(可复用)。
vue的局部组件的使用
01-vue的局部组件的使用
//全局组件
Vue.component('Vbtn',{
    template:'<div>button</div>'
})


//局部组件
var Vheader ={
    data(){
        return{}
    },
    template:'<div>i am header.<Vbtn/></div>',
    methods:{}
}

//声子
var App ={
template:'<div>我是入口组件<Vheader/><</div>',
    components:{Vheader}
};
new Vue({
el:'#app',
data(){
return{}
},
components:{
App
},
template:'<App/>'
})
组件通信
父子之间的组件传值、平行之间的组件传值。
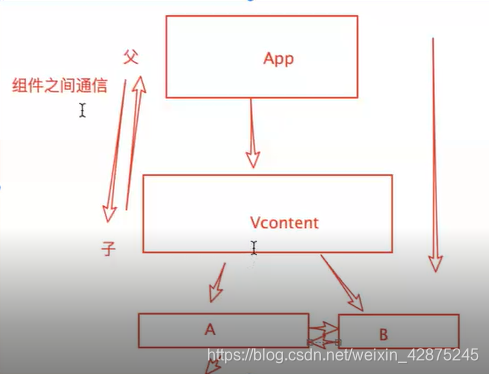
通过prop往子组件通信,
02-通过prop往子组件通信prop
//全局组件。
//第一个参数是组件的名字,第一个参数是options
//1.prent 2.child
Vue.component('Child',{
template:'<div><p>i am a child component.</p><input type="text" v-model='childData'/></div>',
props:['childData'],
methods:{changeValue(val){
//自定义的事件一定通过$emit
//在函数中$emit(自定义的事件名,消息)
this.$emit('childHandler',val)
}}
});
//父===》子
//1.先给父组件中绑定自定义的属性
//2.在子组件中使用props接收父组件传递的数据
//3.可以在子组件中任意使用

//子==》父
//1.在父组件绑定自定义的事件
//2.在子组件中触发原生的事件 在函数中使用$emit触发自定义的childHandler
Vue.component('Parent',{
data(){
return{msg:'i am a date of father component.'}
},
template:'<div><p>i am a father component.</p><Child:childData='msg'/></div>',
methods:{childHander(val){console.log(val);}};
});
//1声子
var App={
template:'<div><Parent/></div>'
};
new Vue({
el:'#app',
data(){

}
})
通过事件向父组件发送消息
03-通过事件向父组件发送消息$emit
全局组件的使用
04-全局组件的使用slot
插槽,是内置的全局组件slot 作为承载分发内容的出口。
使用elementUI的按钮。通过Chrome的element来找元素,复制样式。来用插槽的方式封装组件。
具名插槽
05-具名插槽
var App={
template:'
<div><ul><myli><h2 slot ='two'>我是第一个坑</h2><h3 slot='three'>我是第二个坑</h3></myli></ul></div>
}
过滤器
06-过滤器
为页面的数据进行添油加醋的功能,有两种,局部过滤器和全部过滤器。filters:{key:value}
做反转,
//全局过滤器
//1声明过滤器;2{{数据|过滤器的名字}}
Vue.filter('myReverse',function(value,arg){return arg+""+value.split('').reverse().join('');});
var App={
    data(){
        return{
            price:0,
            msg:'hello filter'
        }
    },
    template:'<div><input type="number"v-model='price'/>
    <h3>{{price|myCurrentcy}}</h3>
    <h4>{{msg|myReverse('哈哈哈')}}</h4>
</div>',
filters:{
    //1声明过滤器
    myCurrentcy:function(value){return "¥"+valur}
}
}
监听watch
07-watch
监听date中的属性。
new Vue({
el:'#app',
data(){
return{msg:''}
},
watch:{
msg:function(newV,oldV){
console.log(newV,oldV);
if(newV==='tusir'){console.log('tusir来了');}
}
}
});
计算属性computed
08-计算属性
computed:{
//计算属性默认只要getter
getCurrentSongStc:function(){
return this.musicData[0].songSrc
}
},
methods:{
clickHandler(item){}
}
生命周期
created mounted updated destryed
beforeCreate:function(){
//组件创建之前
console.log(this.msg);//undefine
},
created:function(){
//组件创建之后
console.log(this.msg);
//使用该组件,就会调用created方法。
//在created这个方法中可以操作后端的数据,数据驱动视图。
//应用:发送ajax请求
},
beforeMount:function(){
//挂载数据到DOM之前会调用
console.log(document.getElementById('app'));
},
mounted:function(){
//挂载数据到DOM之后会调用Vue作用之后的DOM  操作DOM
console.log(document.getElementById('app'));
},
beforUpdata:function(){
//在更新DOM之前 调用该钩子 应用:可以获取原始的DOM
},
updated:function(){
//更新DOM之后调用该钩子 应用:可以获取最新的DOM
}
beforDestroy:function(){
console.log('beforDestroy');
},
destroyed:function(){
console.log('destroyed');
},
activated:function(){
console.log('组件被激活了');
},
deactivated:function(){
console.log('组件被停用了');
}
ajax请求
$.ajax({
url:''
methods:'get',
success:(data)=>{
this.data =data;
}
})
vue组件通信一(父子组件)
//1props和$emit
//父组件向子组件传递数据是通过prop传递的,子组件传递数据给父组件是通过$emit触发事件来做到的。
//在下面的例子中,有父组件App和子组件Child。
//1父组件传递了message数据给子组件,并且通过v-on绑定了一个getChildData事件来监听子组件的触发事件;
//2子组件通过props得到相关的message数据,最后通过this.$emit触发了getChildData事件。
vue组件通信二(多层组件)
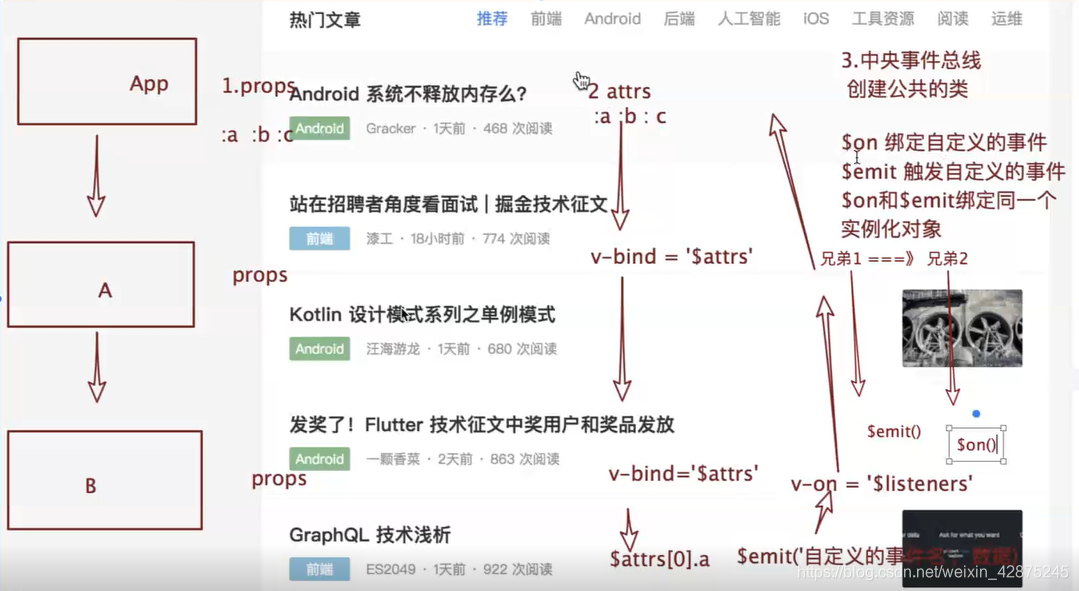
/*$attrs和$listeners
第一种方式处理父子组件之间的数据传输有一个问题:如果父组件A下面有子组件B,子组件B下面有组件C,这时如果组件A想传递数据给组件C怎么办?
如果采用第一种方法,我们必须让组件A通过prop传递消息给组件B,组件B再通过prop传递消息给组件C;
要是组件A和组件C之间有更多的组件,那采用这种方式就很复杂了。vue2.4开始提供了$attrs和$listeners来解决这个问题,能够让组件A之间传递消息给组件C。
*/
methods:{
    cClickHandler(){
        alert(1);
        this.$emit('getCData','我是C的数据')
    }
}
Vue.component('A',{
    data(){return{}},
    props:['message'],
    template:'
    <div>
    <B v-bind="$attrs"v-on'$listeners'></B>
    </div>',
})
vue组件通信三(平行组件)
/*
上面两种方式处理的都是父子组件之间的数据传递,而如果两个组件不是父子关系呢?这种情况下可以使用中央事件总线的方式。新建一个vue事件bus对象,然后通过bus.$emit触发事件,bus.$on监听触发的事件。
*/
//中央事件组件
Vue.component('brother1',{
    data(){return{
        msg:"hello brother1",
        brother2Msg:''
    }},
    template:'<div><p>我是老二</p>
    <p>老大传递过来的数据:{{brother2Msg}}</p>
    </div>',
    mounted(){
    //绑定全局事件globalEvent事件
    bus.$on('globalEvent',(val)=>{
        this.brother2Msg = val;
    })
}
});
vue组件通信四父往子多层通信
/*
父组件中通过provider来提供变量,然后在子组件中通过inject来注入变量。不论子组件有多深,只要调用了inject那么就可以注入provider中的数据。而不是局限于只能从当前父组件的prop属性来获取数据,只要在父组件的生命周期内,子组件都可以调用。
*/
Vue.component('Child',{
    data(){return{msg:''}},
    template:'<div>我是孩子{{msg}}</div>',
    inject:['for'],
    created(){
        this.msg=this.for;
    }
});
Vue.component('Father',{
    data(){}
})
Vue组件通信五子往父多层通信
Vue.component('Child',{
    props:{value:String,//v-model会自动传递一个字段为value的prop属性},
    data(){return{mymessage:this.value}},
    methods:{
    changeValue(){
    this.$parent.message=this.mymessage;
    //通过如此调用可以改变父组件的值
    }
    },
    template:'
    <div>
    <input type='text'v-model='value'@change='changeValue'/>
    </div>',
});
Vue.component('Parent',{
template:'<div><p>我是父组件</p>
<button @click="changeChildValue">test</button>
<Child></Child></div>',
methods:{
    changeChildValue(){
    this.$children[0].mymessage='hello';
}
},
    data(){return(message:'hello')}
})
总结
vuex用得少
vuex
中央空调;store商店;
processON画流程图。
总结
这一部分还是收获不少的,对组件以及组件通信的认识更全面了。也熟悉了在官网学习的方法了。