【Spring Security开发安全的REST服务】第六章
- 6.1 SpringSecurityOauth简介
- 6.2 实现标准的OAuth服务提供商
- 6.3 SpringSecurityOAuth核心源码解析
- 6.4 重构用户名密码登录
- 6.5 重构短信登陆
- 6.5.1 代码重构
- 6.5.1.1 core包中创建验证码的存储接口ValidateCodeRepository
- 6.5.1.2 在browser和app项目中分别创建两个ValidateCodeRepository 实现类
- 6.5.1.3 修改通用接口部分代码
- 6.5.2 测试
- 6.6 重构社交登陆
- 6.7 重构注册逻辑
- 6.8 令牌配置
6.1 SpringSecurityOauth简介

6.2 实现标准的OAuth服务提供商
6.2.1 前期准备
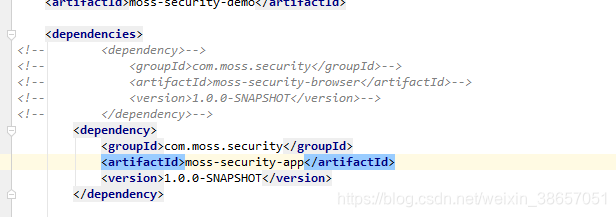
由于之前都在做Browser的部分的项目代码的编写,所以首先我们需要在Demo项目中把依赖配置调整,注释掉browser部分的依赖,引入app部分的依赖。
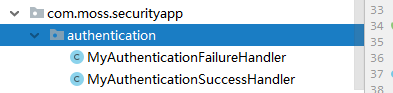
启动项目我们会发现,项目报了一个validateCodeFilter需要配置AuthenticationFailureHandler,之前的这个处理器是在brower项目中,我们需要在app项目中也配置这个处理器。我们把这两个类复制到app项目中
再次启动项目,又报了如下的错误

将配置在browser项目当中的如下图的配置移动到core项目当中的SecurityCoreConfig类中

至此,我们重新启动项目,项目没有再继续报错。
6.2.2 实现认证服务器
在app项目中新建 MossAuthorizationServerConfig 类,将该类注解为一个配置类,并添加EnableAuthorizationServer注解,此时项目已经是一个OAuth认证服务器。
package com.moss.securityapp;

import org.springframework.context.annotation.Configuration;
import org.springframework.security.oauth2.config.annotation.web.configuration.EnableAuthorizationServer;

/**
 * 认证服务器
 *
 * @author lwj
 */
@Configuration
@EnableAuthorizationServer
public class MossAuthorizationServerConfig {

}
重启项目,此时OAuth认证服务器启动。
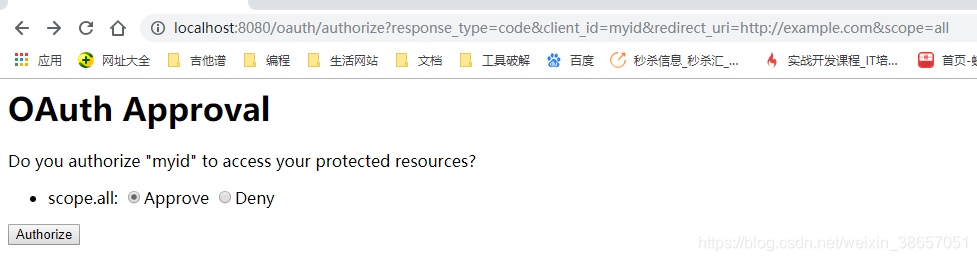
通过查看文档,我们来拼访问路径
http://localhost:8080/oauth/authorize?response_type=code&client_id=myid&redirect_uri=http://example.com&scope=all
访问后发现,页面报500错误。查看后台报错:
User must be authenticated with Spring Security before authorization can be completed.

视频教程中的security版本中是默认basic认证的,security5+ 认证默认为表单了也就是http.formLogin()
所以我们需要在app项目中新建MossWebSecurityConfigurerAdapter 类
package com.moss.securityapp;

import org.springframework.context.annotation.Configuration;
import org.springframework.security.config.annotation.web.builders.HttpSecurity;
import org.springframework.security.config.annotation.web.configuration.WebSecurityConfigurerAdapter;


@Configuration
public class MossWebSecurityConfigurerAdapter extends WebSecurityConfigurerAdapter {
    @Override
    protected void configure(HttpSecurity http) throws Exception {
        http.httpBasic();
    }
}
重启项目出现如下图中的报错

需要去为OAuth指定redirect_uri;在Demo项目的application.yml中配置
security:
  oauth2:
    client:
      client-id: myid
      client-secret: myid
      registered-redirect-uri:
        - "http://example.com"
        - "http://ora.com"
重启项目,重新访问后看到页面跳转到下图中
点击确认后页面跳转到如下图
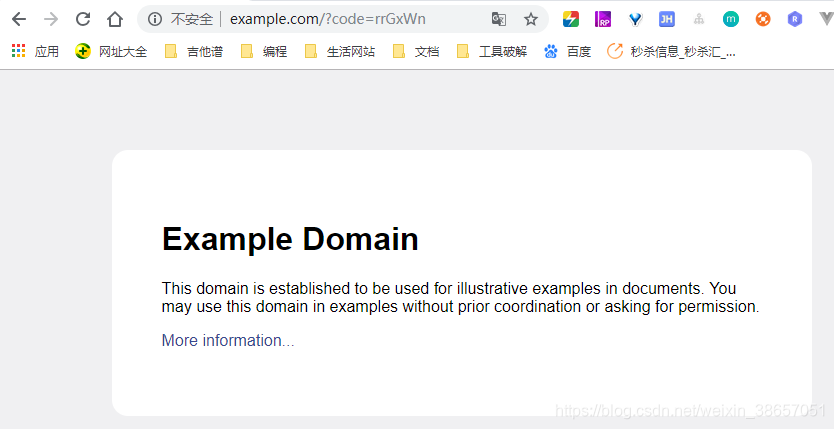
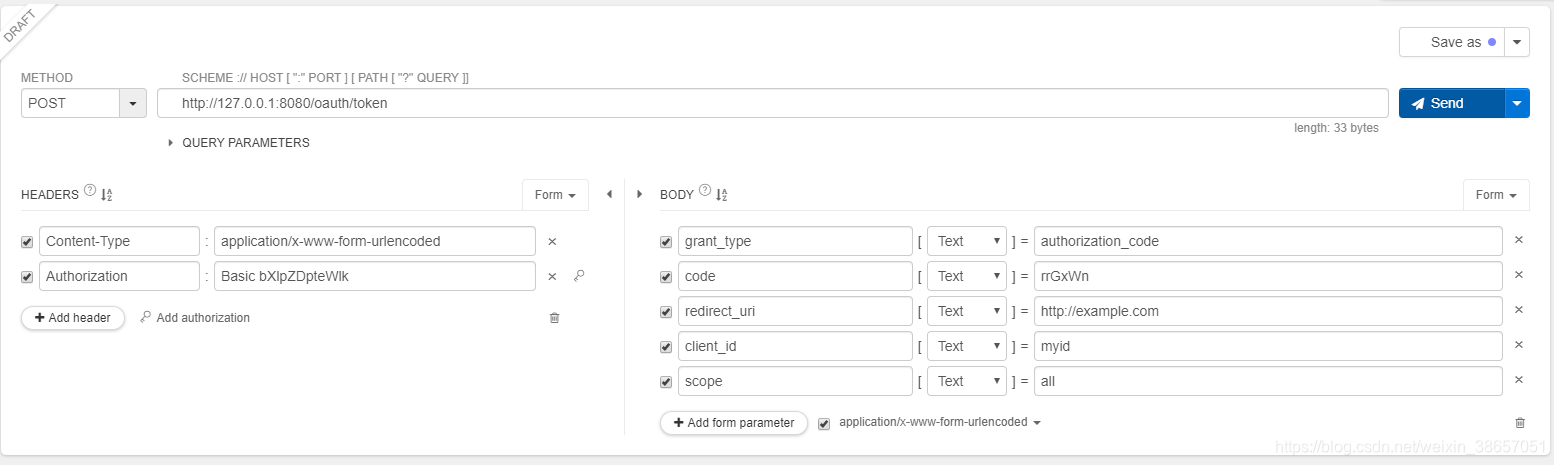
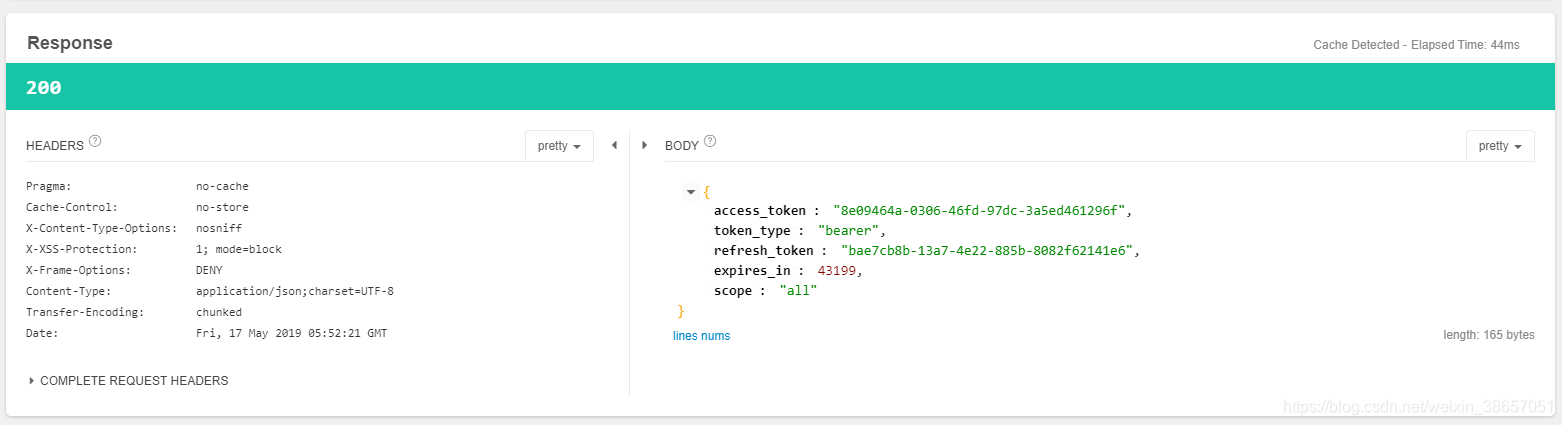
6.2.2.1 授权码模式获取token
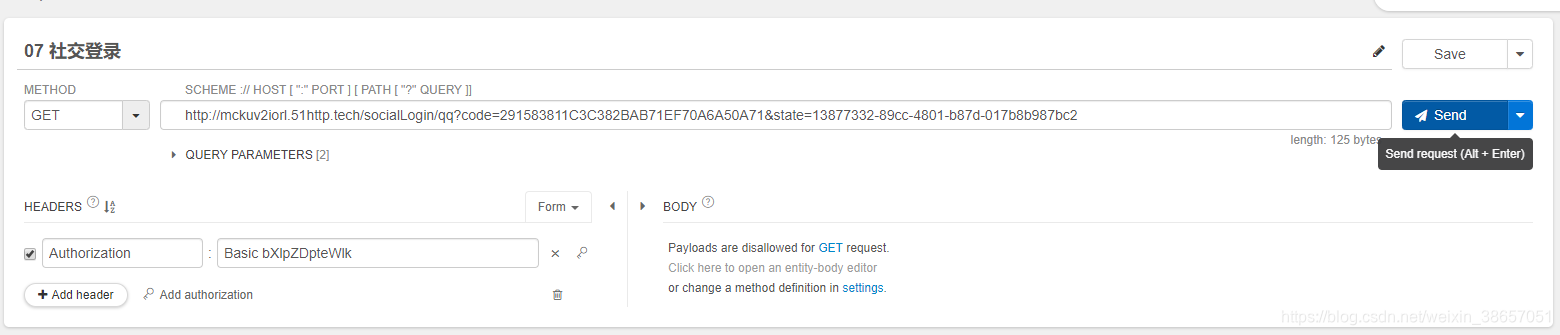
需要在请求头上配置之前在申请token的应用的id和secret。如下图所示

注意http的头是http而不是https,请求中的code为上图中的url中的code后面的码

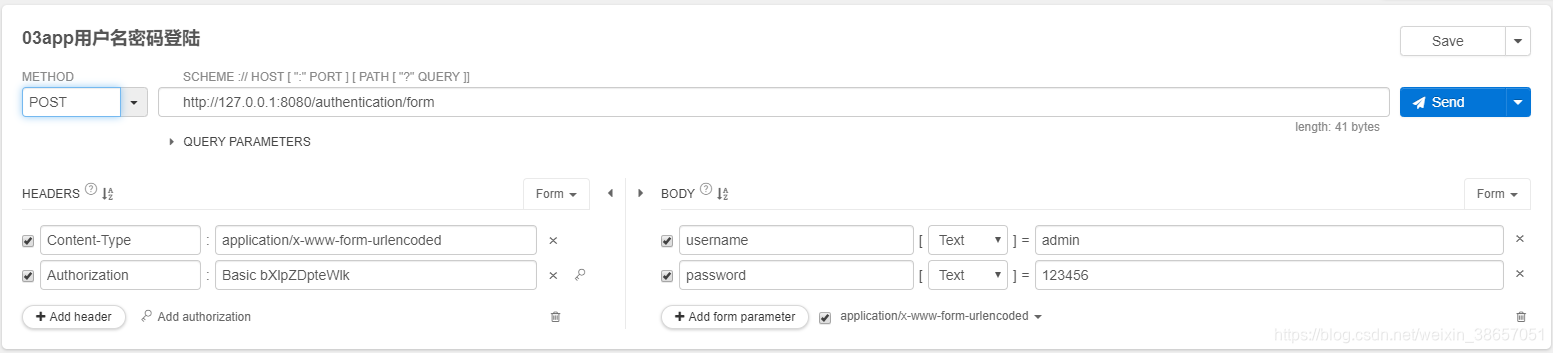
6.2.2.2 用户名密码模式获取token

6.2.3 实现资源服务器
新建MossResourceServerConfig类
package com.moss.securityapp;

import org.springframework.context.annotation.Configuration;
import org.springframework.security.oauth2.config.annotation.web.configuration.EnableResourceServer;

/**
 * 资源服务器
 *
 * @author lwj
 */
@Configuration
@EnableResourceServer
public class MossResourceServerConfig {

}
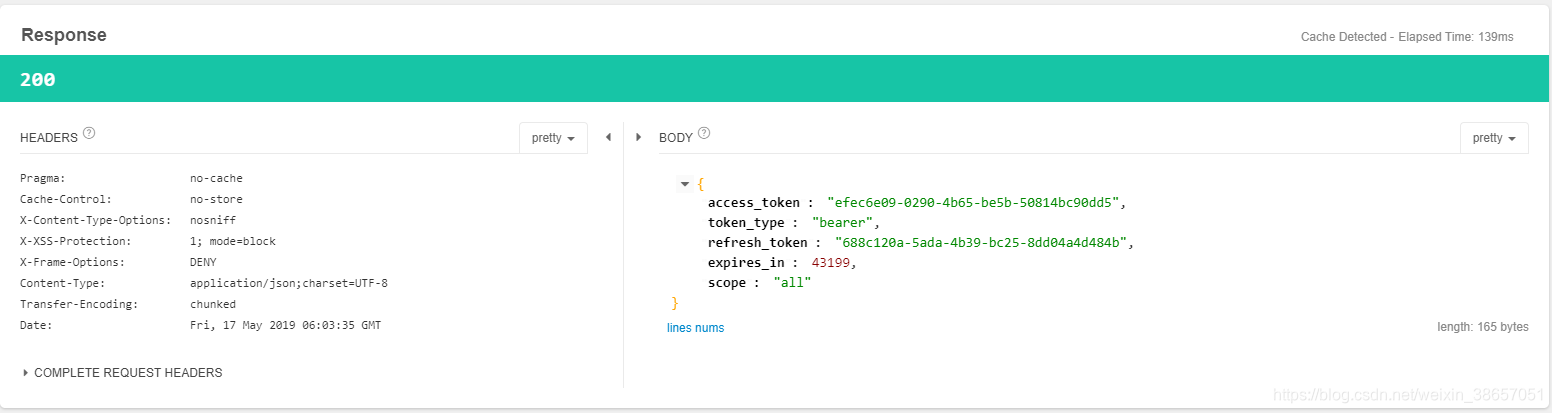
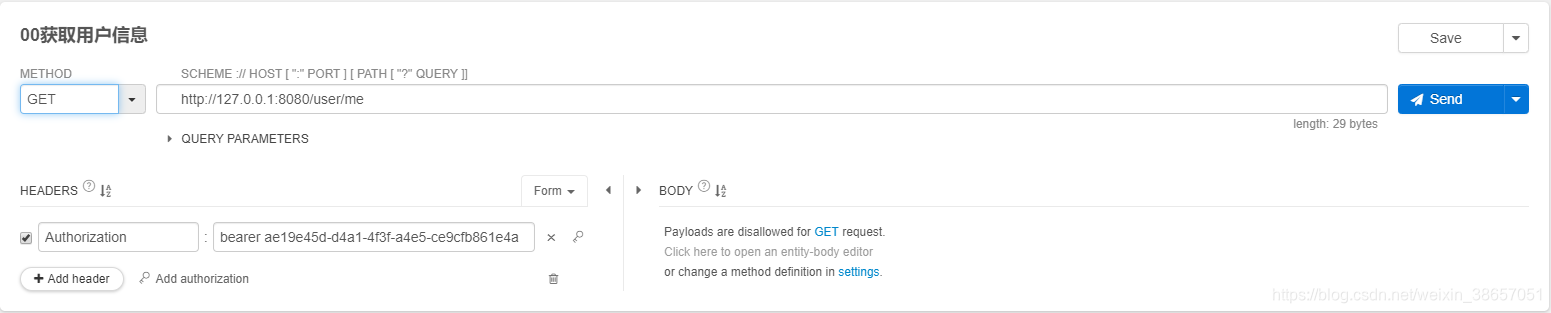
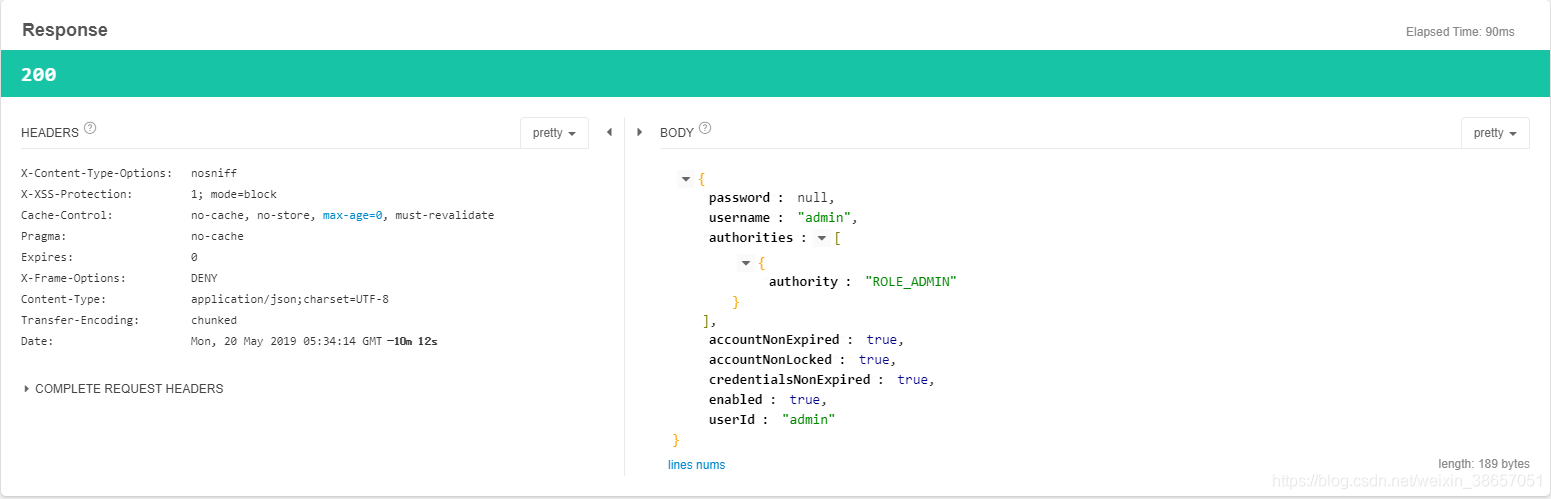
6.2.4 使用密码模式获取的access_token去获取用户信息
6.3 SpringSecurityOAuth核心源码解析

6.4 重构用户名密码登录
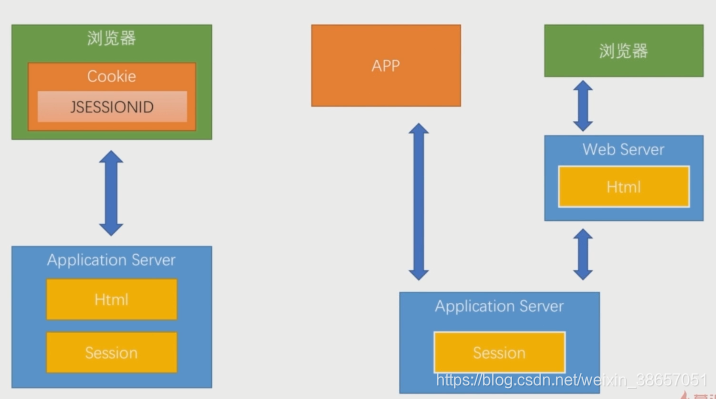
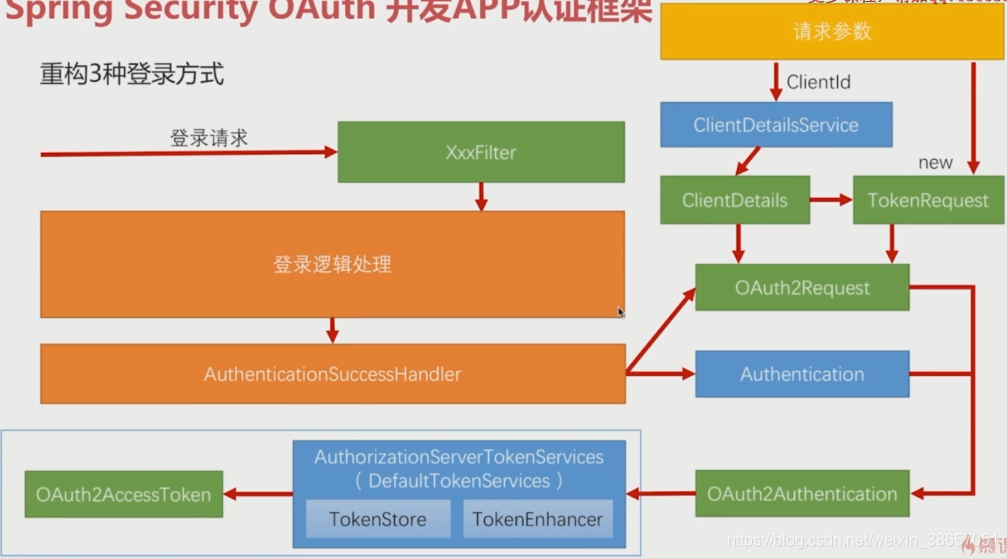 根据上面的图,我们需要去处理的就是在AuthenticationSuccessHandler中的success方法中去组装图中右侧部分的数据传递给AuthorizationServerTokenServices然后去获取OAuth2AccessToken。
package com.moss.securityapp.authentication;

import com.fasterxml.jackson.databind.ObjectMapper;
import com.moss.securitycore.properties.SecurityProperties;
import org.apache.commons.collections4.MapUtils;
import org.apache.commons.lang3.StringUtils;
import org.slf4j.Logger;
import org.slf4j.LoggerFactory;
import org.springframework.beans.factory.annotation.Autowired;
import org.springframework.security.authentication.BadCredentialsException;
import org.springframework.security.core.Authentication;
import org.springframework.security.oauth2.common.OAuth2AccessToken;
import org.springframework.security.oauth2.common.exceptions.UnapprovedClientAuthenticationException;
import org.springframework.security.oauth2.provider.*;
import org.springframework.security.oauth2.provider.token.AuthorizationServerTokenServices;
import org.springframework.security.web.authentication.SavedRequestAwareAuthenticationSuccessHandler;
import org.springframework.stereotype.Component;

import javax.servlet.ServletException;
import javax.servlet.http.HttpServletRequest;
import javax.servlet.http.HttpServletResponse;
import java.io.IOException;
import java.util.Base64;

/**
 * 登陆成功处理器
 *
 * @author lwj
 */
@Component("myAuthenticationSuccessHandler")
public class MyAuthenticationSuccessHandler extends SavedRequestAwareAuthenticationSuccessHandler {
    private Logger logger = LoggerFactory.getLogger(getClass());

    @Autowired
    private ObjectMapper objectMapper;

    @Autowired
    private SecurityProperties securityProperties;

    @Autowired
    private ClientDetailsService clientDetailsService;

    @Autowired
    private AuthorizationServerTokenServices authorizationServerTokenServices;

    @Override
    public void onAuthenticationSuccess(HttpServletRequest httpServletRequest, HttpServletResponse httpServletResponse, Authentication authentication) throws IOException, ServletException {
        logger.info("登陆成功");
        /**
         * @see BasicAuthenticationFilter#doFilterInternal(javax.servlet.http.HttpServletRequest, javax.servlet.http.HttpServletResponse, javax.servlet.FilterChain)
         *
         **/
        String header = httpServletRequest.getHeader("Authorization");
        if (header == null && !header.toLowerCase().startsWith("basic ")) {
            throw new UnapprovedClientAuthenticationException("请求头中无client信息");
        }

        String[] tokens = this.extractAndDecodeHeader(header, httpServletRequest);

        assert tokens.length == 2;

        String clientId = tokens[0];
        String clientSecret = tokens[1];

        ClientDetails clientDetails = clientDetailsService.loadClientByClientId(clientId);

        if (clientDetails == null) {
            throw new UnapprovedClientAuthenticationException("clientId对应的配置信息不存在:" + clientId);
        } else if (!StringUtils.equals(clientDetails.getClientSecret(), clientSecret)) {
            throw new UnapprovedClientAuthenticationException("clientSecret不匹配:" + clientId);
        }

        TokenRequest tokenRequest = new TokenRequest(MapUtils.EMPTY_SORTED_MAP, clientId, clientDetails.getScope(), "custom");

        OAuth2Request oAuth2Request = tokenRequest.createOAuth2Request(clientDetails);

        OAuth2Authentication oAuth2Authentication = new OAuth2Authentication(oAuth2Request, authentication);

        OAuth2AccessToken token = authorizationServerTokenServices.createAccessToken(oAuth2Authentication);

        httpServletResponse.setContentType("application/json;charset=UTF-8");
        httpServletResponse.getWriter().write(objectMapper.writeValueAsString(token));
    }

    private String[] extractAndDecodeHeader(String header, HttpServletRequest request) throws IOException {
        byte[] base64Token = header.substring(6).getBytes("UTF-8");

        byte[] decoded;
        try {
            decoded = Base64.getDecoder().decode(base64Token);
        } catch (IllegalArgumentException var7) {
            throw new BadCredentialsException("Failed to decode basic authentication token");
        }

        String token = new String(decoded, "UTF-8");
        int delim = token.indexOf(":");
        if (delim == -1) {
            throw new BadCredentialsException("Invalid basic authentication token");
        } else {
            return new String[]{token.substring(0, delim), token.substring(delim + 1)};
        }
    }
}
在资源配置类中添加app的安全配置
package com.moss.securityapp;

import com.moss.securitycore.authentication.mobile.SmsCodeAuthenticationConfig;
import com.moss.securitycore.properties.SecurityConstants;
import com.moss.securitycore.properties.SecurityProperties;
import com.moss.securitycore.validate.code.ValidateCodeSecurityConfig;
import org.springframework.beans.factory.annotation.Autowired;
import org.springframework.context.annotation.Configuration;
import org.springframework.security.config.annotation.web.builders.HttpSecurity;
import org.springframework.security.oauth2.config.annotation.web.configuration.EnableResourceServer;
import org.springframework.security.oauth2.config.annotation.web.configuration.ResourceServerConfigurerAdapter;
import org.springframework.security.web.authentication.AuthenticationFailureHandler;
import org.springframework.security.web.authentication.AuthenticationSuccessHandler;
import org.springframework.social.security.SpringSocialConfigurer;

/**
 * 资源服务器
 *
 * @author lwj
 */
@Configuration
@EnableResourceServer
public class MossResourceServerConfig extends ResourceServerConfigurerAdapter {

    /**
     * 注入登陆成功处理器
     */
    @Autowired
    protected AuthenticationSuccessHandler myAuthenticationSuccessHandler;

    /**
     * 配置登陆失败处理器
     */
    @Autowired
    protected AuthenticationFailureHandler myAuthenticationFailureHandler;

    @Autowired
    private ValidateCodeSecurityConfig validateCodeSecurityConfig;

    @Autowired
    private SmsCodeAuthenticationConfig smsCodeAuthenticationConfig;

    @Autowired
    private SpringSocialConfigurer mossSpringSocialConfigurer;

    @Autowired
    private SecurityProperties securityProperties;

    @Override
    public void configure(HttpSecurity http) throws Exception {
        http.formLogin()
                .loginPage(SecurityConstants.DEFAULT_UNAUTHENTICATION_URL)
                .loginProcessingUrl(SecurityConstants.DEFAULT_LOGIN_PROCESSING_URL_FORM)
                .successHandler(myAuthenticationSuccessHandler)
                .failureHandler(myAuthenticationFailureHandler);
        http//.apply(validateCodeSecurityConfig)
                //.and()
                .apply(smsCodeAuthenticationConfig)
                .and()
                .apply(mossSpringSocialConfigurer)
                .and()
                .authorizeRequests()
                .antMatchers(
                        SecurityConstants.DEFAULT_UNAUTHENTICATION_URL,
                        SecurityConstants.DEFAULT_LOGIN_PROCESSING_URL_MOBILE,
                        securityProperties.getBrowser().getLoginPage(),
                        SecurityConstants.DEFAULT_VALIDATE_CODE_URL_PREFIX + "/*",
                        securityProperties.getBrowser().getSignUpUrl(),
                        SecurityConstants.DEFAULT_SESSION_INVALID_URL,
                        "/user/regist",
                        "/auth/*",
                        "/qqLogin/*",
                        securityProperties.getBrowser().getSignOutUrl()
                )
                .permitAll()
                .anyRequest().authenticated()
                .and()
                .csrf().disable();
    }
}
重新启动项目后,出现了报错。

这里还需要修改一下之前推出登录成功处理器部分的内容。


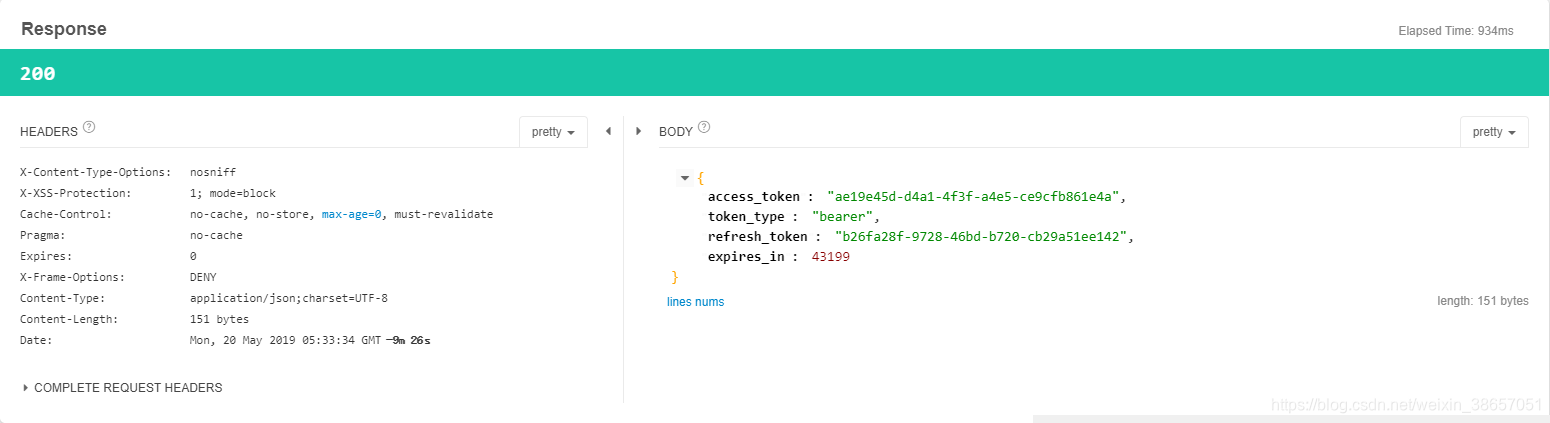
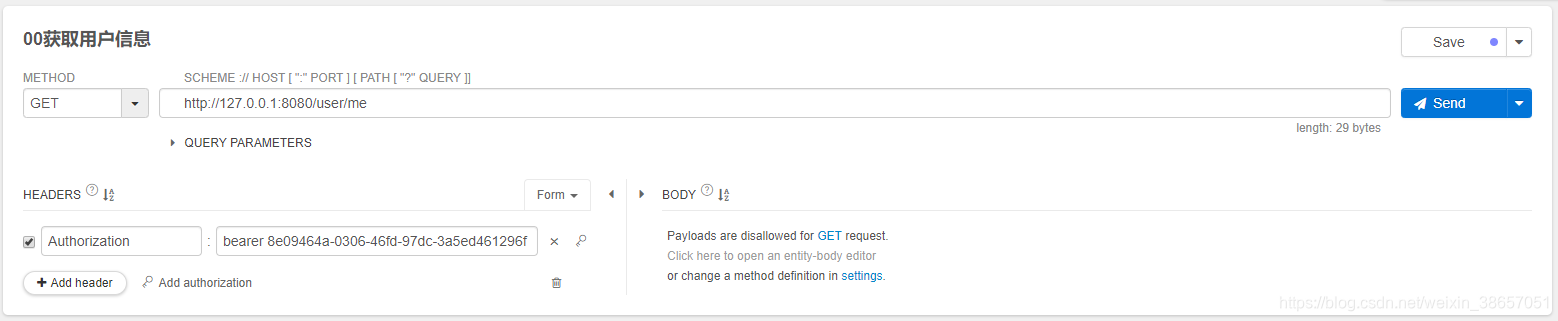
获取Accesstoken后,我们去访问用户数据
6.5 重构短信登陆
6.5.1 代码重构
6.5.1.1 core包中创建验证码的存储接口ValidateCodeRepository
package com.lwj.security.core.validate.code;

import org.springframework.web.context.request.ServletWebRequest;

/**
 * 验证码存储仓库接口
 *
 * @author lwj
 */
public interface ValidateCodeRepository {
    /**
     * 保存验证码
     *
     * @param request
     * @param code
     * @param validateCodeType
     */
    void save(ServletWebRequest request, ValidateCode code, ValidateCodeType validateCodeType);

    /**
     * 获取验证码
     *
     * @param request
     * @param validateCodeType
     * @return
     */
    ValidateCode get(ServletWebRequest request, ValidateCodeType validateCodeType);

    /**
     * 移除验证码
     *
     * @param request
     * @param validateCodeType
     */
    void remove(ServletWebRequest request, ValidateCodeType validateCodeType);
}
6.5.1.2 在browser和app项目中分别创建两个ValidateCodeRepository 实现类

这里主要是为了适配,browser和app这边,一个可以用session一个不能用session的模式。
RedisValidateCodeRepository
package com.lwj.security.app.validate.code.impl;

import com.lwj.security.app.AppConstants;
import com.lwj.security.core.validate.code.ValidateCode;
import com.lwj.security.core.validate.code.ValidateCodeException;
import com.lwj.security.core.validate.code.ValidateCodeRepository;
import com.lwj.security.core.validate.code.ValidateCodeType;
import com.lwj.security.core.validate.code.impl.AbstractValidateCodeProcessor;
import org.apache.commons.lang3.StringUtils;
import org.springframework.beans.factory.annotation.Autowired;
import org.springframework.data.redis.core.RedisTemplate;
import org.springframework.stereotype.Component;
import org.springframework.web.context.request.ServletWebRequest;

import java.util.concurrent.TimeUnit;

/**
 * app处理验证码登陆的方式
 *
 * @author lwj
 */
@Component
public class RedisValidateCodeRepository implements ValidateCodeRepository {

    @Autowired
    private RedisTemplate<Object, Object> redisTemplate;

    /**
     * 验证码放入redis规则模式:CODE_{TYPE}_{DEVICEId}
     */
    private final static String CODE_KEY_PATTERN = "CODE_%s_%s";

    @Override

    public void save(ServletWebRequest request, ValidateCode code, ValidateCodeType validateCodeType) {
        redisTemplate.opsForValue().set(buildKey(request, validateCodeType), code, 30, TimeUnit.MINUTES);
    }

    @Override
    public ValidateCode get(ServletWebRequest request, ValidateCodeType validateCodeType) {
        String key = buildKey(request, validateCodeType);
        //  拿到创建create()存储到session的code验证码对象
        return (ValidateCode) redisTemplate.opsForValue().get(key);
    }

    @Override
    public void remove(ServletWebRequest request, ValidateCodeType validateCodeType) {
        String key = buildKey(request, validateCodeType);
        redisTemplate.delete(key);
    }

    /**
     * 构建验证码放入redis时的key; 在保存的时候也使用该key
     * {@link AbstractValidateCodeProcessor#save(ServletWebRequest, ValidateCode)}
     *
     * @param validateCodeType
     * @return
     */
    private String buildKey(ServletWebRequest request, ValidateCodeType validateCodeType) {
        String deviceId = request.getHeader(AppConstants.DEFAULT_HEADER_DEVICE_ID);
        if (StringUtils.isBlank(deviceId)) {
            throw new ValidateCodeException("请在请求头中携带deviceId参数");
        }
        return String.format(CODE_KEY_PATTERN, validateCodeType, deviceId);
    }
}
SessionValidateCodeRepository
package com.lwj.security.browser.validate.code.impl;

import com.lwj.security.core.validate.code.ValidateCode;
import com.lwj.security.core.validate.code.ValidateCodeRepository;
import com.lwj.security.core.validate.code.ValidateCodeType;
import org.springframework.social.connect.web.HttpSessionSessionStrategy;
import org.springframework.social.connect.web.SessionStrategy;
import org.springframework.stereotype.Component;
import org.springframework.web.context.request.ServletWebRequest;

/**
 * session处理验证码的登陆方式
 *
 * @author lwj
 */
@Component
public class SessionValidateCodeRepository implements ValidateCodeRepository {

    /**
     * 操作session的工具类
     */
    private final SessionStrategy sessionStrategy = new HttpSessionSessionStrategy();

    /**
     * 验证码放入session的时候的前缀
     */
    public final static String SESSION_KEY_PREFIX = "SESSION_KEY_FOR_CODE";

    @Override
    public void save(ServletWebRequest request, ValidateCode code, ValidateCodeType validateCodeType) {
        sessionStrategy.setAttribute(request, getSessionKey(validateCodeType), code);
    }

    @Override
    public ValidateCode get(ServletWebRequest request, ValidateCodeType validateCodeType) {
        String sessionKey = getSessionKey(validateCodeType);
        //  拿到创建create() 存储到session的code验证码对象
        return (ValidateCode) sessionStrategy.getAttribute(request, sessionKey);
    }

    @Override
    public void remove(ServletWebRequest request, ValidateCodeType validateCodeType) {
        sessionStrategy.removeAttribute(request, getSessionKey(validateCodeType));
    }

    /**
     * 构建验证码放入session时的key; 在保存的时候也使用该key
     * {@link AbstractValidateCodeProcessor#save(ServletWebRequest, com.lwj.security.core.validate.code.ValidateCode)}
     *
     * @param validateCodeType
     * @return
     */
    private String getSessionKey(ValidateCodeType validateCodeType) {
        return SESSION_KEY_PREFIX + validateCodeType.toString().toUpperCase();
    }
}
6.5.1.3 修改通用接口部分代码


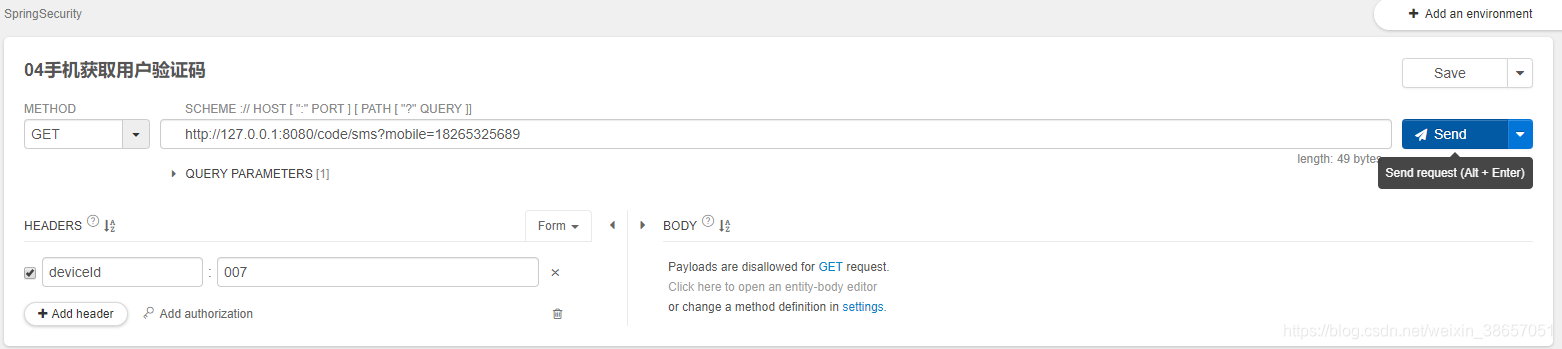
6.5.2 测试
请求获取验证码
在控制台中获取验证码

填写手机验证码登陆的请求
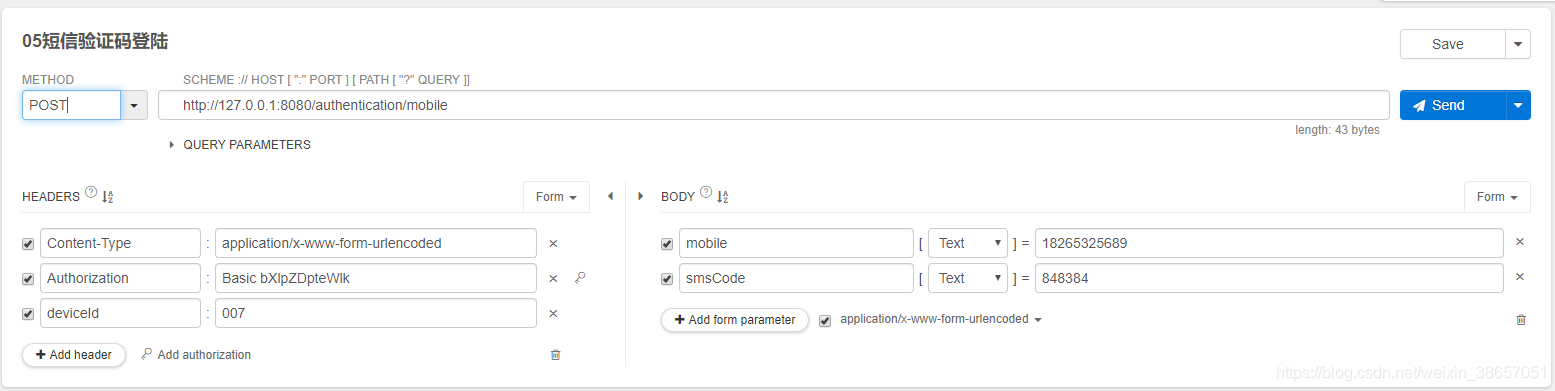
点击save按钮下拉处里面的copy as curl,将模拟手机登陆请求的curl拷贝下来。
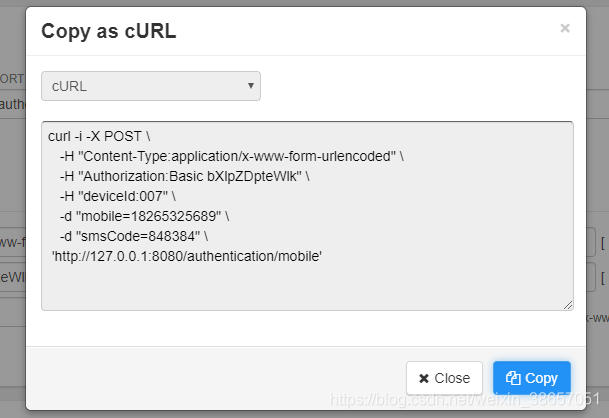
**注意:**如果是Windows用户需要安装curl工具
curl工具下载地址
下载并如何使用不知道的,请百度。
在使用Windows来模拟的时候,不能直接用从上面直接复制下来的curl,因为Windows中不支持分行的格式。需要整理到同一行,并且去掉分行的反斜杠。
例如:curl -i -X POST -H “Content-Type:application/x-www-form-urlencoded” -H “Authorization:Basic bXlpZDpteWlk” -H “deviceId:007” -d “mobile=18265325689” -d “smsCode=848384” ‘http://127.0.0.1:8080/authentication/mobile’
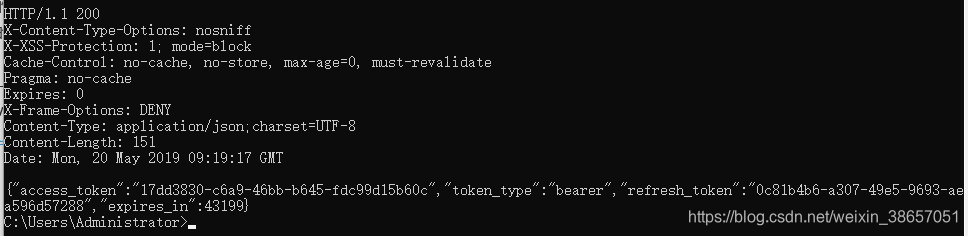
整理后执行代码,成功如下图显示
6.6 重构社交登陆
6.6.1 简化模式登陆
6.6.1.1 浏览器模式简单回顾
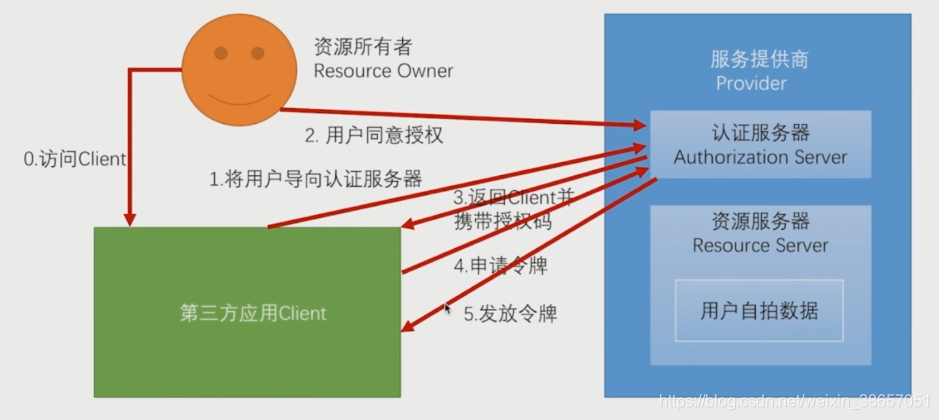
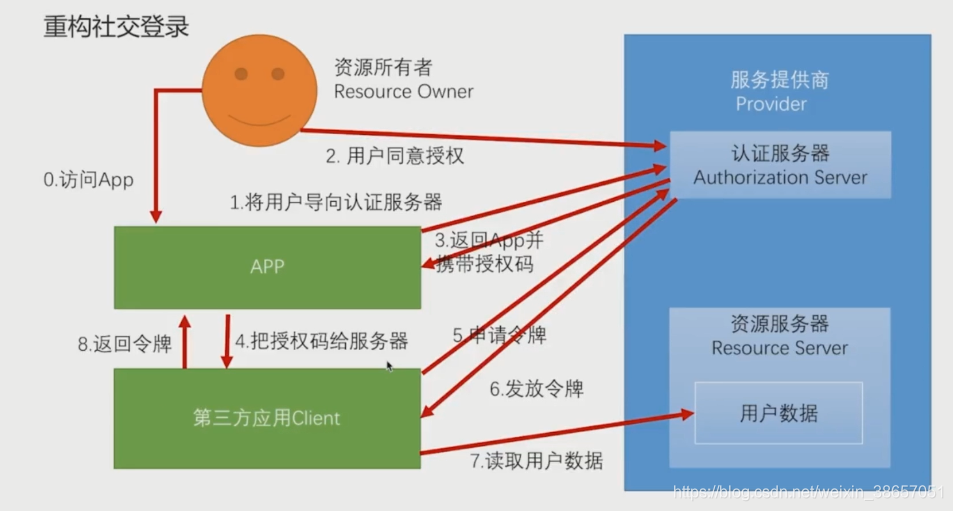
浏览器模式
在浏览器模式的社交登陆中,我们在访问第三方应用的时候会将用户导向认证服务器,用户同意授权后认证服务器会返回Client和授权码,再通过授权码去申请访问的令牌。认证服务器发放令牌后,用户根据令牌去访问资源服务器。
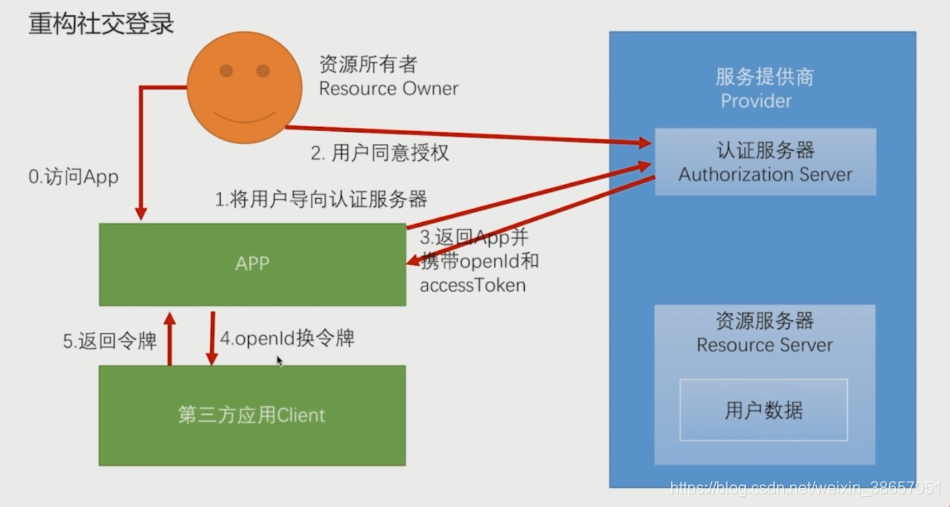
6.6.1.2 简化模式社交登陆流程
简化模式社交登陆
用户在通过社交登陆的时候,sdk会将用户导向认证服务器,用户同意授权后,返回App并携带openId和accessToken,再通过openId和我们自己的认证服务器交换令牌,用户拿到我们的认证服务器发放的令牌和资源服务器交换数据。
6.6.1.3 简化模式社交登陆代码部分
创建OpenIdAuthenticationToken 类
package com.moss.securityapp.social.openid;

import org.springframework.security.authentication.AbstractAuthenticationToken;
import org.springframework.security.core.GrantedAuthority;
import org.springframework.security.core.SpringSecurityCoreVersion;

import java.util.Collection;

/**
 * @author lwj
 */
public class OpenIdAuthenticationToken extends AbstractAuthenticationToken {

    private static final long serialVersionUID = SpringSecurityCoreVersion.SERIAL_VERSION_UID;

    // ~ Instance fields
    // ================================================================================================

    private final Object principal;
    private String providerId;

    // ~ Constructors
    // ===================================================================================================

    public OpenIdAuthenticationToken(Object principal, String providerId) {
        super(null);
        this.principal = principal;
        this.providerId = providerId;
        super.setAuthenticated(false); // must use super, as we override
    }

    public OpenIdAuthenticationToken(Object principal,
                                     Collection<? extends GrantedAuthority> authorities) {
        super(authorities);
        this.principal = principal;
        super.setAuthenticated(true); // must use super, as we override
    }

    // ~ Methods
    // ========================================================================================================


    @Override
    public Object getPrincipal() {
        return this.principal;
    }

    @Override
    public Object getCredentials() {
        return null;
    }

    public String getProviderId() {
        return providerId;
    }

    @Override
    public void setAuthenticated(boolean isAuthenticated) throws IllegalArgumentException {
        if (isAuthenticated) {
            throw new IllegalArgumentException(
                    "Cannot set this token to trusted - use constructor which takes a GrantedAuthority list instead");
        }

        super.setAuthenticated(false);
    }

    @Override
    public void eraseCredentials() {
        super.eraseCredentials();
    }
}
创建OpenIdAuthenticationFilter过滤器类
package com.moss.securityapp.social.openid;

import com.moss.securitycore.properties.QQProperties;
import com.moss.securitycore.properties.SecurityConstants;
import org.springframework.security.authentication.AuthenticationServiceException;
import org.springframework.security.core.Authentication;
import org.springframework.security.core.AuthenticationException;
import org.springframework.security.web.authentication.AbstractAuthenticationProcessingFilter;
import org.springframework.security.web.util.matcher.AntPathRequestMatcher;
import org.springframework.util.Assert;

import javax.servlet.http.HttpServletRequest;
import javax.servlet.http.HttpServletResponse;

/**
 * openId认证过滤器
 *
 * @author lwj
 */
public class OpenIdAuthenticationFilter extends AbstractAuthenticationProcessingFilter {

    // ~ Static fields/initializers
    // =====================================================================================
    private String openIdParameter = SecurityConstants.DEFAULT_PARAMETER_NAME_OPEN_ID;
    // 服务提供商id,qq还是微信
    /**
     * @see QQProperties#providerId
     */
    private String providerIdParameter = SecurityConstants.DEFAULT_PARAMETER_NAME_PROVIDERID;
    private boolean postOnly = true;

    // ~ Constructors
    // ===================================================================================================

    public OpenIdAuthenticationFilter() {
        super(new AntPathRequestMatcher(SecurityConstants.DEFAULT_LOGIN_PROCESSING_URL_OPEN_ID, "POST"));
    }

    // ~ Methods
    // ========================================================================================================

    @Override
    public Authentication attemptAuthentication(HttpServletRequest request,
                                                HttpServletResponse response) throws AuthenticationException {
        if (postOnly && !request.getMethod().equals("POST")) {
            throw new AuthenticationServiceException(
                    "Authentication method not supported: " + request.getMethod());
        }

        String openId = obtainOpenId(request);
        String providerId = obtainProviderId(request);

        if (openId == null) {
            openId = "";
        }
        if (providerId == null) {
            providerId = "";
        }
        openId = openId.trim();

        OpenIdAuthenticationToken authRequest = new OpenIdAuthenticationToken(openId, providerId);

        // Allow subclasses to set the "details" property
        setDetails(request, authRequest);

        return this.getAuthenticationManager().authenticate(authRequest);
    }


    protected String obtainOpenId(HttpServletRequest request) {
        return request.getParameter(openIdParameter);
    }

    private String obtainProviderId(HttpServletRequest request) {
        return request.getParameter(providerIdParameter);
    }

    protected void setDetails(HttpServletRequest request,
                              OpenIdAuthenticationToken authRequest) {
        authRequest.setDetails(authenticationDetailsSource.buildDetails(request));
    }

    public void setOpenIdParameter(String openIdParameter) {
        Assert.hasText(openIdParameter, "Username parameter must not be empty or null");
        this.openIdParameter = openIdParameter;
    }

    public void setPostOnly(boolean postOnly) {
        this.postOnly = postOnly;
    }

    public final String getOpenIdParameter() {
        return openIdParameter;
    }
}
创建OpenIdAuthenticationProvider认证类
package com.moss.securityapp.social.openid;

import org.apache.commons.collections4.CollectionUtils;
import org.springframework.security.authentication.AuthenticationProvider;
import org.springframework.security.authentication.InternalAuthenticationServiceException;
import org.springframework.security.core.Authentication;
import org.springframework.security.core.AuthenticationException;
import org.springframework.security.core.userdetails.UserDetails;
import org.springframework.social.connect.UsersConnectionRepository;
import org.springframework.social.security.SocialUserDetailsService;

import java.util.HashSet;
import java.util.Set;


/**
 * @author lwj
 */
public class OpenIdAuthenticationProvider implements AuthenticationProvider {
    // 要使用social的
    private SocialUserDetailsService userDetailsService;

    private UsersConnectionRepository usersConnectionRepository;

    @Override
    public Authentication authenticate(Authentication authentication) throws AuthenticationException {
        // 这里和之前短信验证码登录 唯一不同的是
        // 这里是使用社交登录的userDetailsService 和 usersConnectionRepository
        // 因为只有社交信息里面才会存在相关信息
        OpenIdAuthenticationToken authenticationToken = (OpenIdAuthenticationToken) authentication;
        Set<String> providerUserIds = new HashSet<>();
        providerUserIds.add((String) authenticationToken.getPrincipal());
        Set<String> userIds = usersConnectionRepository.findUserIdsConnectedTo(authenticationToken.getProviderId(), providerUserIds);

        if (CollectionUtils.isEmpty(userIds) || userIds.size() != 1) {
            throw new InternalAuthenticationServiceException("无法获取用户信息");
        }

        String userId = userIds.iterator().next();

        UserDetails user = userDetailsService.loadUserByUserId(userId);

        if (user == null) {
            throw new InternalAuthenticationServiceException("无法获取用户信息");
        }

        OpenIdAuthenticationToken authenticationResult = new OpenIdAuthenticationToken(user, user.getAuthorities());

        authenticationResult.setDetails(authenticationToken.getDetails());

        return authenticationResult;
    }

    @Override
    public boolean supports(Class<?> authentication) {
        return OpenIdAuthenticationToken.class.isAssignableFrom(authentication);
    }

    public SocialUserDetailsService getUserDetailsService() {
        return userDetailsService;
    }

    public void setUserDetailsService(SocialUserDetailsService userDetailsService) {
        this.userDetailsService = userDetailsService;
    }

    public UsersConnectionRepository getUsersConnectionRepository() {
        return usersConnectionRepository;
    }

    public void setUsersConnectionRepository(UsersConnectionRepository usersConnectionRepository) {
        this.usersConnectionRepository = usersConnectionRepository;
    }
}

~
创建OpenIdAuthenticationSecurityConfig配置类
package com.moss.securityapp.social.openid;

import org.springframework.beans.factory.annotation.Autowired;
import org.springframework.security.authentication.AuthenticationManager;
import org.springframework.security.config.annotation.SecurityConfigurerAdapter;
import org.springframework.security.config.annotation.web.builders.HttpSecurity;
import org.springframework.security.web.DefaultSecurityFilterChain;
import org.springframework.security.web.authentication.AuthenticationFailureHandler;
import org.springframework.security.web.authentication.AuthenticationSuccessHandler;
import org.springframework.security.web.authentication.UsernamePasswordAuthenticationFilter;
import org.springframework.social.connect.UsersConnectionRepository;
import org.springframework.social.security.SocialUserDetailsService;
import org.springframework.stereotype.Component;

/**
 * @author lwj
 */
@Component
public class OpenIdAuthenticationSecurityConfig
        extends SecurityConfigurerAdapter<DefaultSecurityFilterChain, HttpSecurity> {
    @Autowired
    private SocialUserDetailsService userDetailsService;

    @Autowired
    private UsersConnectionRepository usersConnectionRepository;

    @Autowired
    private AuthenticationFailureHandler authenticationFailureHandler;
    @Autowired
    private AuthenticationSuccessHandler authenticationSuccessHandler;

    @Override
    public void configure(HttpSecurity builder) throws Exception {
        OpenIdAuthenticationProvider provider = new OpenIdAuthenticationProvider();
        provider.setUserDetailsService(userDetailsService);
        provider.setUsersConnectionRepository(usersConnectionRepository);

        OpenIdAuthenticationFilter filter = new OpenIdAuthenticationFilter();
        // 获取manager的是在源码中看到过
        filter.setAuthenticationManager(builder.getSharedObject(AuthenticationManager.class));
        filter.setAuthenticationFailureHandler(authenticationFailureHandler);
        filter.setAuthenticationSuccessHandler(authenticationSuccessHandler);

        // 需要一个服务提供商 和 一个过滤器
        builder.
                authenticationProvider(provider)
                .addFilterAfter(filter, UsernamePasswordAuthenticationFilter.class);
    }
}
~
在SecurityConstants类中添加如下定义
/** openId登录拦截地址 */
String DEFAULT_LOGIN_PROCESSING_URL_OPEN_ID = "/authentication/openid";
/** openId字段名 */
String DEFAULT_PARAMETER_NAME_OPEN_ID = "openId";
/** providerId参数名 */
String DEFAULT_PARAMETER_NAME_PROVIDERID = "providerId";
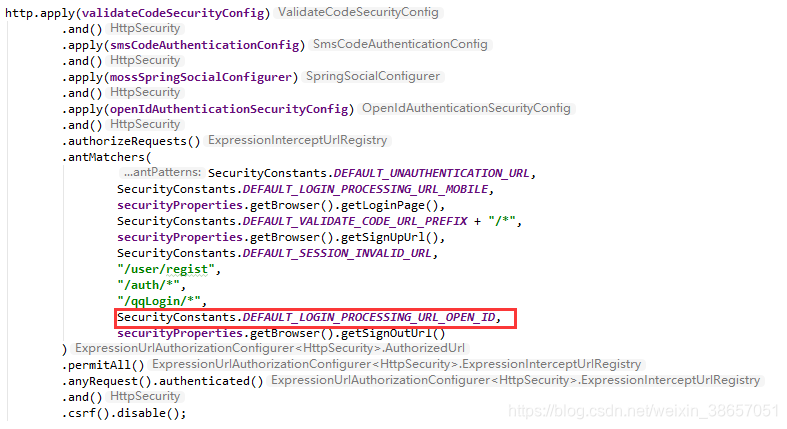
注意,由于配置了openid登陆的链接入口,所以我们需要在MossResourceServerConfig类中的添加"/authentication/openid"路由的过滤拦截。
6.6.1.4 简化模式社交登陆测试

图中的openId为我们之前在社交登陆部分操作时拿到的id值
6.6.2 标准授权码模式登陆
6.6.2.1 标准授权码模式流程
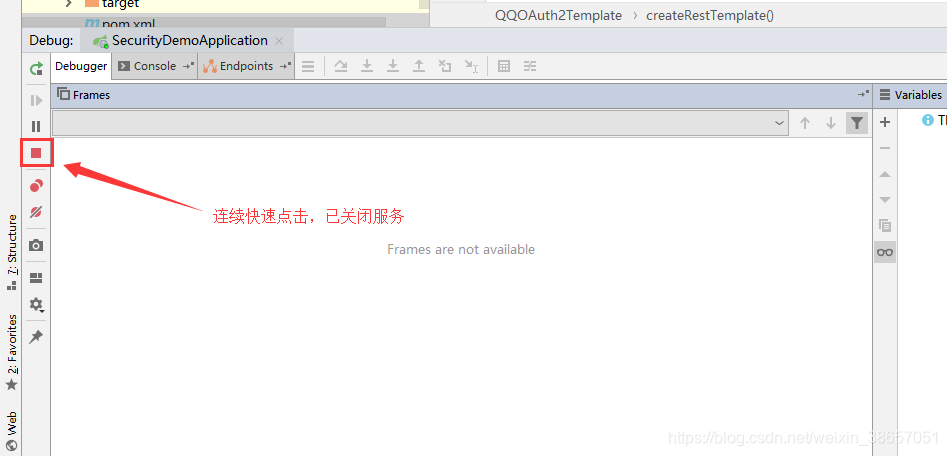
在此处按照视频中的去通过先将项目切换到browser中然后下图的位置打上断点,通过点击qq登录后,用户同意授权。然后进入该断点,然后点击右上角的红色按钮关闭服务。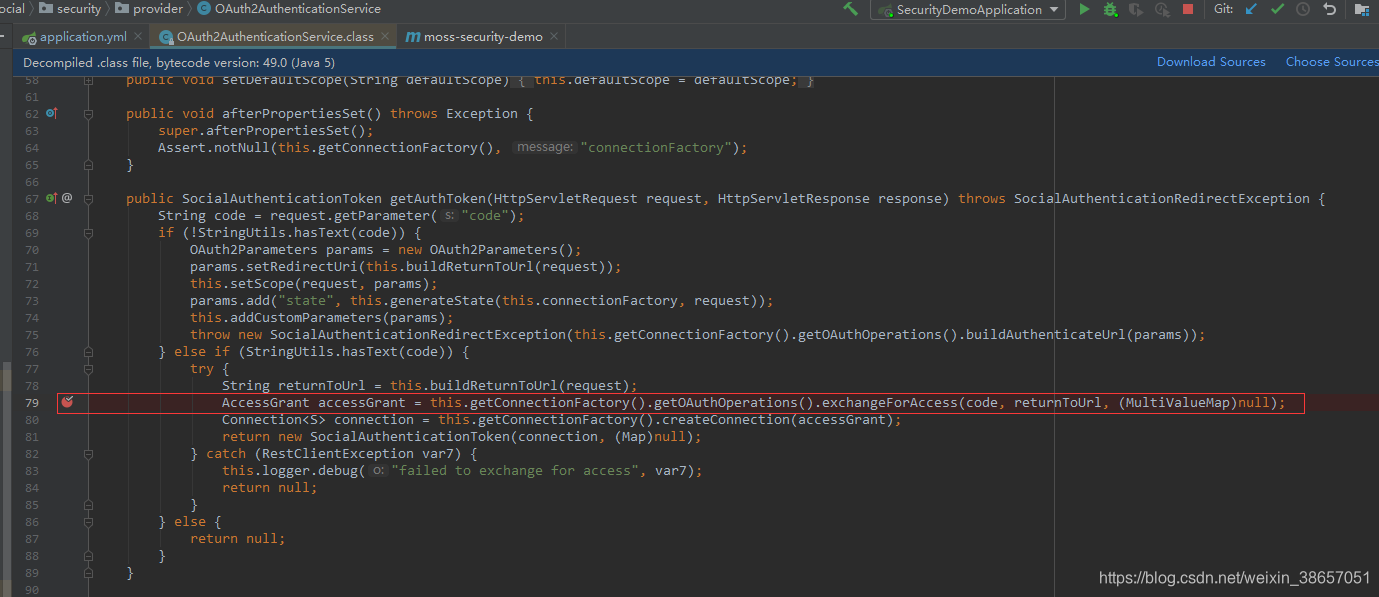
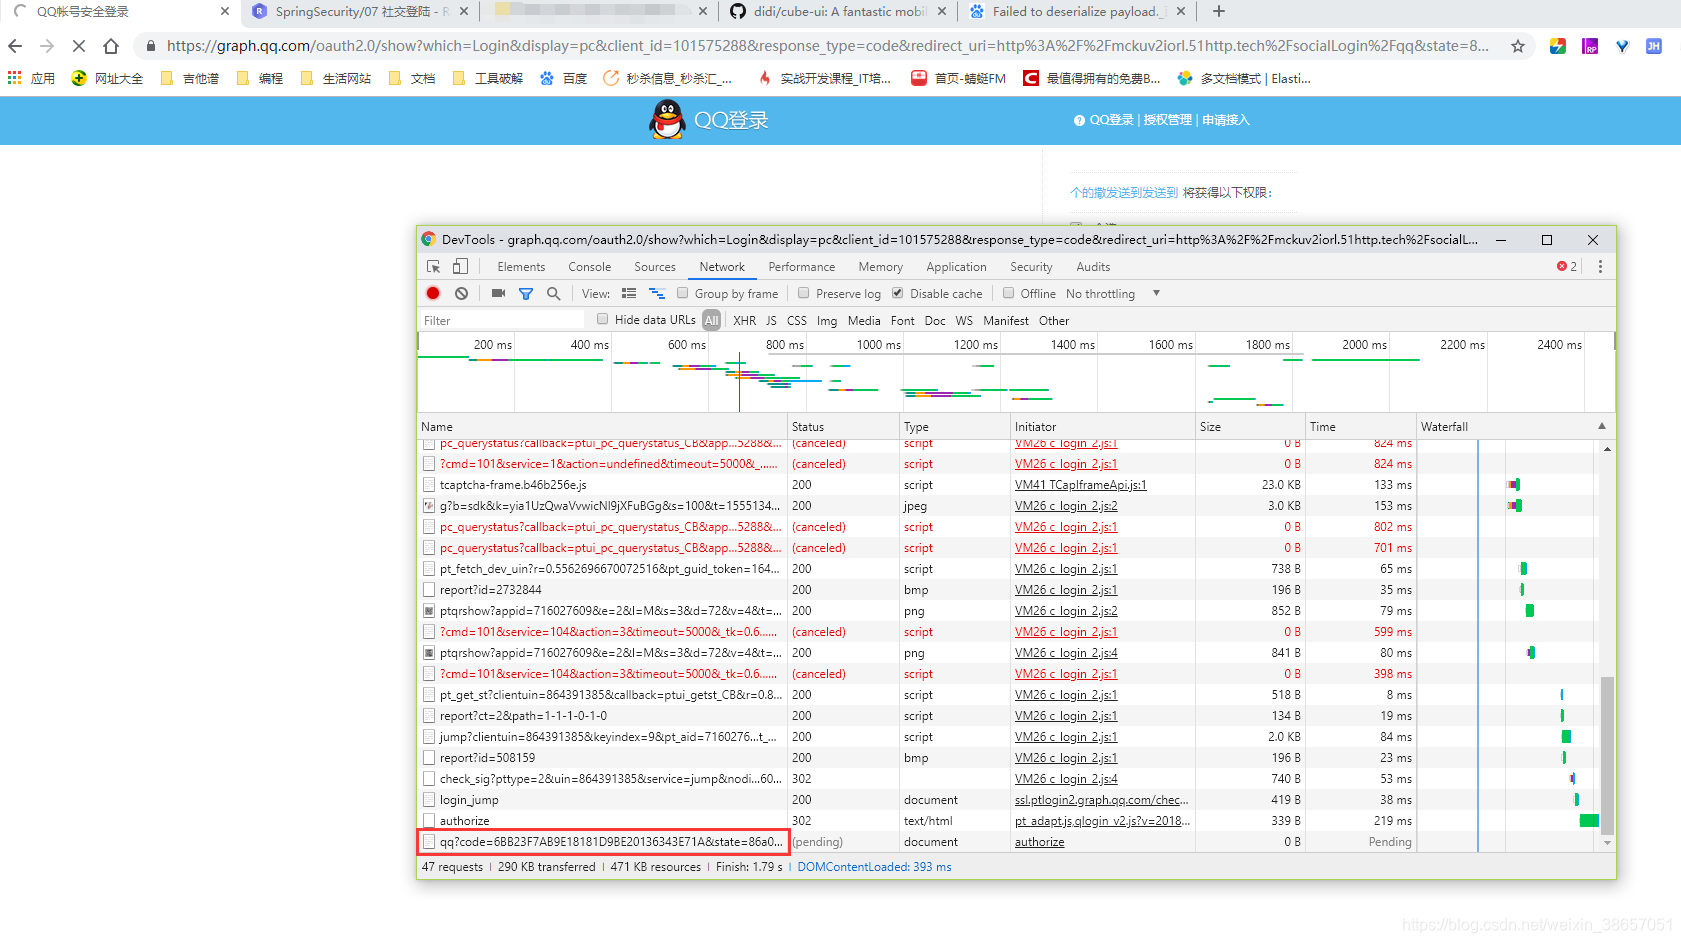
我们可以在浏览器上获取到我们需要的授权码

通过发送下图中的请求(url即上图中的url),我们本应该可以申请到令牌。
但是在实操的时候我们发现会出现一个问题,也就是多次通过这个code换取了令牌,这个问题暂时无法处理。目前猜测可能和模拟获取授权码的方式上是否在进入断点,关闭服务的时候,实际已经拿这个授权码去获取了令牌。才导致后面的请求的时候出现了下面这个错误。
 注意:这里我们通过idea右上角的红色按钮关闭服务,请求可能还是会被发送出去。我们可以点击idea左下角的关闭按钮
然后复制前端调试工具中的url到请求发送的工具中,获取access_token。
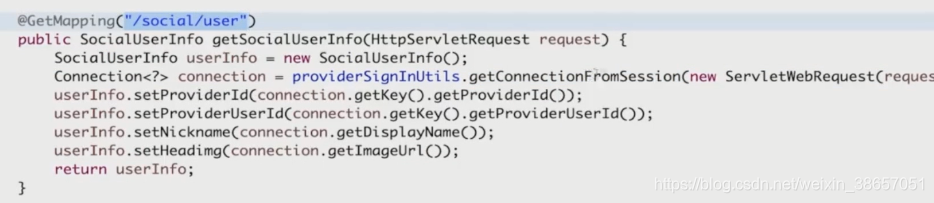
在获取到令牌后,我们发现之前配置的自定义的社交登录过滤器部分不适配app的方式,即我们需要让社交登录拿到令牌后走我们自己写的successhandler,在这个成功处理器中我们在之前添加了获取我们的令牌的方法。
首先,
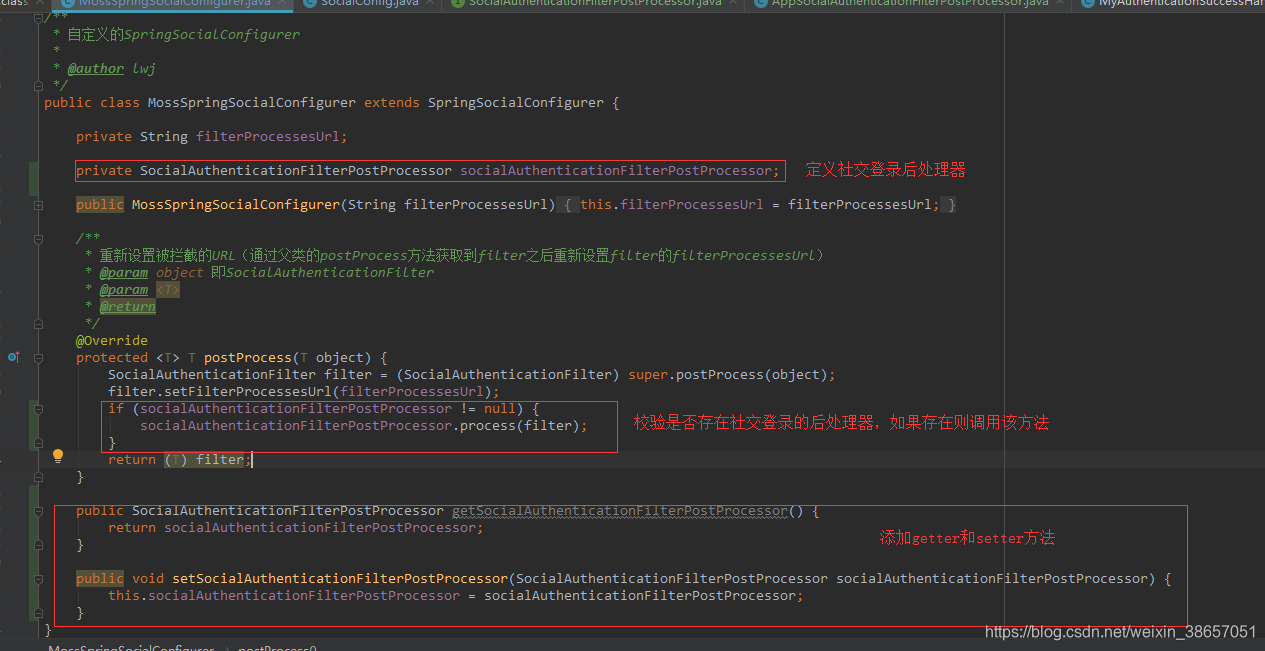
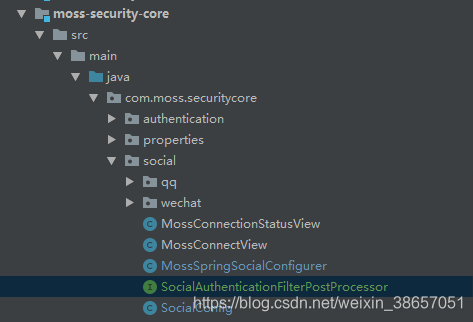 添加SocialAuthenticationFilterPostProcessor接口
package com.moss.securitycore.social;

import org.springframework.social.security.SocialAuthenticationFilter;

/**
 * 社交登录后处理器接口
 *
 * @author lwj
 */
public interface SocialAuthenticationFilterPostProcessor {

    void process(SocialAuthenticationFilter socialAuthenticationFilter);

}
在app项目中添加对该接口的实现类AppSocialAuthenticationFilterPostProcessor

/**
 *
 */
package cn.mrcode.imooc.springsecurity.securityapp.social.impl;

import cn.mrcode.imooc.springsecurity.securitycore.social.SocialAuthenticationFilterPostProcessor;
import org.springframework.beans.factory.annotation.Autowired;
import org.springframework.security.web.authentication.AuthenticationSuccessHandler;
import org.springframework.social.security.SocialAuthenticationFilter;
import org.springframework.stereotype.Component;

/**
 * @author zhailiang
 */
@Component
public class AppSocialAuthenticationFilterPostProcessor implements SocialAuthenticationFilterPostProcessor {

    @Autowired
    private AuthenticationSuccessHandler imoocAuthenticationSuccessHandler;

    /**
     * @see cn.mrcode.imooc.springsecurity.securitycore.social.SocialAuthenticationFilterPostProcessor.process
     */
    @Override
    public void process(SocialAuthenticationFilter socialAuthenticationFilter) {
        socialAuthenticationFilter.setAuthenticationSuccessHandler(imoocAuthenticationSuccessHandler);
    }

}
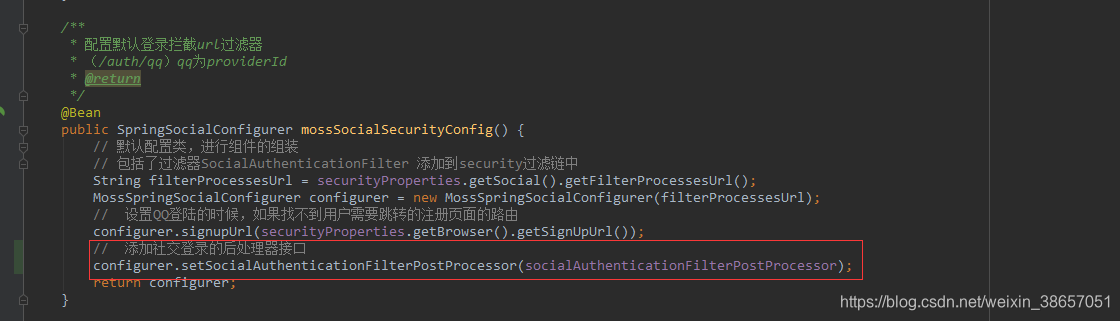
修改之前的自定义社交登录配置类
修改SocialConfig类
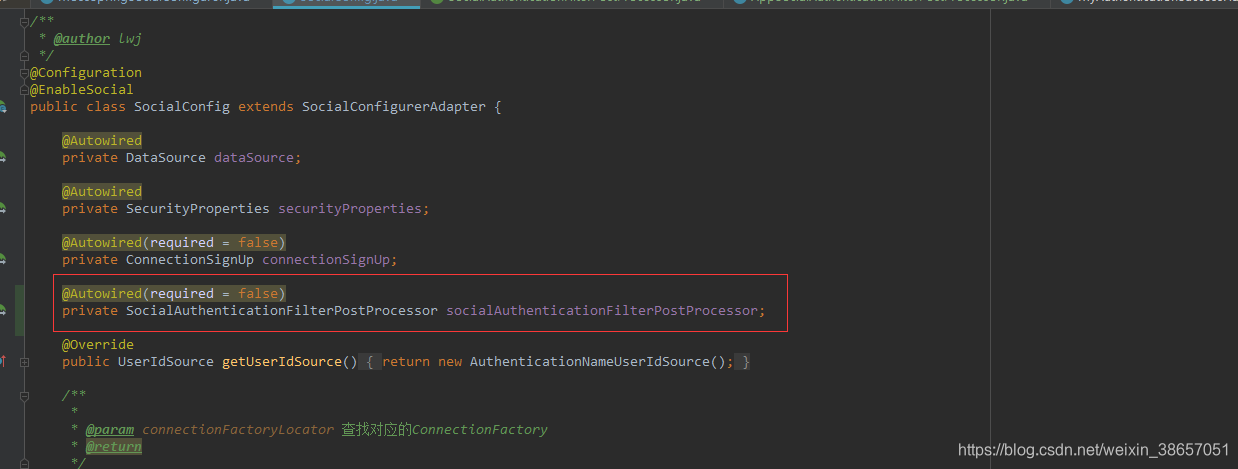
将app的社交登录后处理器配置到配置类中
6.7 重构注册逻辑
6.7.1 回顾之前的浏览器注册逻辑
1.当用户是第一次登陆系统的时候,会将用户引导到一个注册页面,让用户在系统中去注册。
2.在跳转到注册页面之前,会将用户的第三方信息,放到session中。
3.用户跳转到注册页面进行注册的时候可以通过下面的这个服务,从session拿到用户信息。
4.再通过调用下面的这个服务将第三方信息和用户信息绑定并保存到数据库中
6.7.2 app环境中的注册
思考:既然在app环境中没有session,那么我们只需要将第三方的用户信息加上deviceId,并将用户信息保存到redis上即可。
6.7.2.1 创建AppSignUpUtils类
其中,该类和视频中不太一样
1、首先是request请求的类型从WebRequest变更为ServletWebRequest。
2、抽象了获取connection的getConnection方法。
3、该类继承了一个SignUpUtils接口
package com.moss.securityapp.social;

import com.moss.securityapp.exception.AppSecretException;
import com.moss.securitycore.social.SignUpUtils;
import org.apache.commons.lang3.StringUtils;
import org.springframework.beans.factory.annotation.Autowired;
import org.springframework.data.redis.core.RedisTemplate;
import org.springframework.social.connect.Connection;
import org.springframework.social.connect.ConnectionData;
import org.springframework.social.connect.ConnectionFactoryLocator;
import org.springframework.social.connect.UsersConnectionRepository;
import org.springframework.stereotype.Component;
import org.springframework.web.context.request.ServletWebRequest;

import java.util.concurrent.TimeUnit;

/**
 * app的用户信息相关工具类
 *
 * @author lwj
 */
@Component
public class AppSignUpUtils implements SignUpUtils {

    @Autowired
    private RedisTemplate<Object, Object> redisTemplate;

    @Autowired
    private UsersConnectionRepository usersConnectionRepository;

    @Autowired
    private ConnectionFactoryLocator connectionFactoryLocator;


    @Override
    public void saveConnection(ServletWebRequest request, ConnectionData connectionData) {
        redisTemplate.opsForValue().set(buildKey(request), connectionData, 10, TimeUnit.MINUTES);
    }

    @Override
    public void doPostSignUp(String userId, ServletWebRequest request) {
        String key = buildKey(request);
        if (!redisTemplate.hasKey(key)) {
            throw new AppSecretException("无法找到缓存中的用户社交账号信息");
        }
        ConnectionData connectionData = (ConnectionData) redisTemplate.opsForValue().get(key);
        usersConnectionRepository.createConnectionRepository(userId).addConnection(getConnection(connectionFactoryLocator, connectionData));

        redisTemplate.delete(key);
    }

    /**
     * 获取connection
     * @param connectionFactoryLocator
     * @param connectionData
     * @return
     */
    private Connection<?> getConnection(ConnectionFactoryLocator connectionFactoryLocator, ConnectionData connectionData) {
        return connectionFactoryLocator.getConnectionFactory(connectionData.getProviderId()).createConnection(connectionData);
    }

    /**
     * 根据请求投中传递的deviceId构建redis缓存的key
     * @param request
     * @return
     */
    private String buildKey(ServletWebRequest request) {
        String deviceId = request.getHeader("deviceId");
        if (StringUtils.isBlank(deviceId)) {
            throw new AppSecretException("设备id参数不能为空");
        }
        return "moss:security:social.connect." + deviceId;
    }


}
6.7.2.2 创建SignUpUtils接口类
package com.moss.securitycore.social;

import org.springframework.social.connect.ConnectionData;
import org.springframework.web.context.request.ServletWebRequest;

/**
 * 用户信息获取和缓存接口
 * @author : lwj
 */
public interface SignUpUtils {

    /**
     * 将获取到的用户信息暂存到缓存中
     * @param request
     * @param connectionData
     */
    void saveConnection(ServletWebRequest request, ConnectionData connectionData);

    /**
     * 创建关联账号数据
     * @param userId
     * @param request
     */
    void doPostSignUp(String userId, ServletWebRequest request);
}
6.7.2.3 创建SpringSocialConfigurerPostProcessor类在app中替换之前的注册路由
package com.moss.securityapp;

import com.moss.securitycore.properties.SecurityConstants;
import com.moss.securitycore.social.MossSpringSocialConfigurer;
import org.apache.commons.lang3.StringUtils;
import org.springframework.beans.BeansException;
import org.springframework.beans.factory.config.BeanPostProcessor;
import org.springframework.stereotype.Component;

/**
 *  app模式下设置登录页面
 *
 * 任何Bean在初始化之前和初始化之后都会经过该类中下面的两个方法
 * @author lwj
 */
@Component
public class SpringSocialConfigurerPostProcessor implements BeanPostProcessor {

    @Override
    public Object postProcessBeforeInitialization(Object bean, String beanName) throws BeansException {
        return bean;
    }

    @Override
    public Object postProcessAfterInitialization(Object bean, String beanName) throws BeansException {
        if (StringUtils.equals(beanName, "mossSocialSecurityConfig")) {
            MossSpringSocialConfigurer configurer = (MossSpringSocialConfigurer) bean;
            configurer.signupUrl(SecurityConstants.DEFAULT_APP_SOCIAL_SIGNUP);
            return configurer;
        }
        return bean;
    }
}
6.7.2.4 创建AppSecurityController 类(该部分和视频中的不太一样)
package com.moss.securityapp;

import com.moss.securityapp.social.AppSignUpUtils;
import com.moss.securitycore.support.SocialUserInfo;
import org.apache.commons.lang3.builder.ReflectionToStringBuilder;
import org.apache.commons.lang3.builder.ToStringStyle;
import org.slf4j.Logger;
import org.slf4j.LoggerFactory;
import org.springframework.beans.factory.annotation.Autowired;
import org.springframework.http.HttpStatus;
import org.springframework.social.connect.Connection;
import org.springframework.social.connect.ConnectionData;
import org.springframework.social.connect.web.ProviderSignInUtils;
import org.springframework.web.bind.annotation.GetMapping;
import org.springframework.web.bind.annotation.ResponseStatus;
import org.springframework.web.bind.annotation.RestController;
import org.springframework.web.context.request.ServletWebRequest;

import javax.servlet.http.HttpServletRequest;

/**
 * @author lwj
 */
@RestController
public class AppSecurityController {

    private Logger logger = LoggerFactory.getLogger(getClass());

    @Autowired
    private ProviderSignInUtils providerSignInUtils;

    @Autowired
    private AppSignUpUtils appSignUpUtils;

    @GetMapping("/social/signUp")
    @ResponseStatus(HttpStatus.UNAUTHORIZED)
    public ConnectionData signUp(HttpServletRequest request) {
        Connection<?> connection = providerSignInUtils.getConnectionFromSession(new ServletWebRequest(request));
        // 这里还不能直接放 Connection 因为这个里面包含了很多对象
        ConnectionData connectionData = connection.createData();
        logger.info(ReflectionToStringBuilder.toString(connection, ToStringStyle.JSON_STYLE));
        appSignUpUtils.saveConnection(new ServletWebRequest(request), connectionData);
        // 注意:如果真的在客户端无session的情况下,这里是无法获取到providerSignInUtils中的用户信息的
        // 因为302重定向,是客户端重新发起请求,如果没有cookie的情况下,就不会有相同的session
        // 教程中这里应该是一个bug
        // 为了进度问题,先默认可以获取到
        // 最后要调用这一步:providerSignInUtils.doPostSignUp(userId, new ServletWebRequest(request));
        // 那么在demo注册控制器中这一步之前,就要把这里需要的信息获取到
        // 跟中该方法的源码,转换成使用redis存储
        return connectionData;
    }
}
6.7.2.5 修改UserController类
在该类中添加
@Autowired
private SignUpUtils signUpUtils;
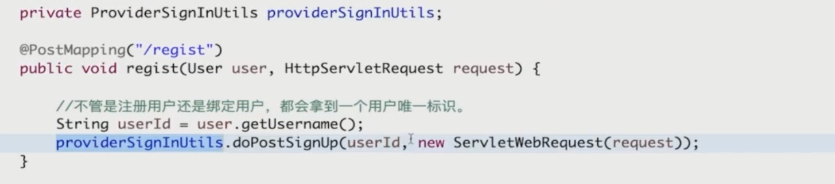
@PostMapping("/regist")
public void regist(User user, HttpServletRequest request) {
// 不管是注册用户还是绑定用户,都会拿到用户地一个唯一标识(此处用用户的名称作为唯一标识)
String userId = user.getUsername();
signUpUtils.doPostSignUp(userId, new ServletWebRequest(request));
}
由于需要兼容Browser部分所以需要添加BrowserSignUpUtils类来实例化Browser项目的时候的方法。
package com.moss.securitybrowser;

import com.moss.securitycore.social.SignUpUtils;
import org.springframework.beans.factory.annotation.Autowired;
import org.springframework.social.connect.ConnectionData;
import org.springframework.social.connect.web.ProviderSignInUtils;
import org.springframework.stereotype.Component;
import org.springframework.web.context.request.ServletWebRequest;

/**
 * 浏览器下的注册工具类
 *
 * @author : lwj
 */
@Component
public class BrowserSignUpUtils implements SignUpUtils {

    @Autowired
    private ProviderSignInUtils providerSignInUtils;

    @Override
    public void saveConnection(ServletWebRequest request, ConnectionData connectionData) {
        // 浏览器环境下不用处理
    }

    @Override
    public void doPostSignUp(String userId, ServletWebRequest request) {
        providerSignInUtils.doPostSignUp(userId, request);
    }
}
6.8 令牌配置
6.8.1、MossAuthorizationServerConfig继承AuthorizationServerConfigurerAdapter
这里如果继承了AuthorizationServerConfigurerAdapter,那么就需要我们自己配置这个authenticationManager和userDetailsService

这里需要注意的是,这个authenticationManager的自动注入,通过上述方法是无法找到的。需要使用下面的方式

    /**
     * 获取authenticationManager
     *
     * @param authenticationConfiguration
     * @throws Exception
     */
    public MarsAuthorizationServerConfig(AuthenticationConfiguration authenticationConfiguration) throws Exception {
        this.authenticationManager = authenticationConfiguration.getAuthenticationManager();
    }
6.8.2、配置client相关信息

重写这个configure方法后,我们在demo项目中的application.yml中配置的关于security的client相关配置就失效了。如下图所示

6.8.3、支持外部配置client信息
6.8.3.1、OAuth2Properties
package com.lwj.security.core.properties;

import lombok.Data;

/**
 * OAuth2配置类
 *
 * @author lwj
 */
@Data
public class OAuth2Properties {

    private OAuth2ClientProperties[] clients = {};
}
6.8.3.2、OAuth2ClientProperties
package com.lwj.security.core.properties;

import lombok.Data;

/**
 * OAuth2Client配置类
 *
 * @author lwj
 */
@Data
public class OAuth2ClientProperties {

    private String clientId;

    private String clientSecret;

    private int accessTokenValiditySeconds;

    private String[] authorizedGrantTypes = {};

    /** 信任的回调域 */
    private String[] redirectUris = {};

    private String[] scopes = {};
}
6.8.3.3、在SecurityProperties中添加Oauth2相关配置类

6.8.3.4、配置demo项目中的application.yml文件
    oauth2:
      clients:
        - clientId: myid
          clientSecret: myid
          redirectUris:
            - "http://example.com"
            - "http://ora.com"
          accessTokenValiditySeconds: 0
        - clientId: myid2
          clientSecret: myid2
          authorizedGrantTypes: ["refresh_token", "password"]
          redirectUris:
            - "http://example.com"
            - "localhost:8080"
          scopes: ["all", "read", "write"]
          accessTokenValiditySeconds: 7200
6.8.4、持久化令牌
6.8.4.1、TokenStoreConfig
package com.lwj.security.app;

import org.springframework.beans.factory.annotation.Autowired;
import org.springframework.context.annotation.Bean;
import org.springframework.data.redis.connection.RedisConnectionFactory;
import org.springframework.security.oauth2.provider.token.TokenStore;
import org.springframework.security.oauth2.provider.token.store.redis.RedisTokenStore;

/**
 * token存储配置类
 *
 * @author lwj
 */
public class TokenStoreConfig {

    @Autowired
    private RedisConnectionFactory redisConnectionFactory;

    @Bean
    public TokenStore redisTokenStore() {
        return new RedisTokenStore(redisConnectionFactory);
    }

}
6.8.4.2、MarsAuthorizationServerConfig配置类中添加配置
