一。PXC简介
Percona XtraDB Cluster简称PXC。是一套开源mysql高可用解决方案(XtraDb是mysql被oracle收购之前 开源一个分支 其他分支还有mariadb),Percona Xtradb Cluster的实现是在原mysql代码上通过Galera包将不同的mysql实例(新名称 Percona Server)连接起来,实现了multi-master(多个主都可以同时写入)的集群架构。pxc包含 Percona XtraBackup 组件用于提供Percone Server所有版本 在线备份解决方案
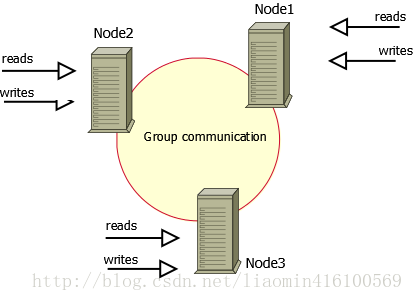
一个集群包含多个节点 每个节点互相同步包含相同的数据集 ,至少应该包含3个节点 每个节点都可以拥有读写的能力
Percona XtraDB Cluster特点
(1)同步复制,事务在所有集群节点要么同时提交,要么不提交。
(2)多主复制,可以在任意一个节点写入。
(3)从服务器上的并行应用事件,真正的“并行复制”。
(4)自动配置节点。
(5)数据一致性,没有不同步的从服务器。
Percona XtraDB Cluster与MySQL Replication区别在于:
分布式系统的CAP理论:
C—一致性,所有节点的数据一致;
A—可用性,一个或多个节点失效,不影响服务请求;
P—分区容忍性,节点间的连接失效,仍然可以处理请求;
任何一个分布式系统,需要满足这三个中的两个。
MySQLReplication: 可用性和分区容忍性;
Percona XtraDBCluster: 一致性和可用性。
因此MySQL Replication并不保证数据的一致性,而Percona XtraDB Cluster提供数据一致性。
官方文档参考 (https://www.percona.com/doc/percona-xtradb-cluster/LATEST/index.html)
二。PXC安装
1》安装
安装参考(https://www.percona.com/doc/percona-xtradb-cluster/LATEST/overview.html)
模拟环境(centos7)
| ode | 主机名 | IP地址 |
|---|---|---|
| Node 1 | node1 | 192.168.58.147 |
| Node 2 | node2 | 192.168.58.149 |
| Node 3 | node3 | 192.168.58.150 |
配置yum的peronna仓库(https://www.percona.com/doc/percona-repo-config/yum-repo.html)
yum install http://www.percona.com/downloads/percona-release/redhat/0.1-4/percona-release-0.1-4.noarch.rpm关闭selinux
setenforce 0
或者修改 /etc/selinux/config 永久关闭SELINUX=disabled
安装
yum install Percona-XtraDB-Cluster-57 -y重置xtradb默认密码 root默认密码是个临时密码 需要在启动后 读取/var/log/mysqld.log获取 得到后修改即可
启动xtradb
service mysql start查看临时密码
 grep 'temporary password' /var/log/mysqld.log
[root@node1 log]#  grep 'temporary password' /var/log/mysqld.log
2018-02-05T08:34:23.628185Z 1 [Note] A temporary password is generated for root@localhost: O9Y-Ji8#>)u_
如果之前安装过mysql 卸载过 就会发现没有查看到 后来用root作为密码登录测试能成功 默认临时密码就是root
这样是安装失败的
登录测试
mysql -uroot -p
输入密码O9Y-Ji8#>)u_ 登录后修改密码
set password=password('root')
如果不小心删了日志或者查找不到临时密码 可以修改/etc/my.cnf最上面加入
[mysqld]
skip-grant-tables
重启mysql服务 直接使用 mysql -uroot -p 不输入密码直接回车进入 修改密码
update user set authentication_string=password('root'); 重启 即可
得到控制台结果(日志中打印了 5.7.20 PXC)
碰到错误
错误1:WSREP: wsrep_load(): dlopen(): /usr/lib64/galera3/libgalera_smm.so: symbol SSL_COMP_free_compression_methods, version libssl.so.10 not defined in file libssl.so.10 with link time reference
解决方案: 升级openssl (yum update openssl)
成功效果 :
[root@node2 ~]#
[root@node2 ~]# mysql -uroot -proot
mysql: [Warning] Using a password on the command line interface can be insecure.
Welcome to the MySQL monitor.  Commands end with ; or \g.
Your MySQL connection id is 8
Server version: 5.7.20-18-57 Percona XtraDB Cluster (GPL), Release rel18, Revision 4a4da7e, WSREP version 29.24, wsrep_29.24
2》配置pxc(参考https://www.percona.com/doc/percona-xtradb-cluster/LATEST/configure.html)
关闭三台mysql
service stop mysql
默认配置文件位于 /etc/my.cnf
[root@node2 ~]# more /etc/my.cnf
#
# The Percona XtraDB Cluster 5.7 configuration file.
#
#
# * IMPORTANT: Additional settings that can override those from this file!
#   The files must end with '.cnf', otherwise they'll be ignored.
#   Please make any edits and changes to the appropriate sectional files
#   included below.
#
!includedir /etc/my.cnf.d/
!includedir /etc/percona-xtradb-cluster.conf.d/
147配置如下(注意 要加[mysqld啊])
[mysqld]
wsrep_provider=/usr/lib64/galera3/libgalera_smm.so

wsrep_cluster_name=pxc-cluster
wsrep_cluster_address=gcomm://192.168.58.147,192.168.58.149,192.168.58.150

wsrep_node_name=node1
wsrep_node_address=192.168.58.147

wsrep_sst_method=xtrabackup-v2
wsrep_sst_auth=sstuser:passw0rd

pxc_strict_mode=ENFORCING

binlog_format=ROW
default_storage_engine=InnoDB
innodb_autoinc_lock_mode=2
149所有配置和147相同 除了
wsrep_node_name=node2
wsrep_node_address=192.168.58.149
150所有配置和147相同 除了
wsrep_node_name=node3
wsrep_node_address=192.168.58.150
3》启动第一个节点pxc
》》启动第一个节点147 (确保该节点上拥有所有的数据 数据会被同步到其他节点)参考https://www.percona.com/doc/percona-xtradb-cluster/LATEST/bootstrap.html#bootstrap
执行启动单台节点初始化
systemctl start [email protected]登录确实是否成功
mysql> show status like 'wsrep%';
+----------------------------------+----------------------------------------------+
| Variable_name                    | Value                                        |
+----------------------------------+----------------------------------------------+
| wsrep_local_state_uuid           | 640a6119-0a4f-11e8-a74b-bbd28c7ed16f         |
| wsrep_protocol_version           | 7                                            |
| wsrep_last_applied               | 1                                            |
| wsrep_last_committed             | 1                                            |
| wsrep_replicated                 | 0                                            |
| wsrep_replicated_bytes           | 0                                            |
| wsrep_repl_keys                  | 0
| wsrep_cluster_conf_id            | 1                                            |
| wsrep_cluster_size               | 1                                            |
| wsrep_cluster_state_uuid         | 640a6119-0a4f-11e8-a74b-bbd28c7ed16f         |
| wsrep_cluster_status             | Primary                                      |
| wsrep_connected                  | ON
wsrep_cluster_size=1表示集群中只有一个节点 已经连接 并且状态时 primary 随时写入数据到集群 再加入其他两个节点
之前 需要创建一个SST( State Snapshot Transfer)账号 用于集群间通信 必须和主机my.cnf配置的参数一致
wsrep_sst_auth=sstuser:passw0rd添加用户并赋予权限
mysql>  CREATE USER 'sstuser'@'localhost' IDENTIFIED BY 'passw0rd';
Query OK, 0 rows affected (0.01 sec)

mysql> GRANT RELOAD, LOCK TABLES, PROCESS, REPLICATION CLIENT ON *.* TO
    ->   'sstuser'@'localhost';
Query OK, 0 rows affected (0.01 sec)

mysql>  FLUSH PRIVILEGES;
Query OK, 0 rows affected (0.00 sec)
4》添加其他节点到集群
其他机器 启动即可
service mysql start再次到147登录显示状态(表示集群中有三个元素了)
wsrep_cluster_size | 3
5》测试
149创建数据库tt和表aa
mysql> create database tt;
Query OK, 1 row affected (0.01 sec)
mysql> use tt;
Database changed
mysql> create table aa(id int auto_increment primary key,uname varchar(20));
Query OK, 0 rows affected (0.16 sec)
150 查看是会否自动同步表 并插入数据
mysql> use tt
Reading table information for completion of table and column names
You can turn off this feature to get a quicker startup with -A

Database changed
mysql> desc aa;
+-------+-------------+------+-----+---------+----------------+
| Field | Type        | Null | Key | Default | Extra          |
+-------+-------------+------+-----+---------+----------------+
| id    | int(11)     | NO   | PRI | NULL    | auto_increment |
| uname | varchar(20) | YES  |     | NULL    |                |
+-------+-------------+------+-----+---------+----------------+
2 rows in set (0.00 sec)

mysql> insert into aa(uname) values('hello');
Query OK, 1 row affected (0.06 sec)
147上查看是否存在数据并删除数据
mysql> select * from tt.aa;
+----+-------+
| id | uname |
+----+-------+
|  3 | hello |
+----+-------+
1 row in set (0.00 sec)

mysql> delete from tt.aa;
Query OK, 1 row affected (0.15 sec)
PXC的缺点非常明显是 操作表数据库会锁定整个集群的所有数据库 等待写入 资源竞争压力大
三。使用ProxySql负载均衡
ProxySql是一款高性能 Sql代理 ProxySql作为后台服务运行,会被后台进程监控 后台进程在Proxy当掉后 短时间内快速重启,
接受来自mysql客户端的请求 将请求转发后实际的后台mysql服务器
ProxySql同时支持PXC的状态检查
1》安装ProxySql(https://www.percona.com/doc/percona-xtradb-cluster/LATEST/howtos/proxysql.html#load-balancing-with-proxysql)
centos使用yum安装(先安装之前的pxc的yum源) 机器ip 192.168.58.151
yum -y install proxysqlproxysql提供了proxysql-admin 工具配置 pxc 查看该工具命令选项
[root@node4 ~]# proxysql-admin
Usage: [ options ]
Options:
  --config-file                      Read login credentials from a configuration file (overrides any login credentials specified on the command line)
  --quick-demo                       Setup a quick demo with no authentication
  --proxysql-username=user_name      Username for connecting to the ProxySQL service
  --proxysql-password[=password]     Password for connecting to the ProxySQL service
  --proxysql-port=port_num           Port Nr. for connecting to the ProxySQL service
  --proxysql-hostname=host_name      Hostname for connecting to the ProxySQL service
  --cluster-username=user_name       Username for connecting to the Percona XtraDB Cluster node
  --cluster-password[=password]      Password for connecting to the Percona XtraDB Cluster node
  --cluster-port=port_num            Port Nr. for connecting to the Percona XtraDB Cluster node
  --cluster-hostname=host_name       Hostname for connecting to the Percona XtraDB Cluster node
  --cluster-app-username=user_name   Application username for connecting to the Percona XtraDB Cluster node
  --cluster-app-password[=password]  Application password for connecting to the Percona XtraDB Cluster node
  --without-cluster-app-user         Configure Percona XtraDB Cluster without application user
  --monitor-username=user_name       Username for monitoring Percona XtraDB Cluster nodes through ProxySQL
  --monitor-password[=password]      Password for monitoring Percona XtraDB Cluster nodes through ProxySQL
  --enable, -e                       Auto-configure Percona XtraDB Cluster nodes into ProxySQL
  --disable, -d                      Remove any Percona XtraDB Cluster configurations from ProxySQL
  --node-check-interval=3000         Interval for monitoring node checker script (in milliseconds)
  --mode=[loadbal|singlewrite]       ProxySQL read/write configuration mode, currently supporting: 'loadbal' and 'singlewrite' (the default) modes
  --write-node=host_name:port        Writer node to accept write statments. This option is supported only when using --mode=singlewrite
                                     Can accept comma delimited list with the first listed being the highest priority.
  --include-slaves=host_name:port    Add specified slave node(s) to ProxySQL, these nodes will go into the reader hostgroup and will only be put into
                                     the writer hostgroup if all cluster nodes are down.  Slaves must be read only.  Can accept comma delimited list.
                                     If this is used make sure 'read_only=1' is in the slave's my.cnf
  --adduser                          Adds the Percona XtraDB Cluster application user to the ProxySQL database
  --syncusers                        Sync user accounts currently configured in MySQL to ProxySQL (deletes ProxySQL users not in MySQL)
  --version, -v                      Print version info
我这里使用手动的方式配置 当前命令行的方式更好 无需重启
启动proxysql
service proxysql start必须在151主机上 安装pxc客户端 其他机器有客户端的是无法连接的
yum install Percona-XtraDB-Cluster-client-57登录管理接口
[root@node4 ~]# mysql -u admin -padmin -h 127.0.0.1 -P 6032查看所有数据库、
mysql> show databases;
+-----+---------------+-------------------------------------+
| seq | name          | file                                |
+-----+---------------+-------------------------------------+
| 0   | main          |                                     |
| 2   | disk          | /var/lib/proxysql/proxysql.db       |
| 3   | stats         |                                     |
| 4   | monitor       |                                     |
| 5   | stats_history | /var/lib/proxysql/proxysql_stats.db |
+-----+---------------+-------------------------------------+
5 rows in set (0.00 sec)
2》添加集群到ProxySql
只需要插入对应的pxc后端数据库服务器的信息到main数据库下的mysql_servers表即可
INSERT INTO mysql_servers(hostgroup_id, hostname, port) VALUES (0,'192.168.58.147',3306);
INSERT INTO mysql_servers(hostgroup_id, hostname, port) VALUES (0,'192.168.58.149',3306);
INSERT INTO mysql_servers(hostgroup_id, hostname, port) VALUES (0,'192.168.58.150',3306);
加载服务器到实时内存中
LOAD MYSQL SERVERS TO RUNTIME;
SAVE MYSQL SERVERS TO DISK;
配置访问后端数据库服务器的用户名和密码
INSERT INTO mysql_users (username,password) VALUES ('root','root');加载用户名和密码到实时内存 并写入磁盘
LOAD MYSQL USERS TO RUNTIME;
SAVE MYSQL USERS TO DISK;
确保 proxysql安装机器(151)有访问集群的root用户权限 登录147插入root账号
CREATE USER root@'%' IDENTIFIED BY 'root';
grant all on *.* to root@'%';
注意管理接口是6032 代理后端mysql是 6033 测试登录
[root@node4 ~]#  mysql -u root -proot -h 127.0.0.1 -P 6033
mysql: [Warning] Using a password on the command line interface can be insecure.
Welcome to the MySQL monitor.  Commands end with ; or \g.
Your MySQL connection id is 7
Server version: 5.5.30 (ProxySQL)

Copyright (c) 2009-2017 Percona LLC and/or its affiliates
Copyright (c) 2000, 2017, Oracle and/or its affiliates. All rights reserved.

Oracle is a registered trademark of Oracle Corporation and/or its
affiliates. Other names may be trademarks of their respective
owners.

Type 'help;' or '\h' for help. Type '\c' to clear the current input statement.
测试之前集群中创建的表是否创建 其他关于监控相关的 参考(https://www.percona.com/doc/percona-xtradb-cluster/LATEST/howtos/proxysql.html#load-balancing-with-proxysql)