-
-
-
- 因为axios中只能使用get和post方法来进行请求数据没有提供jsonp等方法进行跨域访问数据
- 如果要使用axios直接进行跨域访问是不可以的这是就需要配置代理了为什么要配置代理呢
- 原因就是因为客户端请求服务端的数据是存在跨域问题的而服务器和服务器之间可以相互请求数据是没有跨域的概念如果服务器没有设置禁止跨域的权限问题也就是说我们可以配置一个代理的服务器可以请求另一个服务器中的数据然后把请求出来的数据返回到我们的代理服务器中代理服务器再返回数据给我们的客户端这样我们就可以实现跨域访问数据啦
- 如果不理解可以看依据看下图
- 理解了这个原理之后我们就可以按照这个逻辑去配置了
- 1首先在本地全局安装 vue-cli
- 2初始化项目axios-cross 项目名称
- 3在axios-cross 项目中安装依赖文件
- 4在axios-cross 项目中安装axios
- 5在axios-cross 项目中安装http-proxy-middleware中间件作为代理
- 6在axios-cross 项目的找到srcmainjs中引入axios
- 7为http-proxy-middleware这个中间件进行本地代理配置在axios-cross 项目中找到configindexjs
- 8在axios-cross 项目的找到srccomponentsHelloWorldvue代码修改如下
- 9因为在新版的vue-cli的packagejson中webpack-dev-server没有设置--open所以打开packagejson文件在scripts属性中的dev属性中手动添加--open如下代码所示
- 10在cmd控制台中输入npm run dev 启动服务效果图如下
-
-
因为axios中只能使用get和post方法来进行请求数据,没有提供jsonp等方法进行跨域访问数据
axios中文网址:https://www.kancloud.cn/yunye/axios/234845
// axios 中的GET请求
axios.get('/user', {
    params: {
      ID: 12345
    }
  })
  .then(function (response) {
    console.log(response);
  })
  .catch(function (error) {
    console.log(error);
  });

// axios 中的POST请求
axios.post('/user', {
    firstName: 'Fred',
    lastName: 'Flintstone'
  })
  .then(function (response) {
    console.log(response);
  })
  .catch(function (error) {
    console.log(error);
  });
如果要使用axios直接进行跨域访问是不可以的,这是就需要配置代理了,为什么要配置代理呢?
原因就是因为客户端请求服务端的数据是存在跨域问题的,而服务器和服务器之间可以相互请求数据,是没有跨域的概念(如果服务器没有设置禁止跨域的权限问题),也就是说,我们可以配置一个代理的服务器可以请求另一个服务器中的数据,然后把请求出来的数据返回到我们的代理服务器中,代理服务器再返回数据给我们的客户端,这样我们就可以实现跨域访问数据啦。
如果不理解可以看依据看下图
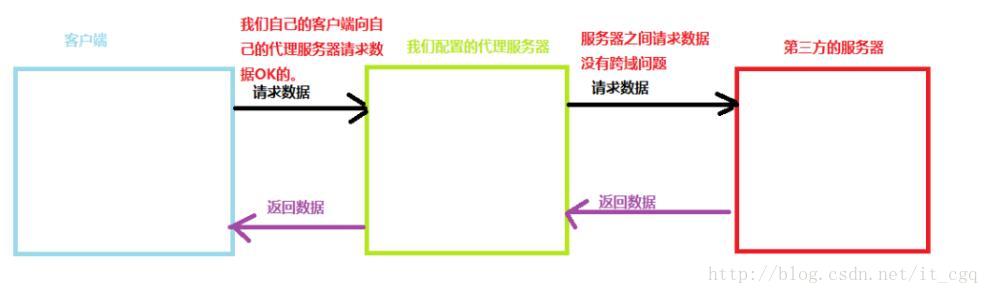
理解了这个原理之后,我们就可以按照这个逻辑去配置了。
步骤:
1、首先在本地全局安装 vue-cli
vue-cli网址:https://github.com/vuejs/vue-cli
npm install -g vue-cli
2、初始化项目(axios-cross 项目名称)
vue init webpack axios-cross
3、在axios-cross 项目中安装依赖文件
npm install
4、在axios-cross 项目中安装axios
npm install axios -D
-D等价于--save-dev
-S等价于--save
5、在axios-cross 项目中安装http-proxy-middleware中间件作为代理
npm install -S http-proxy-middleware
6、在axios-cross 项目的找到src/main.js中引入axios
// The Vue build version to load with the `import` command
// (runtime-only or standalone) has been set in webpack.base.conf with an alias.
import Vue from 'vue'
import App from './App'
import router from './router'
import axios from 'axios' // 1、在这里引入axios

Vue.prototype.$axios = axios;   // 2、在vue中使用axios

Vue.config.productionTip = false

/* eslint-disable no-new */
new Vue({
  el: '#app',
  router,
  template: '<App/>',
  components: { App }
})
7、为http-proxy-middleware这个中间件进行本地代理配置,在axios-cross 项目中找到config/index.js
'use strict'
// Template version: 1.2.6
// see http://vuejs-templates.github.io/webpack for documentation.

const path = require('path')

module.exports = {
  dev: {

    // Paths
    assetsSubDirectory: 'static',
    assetsPublicPath: '/',
    proxyTable: { // 在这里配置如下代码
        '/api': {
            target:'http://api.jisuapi.com/XXXXX', // 你请求的第三方接口
            changeOrigin:true, // 在本地会创建一个虚拟服务端,然后发送请求的数据,并同时接收请求的数据,这样服务端和服务端进行数据的交互就不会有跨域问题
            pathRewrite:{  // 路径重写,
                '^/api': '/api'  // 替换target中的请求地址,也就是说以后你在请求http://api.jisuapi.com/XXXXX这个地址的时候直接写成/api即可。
            }
        }
    },

  // 以下代码省略……
8、在axios-cross 项目的找到src/components/HelloWorld.vue,代码修改如下
<template>
  <div class="hello">
    <h1>{{ msg }}</h1>
    // 在这里把其他代码删除,添加button按钮注册一个点击事件
    <button @click="jsonpData">axios跨域获取数据</button>
  </div>
</template>

<script>
export default {
  name: 'HelloWorld',
  data () {
    return {
      msg: 'Welcome to Your Vue.js App'
    }
  },
  methods:{
    jsonpData: function() {
                    var url = '/api'; // 这里就是刚才的config/index.js中的/api
                    this.$axios.get(url)
                        .then(function(response) {
                            console.log(response);
                        })
                        .catch(function(error) {
                            console.log(error);
                        });
                        // 或者使用以下代码也可
                        /*this.$axios({
                            method: "get",
                            url: url,
                            data: {
                                name: "axios",
                                id: "1"
                            }
                        })
                        .then(function(res) {
                           console.log(res);
                       })
                        .catch(function(err) {
                           console.log(err);
                       });*/

    }
  }
}
</script>
9、因为在新版的vue-cli的package.json中webpack-dev-server没有设置--open,所以打开package.json文件在”scripts”属性中的”dev”属性中手动添加--open,如下代码所示
"scripts": {
    "dev": "webpack-dev-server --open --inline --progress --config build/webpack.dev.conf.js",
    "start": "npm run dev",
    "unit": "jest --config test/unit/jest.conf.js --coverage",
    "e2e": "node test/e2e/runner.js",
    "test": "npm run unit && npm run e2e",
    "lint": "eslint --ext .js,.vue src test/unit/specs test/e2e/specs",
    "build": "node build/build.js"
},10、在cmd控制台中输入npm run dev 启动服务。效果图如下:
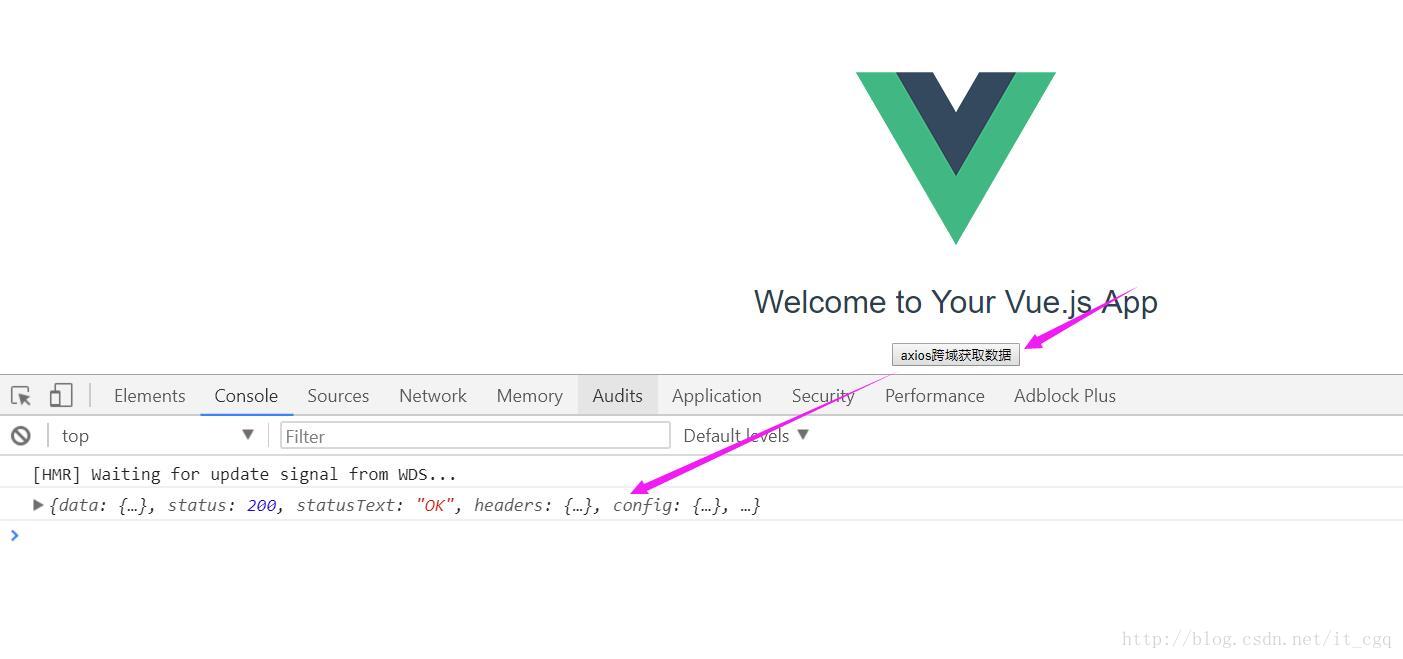
这样我们就可以通过配置好的代理,使用axios跨域请求数据啦!