文章目录
简介
- Thymeleaf是适用于Web和独立环境的现代服务器端Java模板引擎。
- Thymeleaf的主要目标是为您的开发工作流程带来优雅的自然模板 -HTML可以在浏览器中正确显示,也- 可以作为静态原型工作,从而可以在开发团队中加强协作。
- Thymeleaf拥有适用于Spring Framework的模块,与您喜欢的工具的大量集成以及插入您自己的功能的能力,对于现代HTML5 JVM Web开发而言,Thymeleaf是理想的选择-尽管它还有很多工作要做。
- Thymeleaf和JSP有点类似,所以这个上手难度很低
环境准备
引入thymeleaf相关依赖
在pom.xml文件中引入以下依赖
      <!--web相关依赖-->
       <dependency>
            <groupId>org.springframework.boot</groupId>
            <artifactId>spring-boot-starter-web</artifactId>
        </dependency>
		 <!--thymeleaf模板依赖-->
        <dependency>
            <groupId>org.springframework.boot</groupId>
            <artifactId>spring-boot-starter-thymeleaf</artifactId>
        </dependency>
        <!--热部署-->
        <dependency>
            <groupId>org.springframework.boot</groupId>
            <artifactId>spring-boot-devtools</artifactId>
            <optional>true</optional>
        </dependency>
配置应用热部署
配置应用热部署的好处是你改了页面模板的内容,不需要重启应用,上面已经引入了热部署需要的依赖,
现在只需要把模板缓存关闭就行
spring:
  thymeleaf:
    #关闭模板缓存
    cache: false
server:
  servlet:
    #配置应用的根路径
    context-path: /thymeleaf
  #应用的访问路径
  port: 8002
后台数据准备
接口访问层
@Controller
public class UserController {


    @Autowired
    UserRepository userRepository;

    @GetMapping(value = {

    "/","/index"})
    public ModelAndView index(HttpSession session){


        User user=new User(0,"admin",0);
        //往session中把当前用户信息放进去
        session.setAttribute("user",user);
        ModelAndView modelAndView=new ModelAndView("index");
        List<User> userList=userRepository.findAll();
        modelAndView.addObject(userList);
        modelAndView.addObject("id",0);
        HashMap map=new HashMap();
        map.put("totalPage",5);
        map.put("totalRecord",50);
        modelAndView.addObject("page",map);
        return modelAndView;
    }
}
数据存储层
@Component
public class UserRepository {


    //模拟数据库存储
    private List<User> userList = new ArrayList<>();

    //初始化仓储数据,实际应该重数据库中获取
    {


        User user;
        for (int i = 1; i <= 20; i++) {


            user = new User(i, RandomName.randomName(true, 3), i % 2);
            userList.add(user);
        }
    }

    public Optional<User> findById(Integer id) {


        return Optional.ofNullable(userList.get(id));
    }
    public List<User> findAll() {


        return userList;
    }

}
数据模型层
public class User {


    public User(){

    }

    public User(Integer userId,String name,Integer gender){


        this.userId=userId;
        this.name=name;
        this.gender=gender;
        this.createTime=new Date();
    }

    //用户ID
    private Integer userId;
    //用户姓名
    private String name;
    //性别
    private Integer gender;
    //创建时间
    private Date createTime;
    //省略get set方法 。。。。
   }
模板标签应用
常用的表达式
变量表达式
${}
可以获取各种作用域的变量属性
<input type="text" th:value="${id}">
还可以在里面做一些简单的逻辑运算,下面做了一个三目运算,如果id小于0则显示id小于0
<input type="text" th:value="${id>=0?id:'id小于0'}">
链接表达式
@{}
链接表达式@{}直接拿到应用路径,然后拼接静态资源路径
<script th:src="@{/js/test.js}"></script>
<!--类似于jsp中的下面一行代码-->
<script src="<%=request.getContextPath()%>/js/test.js"></script>
片段表达式
定制片段
th:fragment
通过th:fragment可以定制片段
下面是定制一个公共的资源加载工具
<!DOCTYPE html>
<html lang="en" xmlns:th="http://www.thymeleaf.org">
<head  th:fragment="static">
    <!--放入页码需要引用的全局css文件和js文件 -->
    <link th:href="@{/css/global.css}" rel="stylesheet" type="text/css"/>
    <script th:src="@{/js/jquery-1.12.4.min.js}"></script>
</head>
</html>
引入片段
th:replace
通关th:replace标签添加片段路径,片段名称引入
<!DOCTYPE html>
<html lang="en" xmlns:th="http://www.thymeleaf.org">
<head>
    <meta charset="UTF-8">
    <title>Title</title>
    <!--加载通用模板 (默认拼接前缀路径,开头请勿再添加斜杠,防止部署运行报错)-->
    <script th:replace="common/resources::static"></script>
</head>
<body>
网站的头尾标签片段的应用
头部片段
common/header.html
<!DOCTYPE html>
<html lang="en"  xmlns:th="http://www.thymeleaf.org">
<body>
<header  th:fragment="header">
    <div>
        <h2 >SpringBoot Thymeleaf使用教程</h2>
    </div>
    <div>
        <div>
            欢迎访问我的博客:<a href="https://blog.csdn.net/ming19951224">https://blog.csdn.net/ming19951224</a>
        </div>
        <div >
            欢迎访问我的github地址:<a href="https://github.com/Dominick-Li">https://github.com/Dominick-Li</a>
        </div>
    </div>
</header>
</body>
</html>
尾部片段
common/footer.html
<!DOCTYPE html>
<html lang="en"  xmlns:th="http://www.thymeleaf.org">
<body>
<footer id="footer" th:fragment="footer">
    <div>
        <h2 style="text-align: center">网站的通用底部模板</h2>
    </div>
    <div>
    <a href="https://www.thymeleaf.org/doc/tutorials/3.0/usingthymeleaf.html">Thymeleaf官方文档</a>
    </div>
</footer>
</body>
</html>
主页面
在index.html引入头尾片段
<!DOCTYPE html>
<html lang="en" xmlns:th="http://www.thymeleaf.org">
<head>
    <meta charset="UTF-8">
    <title>引入网站的头尾片段</title>
</head>
<body>
<!--导入网站通用的头部标签模板-->
<header th:include="common/header :: header"></header>
<div id="body">
   网站的主体内容
</div>
<!--导入网站通用的尾部模板-->
<footer th:include="common/footer :: footer" ></footer>
</body>
</html>
效果图如下

渲染内容标签
文本渲染标签
th:text
类似于jqeury里的text()方法,只能渲染文本
<p th:text='${session.user.name}'></p>
dom元素渲染标签
th:utext
类似于jqeury里的html()方法,能渲染文本和dom元素
<p th:utext="'<button>我是按钮</button>当前登录的用户:'+${session.user.name}"></p>
内置对象标签
和jsp内置对象类似。。
| 标签 | 描述 |
|---|---|
| ${#ctx} | 上下文对象,可用于获取其它内置对象。 |
| ${#vars} | 上下文变量。 |
| ${#locale} | 上下文区域设置。 |
| ${#request} | HttpServletRequest对象。 |
| ${#response} | HttpServletResponse对象。 |
| ${#session} | HttpSession对象。 |
| ${#servletContext} | ServletContext对象。 |
使用${#session} 显示登录的用户信息
<div th:if="${session.user}" th:text="'当前登录的用户:'+${session.user.name}"></div>
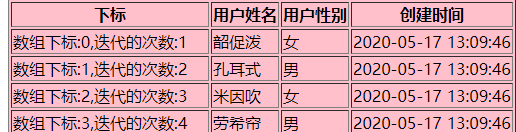
迭代list,map
迭代list
<tr th:each="user,iterObj : ${userList}">
    <td th:text="${

     '数组下标:'+iterObj.index+',迭代的次数:'+iterObj.count}"></td>
    <td th:text="${user.name}"></td>
    <td th:text="${user.getGendenName()}"></td>
    <td th:text="${#dates.format(user.createTime,'yyyy-MM-dd HH:mm:ss')}"></td>
</tr>
效果如下
| 属性 | 描述 |
|---|---|
| user | 当前迭代的对象 |
| iterObj | 迭代的详细信息对象 |
| iterObj.index | 数组下标,重0开始 |
| iterObj.count | 迭代的次数,重1开始 |
迭代map
类似于java中迭代map
<li th:each="entry : ${page}" th:text="${entry.key+':'+entry.value}" ></li>
效果如下

条件判断
条件判断一般用于是否要渲染该片段
th:if
条件为true时候则渲染元素
 <div th:if="${userList}">
        变量存在,则渲染
</div>
th:unless
条件为false时候则渲染元素
<div th:unless="false">
      条件等于false,则渲染
</div>
在script脚本中获取后台变量的值
th:inline内联标签
#script设置th:inline="javascript",然后在script脚本中通关[[${xx}]] 获取变量值
<script th:inline="javascript">
    //获取session中的user
    var user = [[${session.user}]];
    console.log(user.name)
</script>

日期格式化
#dates.format函数
格式#dates.format(变量值,‘格式’)
<td th:text="${#dates.format(user.createTime,'yyyy-MM-dd HH:mm:ss')}"></td>
项目配套代码
github地址
要是觉得我写的对你有点帮助的话,麻烦在github上帮我点 Star
【SpringBoot框架篇】其它文章如下,后续会继续更新。
- 1.搭建第一个springboot项目
- 2.Thymeleaf模板引擎实战
- 3.优化代码,让代码更简洁高效
- 4.集成jta-atomikos实现分布式事务
- 5.分布式锁的实现方式
- 6.docker部署,并挂载配置文件到宿主机上面
- 7.项目发布到生产环境
- 8.搭建自己的spring-boot-starter
- 9.dobbo入门实战
- 10.API接口限流实战
- 11.Spring Data Jpa实战
- 12.使用druid的monitor工具查看sql执行性能
- 13.使用springboot admin对springboot应用进行监控
- 14.mybatis-plus实战
- 15.使用shiro对web应用进行权限认证
- 16.security整合jwt实现对前后端分离的项目进行权限认证
- 17.使用swagger2生成RESTful风格的接口文档