Reactor 模型
Reactor 单线程模型
Reactor 单线程模型指的是所有的 I/O 操作都在同一个 NIO 线程上完成的。NIO 线程主要有四个作用:
- 作为 NIO 服务端,接收客户端 TCP 连接请求;
- 作为 NIO 客户端,向服务端发起 TCP 连接;
- 读取通信对等端的请求或者应答信息;
- 向通信对等端发送消息请求或者应答消息;
Reactor 单线程模型的整体框架如下:
single thread reactor.jpg
对于编码来说,Reactor 单线程模型的框架如下:
// 服务器端
public class SingleThreadServerReactorModel {

    public static void main(String[] args) {
        SingleThreadServerReactorModel singleThreadServerReactorModel = new SingleThreadServerReactorModel();
        new Thread(singleThreadServerReactorModel.nioThread).start();
    }

    public Runnable nioThread = new Runnable() {
        @Override
        public void run() {
            try {
                Selector selector = Selector.open();
                ServerSocketChannel socketChannel = ServerSocketChannel.open();
                socketChannel.bind(new InetSocketAddress(PORT));
                socketChannel.configureBlocking(false);
                socketChannel.register(selector, SelectionKey.OP_ACCEPT);
                // dispatcher
                while (true) {
                    selector.select();
                    Iterator<SelectionKey> iterator = selector.selectedKeys().iterator();
                    while (iterator.hasNext()) {
                        SelectionKey key = iterator.next();
                        iterator.remove();
                        if (key.isAcceptable()) {
                            SocketChannel channel = ((ServerSocketChannel)key.channel()).accept();
                            channel.configureBlocking(false);
                            channel.register(selector, SelectionKey.OP_READ & SelectionKey.OP_WRITE);
                        }
                        if (key.isReadable()) {
                            ByteBuffer buffer = ByteBuffer.allocate(1024);
                            SocketChannel channel = ((SocketChannel)key.channel());
                            channel.read(buffer);
                            handler1(buffer);
                            handler2(buffer);
                        }
                        if (key.isWritable()) {
                            SocketChannel channel = ((SocketChannel)key.channel());
                            channel.write(handler4(handler3(writeBuffer)));
                        }
                    }
                }
            } catch (IOException e) {
                e.printStackTrace();
            }

        }
    };

    public ByteBuffer handler1(ByteBuffer byteBuffer) {
        // 处理器 1,可能是去掉一些不需要的字节
        return byteBuffer;
    }
    public ByteBuffer handler2(ByteBuffer byteBuffer) {
        // 处理器 2,向发送缓存写入一些数据
        writeBuffer.put(byteBuffer);
        writeBuffer.flip();
        return byteBuffer;
    }
    public ByteBuffer handler3(ByteBuffer byteBuffer) {
        return byteBuffer;
    }
    public ByteBuffer handler4(ByteBuffer byteBuffer) {
        return byteBuffer;
    }

    ByteBuffer writeBuffer = ByteBuffer.allocate(1024);

    public static int PORT = 8080;

}
note
- 该模型适合于一些小容量应用的场景
- 对于高负载、大并发的应用,一个 NIO 线程同时处理成败上千的链路,会负载过重
- 一旦 NIO 线程挂掉,整个服务器都会崩溃
Reactor 多线程模型
Reactor 多线程模型有一组 NIO 线程来处理 I/O 操作,有如下特点:
- 有一个专门的 NIO 线程 - Accepter 线程用于监听服务端,接受客户端的 TCP 连接
- 网络 I/O 操作由一个 NIO 线程池负责,线程池可以采用标准的 JDK 线程池实现,用于消息的读取、解码、编码和发送等
- 一个 NIO 线程可以同时处理 N 条链路,但是一个链路只能由一个对应的 NIO 线程处理,防止并发操作问题
模型如下,如下:
mutiple thread reactor.jpg
对于编码来说,Reactor 多线程模型的框架如下:
public class MultiplyThreadServerReactorModel {

    private Executor nioPool = Executors.newFixedThreadPool(10);
    private static final int PORT = 8080;

    public static void main(String[] args) {
        MultiplyThreadServerReactorModel reactorModel = new MultiplyThreadServerReactorModel();
        new Thread(reactorModel.accepter).start();
    }

    public Runnable accepter = () -> {

        try {
            Selector selector = Selector.open();
            ServerSocketChannel serverSocketChannel = ServerSocketChannel.open();
            serverSocketChannel.configureBlocking(false);
            serverSocketChannel.bind(new InetSocketAddress(PORT));
            serverSocketChannel.register(selector, SelectionKey.OP_ACCEPT);
            while (true) {
                selector.select();
                Iterator<SelectionKey> iterator = selector.selectedKeys().iterator();
                while (iterator.hasNext()) {
                    SelectionKey key = iterator.next();
                    iterator.remove();
                    ServerSocketChannel channel = (ServerSocketChannel) key.channel();
                    SocketChannel nioChannel = channel.accept();
                    NioThread nioThread = new NioThread(nioChannel);
                    nioPool.execute(nioThread);
                }
            }
        } catch (IOException e) {
            e.printStackTrace();
        }

    };

    public class NioThread implements Runnable {

        public NioThread(SocketChannel socketChannel) {
            try {
                selector = Selector.open();
                socketChannel.configureBlocking(false);
                socketChannel.register(selector, SelectionKey.OP_WRITE & SelectionKey.OP_READ);
                while (socketChannel.isConnected()) {
                    selector.select();
                    Iterator<SelectionKey> iterator = selector.selectedKeys().iterator();
                    while (iterator.hasNext()) {
                        SelectionKey key = iterator.next();
                        iterator.remove();
                        if (key.isAcceptable()) {
                            SocketChannel channel = ((ServerSocketChannel)key.channel()).accept();
                            channel.configureBlocking(false);
                            channel.register(selector, SelectionKey.OP_READ & SelectionKey.OP_WRITE);
                        }
                        if (key.isReadable()) {
                            ByteBuffer buffer = ByteBuffer.allocate(1024);
                            SocketChannel channel = ((SocketChannel)key.channel());
                            channel.read(buffer);
                            handler2(handler1(buffer), writeBuffer);
                        }
                        if (key.isWritable()) {
                            SocketChannel channel = ((SocketChannel)key.channel());
                            channel.write(handler4(handler3(writeBuffer)));
                        }
                    }
                }
            } catch (IOException e) {
                e.printStackTrace();
            }
        }

        @Override
        public void run() {

        }
        Selector selector;
        private ByteBuffer writeBuffer = ByteBuffer.allocate(1024);
    }

    private ByteBuffer handler1(ByteBuffer byteBuffer) {
        // 处理器 1,可能是去掉一些不需要的字节
        return byteBuffer;
    }
    private ByteBuffer handler2(ByteBuffer byteBuffer, ByteBuffer writeBuffer) {
        // 处理器 2,向发送缓存写入一些数据
        writeBuffer.put(byteBuffer);
        writeBuffer.flip();
        return byteBuffer;
    }
    private ByteBuffer handler3(ByteBuffer byteBuffer) {
        return byteBuffer;
    }
    private ByteBuffer handler4(ByteBuffer byteBuffer) {
        return byteBuffer;
    }

}
note
- 在绝大部分情况下,该模型都可以较好的使用
- 但是在极端情况下,比如说需要对客户端握手进行安全验证等,都会影响效率
- 如果 Acceptor 挂掉,会影响整个系统的稳定
主从 Reactor 多线程模型
该模型的主要特点是将 多线程的 Acceptor 线程,放在一个线程池中运行。Acceptor 线程池仅仅用于用户的登陆、握手和安全认证,一旦连接建立成功,就将链路注册到后端 subReactor 线程池中,由 I/O 线程负责后续的 I/O 操作。
整体架构如下:
master thread reactor.jpg
利用主从 NIO 线程模型,可以有效解决一个服务端监听线程无法有效处理所有客户端连接的性能不足问题。在 Netty 的官方 Demo 中,推荐使用该线程模型。
netty 线程池
netty 的线程池(NioEventLoop)设计并不仅仅是为了纯粹的 I/O 线程(向 channel 中读写数据),除了负责 I/O 操作外,还要负责处理以下的两种任务:
- 系统 Task:通过调用
NioEventLoop的execute(Runnable task)实现。创建系统 Task 的原因是当 I/O 线程和用户线程同时操作网络资源时,为了防止并发操作导致的锁竞争,将用户线程的操作封装成 Task 放入消息队列中,由 I/O 线程负责执行,这样就实现了局部无锁化。 - 定时任务:通过调用
NioEventLoop的schedule(Runnable command, long delay, TimeUnit unit)实现。
note
- 通过调整线程池的个数,是否共享线程池等方式,netty 可以在单线程、多线程、主从 Reactor 模式之间自由切换
- 为了尽可能的提高性能,netty 在很多地方进行了无锁化设计,如,在 I/O 线程内部进行了串行化设计,避免多线程竞争导致的性能下降问题。
为了要实现定时任务和系统 Task,所有的 netty 线程池及其实现都继承了 ScheduledExecutorService,该类是 JDK 的基本接口,比较重要的接口函数如下:
// 提交一个任务,在 delay 之后执行
// 返回 ScheduledFuture
// 可以通过 ScheduledFuture 查看多少时间之后执行 (getDelay),查看是否成功(isDone),阻塞的取得运算结果(get)
// 或者可以通过 ScheduledFuture 取消任务(cancel)
// 注意 isDone 返回 true 不代表执行任务成功,也可能是被取消,抛出异常等
public ScheduledFuture<?> schedule(Runnable command, long delay, TimeUnit unit);

public <V> ScheduledFuture<V> schedule(Callable<V> callable, long delay, TimeUnit unit);

// 提交一个任务,在初始时间 initialDelay 之后,按照 period 的时间差执行任务
// 执行第一次任务在 initialDelay 之时
// 第 n 次任务在 initialDelay + (n - 1) * period 之时
public ScheduledFuture<?> scheduleAtFixedRate(Runnable command, long initialDelay, long period, TimeUnit unit);

// 提交一个任务,在初始时间 initialDelay 之后开始执行任务,任务结束后在 delay 的延迟之后继续开始循环做任务
public ScheduledFuture<?> scheduleWithFixedDelay(Runnable command, long initialDelay, long delay, TimeUnit unit);

// 提交一个任务执行,submit 类都会返回一个 future,用来记录执行的状态
<T> Future<T> submit(Callable<T> task);
<T> Future<T> submit(Runnable task, T result);
Future<?> submit(Runnable task);

// 提交一个任务并执行
void execute(Runnable command);
ScheduledExecutorService 接口基本能满足定时执行执行系统 Task 的要求。
一个基本的 ScheduledExecutorService 代码如下:
public class ScheduledExecutorDemo {

    public static void main(String[] args) {
        ScheduledExecutorService service = Executors.newScheduledThreadPool(3);
        service.scheduleAtFixedRate(() -> {System.out.println("this is first scheduled task"); while (true);}, 0, 1, TimeUnit.SECONDS);
        service.scheduleAtFixedRate(() -> System.out.println("this is second scheduled task"), 0, 1, TimeUnit.SECONDS);
        ScheduledFuture<String> future = service.schedule(() -> {
            sleep(10);
            return "successes";}, 5, TimeUnit.SECONDS);
        future.cancel(true);
        service.execute(() -> System.out.println("======= other task================"));
    }

}
netty 的线程池以该类为基类,做了大量的拓展,部分继承关系图如下:
eventloop.jpg
组件分析
EventExecutorGroup
EventExecutorGroup 直接继承自 ScheduledExecutorService,可以理解为一个线程池数组的容器,可以通过 next() 方法获得下一个线程池,同时增加了 shutdownGracefully() 等方法,异步的关闭线程池容器。
public interface EventExecutorGroup extends ScheduledExecutorService, Iterable<EventExecutor> {

    /**
     * Returns {@code true} if and only if all {@link EventExecutor}s managed by this {@link EventExecutorGroup}
     * are being {@linkplain #shutdownGracefully() shut down gracefully} or was {@linkplain #isShutdown() shut down}.
     */
    boolean isShuttingDown();

    /**
     * Shortcut method for {@link #shutdownGracefully(long, long, TimeUnit)} with sensible default values.
     *
     * @return the {@link #terminationFuture()}
     */
    Future<?> shutdownGracefully();

    /**
     * Signals this executor that the caller wants the executor to be shut down.  Once this method is called,
     * {@link #isShuttingDown()} starts to return {@code true}, and the executor prepares to shut itself down.
     * Unlike {@link #shutdown()}, graceful shutdown ensures that no tasks are submitted for <i>'the quiet period'</i>
     * (usually a couple seconds) before it shuts itself down.  If a task is submitted during the quiet period,
     * it is guaranteed to be accepted and the quiet period will start over.
     *
     * @param quietPeriod the quiet period as described in the documentation
     * @param timeout     the maximum amount of time to wait until the executor is {@linkplain #shutdown()}
     *                    regardless if a task was submitted during the quiet period
     * @param unit        the unit of {@code quietPeriod} and {@code timeout}
     *
     * @return the {@link #terminationFuture()}
     */
    Future<?> shutdownGracefully(long quietPeriod, long timeout, TimeUnit unit);

    /**
     * Returns the {@link Future} which is notified when all {@link EventExecutor}s managed by this
     * {@link EventExecutorGroup} have been terminated.
     */
    Future<?> terminationFuture();

    /**
     * Returns one of the {@link EventExecutor}s managed by this {@link EventExecutorGroup}.
     */
    EventExecutor next();

    @Override
    Iterator<EventExecutor> iterator();

    // ...
}
EventExecutor
EventExecutor 提供了一些实用的信息判断某一个线程是否在这个线程池中,关键方法如下:
public interface EventExecutor extends EventExecutorGroup {

    /**
     * Returns a reference to itself.
     */
    // 要求返回他自己,相当于只有自己的一个线程池容器
    @Override
    EventExecutor next();

    EventExecutorGroup parent();

    /**
     * Calls {@link #inEventLoop(Thread)} with {@link Thread#currentThread()} as argument
     */
    boolean inEventLoop();

    /**
     * Return {@code true} if the given {@link Thread} is executed in the event loop,
     * {@code false} otherwise.
     */
    // 判断给定的线程是否在本 eventloop 中执行
    boolean inEventLoop(Thread thread);

    // 返回一个用于异步通知的 Future
    <V> Promise<V> newPromise();

    // 返回一个用于可以记录进度的异步通知 Future
    <V> ProgressivePromise<V> newProgressivePromise();

    // 返回一个记录成功信息的异步通知 Future
    <V> Future<V> newSucceededFuture(V result);

    // 返回一个记录失败信息的异步通知 Future
    <V> Future<V> newFailedFuture(Throwable cause);

}
AbstractExecutorService
AbstractExecutorService 是 JDK 提供的抽象类,实现了 submit 系列的方法,通过将 Runnable 封装成 Callable,实现 submit 的功能,并返回一个用于指示完成情况的 Future 对象。
eventLoop
EventLoop 用于在 channel 注册到他上面时,处理所有的 I/O 请求。如下:
public interface EventLoop extends OrderedEventExecutor, EventLoopGroup {
    @Override
    EventLoopGroup parent();
}
note
- 根据实现的不同,一个 eventLoop 可以处理一个或者多个连接
AbstractEventExecutor
AbstractEventExecutor 是最基本的事件执行类,基本就是重写了父类的返回类型,并且实现了一个静态方法,关键代码如下:
public abstract class AbstractEventExecutor extends AbstractExecutorService implements EventExecutor {

    static final long DEFAULT_SHUTDOWN_QUIET_PERIOD = 2;
    static final long DEFAULT_SHUTDOWN_TIMEOUT = 15;

    private final EventExecutorGroup parent;

    private final Collection<EventExecutor> selfCollection = Collections.<EventExecutor>singleton(this);

    protected AbstractEventExecutor() {
        this(null);
    }

    protected AbstractEventExecutor(EventExecutorGroup parent) {
        this.parent = parent;
    }

    @Override
    public EventExecutorGroup parent() {
        return parent;
    }

    // 返回自己
    @Override
    public EventExecutor next() {
        return this;
    }

    // 判断当前线程是否在这个执行 eventLoop 中
    @Override
    public boolean inEventLoop() {
        return inEventLoop(Thread.currentThread());
    }

    @Override
    public Iterator<EventExecutor> iterator() {
        return selfCollection.iterator();
    }

    @Override
    public Future<?> shutdownGracefully() {
        return shutdownGracefully(DEFAULT_SHUTDOWN_QUIET_PERIOD, DEFAULT_SHUTDOWN_TIMEOUT, TimeUnit.SECONDS);
    }

    @Override
    public ScheduledFuture<?> schedule(Runnable command, long delay,
                                       TimeUnit unit) {
        throw new UnsupportedOperationException();
    }

    @Override
    public <V> ScheduledFuture<V> schedule(Callable<V> callable, long delay, TimeUnit unit) {
        throw new UnsupportedOperationException();
    }

    @Override
    public ScheduledFuture<?> scheduleAtFixedRate(Runnable command, long initialDelay, long period, TimeUnit unit) {
        throw new UnsupportedOperationException();
    }

    @Override
    public ScheduledFuture<?> scheduleWithFixedDelay(Runnable command, long initialDelay, long delay, TimeUnit unit) {
        throw new UnsupportedOperationException();
    }

    //直接调用 run 方法执行,而不开启新线程
    protected static void safeExecute(Runnable task) {
        try {
            task.run();
        } catch (Throwable t) {
            logger.warn("A task raised an exception. Task: {}", task, t);
        }
    }
}
note
safeExecute方法直接调用Runnable的run方法运行,不开启线程,可以更加高效
AbstractScheduledEventExecutor
AbstractScheduledEventExecutor 介于 AbstractEventExecutor 和 SingleThreadEventExecutor 中,实现了支持调度的 EventExecutor。
该类维护了一个优先级队列 PriorityQueue<ScheduledFutureTask<?>> scheduledTaskQueue,用来保存任务。
该类提供的一些方法如下:
// 返回一个优先级队列
PriorityQueue<ScheduledFutureTask<?>> scheduledTaskQueue() {
    if (scheduledTaskQueue == null) {
        scheduledTaskQueue = new DefaultPriorityQueue<ScheduledFutureTask<?>>(
                SCHEDULED_FUTURE_TASK_COMPARATOR,
                // Use same initial capacity as java.util.PriorityQueue
                11);
    }
    return scheduledTaskQueue;
}

// 取消所有任务
protected void cancelScheduledTasks();

// 弹出一个在当前 nanotime 可以执行的任务
protected final Runnable pollScheduledTask(long nanoTime);

// 当下一个任务准备开始执行时,返回可以开始执行剩余的时间
protected final long nextScheduledTaskNano();

// 弹出但不移除下一个任务
final ScheduledFutureTask<?> peekScheduledTask();

// 返回是否由可执行的任务
protected final boolean hasScheduledTasks();
SingleThreadEventExecutor
SingleThreadEventExecutor 在一个单线程中执行所有的提交的任务,是一个抽象类。
该类的关键域如下:
// 该线程池状态
private static final int ST_NOT_STARTED = 1;
private static final int ST_STARTED = 2;
private static final int ST_SHUTTING_DOWN = 3;
private static final int ST_SHUTDOWN = 4;
private static final int ST_TERMINATED = 5;

// 因为 queue 为阻塞队列,如果需要从 take 中返回,则需要是要在 queue 中增加元素
// 该域的作用就是唤醒 take 方法
private static final Runnable WAKEUP_TASK = () -> {// Do nothing.
};
private static final Runnable NOOP_TASK = () -> {// Do nothing.
};

// 任务队列
private final Queue<Runnable> taskQueue;

// 当前循环属于哪一个线程
private volatile Thread thread;
@SuppressWarnings("unused")
private volatile ThreadProperties threadProperties;
// Executor 接口, execute
private final Executor executor;
// 是否打断
private volatile boolean interrupted;

// 线程锁
private final Semaphore threadLock = new Semaphore(0);
private final Set<Runnable> shutdownHooks = new LinkedHashSet<Runnable>();
private final boolean addTaskWakesUp;
// 最大等待任务数
private final int maxPendingTasks;
// 大于最大等待数时的拒绝策略
private final RejectedExecutionHandler rejectedExecutionHandler;

// 最近一次执行时间
private long lastExecutionTime;

@SuppressWarnings({ "FieldMayBeFinal", "unused" })
private volatile int state = ST_NOT_STARTED;

private volatile long gracefulShutdownQuietPeriod;
private volatile long gracefulShutdownTimeout;
private long gracefulShutdownStartTime;

private final Promise<?> terminationFuture = new DefaultPromise<Void>(GlobalEventExecutor.INSTANCE);
首先看 inEventLoop(Thread thread) 方法,该方法的实现如下:
@Override
public boolean inEventLoop(Thread thread) {
    return thread == this.thread;
}
即判断当前执行的线程是否时给定的线程。那么 inEventLoop 即是当前线程是否是执行当前线程。
看他的构造函数,如下:
protected SingleThreadEventExecutor(EventExecutorGroup parent, Executor executor,
                                        boolean addTaskWakesUp, int maxPendingTasks,
                                        RejectedExecutionHandler rejectedHandler) {
    super(parent);
    this.addTaskWakesUp = addTaskWakesUp;
    this.maxPendingTasks = Math.max(16, maxPendingTasks);
    this.executor = ThreadExecutorMap.apply(executor, this);
    taskQueue = newTaskQueue(this.maxPendingTasks);
    rejectedExecutionHandler = ObjectUtil.checkNotNull(rejectedHandler, "rejectedHandler");
}
给域赋值,同时,通过 newTaskQueue(maxPendingTasks) 创建一个新的队列。创建什么队列由 newTaskQueue(maxPendingTasks) 函数决定,在该抽象类的实现中,采用 LinkedBlockingQueue 作为任务队列。
在 SingleThreadEventExecutor 中,维持了两个队列,一个适用于存储普通任务的 taskQueue,一个是用于存储优先级任务的 scheduledTaskQueue。
Runnable takeTask 方法用于阻塞的从任务队列中获得任务,该方法会同时访问 scheduledTaskQueue 和 taskQueue 两个队列,返回已经到时间的 scheduledTask 或者在到时间之前添加在 taskQueue 中的队列,具体的逻辑如下:
- 1 . 从
scheduledTaskQueue中取出一个元素scheduledTask - yes.1
scheduledTask不为空,说明scheduledTask需要在delay事件后执行 - yes.2 尝试在延迟
delay内从taskQueue中读取数据task。(taskQueue.poll(delay)) - yes.3 如果在延迟
delay内读到了task,返回task,否则,将scheduledTask加入到taskQueue(fetchFromScheduledTaskQueue()),并且重新调用taskQueue.poll()返回值 - no.1 如果
scheduledTask为空,则,调用task.poll()直接等待返回数据。
如下:
protected Runnable takeTask() {
    assert inEventLoop();
    if (!(taskQueue instanceof BlockingQueue)) {
        throw new UnsupportedOperationException();
    }
    BlockingQueue<Runnable> taskQueue = (BlockingQueue<Runnable>) this.taskQueue;
    for (;;) {
        // 1
        ScheduledFutureTask<?> scheduledTask = peekScheduledTask();
        if (scheduledTask == null) {
            // no 1
            Runnable task = null;
            try {
                task = taskQueue.take();
                if (task == WAKEUP_TASK) {
                    task = null;
                }
            } catch (InterruptedException e) {
                // Ignore
            }
            return task;
        } else {
            // yes 1
            long delayNanos = scheduledTask.delayNanos();
            Runnable task = null;
            if (delayNanos > 0) {
                try {
                    // yes 2
                    task = taskQueue.poll(delayNanos, TimeUnit.NANOSECONDS);
                } catch (InterruptedException e) {
                    // Waken up.
                    return null;
                }
            }
            if (task == null) {
                // We need to fetch the scheduled tasks now as otherwise there may be a chance that
                // scheduled tasks are never executed if there is always one task in the taskQueue.
                // This is for example true for the read task of OIO Transport
                // See https://github.com/netty/netty/issues/1614
                // yes 3
                fetchFromScheduledTaskQueue();
                task = taskQueue.poll();
            }

            if (task != null) {
                return task;
            }
        }
    }
}

private boolean fetchFromScheduledTaskQueue() {
    long nanoTime = AbstractScheduledEventExecutor.nanoTime();
    Runnable scheduledTask  = pollScheduledTask(nanoTime);
    while (scheduledTask != null) {
        // 依次将可以执行的 scheduledTask 放入 taskQueue 中
        if (!taskQueue.offer(scheduledTask)) {
            // 如果 taskQueue 不能容纳更多的任务,则将其放回 scheduledTask 中并返回 false
            scheduledTaskQueue().add((ScheduledFutureTask<?>) scheduledTask);
            return false;
        }
        scheduledTask  = pollScheduledTask(nanoTime);
    }
    // 只有全部放入 taskQueue 中才返回成功
    return true;
}
pollTask 和 pollTaskFrom(Queue<Runnable> taskQueue) 只是从 taskQueue 中返回任务并且在队列中删除任务。
peekTask 在 taskQueue 中返回任务但是不删除。
hasTasks() 返回 taskQueue 中是否有任务。
pendingTasks() 返回正在等待的任务个数。
addTask(Runnable task) 添加一个任务到 taskQueue 中,如果到达了有界队列的最大值,会调用 reject 方法拒绝加入(抛出异常)。
boolean offerTask(Runnable task) 在线程池 shutdown 时,调用 reject 方法,否则,尝试添加一个元素到 taskQueue 中,添加成功,则返回 true,否则返回 false。
protected boolean removeTask(Runnable task) 移除一个任务。
runAllTasks() 执行在 scheduledTaskQueue 队列中的所有已经到时间的任务和 taskQueue 中剩下的任务(执行任务并不新开线程,而是调用其 run 方法执行)。代码如下:
protected boolean runAllTasks() {
    assert inEventLoop();
    // 表明是否所有的可以执行的 `scheduledTask` 都被抓取
    boolean fetchedAll;
    // 是否至少执行一个
    boolean ranAtLeastOne = false;

    do {
        // 抓取所有可以执行的 scheduledTask 到 taskQueue 中,如果过没有抓取完,返回 false
        fetchedAll = fetchFromScheduledTaskQueue();
        // 执行任务
        if (runAllTasksFrom(taskQueue)) {
            ranAtLeastOne = true;
        }
    // 直到所有的任务都被抓取完
    } while (!fetchedAll); // keep on processing until we fetched all scheduled tasks.

    if (ranAtLeastOne) {
        lastExecutionTime = ScheduledFutureTask.nanoTime();
    }
    afterRunningAllTasks();
    return ranAtLeastOne;
}

protected final boolean runAllTasksFrom(Queue<Runnable> taskQueue) {
    Runnable task = pollTaskFrom(taskQueue);
    if (task == null) {
        return false;
    }
    for (;;) {
        // 依次取出 taskQueue 中的任务,并调用 task 的 run 方法执行
        safeExecute(task);
        task = pollTaskFrom(taskQueue);
        if (task == null) {
            return true;
        }
    }
}
boolean runAllTasks(long timeoutNanos) 函数在 timeoutNanos 的时间内执行所有的任务,如果超时,则返回(执行任务并不新开线程,而是调用其 run 方法执行)。代码如下:
protected boolean runAllTasks(long timeoutNanos) {
    fetchFromScheduledTaskQueue();
    Runnable task = pollTask();
    if (task == null) {
        afterRunningAllTasks();
        return false;
    }

    final long deadline = ScheduledFutureTask.nanoTime() + timeoutNanos;
    long runTasks = 0;
    long lastExecutionTime;
    for (;;) {
        // 调用 task 的 run 方法执行
        safeExecute(task);
        // 执行完成,任务数自加
        runTasks ++;

        // Check timeout every 64 tasks because nanoTime() is relatively expensive.
        // XXX: Hard-coded value - will make it configurable if it is really a problem.
        // 每执行 64 个任务检测是否超时
        if ((runTasks & 0x3F) == 0) {
            lastExecutionTime = ScheduledFutureTask.nanoTime();
            if (lastExecutionTime >= deadline) {
                break;
            }
        }

        task = pollTask();
        if (task == null) {
            lastExecutionTime = ScheduledFutureTask.nanoTime();
            break;
        }
    }

    afterRunningAllTasks();
    this.lastExecutionTime = lastExecutionTime;
    return true;
}
note
runAllTasks(long timeoutNanos)和runAllTasks()执行任务并不新开线程,而是调用其run方法执行- 以上的两个方法,会在完成之后,调用
afterRunningAllTasks()进行一些处理,可有子类实现。
wakeup 方法主要是供其他方法唤醒该实例的 takeTask 等阻塞方法,实现方法就是在 taskQueue 中加入一个没有任何操作的任务,如下:
protected void wakeup(boolean inEventLoop) {
    if (!inEventLoop || state == ST_SHUTTING_DOWN) {
        // Use offer as we actually only need this to unblock the thread and if offer fails we do not care as there
        // is already something in the queue.
        taskQueue.offer(WAKEUP_TASK);
    }
}
重点你看看 doStartThread,该方法会在 Executor 新开一个线程并执行,关键代码如下:
private void doStartThread() {
    // 1.
    assert thread == null;
    executor.execute(new Runnable() {
        @Override
        public void run() {
            // 2.
            thread = Thread.currentThread();
            // ...
            try {
                // 3.
                SingleThreadEventExecutor.this.run();
                success = true;
            } catch (Throwable t) {
                //
            } finally {
                // 4.
                for (;;) {
                    int oldState = state;
                    if (oldState >= ST_SHUTTING_DOWN || STATE_UPDATER.compareAndSet(
                            SingleThreadEventExecutor.this, oldState, ST_SHUTTING_DOWN)) {
                        break;
                    }
                }

                // Check if confirmShutdown() was called at the end of the loop.
                if (success && gracefulShutdownStartTime == 0) {
                    // ...error
                }

                try {
                    // 5.
                    // Run all remaining tasks and shutdown hooks.
                    for (;;) {
                        if (confirmShutdown()) {
                            break;
                        }
                    }
                } finally {
                    try {
                        cleanup();
                    } finally {
                        // ...
                        // 6.
                        STATE_UPDATER.set(SingleThreadEventExecutor.this, ST_TERMINATED);
                        threadLock.release();
                        if (!taskQueue.isEmpty()) {
                            // erroe log
                        }

                        // 7.
                        terminationFuture.setSuccess(null);
                    }
                }
            }
        }
    });
}
对于新建线程,总共有 6 个关键步骤:
-
- 确保没有线程运行当前循环
-
- 在 executor 中执行当前循环,并将
thread用正真的运行线程赋值
- 在 executor 中执行当前循环,并将
-
- 执行
SingleThreadEventExecutor.this.run()方法,这是真正的运行函数
- 执行
-
- 退出运行时,原子性的设置
state为ST_SHUTTING_DOWN
- 退出运行时,原子性的设置
-
- 确保所有正在运行的任务运行完
-
- 原子性的设定状态为
ST_TERMINATED
- 原子性的设定状态为
-
- 设置
terminationFuture为true,唤醒等待在terminationFuture的线程
- 设置
note
- 作为 单线程的事件执行器,该类通过
thread变量记录当前执行循环的是哪一个线程,对于在SingleThreadEventExecutor.this.run()中执行的方法,都属于一个线程,这样,保证了线程不切换,减少了大量的时间开销。- 对于其他线程,也可以通过
inEventLoop函数确定是否是属于执行此循环的线程,可以做更多的操作。
辅助函数 ensureThreadStarted 主要确保循环线程在运行,如果没有运行,则调用 doStartThread() 运行。如果线程没有运行,则返回 true,否则返回 false。
private boolean ensureThreadStarted(int oldState) {
    if (oldState == ST_NOT_STARTED) {
        try {
            doStartThread();
        } catch (Throwable cause) {
            STATE_UPDATER.set(this, ST_TERMINATED);
            terminationFuture.tryFailure(cause);

            if (!(cause instanceof Exception)) {
                // Also rethrow as it may be an OOME for example
                PlatformDependent.throwException(cause);
            }
            return true;
        }
    }
    return false;
}
startThread() 函数在执行器的状态是 ST_NOT_STARTED 是,首先尝试原子性设置状态为 ST_STARTED,设置成功后,开始线程。
private void startThread() {
    if (state == ST_NOT_STARTED) {
        if (STATE_UPDATER.compareAndSet(this, ST_NOT_STARTED, ST_STARTED)) {
            try {
                doStartThread();
            } catch (Throwable cause) {
                STATE_UPDATER.set(this, ST_NOT_STARTED);
                PlatformDependent.throwException(cause);
            }
        }
    }
}
作为一个线程池,他的核心函数 execute 方法如下:
@Override
public void execute(Runnable task) {
    if (task == null) {
        throw new NullPointerException("task");
    }

    boolean inEventLoop = inEventLoop();
    addTask(task);
    if (!inEventLoop) {
        startThread();
        if (isShutdown()) {
            boolean reject = false;
            try {
                if (removeTask(task)) {
                    reject = true;
                }
            } catch (UnsupportedOperationException e) {
                // The task queue does not support removal so the best thing we can do is to just move on and
                // hope we will be able to pick-up the task before its completely terminated.
                // In worst case we will log on termination.
            }
            if (reject) {
                reject();
            }
        }
    }

    if (!addTaskWakesUp && wakesUpForTask(task)) {
        wakeup(inEventLoop);
    }
}
即对于每一个提交的任务,将其加入到任务队列中,如果没有线程开始执行,则新开一个线程执行该类自己的 run 方法。
==总结==
- ==
SingleThreadEventExecutor主要是实现了单线程方式的execute方法,当任务被提交到execute方法中时,不会向 JDK 提供的原生线程池一样创建一个新线程,而是重复使用一个线程运行==- ==
executor方法会判断执行executor(RUnnable task)这个语句的方法是否属于自身这个线程,如果不是,才新开线程,保证始终一个SingleThreadEventExecutor只有一个线程在运行==
SingleThreadEventLoop
SingleThreadEventLoop 的前驱接口为 EventLoopGroup,允许将 Channel 注册到当前的事件循环中。如下:
public interface EventLoopGroup extends EventExecutorGroup {

    @Override
    EventLoop next();

    // 将 channel 注册到事件循环中,如果注册成功,会给 ChannelFuture 一个通知
    ChannelFuture register(Channel channel);

    // 通过一个 ChannelPromise 注册 channel 循环
    ChannelFuture register(ChannelPromise promise);

    @Deprecated
    ChannelFuture register(Channel channel, ChannelPromise promise);
}
SingleThreadEventLoop 增加了一个 tailQueue 的队列,同时重写了如下的三个函数:
// 在每次执行完 runAllTasks 函数时,会调用他,执行所有的 `tailQueue` 的函数
@Override
protected void afterRunningAllTasks() {
    runAllTasksFrom(tailTasks);
}

// 判断 tailQueue 和 taskQueue,而不仅仅是 taskQueue
@Override
protected boolean hasTasks() {
    return super.hasTasks() || !tailTasks.isEmpty();
}

// 判断 tailQueue 和 taskQueue,而不仅仅是 taskQueue
@Override
public int pendingTasks() {
    return super.pendingTasks() + tailTasks.size();
}
同时重写了如下三个函数,主要就是将 channel 注册到 EventLoop 所持有的 Selector 上:
@Override
public ChannelFuture register(Channel channel) {
    return register(new DefaultChannelPromise(channel, this));
}

@Override
public ChannelFuture register(final ChannelPromise promise) {
    ObjectUtil.checkNotNull(promise, "promise");
    promise.channel().unsafe().register(this, promise);
    return promise;
}

@Deprecated
@Override
public ChannelFuture register(final Channel channel, final ChannelPromise promise) {
    if (channel == null) {
        throw new NullPointerException("channel");
    }
    if (promise == null) {
        throw new NullPointerException("promise");
    }

    channel.unsafe().register(this, promise);
    return promise;
}
NioEventLoop
我们可以简单的把 NioEventLoop 理解成一个持有一个 Selector 对象可以注册多个 I/O Channel 的单线程
既然该类需要线程持有 Selector 对象,则包含如下的重要的域及方法:
private Selector selector;
private Selector unwrappedSelector;
private SelectedSelectionKeySet selectedKeys;

private final SelectorProvider provider;

// 返回一个持有 unwrappedSelector 和 selector 的对象
private SelectorTuple openSelector() {
    final Selector unwrappedSelector;
    try {
        unwrappedSelector = provider.openSelector();
    } catch (IOException e) {
        throw new ChannelException("failed to open a new selector", e);
    }

    if (DISABLE_KEY_SET_OPTIMIZATION) {
        return new SelectorTuple(unwrappedSelector);
    }

    // ...
    // 优化代码,略
}
因为 SingleThreadEventExecutor 创建新线程后,后执行,重写的 run 方法,所以我们看 run 方法的事件就可以。如下:
@Override
protected void run() {
    for (;;) {
        try {
            try {
                switch (selectStrategy.calculateStrategy(selectNowSupplier, hasTasks())) {
                case SelectStrategy.CONTINUE:
                    continue;

                case SelectStrategy.BUSY_WAIT:
                    // fall-through to SELECT since the busy-wait is not supported with NIO

                case SelectStrategy.SELECT:
                    // 1.
                    select(wakenUp.getAndSet(false));
                default:
                }
            } catch (IOException e) {
                rebuildSelector0();
                handleLoopException(e);
                continue;
            }

            cancelledKeys = 0;
            needsToSelectAgain = false;
            final int ioRatio = this.ioRatio;
            if (ioRatio == 100) {
                try {
                    // 2.
                    processSelectedKeys();
                } finally {
                    // Ensure we always run tasks.
                    // 3.
                    runAllTasks();
                }
            } else {
                final long ioStartTime = System.nanoTime();
                try {
                    // 2.
                    processSelectedKeys();
                } finally {
                    // Ensure we always run tasks.
                    final long ioTime = System.nanoTime() - ioStartTime;
                    // 3.
                    runAllTasks(ioTime * (100 - ioRatio) / ioRatio);
                }
            }
        } catch (Throwable t) {
            handleLoopException(t);
        }
        // Always handle shutdown even if the loop processing threw an exception.
        try {
            if (isShuttingDown()) {
                closeAll();
                if (confirmShutdown()) {
                    return;
                }
            }
        } catch (Throwable t) {
            handleLoopException(t);
        }
    }
}
在没有退出的情况下,会一直进行 for 循环,直到运行到 InteruptException。
- 在
for循环中,主要包括了三个步骤: -
- 调用
select方法阻塞线程,直到被唤醒
- 调用
-
- 调用
processSelectedKeys()处理被激活的Channel
- 调用
-
- 盗用
runAllTasks执行所有的任务
- 盗用
select(boolean) 并非 JDK 提供的 select 方法,而是经过 netty 包装之后的方法。
JDK 提供的 select(timeoutMillis) 方法,会在如下的情况下返回:
- 一个 Channel 准备就绪被选择
- Selector 的 wakeup 方法被调用
- 该线程被中断
- 方法超时
select(boolean) 提供的方法,会在如下的情况下返回:
- 一个 Channel 准备就绪被选择
- 该线程被中断
- 在
scheduledTaskQueue中,已经有一个scheduledTask到达超时时间 TaskQueue中有正在等待的任务
note
- select 方法也提供了 Selector 重建的方法,避免 JDK 的 Selector 空轮询 Bug
select(boolean) 方法的实现如下:
// 该变量指定是否需要唤醒 select() 线程
private final AtomicBoolean wakenUp = new AtomicBoolean();

// 参数为原来的 wakeUp 的值,表明是否需要唤醒
private void select(boolean oldWakenUp) throws IOException {
    Selector selector = this.selector;
    try {
        int selectCnt = 0;
        long currentTimeNanos = System.nanoTime();
        // 获得最近一个 scheduled task 的最迟执行时间
        long selectDeadLineNanos = currentTimeNanos + delayNanos(currentTimeNanos);

        for (;;) {
            // 离 selectDeadLineNanos 的截至时间
            long timeoutMillis = (selectDeadLineNanos - currentTimeNanos + 500000L) / 1000000L;
            // 如果截至时间已到,则调用 selector.selectNow 选择并立即返回
            if (timeoutMillis <= 0) {
                if (selectCnt == 0) {
                    selector.selectNow();
                    selectCnt = 1;
                }
                break;
            }

            // If a task was submitted when wakenUp value was true, the task didn't get a chance to call
            // Selector#wakeup. So we need to check task queue again before executing select operation.
            // If we don't, the task might be pended until select operation was timed out.
            // It might be pended until idle timeout if IdleStateHandler existed in pipeline.
            if (hasTasks() && wakenUp.compareAndSet(false, true)) {
                selector.selectNow();
                selectCnt = 1;
                break;
            }

            int selectedKeys = selector.select(timeoutMillis);
            selectCnt ++;

            if (selectedKeys != 0 || oldWakenUp || wakenUp.get() || hasTasks() || hasScheduledTasks()) {
                // - Selected something,
                // - waken up by user, or
                // - the task queue has a pending task.
                // - a scheduled task is ready for processing
                break;
            }
            if (Thread.interrupted()) {
                // Thread was interrupted so reset selected keys and break so we not run into a busy loop.
                // As this is most likely a bug in the handler of the user or it's client library we will
                // also log it.
                //
                // See https://github.com/netty/netty/issues/2426
                if (logger.isDebugEnabled()) {
                    logger.debug("Selector.select() returned prematurely because " +
                            "Thread.currentThread().interrupt() was called. Use " +
                            "NioEventLoop.shutdownGracefully() to shutdown the NioEventLoop.");
                }
                selectCnt = 1;
                break;
            }

            long time = System.nanoTime();
            if (time - TimeUnit.MILLISECONDS.toNanos(timeoutMillis) >= currentTimeNanos) {
                // timeoutMillis elapsed without anything selected.
                selectCnt = 1;
            } else if (SELECTOR_AUTO_REBUILD_THRESHOLD > 0 &&
                    selectCnt >= SELECTOR_AUTO_REBUILD_THRESHOLD) {
                // The code exists in an extra method to ensure the method is not too big to inline as this
                // branch is not very likely to get hit very frequently.

                // 如果多次循环都没有结果,则认为是 selector 空轮询 bug,重建 bug
                selector = selectRebuildSelector(selectCnt);
                selectCnt = 1;
                break;
            }

            currentTimeNanos = time;
        }

        if (selectCnt > MIN_PREMATURE_SELECTOR_RETURNS) {
            if (logger.isDebugEnabled()) {
                logger.debug("Selector.select() returned prematurely {} times in a row for Selector {}.",
                        selectCnt - 1, selector);
            }
        }
    } catch (CancelledKeyException e) {
        if (logger.isDebugEnabled()) {
            logger.debug(CancelledKeyException.class.getSimpleName() + " raised by a Selector {} - JDK bug?",
                    selector, e);
        }
        // Harmless exception - log anyway
    }
}
当 selector 返回后,执行 processSelectedKeys 方法,因为没有开启优化开关,所以最终调用 processSelectedKeysPlain(selector.selectedKeys()) 处理已经准备好的 Channel。关键代码如下:
private void processSelectedKeysPlain(Set<SelectionKey> selectedKeys) {
    if (selectedKeys.isEmpty()) {
        return;
    }

    Iterator<SelectionKey> i = selectedKeys.iterator();
    for (;;) {
        final SelectionKey k = i.next();
        final Object a = k.attachment();
        i.remove();

        if (a instanceof AbstractNioChannel) {
            processSelectedKey(k, (AbstractNioChannel) a);
        } else {
           // ...
        }

        if (!i.hasNext()) {
            break;
        }

        // ...
    }
}
private void processSelectedKey(SelectionKey k, AbstractNioChannel ch) {
    final AbstractNioChannel.NioUnsafe unsafe = ch.unsafe();
    if (!k.isValid()) {
       // ...
    }

    try {
        int readyOps = k.readyOps();
        // 如果是 Connect 事件准备好,调用 finishConnect 完成连接,同时取消 OP_CONNECT 监听
        if ((readyOps & SelectionKey.OP_CONNECT) != 0) {
            int ops = k.interestOps();
            ops &= ~SelectionKey.OP_CONNECT;
            k.interestOps(ops);

            unsafe.finishConnect();
        }

        // 如果是 OP_WRITE,立即强制刷新,减少内存
        if ((readyOps & SelectionKey.OP_WRITE) != 0) {
            // Call forceFlush which will also take care of clear the OP_WRITE once there is nothing left to write
            ch.unsafe().forceFlush();
        }

        // 如果是 OP_READ,读取数据
        if ((readyOps & (SelectionKey.OP_READ | SelectionKey.OP_ACCEPT)) != 0 || readyOps == 0) {
            unsafe.read();
        }
    } catch (CancelledKeyException ignored) {
        unsafe.close(unsafe.voidPromise());
    }
}
总结
通过 netty 线程模型和 Channel 的源码分析,我们大体能够知道 netty 的整个运行流程,如下:
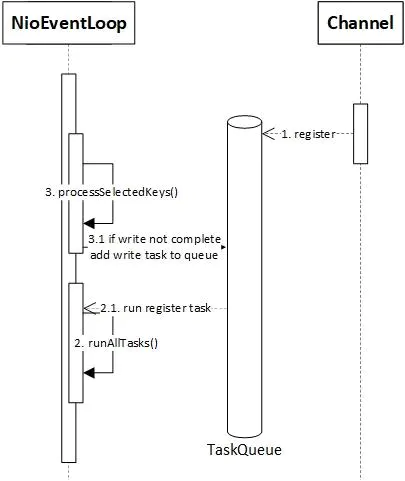
nioEventLoop 交互.jpg
note
NioEventLoop调用任务的run方法执行所有在队列中的任务,串行化的执行所有的任务,提高了效率
总结
鉴于看到很多小伙伴在转发我的写的文章,我最近也总结了几套面试题,【小编在这分享总结的Java面试高频的面试题(包括了Java、MyBatis、ZooKeeper、Dubbo、Elasticsearch、Memcached、Redis、MySQL、Spring、Spring Boot、Spring Cloud、RabbitMQ、Kafka、Linux 等技术栈)都进行了整理以及打包整合,上述面试题答案都整理成文档笔记。 也还整理了一些面试资料&最新2020收集的一些大厂的面试真题(都整理成文档,小部分截图),有需要的可以 点击进入 查看领取资料。 】以下是面试资料部分截图:

希望对大家有所帮助,有用的话点赞,转发 给我支持! 谢谢大家!