在项目中我们如果使用MQ,就一定问好后台给的数据是同步或者是异步的情况,之前在项目中都遇到了这样的坑,后台也没说是同步还是异步,自己用异步的方式去请求,一直收到的数据都是自己发送的情况,
在用的时候先要导入
implementation 'com.rabbitmq:amqp-client:5.7.0' 还需要我们在类中声明

/**
 * 处理handler发送的消息,然后进行操作(在主线程)
 */
@SuppressLint("HandlerLeak")
private Handler incomingMessageHandler = new Handler() {
    @Override
    public void handleMessage(Message msg) {
        msg.getData().getString("msg");
    }
};
/**
* 关联AMPQ
*
* @param routingKey
*/
private void publishToAMPQ(final String routingKey) {
publishThread = new Thread(new Runnable() {
@Override
public void run() {
while (true) {
try {
// 创建连接
Connection connection = rbmqFactory.newConnection();
// 创建通道
Channel ch = connection.createChannel();
ch.confirmSelect();
while (true) {
String message = queue.takeFirst();
LogUtils.e("设备类型请求发送的数据.........." + message);
try {
// 发布消息
ch.basicPublish(AppConstant.MQ_EXCHANGE_CAR, routingKey, null, message.getBytes());
ch.waitForConfirmsOrDie();
} catch (Exception e) {
queue.putFirst(message);
throw e;
}
}
} catch (InterruptedException e) {
break;
} catch (Exception e) {
LogUtils.e("TAG_Publish", "Connection broken: " + e.getClass().getName());
try {
Thread.sleep(5000); //sleep and then try again
} catch (InterruptedException e1) {
break;
}
}
}
}
});
publishThread.start();
}/**
* 创建消费者线程
* 接收消息
*
* @param
*/
private void startSubscribe(final Handler incomingHandler) {
subscribeThread = new Thread(new Runnable() {
@Override
public void run() {
try {
// 需要再次初始化数据的时候就关闭上一个连接
if (connectionCar != null) {
connectionCar.close();
}
// 创建新的连接
connectionCar = rbmqFactory.newConnection();
// 创建通道
Channel channel = connectionCar.createChannel();
// 处理完一个消息,再接收下一个消息
channel.basicQos(1);
// 随机命名一个队列名称 baio_terminal_keepalive
String queueName = "baio_terminal_keepalive";
// 声明交换机类型
channel.exchangeDeclare(AppConstant.MQ_EXCHANGE_CAR, "topic", true);
// 声明队列(持久的、非独占的、连接断开后队列会自动删除)
AMQP.Queue.DeclareOk q = channel.queueDeclare(queueName, true, false, false, null);// 声明共享队列
// 根据路由键将队列绑定到交换机上(需要知道交换机名称和路由键名称)
channel.queueBind(q.getQueue(), AppConstant.MQ_EXCHANGE_CAR, AppConstant.MQ_ROUTINGKEY_CAR2);
// 创建消费者获取rabbitMQ上的消息。每当获取到一条消息后,就会回调handleDelivery()方法,该方法可以获取到消息数据并进行相应处理
Consumer consumer = new DefaultConsumer(channel) {
@Override
public void handleDelivery(String consumerTag, Envelope envelope, AMQP.BasicProperties properties, byte[] body) throws IOException {
super.handleDelivery(consumerTag, envelope, properties, body);
// 通过getBody方法获取消息中的数据
String bodyStr = new String(body);
LogUtils.e("设备类型请求返回的数据.........bodyStr:" + bodyStr);
}
};
channel.basicConsume(q.getQueue(), true, consumer);
} catch (Exception e) {
e.printStackTrace();
try {
Thread.sleep(5000);
} catch (InterruptedException e1) {
e1.printStackTrace();
}
}
}
});
subscribeThread.start();// 开启线程获取RabbitMQ推送消息
}这样是我们的大多数用法,但是还有一部分是用到我们MQ的另外一种模式
MQ的RPC模式
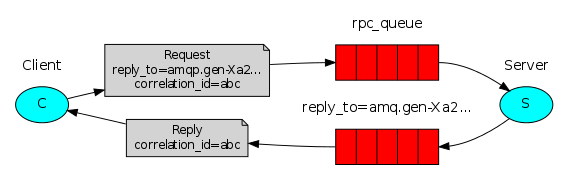
就是这样的一个消费过程,RPC的代码量要比普通的MQ代码量要少,但是这种模式不是经常用到,在之前的一个项目中用到过这种模式,就给大家看一下代码的流程。
public class RpcClient {
    private Connection connection;
    private Channel channel;
    private String requestQueueName = "baio_recorded_broadcast_course";
    private String replyQueueName;

    /**
     * 设置连接
     *
     * @throws IOException
     * @throws TimeoutException
     */
    public RpcClient() throws IOException, TimeoutException {
        ConnectionFactory factory = new ConnectionFactory();
        factory.setHost(AppConstant.MQ_HOST);//设置服务地址
        factory.setPort(AppConstant.MQ_PORT);//设置端口
        factory.setUsername(AppConstant.MQ_USERNAME);//用户名和密码
        factory.setPassword(AppConstant.MQ_PASSWORD);

        connection = factory.newConnection();//创建一个连接
        channel = connection.createChannel();//创建了一个连接的通道

        replyQueueName = channel.queueDeclare().getQueue();//声明回调队列
        LogUtils.e("RpcClient:" + replyQueueName);
    }

    /**
     * 请求返回
     *
     * @param message
     * @return
     * @throws UnsupportedEncodingException
     * @throws IOException
     * @throws InterruptedException
     */
    public String call(String message) throws UnsupportedEncodingException, IOException, InterruptedException {
        String corrId = UUID.randomUUID().toString();
        //此处为返回的核心
        AMQP.BasicProperties props = new AMQP.BasicProperties
                .Builder()
                .correlationId(corrId)//队列的唯一值认证
                .replyTo(replyQueueName)//回调队列
                .build();

        //发送消息
//        channel.basicPublish(AppConstant.MQ_EXCHANGE_CAR, requestQueueName, props, message.getBytes("utf8"));
        channel.basicPublish("", requestQueueName, props, message.getBytes("utf8"));
        //用于存放数据的阻塞队列
        final BlockingQueue<String> response = new ArrayBlockingQueue<String>(1);
        //接收返回数据
        channel.basicConsume(replyQueueName, true, new DefaultConsumer(channel) {
            @Override
            public void handleDelivery(String consumerTag, Envelope envelope, AMQP.BasicProperties properties, byte[] body)
                    throws IOException {
                if (properties.getCorrelationId().equals(corrId)) {
                    response.offer(new String(body));
                }
            }
        });

        return response.take();
    }

    /**
     * 关闭连接
     *
     * @throws IOException
     */
    public void close() throws IOException {
        if (connection != null) {
            this.connection.close();
        }
    }


}
先定义一个工具类出来,然后在我们需要用到的地方再写入我们要发送的消息和消费的消息逻辑,
/**
 * 同步请求设备名称
 */
private void publishAutoAttendClassMessage() {
    new Thread(new Runnable() {
        @Override
        public void run() {
            DeviceReqInfo deviceNameBean = new DeviceReqInfo();
            deviceNameBean.setType("baio");
            deviceNameBean.setSubtype("query_device_name");
            deviceNameBean.setSn("BAIOA202003160231");
            String sendMessage = JsonUtil.parseObjectToJson(deviceNameBean);

            RpcClient rc = null;
            try {
                rc = new RpcClient();
                LogUtils.e("设备名称发送消息.........." + sendMessage);
                String response = rc.call(sendMessage);
                LogUtils.e("设备名称请求返回的数据:" + response);
                DeviceNameBackBean tFromJson = JsonUtil.getTFromJson(response, DeviceNameBackBean.class);
                int code = tFromJson.getCode();

                DeviceNameBackBean.DataBean data = tFromJson.getData();
                String name = data.getName();
                appSp.setFacility(name);
            } catch (Exception e) {
                e.printStackTrace();
            } finally {
                try {
                    if (rc != null) {
                        rc.close();
                    }
                } catch (IOException e) {
                    e.printStackTrace();
                }
            }
        }
    }).start();
}
这样就可以完成我们的功能实现了。