文章目录
初识
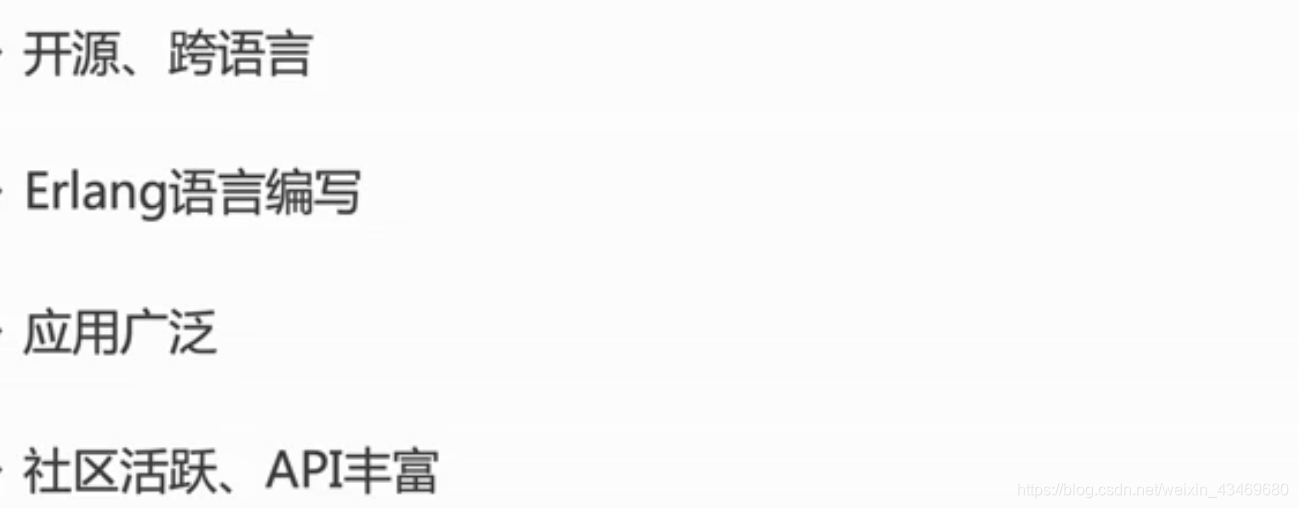
语言Erlang
消息队列

特性:业务无关、FIFO、容灾、性能
使用理由:系统解耦、异步调用、流量消峰、
特点
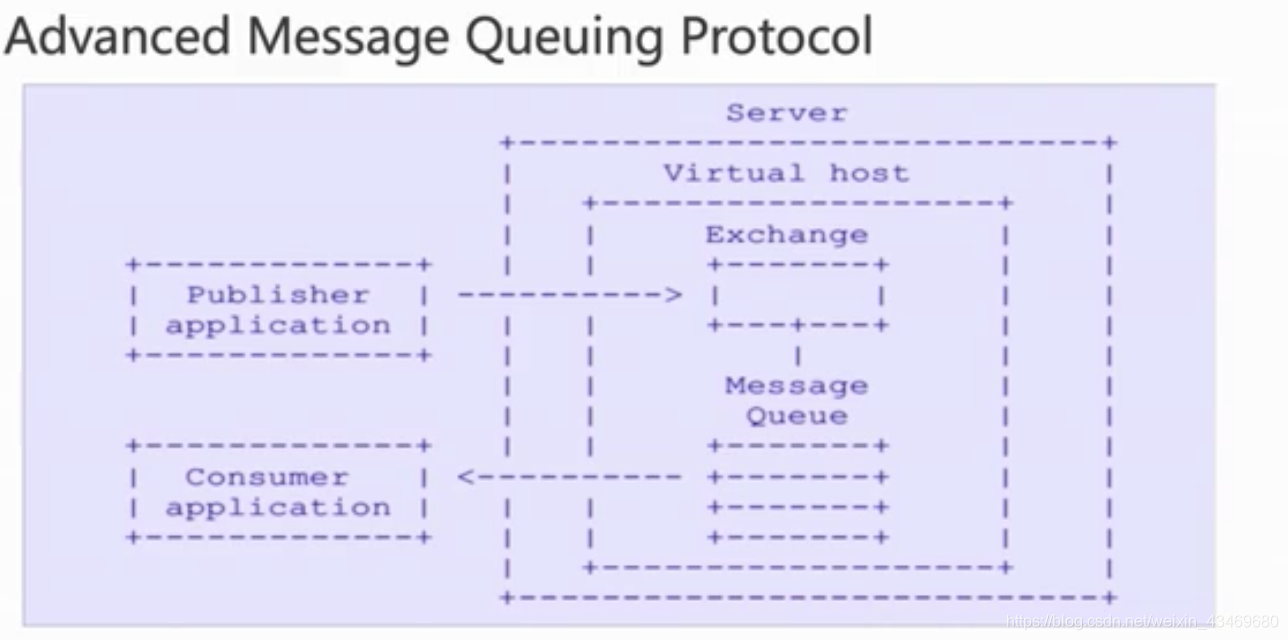
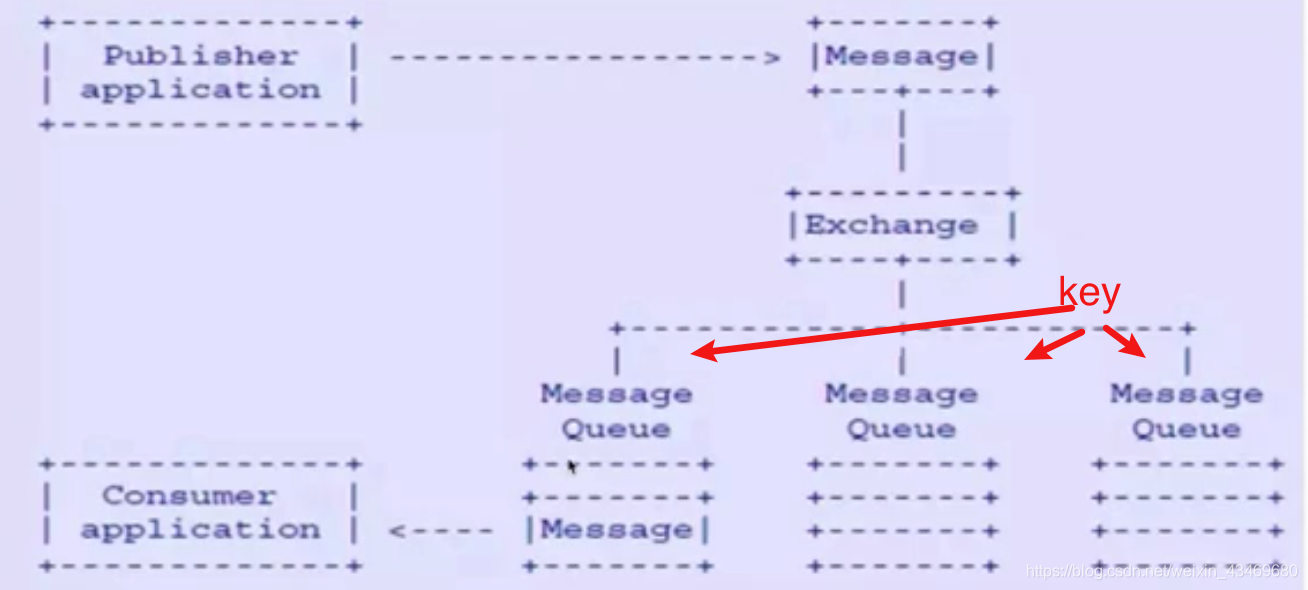
AMQP协议
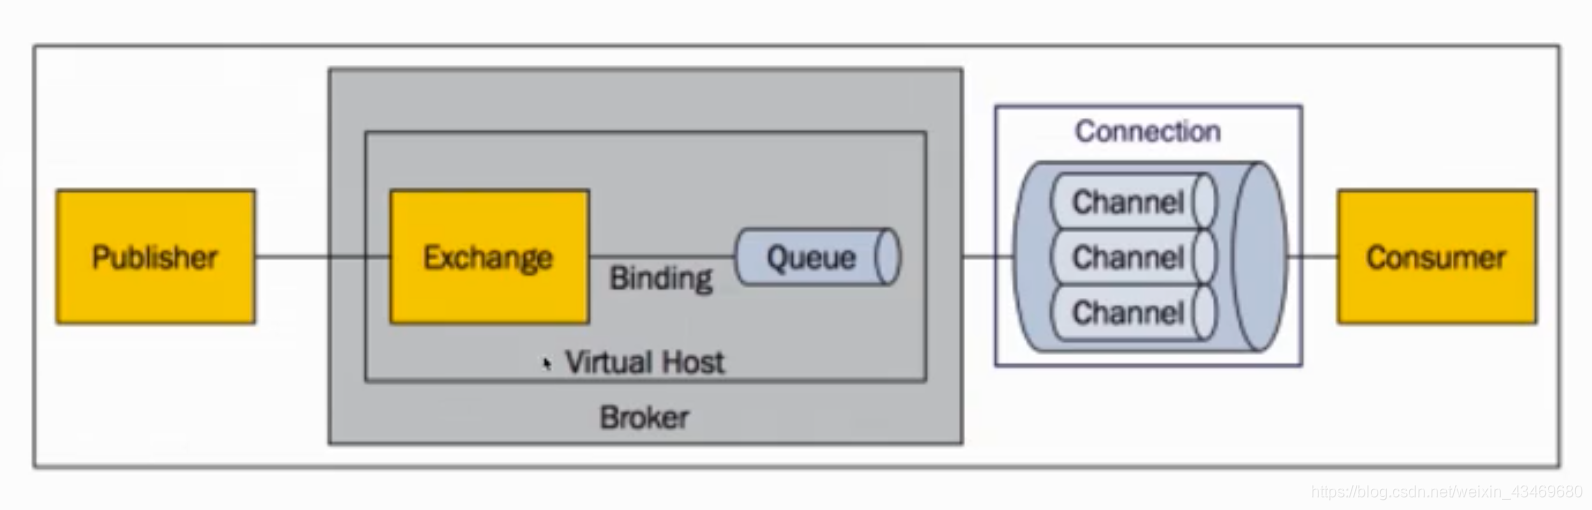
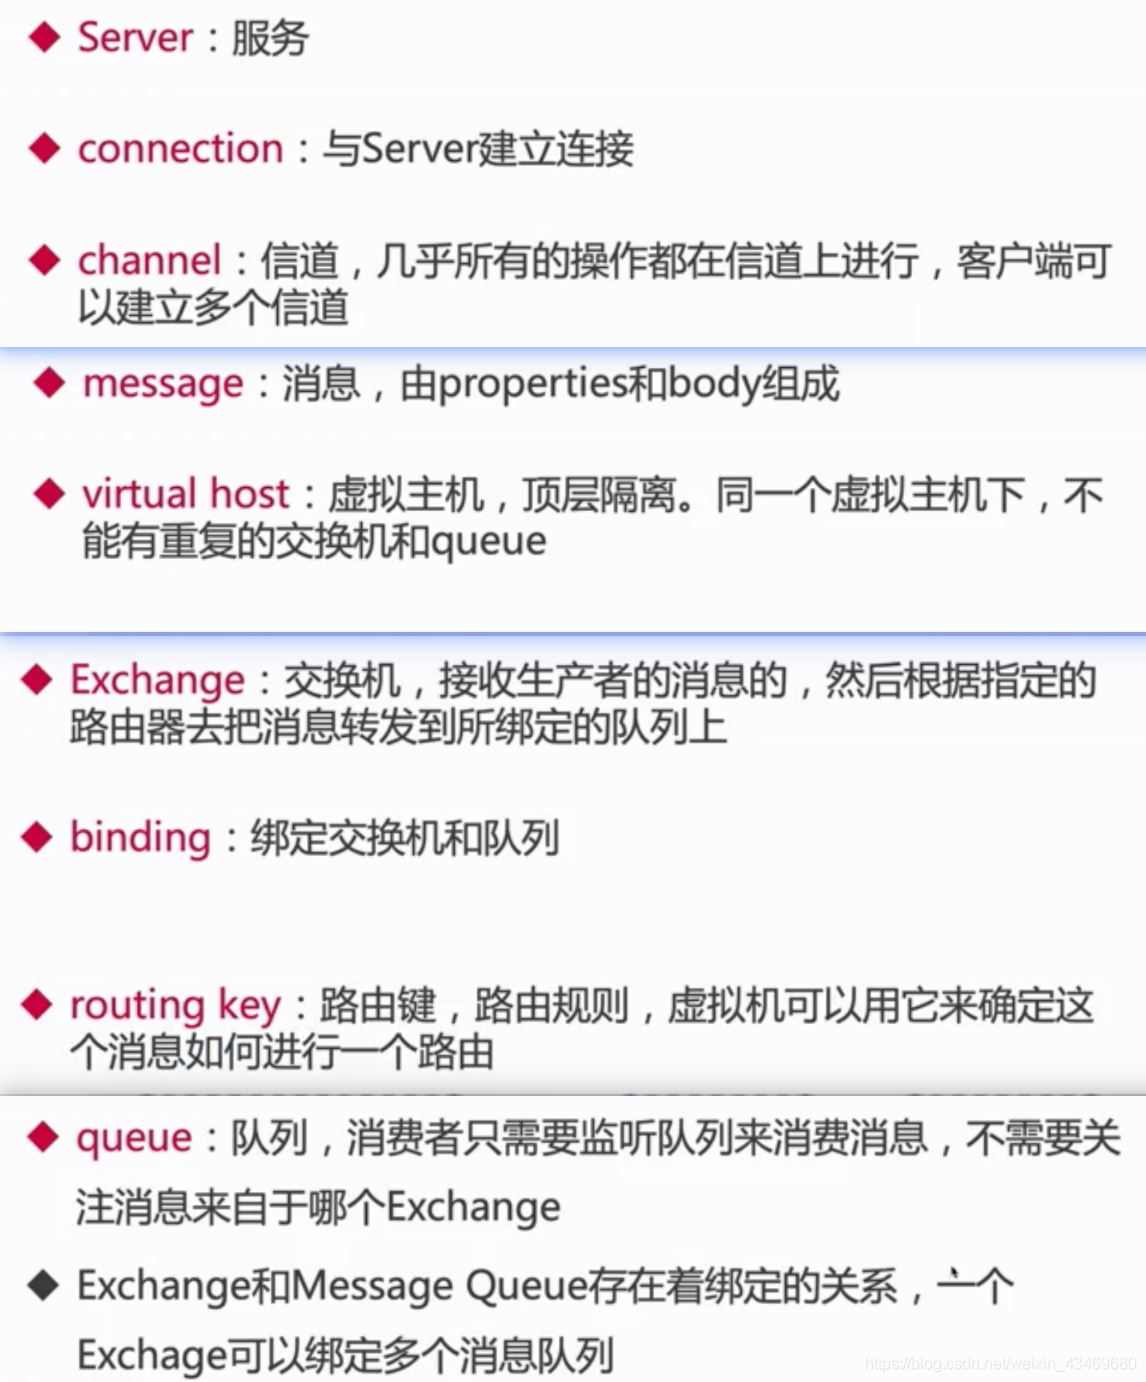
Rabbit核心概念
RabbitMQ的安装 配置 启动
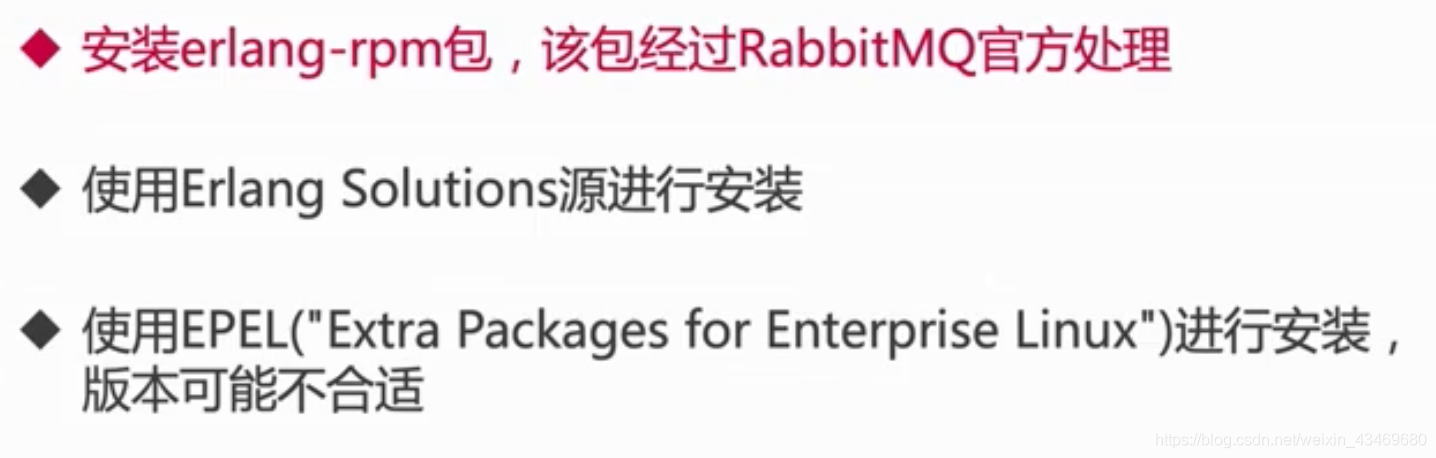
安装Erlang三种方案
Linux下安装RabbitMQ
官方安装指南:https://www.rabbitmq.com/install-rpm.html
安装erlang
// 创建erlang源
vim /etc/yum.repos.d/rabbitmq_erlang.repo
[rabbitmq-erlang]
name=rabbitmq-erlang
baseurl=https://dl.bintray.com/rabbitmq-erlang/rpm/erlang/22/el/7
gpgcheck=1
gpgkey=https://dl.bintray.com/rabbitmq/Keys/rabbitmq-release-signing-key.asc
repo_gpgcheck=0
enabled=1

//yum清理
yum clear all
//下载缓存的生成
yum makecache
//下载erlang
yum install erlang
解决yum命令出现Loaded plugins: fastestmirror
vi /etc/yum.conf
plugins=0

解决no clear
yum clean all
要确认源是“rabbitmq_erlang
如果你网络不好,也可以使用教辅下载好的直接安装
yum install安装包上传到linux的完整路径名
安装RabbitMQ
我们将要安装的RabbitMQ的版本是3.8.2
导入密钥
rpm --import https://www.rabbitmq.com/rabbitmq-release-signing-key.asc

下载rpm安装包:
wget https://dl.bintray.com/rabbitmq/all/rabbitmq-server/3.8.2/rabbitmq-server-3.8.2-1.el7.noarch.rpm

如果速度比较慢,就用:
wget https://github.com/rabbitmq/rabbitmq-server/releases/download/v3.8.2/rabbitmq-server-3.8.2-1.el7.noarch.rpm

 或者本地上传
scp  /Users/didi/Desktop/RabbitMQ教辅/rabbitmq-server-3.8.2-1.el7.noarch.rpm [email protected]:/root

下载完成后,安装:
yum install rabbitmq-server-3.8.2-1.el7.noarch.rpm
如果出现解压错误,说明下载了多次,用ls -la看一下有几个文件,如果有多个安装包,要把多余的删掉,把正确的改名为rabbitmq-server-3.8.2-1.el7.noarch.rpm,再执行yum install来安装
到这里RabbitMQ就安装好了
RabbitMQ常用命令
停止RabbitMQ
$rabbitmqctl stop
设置开机启动
$ systemctl enable rabbitmq-server
启动RabbitMQ
$ systemctl start rabbitmq-server
看看端口有没有起来,查看状态
$ rabbitmqctl status
要检查RabbitMQ服务器的状态,请运行:
systemctl status rabbitmq-server
开启web管理界面
rabbitmq-plugins enable rabbitmq_management
rabbitmq-plugins enable rabbitmq_management
rabbitmqctl add_user admin password
rabbitmqctl set_user_tags admin administrator

//开启安全策略15672
http://xxx:15672/
Mac OS下的安装和启动
官方安装指南:https://www.rabbitmq.com/install-homebrew.html
在Mac OS X中使用brew工具,可以很容易的安装RabbitMQ的服务端,只需要按如下命令操作即可:
brew的卸载安装
https://github.com/homebrew/install#uninstall-homebrew

卸载brew
/bin/bash -c "$(curl -fsSL https://raw.githubusercontent.com/Homebrew/install/master/uninstall.sh)"
安装镜像中科大 序列号1 ,y
/bin/zsh -c "$(curl -fsSL https://gitee.com/cunkai/HomebrewCN/raw/master/Homebrew.sh)"
本地软件库列表:brew ls
        查找软件:brew search google(其中google替换为要查找的软件关键字)
        查看brew版本:brew -v  更新brew版本:brew update

brew更新到最新版本,执行:brew update
安装Erlang,执行:brew install erlang
安装RabbitMQ Server,执行:brew install rabbitmq
解决mac升级
macOS升级至macOS Big Sur 使用brew upgrade更新软件报Error: Your CLT does not support macOS 11.
sudo rm -rf /Library/Developer/CommandLineTools
sudo xcode-select --install
mq环境变量
通过上面的命令安装后,RabbitMQ Server的命令会被安装到/usr/local/opt/rabbitmq/sbin,并不会自动加到用户的环境变量中去:
启动Terminal
进入当前用户的home目录
输入 cd ~
编辑.bash_profile文件

输入open -e .bash_profile,这时./bash_profile就会打开,可以在后面加入要写入的环境变量(注意:从后往前读,注意覆盖)
所以我们需要在.bash_profile或.profile文件中增加下面内容:
export PATH=$PATH:/usr/local/Cellar/rabbitmq/3.8.9_1/sbin


更新刚配置的环境变量
输入source .bash_profile
这样,我们就可以通过rabbitmq-server命令来启动RabbitMQ的服务端了。
rabbitmq-server

0##  ##      RabbitMQ 3.8.2
  ##  ##
  ##########  Copyright (c) 2007-2019 Pivotal Software, Inc.
  ######  ##
  ##########  Licensed under the MPL 1.1. Website: https://rabbitmq.com

  Doc guides: https://rabbitmq.com/documentation.html
  Support:    https://rabbitmq.com/contact.html
  Tutorials:  https://rabbitmq.com/getstarted.html
  Monitoring: https://rabbitmq.com/monitoring.html

  Logs: /usr/local/var/log/rabbitmq/[email protected]
        /usr/local/var/log/rabbitmq/rabbit@localhost_upgrade.log

  Config file(s): (none)

  Starting broker... completed with 6 plugins.
打开管理后台
rabbitmq-plugins enable rabbitmq_management
添加admin账号,赋予administrator权限
rabbitmqctl add_user admin password
rabbitmqctl set_user_tags admin administrator
然后访问浏览器进入管理页面
Windows安装
不推荐,因为要求系统用户名和计算机名必须是英文,而Win10改名比较麻烦,而且可能会有其他坑,而且和未来的实际工作场景严重不符,没有Windows作为服务器的。
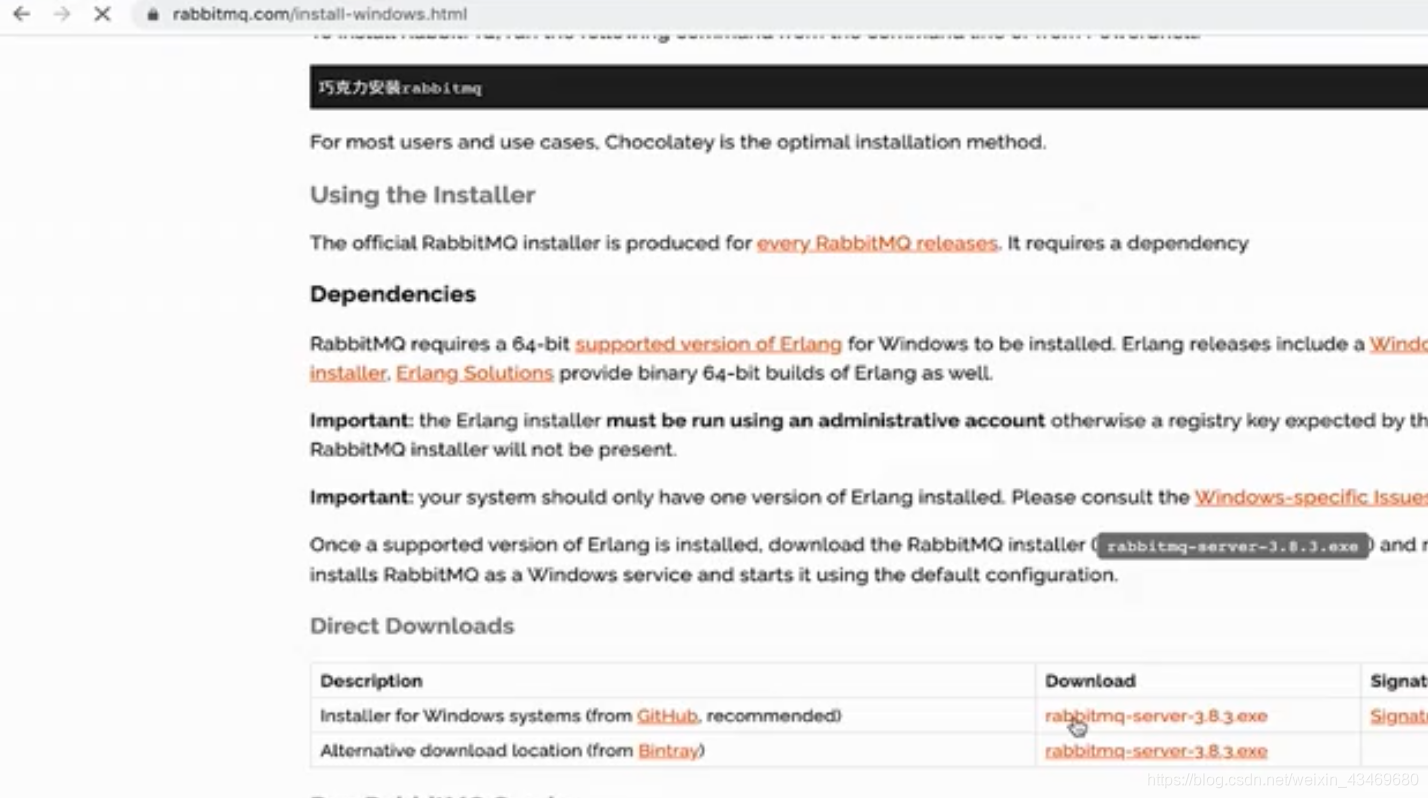
官方安装指南:https://www.rabbitmq.com/install-windows.html
详细步骤:https://www.cnblogs.com/saryli/p/9729591.html
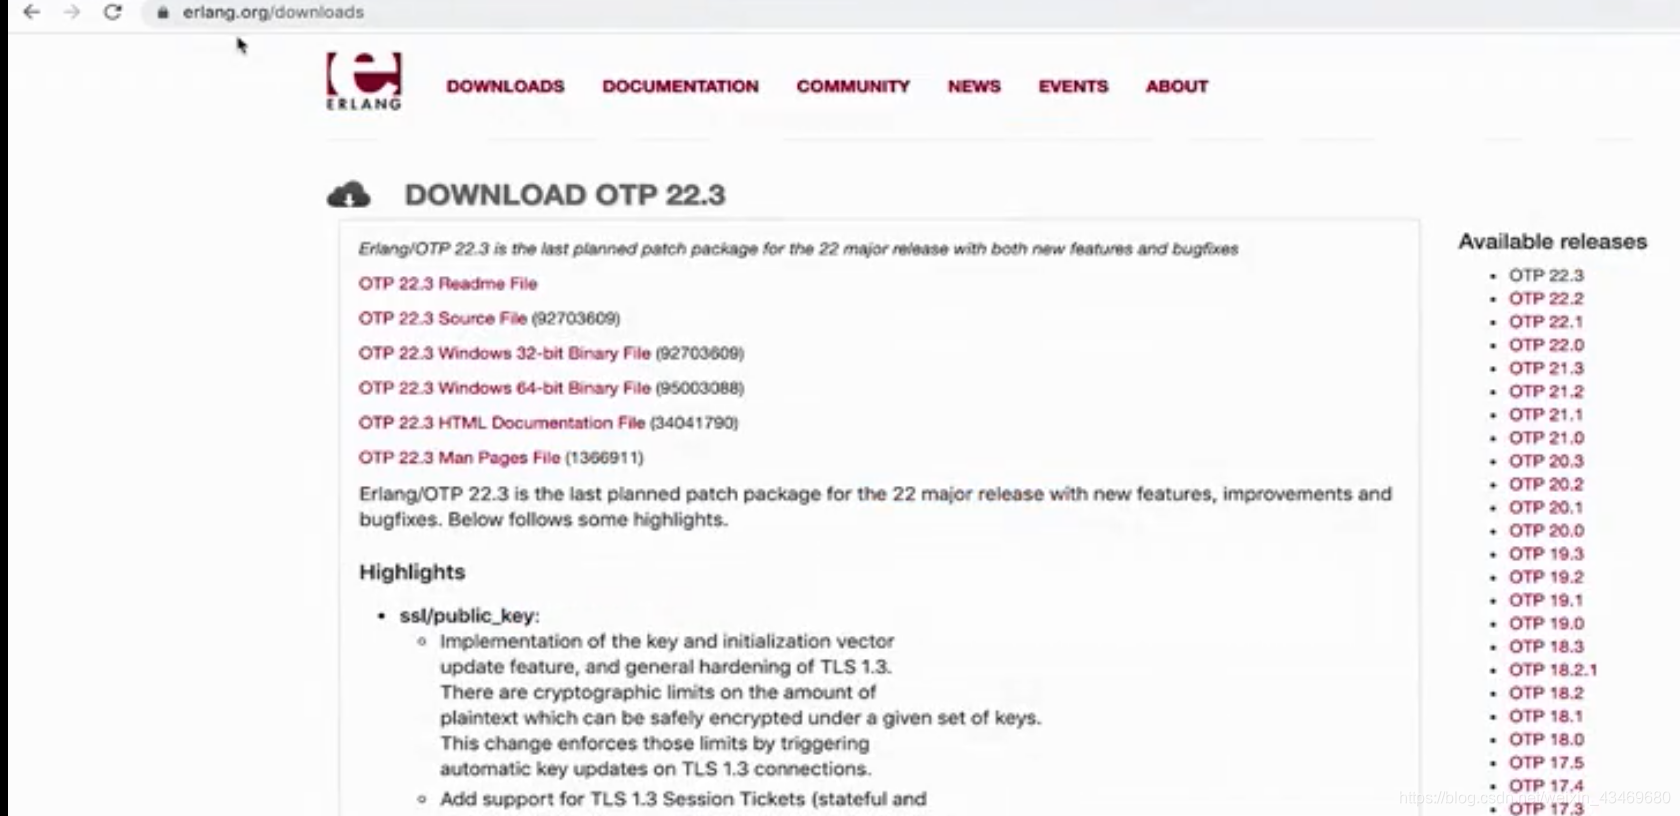
安装Erland,通过官方下载页面http://www.erlang.org/downloads获取exe安装包,直接打开并完成安装。
安装RabbitMQ,通过官方下载页面https://www.rabbitmq.com/install-windows.html获取exe安装包并安装,下载地址:https://github.com/rabbitmq/rabbitmq-server/releases/download/v3.8.2/rabbitmq-server-3.8.2.exe
下载完成后,直接运行安装程序。
RabbitMQ Server安装完成之后,会自动的注册为服务,并以默认配置启动起来。

用终端cmd输入:
cd E:\你的RabbitMQ按照地址\sbin
rabbitmq-server
rabbitmq-plugins enable rabbitmq_management
然后就可以用guest访问http://127.0.0.1:15672/#/
代码
helloworld
生产者
package helloworld;
import com.rabbitmq.client.Channel;
import com.rabbitmq.client.Connection;
import com.rabbitmq.client.ConnectionFactory;
import java.io.IOException;
import java.util.concurrent.TimeoutException;
/**
* @Author bennyrhys
* @Date 12/21/20 4:37 PM
*/
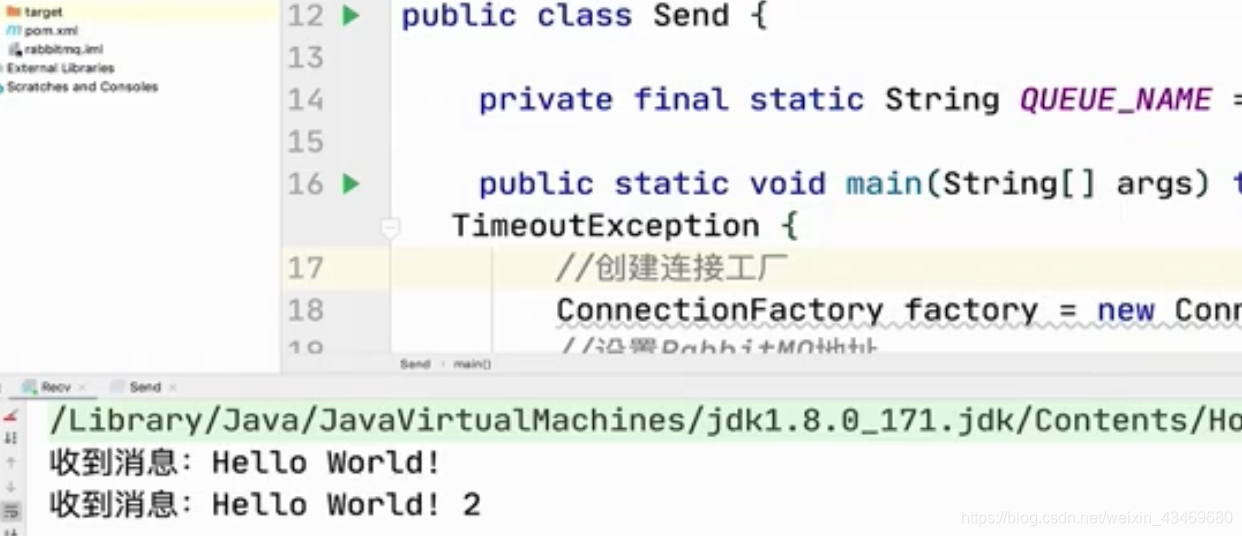
public class Send {
private final static String QUEUE_NAME = "helloworld";
public static void main(String[] args) throws IOException, TimeoutException {
//创建链接工厂
ConnectionFactory factory = new ConnectionFactory();
//设置RabbitMQ地址 注意开放安全组5672 用自己创建的用户
factory.setHost("39.106.75.223");
factory.setUsername("admin");
factory.setPassword("password");
//建立连接
Connection connection = factory.newConnection();
//获得信道
Channel channel = connection.createChannel();
//声明队列
channel.queueDeclare(QUEUE_NAME, false, false, false, null);
//发布消息
String message = "Hello World 2";
channel.basicPublish("", QUEUE_NAME, null, message.getBytes("UTF-8"));
System.out.println("发送了消息" + message);
//关闭连接
channel.close();
connection.close();
}
}
消费者
package helloworld;

import com.rabbitmq.client.*;

import java.io.IOException;
import java.util.concurrent.TimeoutException;

/**
 * @Author bennyrhys
 * @Date 12/21/20 5:17 PM
 */
public class Recv {


    private final static String QUEUE_NAME = "helloworld";
    public static void main(String[] args) throws IOException, TimeoutException {


        //创建链接工厂
        ConnectionFactory factory = new ConnectionFactory();
        //设置RabbitMQ地址 注意开放安全组5672 用自己创建的用户
        factory.setHost("39.106.75.223");
        factory.setUsername("admin");
        factory.setPassword("password");
        //建立连接
        Connection connection = factory.newConnection();
        //获得信道
        Channel channel = connection.createChannel();
        //声明队列
        channel.queueDeclare(QUEUE_NAME, false, false, false, null);
        //接收消息
        channel.basicConsume(QUEUE_NAME, true, new DefaultConsumer(channel) {


            @Override
            public void handleDelivery(String consumerTag, Envelope envelope, AMQP.BasicProperties properties, byte[] body) throws IOException {


                String message = new String(body, "UTF-8");
                System.out.println("收到了消息" + message);
            }
        });
    }
}
单个消费者处理(Thread.sleep)

package workqueues;

import com.rabbitmq.client.Channel;
import com.rabbitmq.client.Connection;
import com.rabbitmq.client.ConnectionFactory;

import java.io.IOException;
import java.util.concurrent.TimeoutException;

/**
 * @Author bennyrhys
 * @Date 12/22/20 2:38 PM
 * 任务有所耗时,多个任务
 */
public class NewTask {


    private final static String TASK_QUEUE_NAME = "task_queue";
    public static void main(String[] args) throws IOException, TimeoutException {


        //创建链接工厂
        ConnectionFactory factory = new ConnectionFactory();
        //设置RabbitMQ地址 注意开放安全组5672 用自己创建的用户(本地启动localhost 默认guest,先启动本地 rabbitmq-server)
        factory.setHost("localhost");
        //建立连接
        Connection connection = factory.newConnection();
        //获得信道
        Channel channel = connection.createChannel();
        //声明队列
        channel.queueDeclare(TASK_QUEUE_NAME, true, false, false, null);
        //发布消息
        for (int i = 0; i < 10; i++) {


            String message;
            message = i + "...";
            channel.basicPublish("", TASK_QUEUE_NAME, null, message.getBytes("UTF-8"));
        }
        channel.close();
        connection.close();
    }
}
package workqueues;

import com.rabbitmq.client.*;

import java.io.IOException;
import java.util.concurrent.TimeoutException;

/**
 * @Author bennyrhys
 * @Date 12/22/20 2:59 PM
 * 消费者 批量处理
 */
public class Work {


    private final static String TASK_QUEUE_NAME = "task_queue";
    public static void main(String[] args) throws IOException, TimeoutException {


        //创建链接工厂
        ConnectionFactory factory = new ConnectionFactory();
        //设置RabbitMQ地址 注意开放安全组5672 用自己创建的用户(本地启动localhost 默认guest,先启动本地 rabbitmq-server)
        factory.setHost("localhost");
        //建立连接
        Connection connection = factory.newConnection();
        //获得信道
        Channel channel = connection.createChannel();
        //声明队列
        channel.queueDeclare(TASK_QUEUE_NAME, true, false, false, null);
        //订阅消息 批处理
        channel.basicConsume(TASK_QUEUE_NAME, true, new DefaultConsumer(channel) {


            @Override
            public void handleDelivery(String consumerTag, Envelope envelope, AMQP.BasicProperties properties, byte[] body) throws IOException {


                String message = new String(body, "UTF-8");
                System.out.println("收到了消息:" + message);
                try {


                    doWork(message);
                }finally {


                    System.out.println("消息处理完成");
                }
            }
        });
    }

    private static void doWork(String task) {


        char[] chars = task.toCharArray();
        for (char c : chars) {


            if (c == '.') {


                try {


                    Thread.sleep(1000);
                } catch (InterruptedException e) {


                    e.printStackTrace();
                }
            }
        }
    }
}
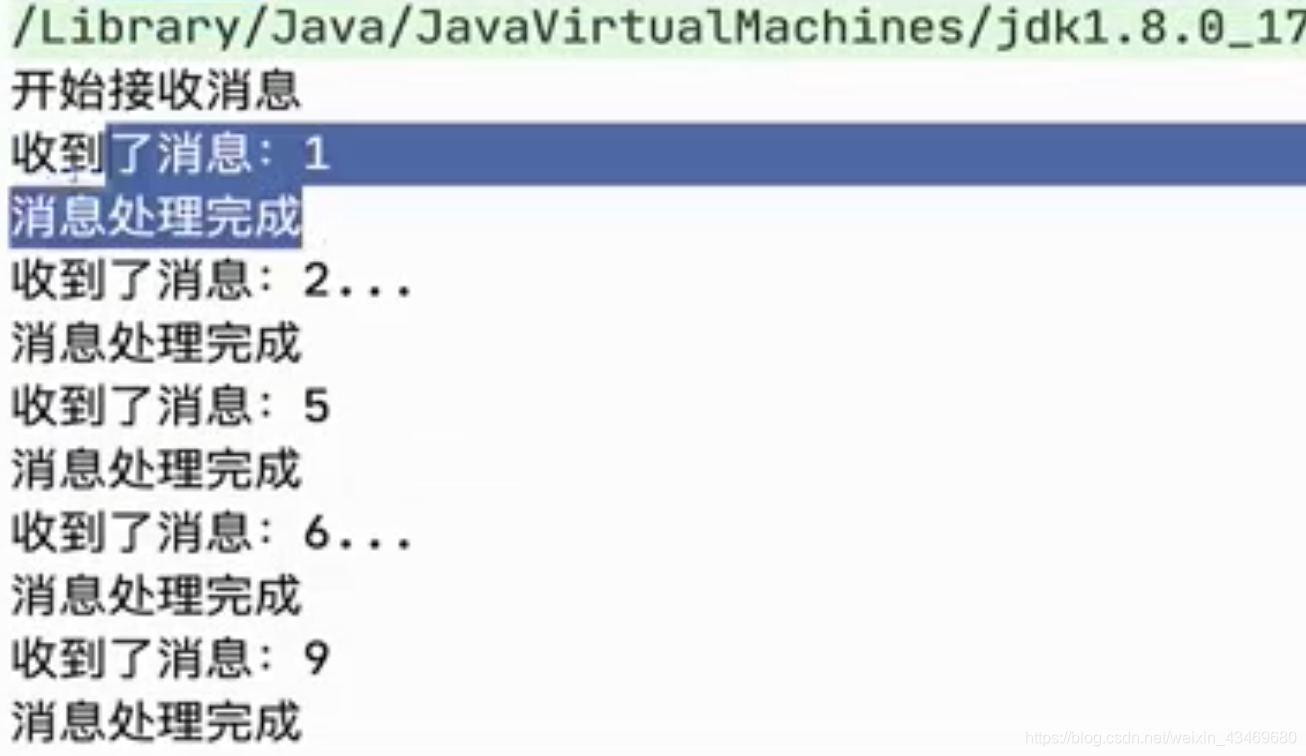
多消费者批处理(循环平均分配,不公平)
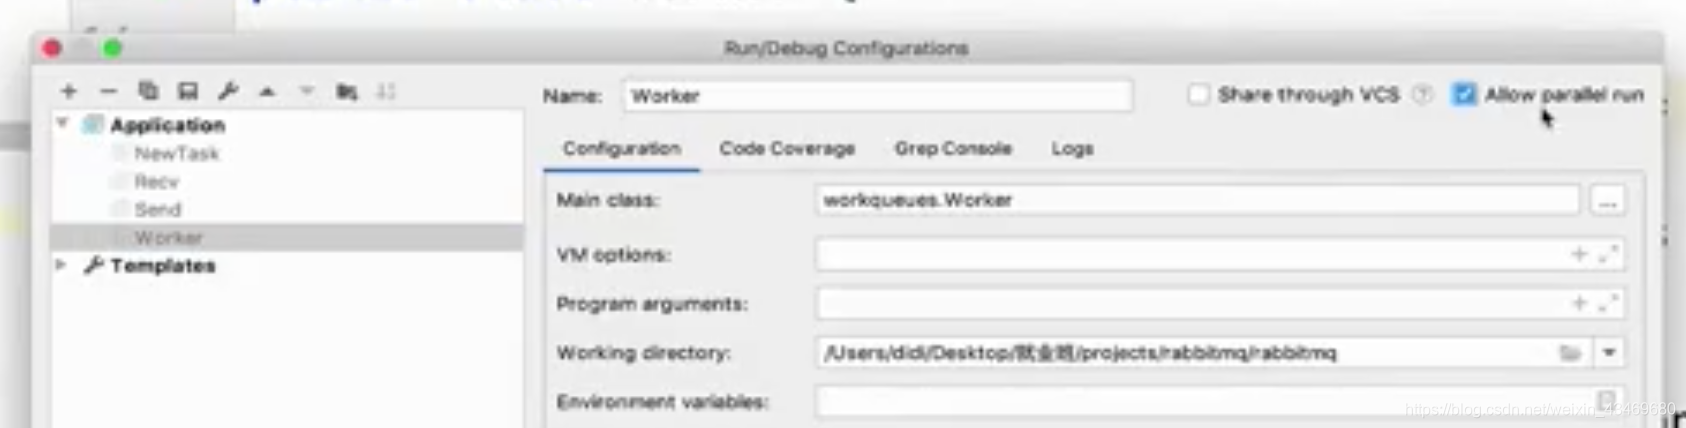
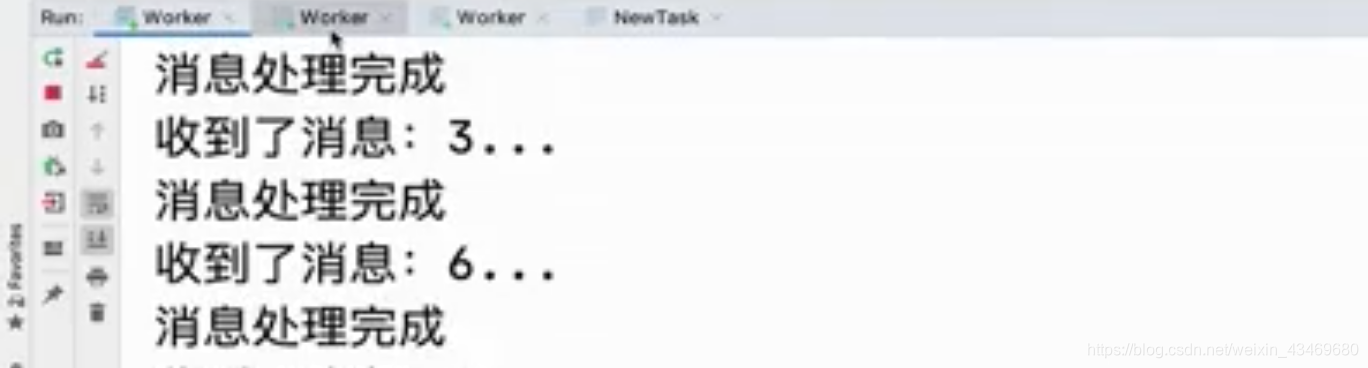
多消费者批处理(压力平均分配,公平)
手动ack
package workqueues;

import com.rabbitmq.client.Channel;
import com.rabbitmq.client.Connection;
import com.rabbitmq.client.ConnectionFactory;

import java.io.IOException;
import java.util.concurrent.TimeoutException;

/**
 * @Author bennyrhys
 * @Date 12/22/20 2:38 PM
 * 任务有所耗时,多个任务
 */
public class NewTask {


    private final static String TASK_QUEUE_NAME = "task_queue";
    public static void main(String[] args) throws IOException, TimeoutException {


        //创建链接工厂
        ConnectionFactory factory = new ConnectionFactory();
        //设置RabbitMQ地址 注意开放安全组5672 用自己创建的用户(本地启动localhost 默认guest,先启动本地 rabbitmq-server)
        factory.setHost("localhost");
        //建立连接
        Connection connection = factory.newConnection();
        //获得信道
        Channel channel = connection.createChannel();
        //声明队列
        channel.queueDeclare(TASK_QUEUE_NAME, true, false, false, null);
        //发布消息
        for (int i = 0; i < 10; i++) {


            String message;
            if (i % 2 == 0) {


                message = i + "...";
            }else {


                message = String.valueOf(i);
            }
            channel.basicPublish("", TASK_QUEUE_NAME, null, message.getBytes("UTF-8"));
        }
        channel.close();
        connection.close();
    }
}
package workqueues;

import com.rabbitmq.client.*;

import java.io.IOException;
import java.util.concurrent.TimeoutException;

/**
 * @Author bennyrhys
 * @Date 12/22/20 2:59 PM
 * 消费者 批量处理
 */
public class Work {


    private final static String TASK_QUEUE_NAME = "task_queue";
    public static void main(String[] args) throws IOException, TimeoutException {


        //创建链接工厂
        ConnectionFactory factory = new ConnectionFactory();
        //设置RabbitMQ地址 注意开放安全组5672 用自己创建的用户(本地启动localhost 默认guest,先启动本地 rabbitmq-server)
        factory.setHost("localhost");
        //建立连接
        Connection connection = factory.newConnection();
        //获得信道
        final Channel channel = connection.createChannel();
        //声明队列
        channel.queueDeclare(TASK_QUEUE_NAME, true, false, false, null);
        //订阅消息 批处理
        //希望处理的数量
        channel.basicQos(1);
        //关闭自动ack
        channel.basicConsume(TASK_QUEUE_NAME, false, new DefaultConsumer(channel) {


            @Override
            public void handleDelivery(String consumerTag, Envelope envelope, AMQP.BasicProperties properties, byte[] body) throws IOException {


                String message = new String(body, "UTF-8");
                System.out.println("收到了消息:" + message);
                try {


                    doWork(message);
                }finally {


                    //同时多个确认false
                    channel.basicAck(envelope.getDeliveryTag(), false);
                    System.out.println("消息处理完成");
                }
            }
        });
    }

    private static void doWork(String task) {


        char[] chars = task.toCharArray();
        for (char c : chars) {


            if (c == '.') {


                try {


                    Thread.sleep(1000);
                } catch (InterruptedException e) {


                    e.printStackTrace();
                }
            }
        }
    }
}
交换机模式
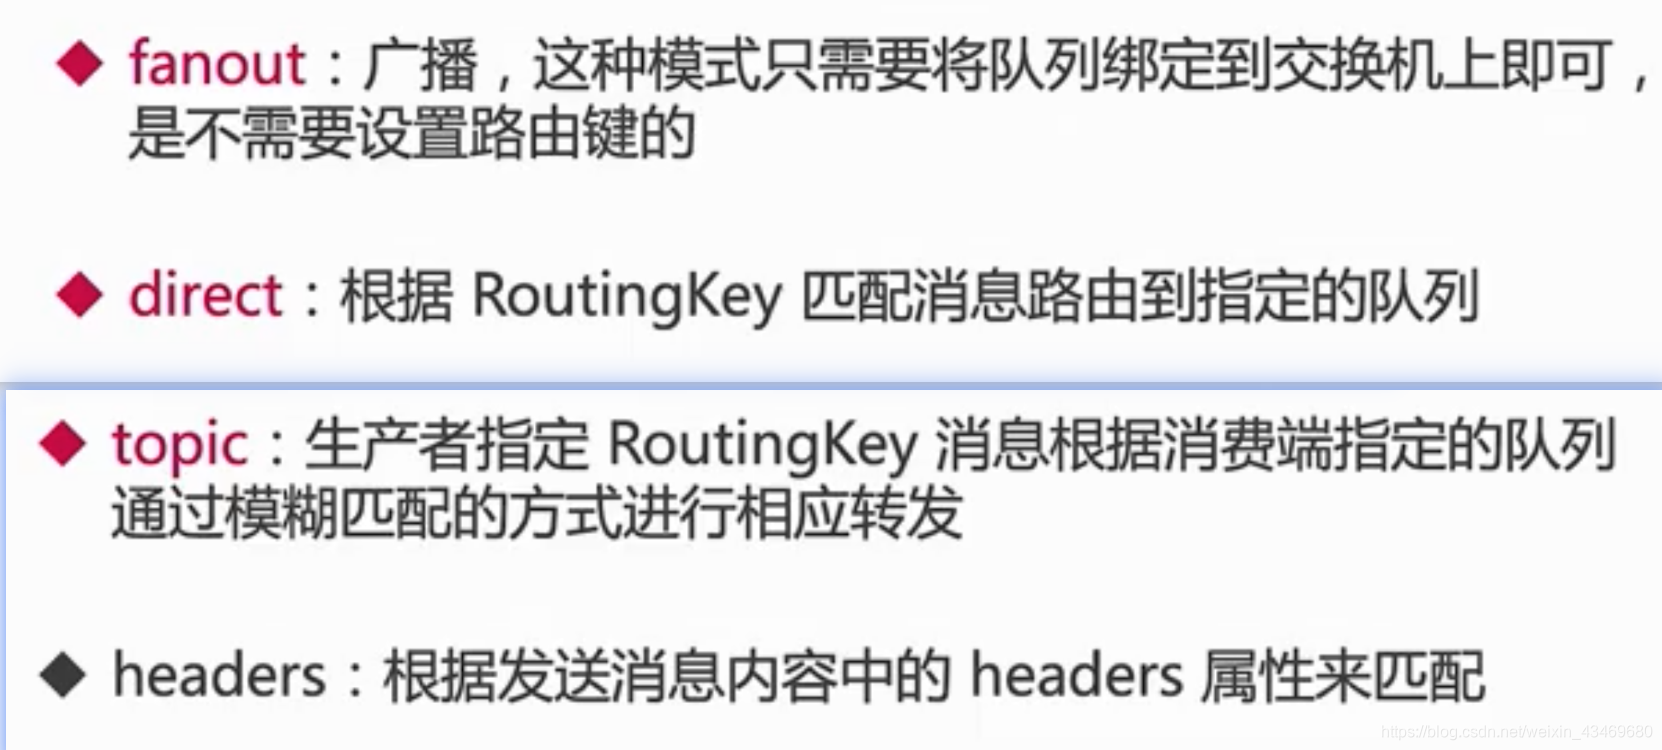
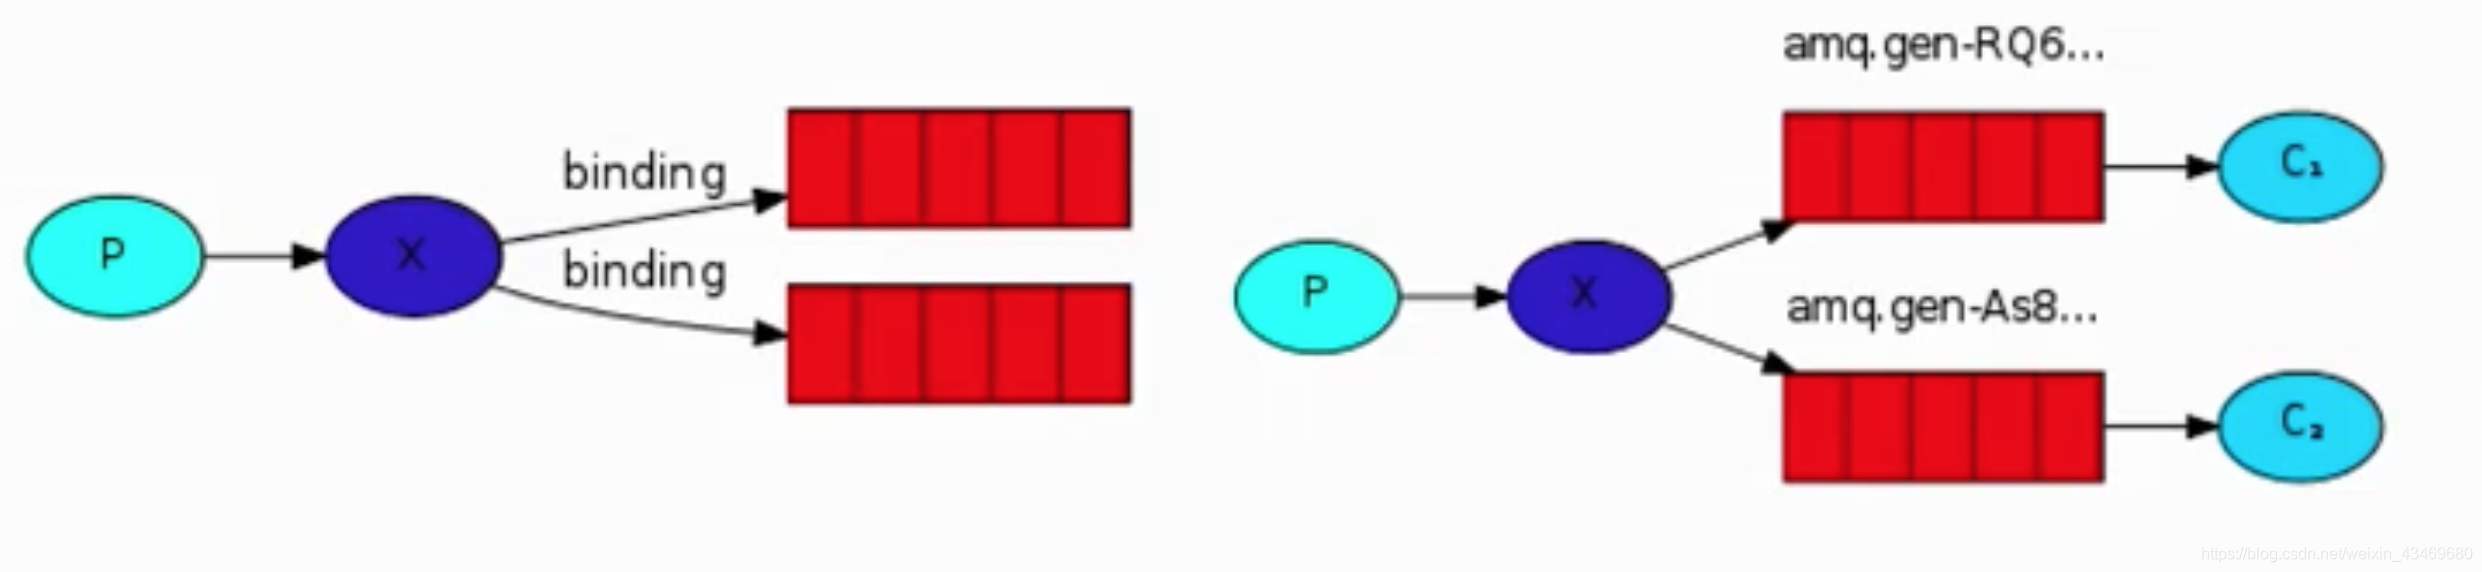
广播fanout
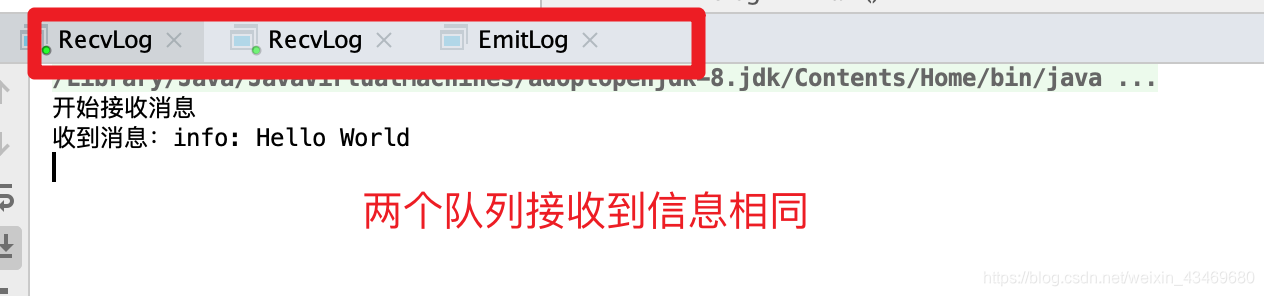
日志 (打印,存储)
队列消息不积压,必先开启消费者。
当没有消费者时,自动删除队列,每次重新,新建新的队列名
创建交换机,绑定交换机与队列
package fanout;

import com.rabbitmq.client.BuiltinExchangeType;
import com.rabbitmq.client.Channel;
import com.rabbitmq.client.Connection;
import com.rabbitmq.client.ConnectionFactory;

import java.io.IOException;
import java.util.concurrent.TimeoutException;

/**
 * @Author bennyrhys
 * @Date 12/22/20 4:46 PM
 * 发送日志
 */
public class EmitLog {


    private static final String EXCHANGE_NAME = "logs";

    public static void main(String[] args) throws IOException, TimeoutException {


        ConnectionFactory factory = new ConnectionFactory();
        factory.setHost("localhost");
        Connection connection = factory.newConnection();
        Channel channel = connection.createChannel();
        channel.exchangeDeclare(EXCHANGE_NAME, BuiltinExchangeType.FANOUT);

        String message = "info: Hello World";

        channel.basicPublish(EXCHANGE_NAME, "", null, message.getBytes("UTF-8"));
        System.out.println("发送了消息:" + message);
        channel.close();
        connection.close();
    }
}
package fanout;

import com.rabbitmq.client.*;

import java.io.IOException;
import java.util.concurrent.TimeoutException;

/**
 * @Author bennyrhys
 * @Date 12/22/20 4:51 PM
 * 接收日志:开启配置并行处理多个队列,绑定交换机获取相同内容
 */
public class RecvLog {


    private static final String EXCHANGE_NAME = "logs";

    public static void main(String[] args) throws IOException, TimeoutException {


        ConnectionFactory factory = new ConnectionFactory();
        factory.setHost("localhost");
        Connection connection = factory.newConnection();
        Channel channel = connection.createChannel();
        channel.exchangeDeclare(EXCHANGE_NAME, BuiltinExchangeType.FANOUT);

        //获取每次自动创建的队列名
        String queueName = channel.queueDeclare().getQueue();
        channel.queueBind(queueName, EXCHANGE_NAME, "");

        System.out.println("开始接收消息");
        DefaultConsumer consumer = new DefaultConsumer(channel) {


            @Override
            public void handleDelivery(String consumerTag, Envelope envelope, AMQP.BasicProperties properties, byte[] body) throws IOException {


                String message = new String(body, "UTF-8");
                System.out.println("收到消息:" + message);
            }
        };
        channel.basicConsume(queueName, true, consumer);
    }
}
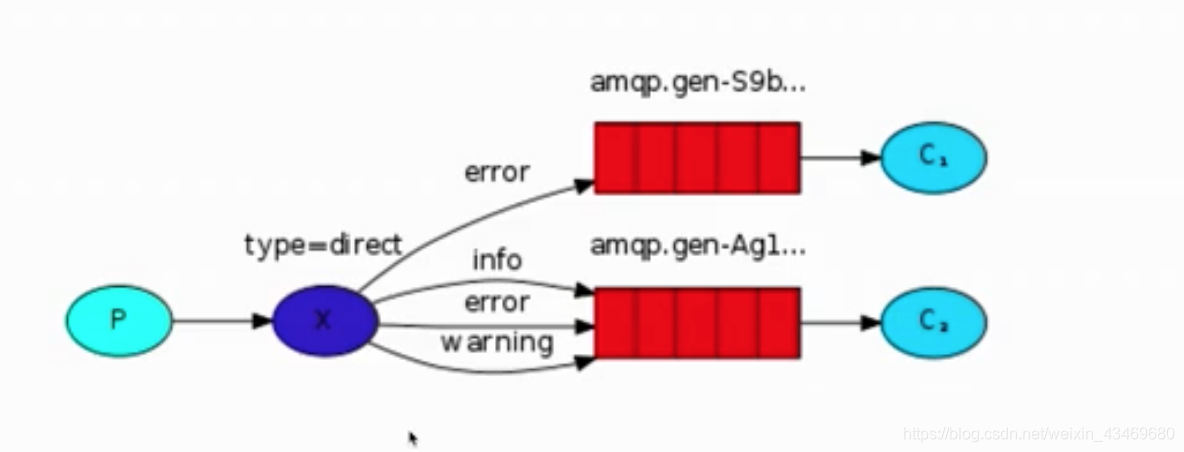
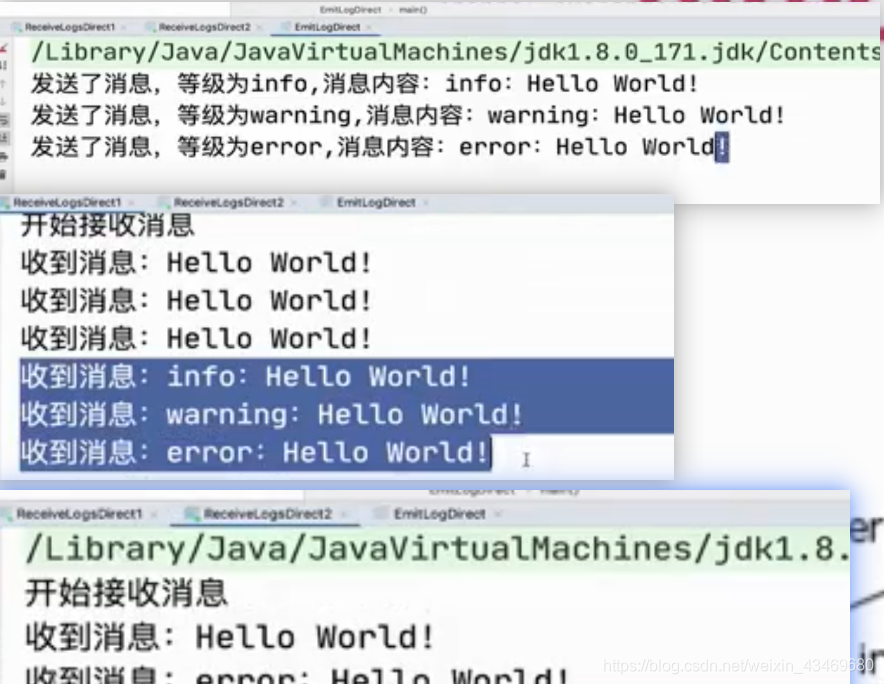
直接direct
日志不同级别(记录error,屏幕打印全部)
根据关键字分发
发送
package direct;

import com.rabbitmq.client.BuiltinExchangeType;
import com.rabbitmq.client.Channel;
import com.rabbitmq.client.Connection;
import com.rabbitmq.client.ConnectionFactory;

import java.io.IOException;
import java.util.concurrent.TimeoutException;

/**
 * @Author bennyrhys
 * @Date 12/22/20 5:16 PM
 * 日志发送 三种级别
 */
public class EmitLogDirect {


    private static final String EXCHANGE_NAME = "direct_logs";

    public static void main(String[] args) throws IOException, TimeoutException {


        ConnectionFactory factory = new ConnectionFactory();
        factory.setHost("localhost");
        Connection connection = factory.newConnection();
        Channel channel = connection.createChannel();
        channel.exchangeDeclare(EXCHANGE_NAME, BuiltinExchangeType.DIRECT);

        String message1 = "info: Hello World";
        String message2 = "error: Hello World";
        String message3 = "warn: Hello World";

        channel.basicPublish(EXCHANGE_NAME, "info", null, message1.getBytes("UTF-8"));
        System.out.println("发送了消息:" + message1);
        channel.basicPublish(EXCHANGE_NAME, "error", null, message2.getBytes("UTF-8"));
        System.out.println("发送了消息:" + message2);
        channel.basicPublish(EXCHANGE_NAME, "warn", null, message3.getBytes("UTF-8"));
        System.out.println("发送了消息:" + message3);
        channel.close();
        connection.close();
    }
}
接收三种
package direct;

import com.rabbitmq.client.*;

import java.io.IOException;
import java.util.concurrent.TimeoutException;

/**
 * @Author bennyrhys
 * @Date 12/22/20 5:19 PM
 * 接收日志 三种级别
 */
public class RecvLogDirect1 {


    private static final String EXCHANGE_NAME = "direct_logs";

    public static void main(String[] args) throws IOException, TimeoutException {


        ConnectionFactory factory = new ConnectionFactory();
        factory.setHost("localhost");
        Connection connection = factory.newConnection();
        Channel channel = connection.createChannel();
        channel.exchangeDeclare(EXCHANGE_NAME, BuiltinExchangeType.DIRECT);

        //生成一个随机的临时的queue
        String queueName = channel.queueDeclare().getQueue();
        //一个交换机同时绑定三个queue
        channel.queueBind(queueName, EXCHANGE_NAME, "info");
        channel.queueBind(queueName, EXCHANGE_NAME, "error");
        channel.queueBind(queueName, EXCHANGE_NAME, "warn");

        System.out.println("开始接收消息");
        DefaultConsumer consumer = new DefaultConsumer(channel) {


            @Override
            public void handleDelivery(String consumerTag, Envelope envelope, AMQP.BasicProperties properties, byte[] body) throws IOException {


                String message = new String(body, "UTF-8");
                System.out.println("收到消息:" + message);
            }
        };
        channel.basicConsume(queueName, true, consumer);
    }
}
接收一种
package direct;

import com.rabbitmq.client.*;

import java.io.IOException;
import java.util.concurrent.TimeoutException;

/**
 * @Author bennyrhys
 * @Date 12/22/20 5:19 PM
 * 接收日志 一种级别
 */
public class RecvLogDirect2 {


    private static final String EXCHANGE_NAME = "direct_logs";

    public static void main(String[] args) throws IOException, TimeoutException {


        ConnectionFactory factory = new ConnectionFactory();
        factory.setHost("localhost");
        Connection connection = factory.newConnection();
        Channel channel = connection.createChannel();
        channel.exchangeDeclare(EXCHANGE_NAME, BuiltinExchangeType.DIRECT);

        //生成一个随机的临时的queue
        String queueName = channel.queueDeclare().getQueue();
        //一个交换机同时绑定1个queue
        channel.queueBind(queueName, EXCHANGE_NAME, "error");

        System.out.println("开始接收消息");
        DefaultConsumer consumer = new DefaultConsumer(channel) {


            @Override
            public void handleDelivery(String consumerTag, Envelope envelope, AMQP.BasicProperties properties, byte[] body) throws IOException {


                String message = new String(body, "UTF-8");
                System.out.println("收到消息:" + message);
            }
        };
        channel.basicConsume(queueName, true, consumer);
    }
}
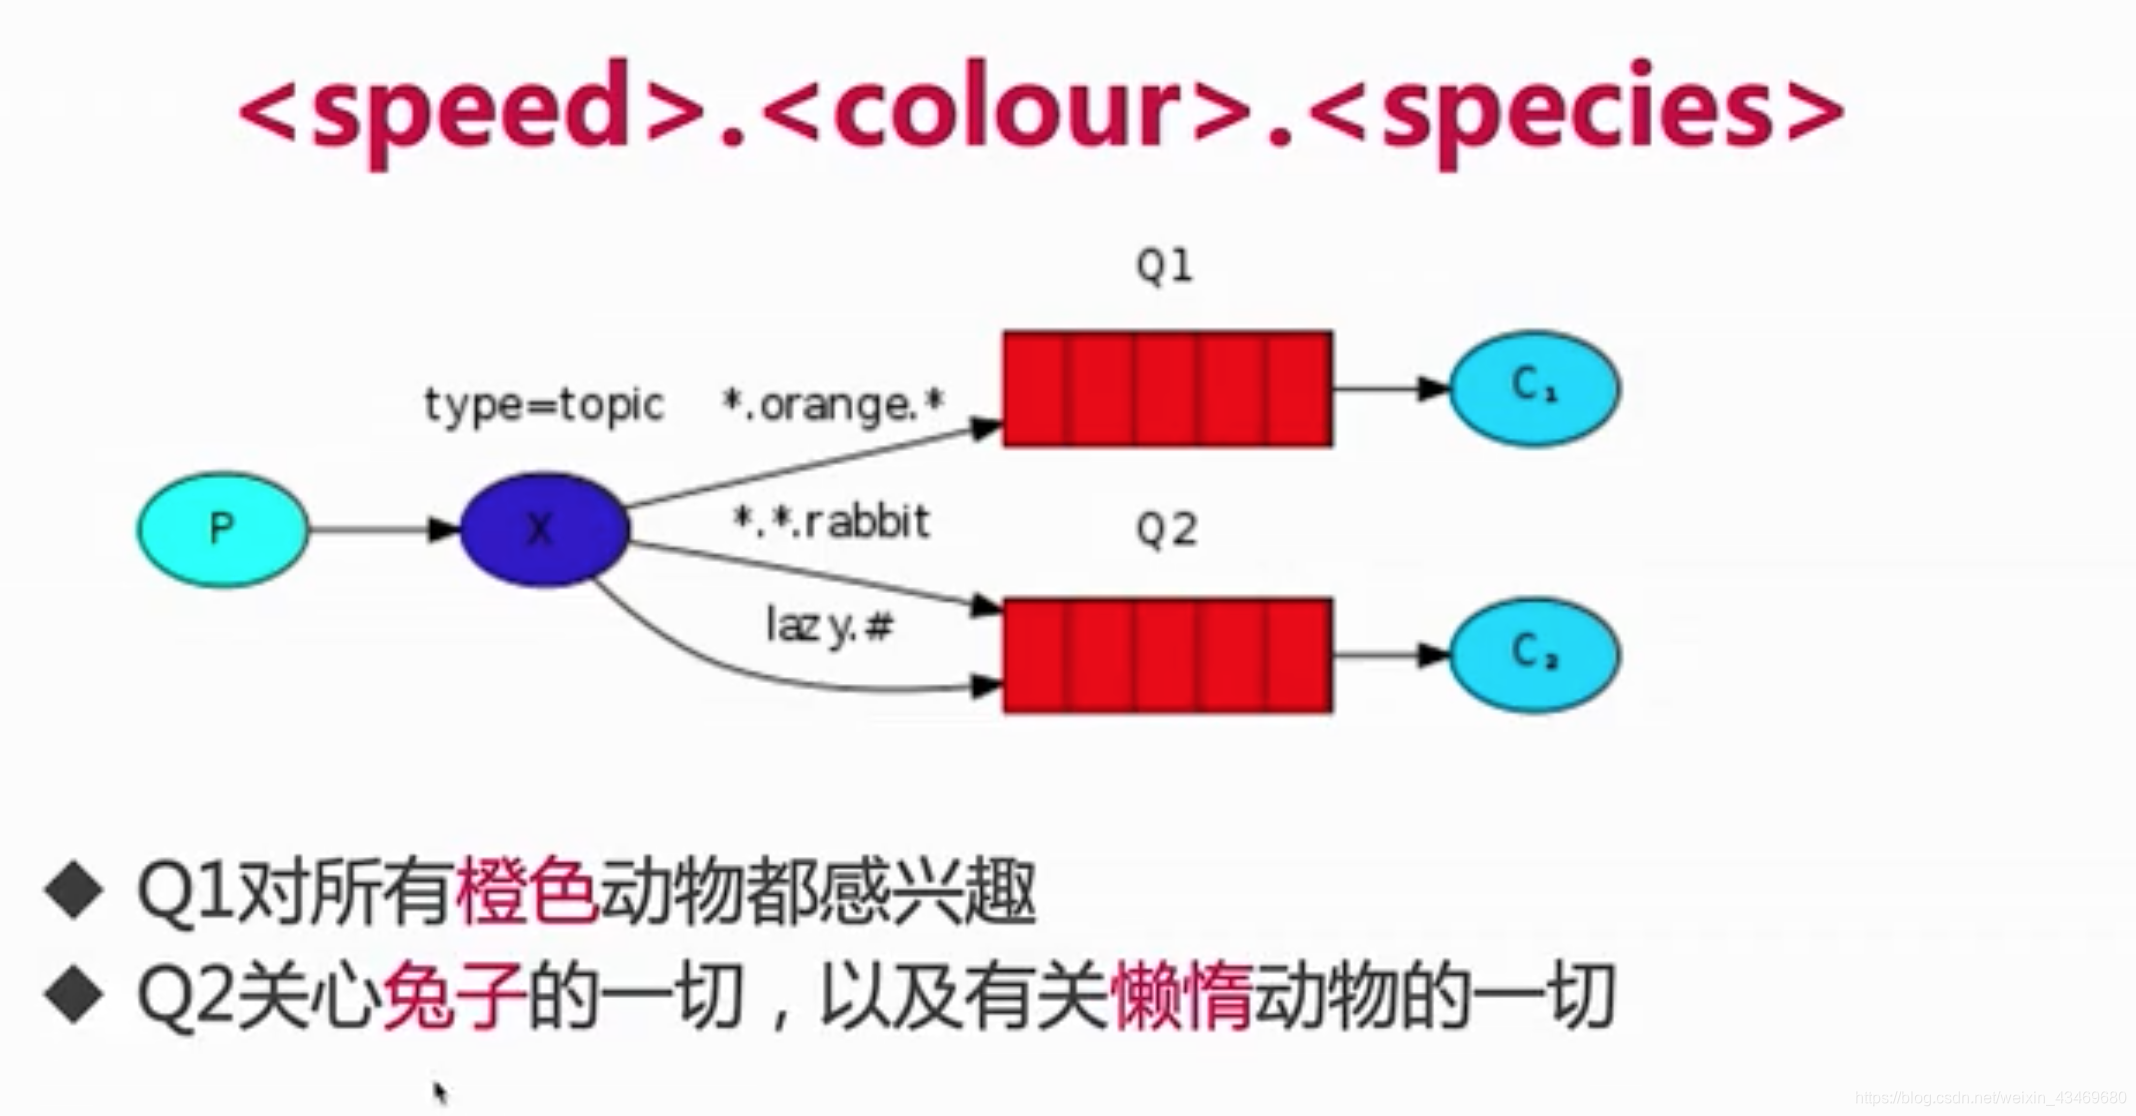
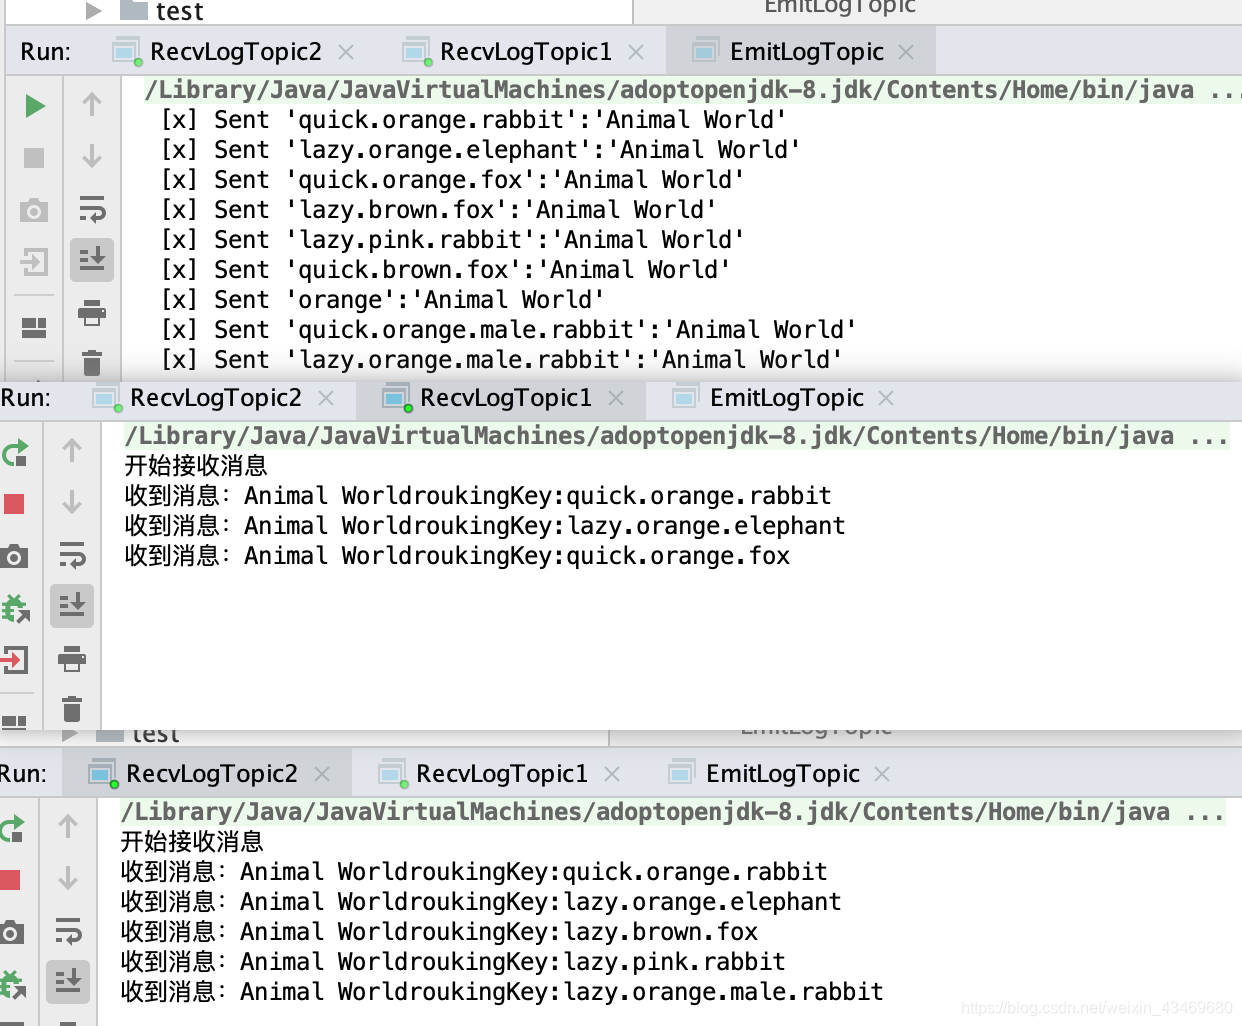
Topic模式

package topic;

import com.rabbitmq.client.BuiltinExchangeType;
import com.rabbitmq.client.Channel;
import com.rabbitmq.client.Connection;
import com.rabbitmq.client.ConnectionFactory;

import java.io.IOException;
import java.util.concurrent.TimeoutException;

/**
 * @Author bennyrhys
 * @Date 12/22/20 5:40 PM
 * Topic交换机 发送 多种匹配* #匹配
 */
public class EmitLogTopic {


    private static final String EXCHANGE_NAME = "topic_logs";

    public static void main(String[] args) throws IOException, TimeoutException {


        ConnectionFactory factory = new ConnectionFactory();
        factory.setHost("localhost");
        Connection connection = factory.newConnection();
        Channel channel = connection.createChannel();
        channel.exchangeDeclare(EXCHANGE_NAME, BuiltinExchangeType.TOPIC);

        String message = "Animal World";

        String[] routingKeys = new String[9];
        routingKeys[0] = "quick.orange.rabbit";
        routingKeys[1] = "lazy.orange.elephant";
        routingKeys[2] = "quick.orange.fox";
        routingKeys[3] = "lazy.brown.fox";
        routingKeys[4] = "lazy.pink.rabbit";
        routingKeys[5] = "quick.brown.fox";
        routingKeys[6] = "orange";
        routingKeys[7] = "quick.orange.male.rabbit";
        routingKeys[8] = "lazy.orange.male.rabbit";
        for (int i = 0; i < routingKeys.length; i++) {


            channel.basicPublish(EXCHANGE_NAME, routingKeys[i], null,
                    message.getBytes("UTF-8"));
            System.out.println(" [x] Sent '" + routingKeys[i] + "':'" + message + "'");
        }

        channel.close();
        connection.close();
    }
}
package topic;

import com.rabbitmq.client.*;

import java.io.IOException;
import java.util.concurrent.TimeoutException;

/**
 * @Author bennyrhys
 * @Date 12/22/20 5:45 PM
 * 接收1种匹配
 */
public class RecvLogTopic1 {


    private static final String EXCHANGE_NAME = "topic_logs";

    public static void main(String[] args) throws IOException, TimeoutException {


        ConnectionFactory factory = new ConnectionFactory();
        factory.setHost("localhost");
        Connection connection = factory.newConnection();
        Channel channel = connection.createChannel();
        channel.exchangeDeclare(EXCHANGE_NAME, BuiltinExchangeType.TOPIC);

        //生成一个随机的临时的queue
        String queueName = channel.queueDeclare().getQueue();
        String routingKey = "*.orange.*";
        //一个交换机同时绑定1个queue
        channel.queueBind(queueName, EXCHANGE_NAME, routingKey);

        System.out.println("开始接收消息");
        DefaultConsumer consumer = new DefaultConsumer(channel) {


            @Override
            public void handleDelivery(String consumerTag, Envelope envelope, AMQP.BasicProperties properties, byte[] body) throws IOException {


                String message = new String(body, "UTF-8");
                System.out.println("收到消息:" + message + "roukingKey:" + envelope.getRoutingKey());
            }
        };
        channel.basicConsume(queueName, true, consumer);
    }
}
package topic;

import com.rabbitmq.client.*;

import java.io.IOException;
import java.util.concurrent.TimeoutException;

/**
 * @Author bennyrhys
 * @Date 12/22/20 5:45 PM
 * 接收1种匹配
 */
public class RecvLogTopic2 {


    private static final String EXCHANGE_NAME = "topic_logs";

    public static void main(String[] args) throws IOException, TimeoutException {


        ConnectionFactory factory = new ConnectionFactory();
        factory.setHost("localhost");
        Connection connection = factory.newConnection();
        Channel channel = connection.createChannel();
        channel.exchangeDeclare(EXCHANGE_NAME, BuiltinExchangeType.TOPIC);

        //生成一个随机的临时的queue
        String queueName = channel.queueDeclare().getQueue();

        String routingKey = "*.*.rabbit";
        channel.queueBind(queueName, EXCHANGE_NAME, routingKey);
        String routingKey2 = "lazy.#";
        channel.queueBind(queueName, EXCHANGE_NAME, routingKey2);

        System.out.println("开始接收消息");
        DefaultConsumer consumer = new DefaultConsumer(channel) {


            @Override
            public void handleDelivery(String consumerTag, Envelope envelope, AMQP.BasicProperties properties, byte[] body) throws IOException {


                String message = new String(body, "UTF-8");
                System.out.println("收到消息:" + message + "roukingKey:" + envelope.getRoutingKey());
            }
        };
        channel.basicConsume(queueName, true, consumer);
    }
}
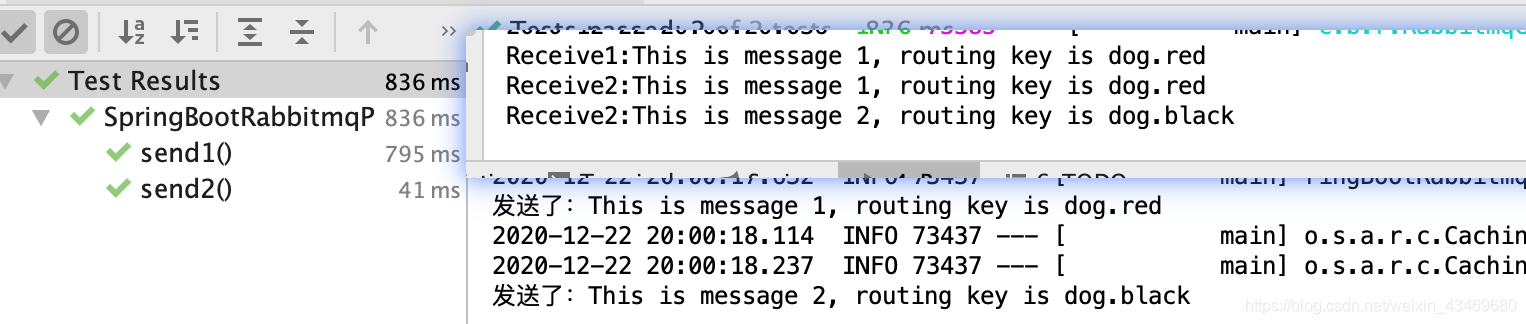
SpringBoot整合MQ
效果图
代码
pom
        <version>2.2.1.RELEASE</version>

		<!--rabbitmq-->
        <dependency>
            <groupId>org.springframework.boot</groupId>
            <artifactId>spring-boot-starter-amqp</artifactId>
        </dependency>
poducer
server.port=8080
spring.application.name=product

spring.rabbitmq.addresses=127.0.0.1:5672
spring.rabbitmq.username=guest
spring.rabbitmq.password=guest
spring.rabbitmq.virtual-host=/
spring.rabbitmq.connection-timeout=15000
package com.bennyrhys.rabbitmqproduct;

import org.springframework.amqp.core.Binding;
import org.springframework.amqp.core.BindingBuilder;
import org.springframework.amqp.core.Queue;
import org.springframework.amqp.core.TopicExchange;
import org.springframework.context.annotation.Bean;
import org.springframework.context.annotation.Configuration;

/**
 * 描述:     rabbitmq配置类
 */
@Configuration
public class TopicRabbitConfig {


    /**
     * 此处queue返回值和方法名一样,方便spring识别
     * @return
     */
    @Bean
    public Queue queue1() {


        return new Queue("queue1");
    }

    @Bean
    public Queue queue2() {


        return new Queue("queue2");
    }

    @Bean
    TopicExchange exchange() {


        return new TopicExchange("bootExchange");
    }

    @Bean
    Binding bingdingExchangeMessage1(Queue queue1, TopicExchange exchange) {


        return BindingBuilder.bind(queue1).to(exchange).with("dog.red");
    }

    @Bean
    Binding bingdingExchangeMessage2(Queue queue2, TopicExchange exchange) {


        return BindingBuilder.bind(queue2).to(exchange).with("dog.#");
    }
}
package com.bennyrhys.rabbitmqproduct;

import org.springframework.amqp.core.AmqpTemplate;
import org.springframework.beans.factory.annotation.Autowired;
import org.springframework.stereotype.Component;

/**
 * 描述:     发送消息
 */
@Component
public class MsgSender {


    @Autowired
    private AmqpTemplate rabbitmqTemplate;

    public void send1() {


        String message = "This is message 1, routing key is dog.red";
        System.out.println("发送了:"+message);
        this.rabbitmqTemplate.convertAndSend("bootExchange", "dog.red", message);
    }

    public void send2() {


        String message = "This is message 2, routing key is dog.black";
        System.out.println("发送了:"+message);
        this.rabbitmqTemplate.convertAndSend("bootExchange", "dog.black", message);
    }
}
Consumer
server.port=8081
spring.application.name=consumer

spring.rabbitmq.addresses=127.0.0.1:5672
spring.rabbitmq.username=guest
spring.rabbitmq.password=guest
spring.rabbitmq.virtual-host=/
spring.rabbitmq.connection-timeout=15000
package com.bennyrhys.rabbitmqconsumer;

import org.springframework.amqp.rabbit.annotation.RabbitHandler;
import org.springframework.amqp.rabbit.annotation.RabbitListener;
import org.springframework.stereotype.Component;

/**
 * @Author bennyrhys
 * @Date 12/22/20 7:56 PM
 * 消费者1
 */
@Component
@RabbitListener(queues = "queue1")
public class Receiver1 {


    @RabbitHandler
    public void process(String message) {


        System.out.println("Receive1:" + message);
    }
}
package com.bennyrhys.rabbitmqconsumer;

import org.springframework.amqp.rabbit.annotation.RabbitHandler;
import org.springframework.amqp.rabbit.annotation.RabbitListener;
import org.springframework.stereotype.Component;

/**
 * @Author bennyrhys
 * @Date 12/22/20 7:56 PM
 * 消费者2
 */
@Component
@RabbitListener(queues = "queue2")
public class Receiver2 {


    @RabbitHandler
    public void process(String message) {


        System.out.println("Receive2:" + message);
    }
}