写在前面的话
1、主要参考自:https://b23.tv/9P0Nrd
2、内容如果有不对的,希望可以指出或补充。
3、新知识。
一、基础知识
(一)概述
对象关系映射(Object Relational Mapping,简称ORM):
是通过使用描述对象和数据库之间映射(对应关系,如类与表就是类的成员变量和表的列一 一对应,对象与表的行一 一对应)的元数据,将面向对象语言程序中的对象自动持久化到关系数据库中。本质就是将数据从一种形式转换到另一种形式。
常用的ORM框架(基于以上概念):
OrmLite(简单)、SugarORM、GreenDAO(高效)、Active Android、Realm。前面三种都是用Java语言编写的,最后一种是C语言。不同点在于它们各自的侧重点不一样。
步骤(括号二到三的总体步骤):引入依赖→定义Person类→定义表与对象的对应关系→表存于数据库,创建(由关系生成)表→Dao对象
(二)设置对应关系
1、依赖(释:5.0版本的,不是最新版的):
将 implementation ‘com.j256.ormlite:ormlite-android:5.0’ 放入如下位置。

2、定义数据库与表的关系:
① 示列
新建一个类(Person.java),编写如下。
package com.example.testormlite;

import com.j256.ormlite.field.DatabaseField;
import com.j256.ormlite.table.DatabaseTable;

// 将Person类与person表建立对应关系,也就是映射
//创建了一个名为person的表
@DatabaseTable(tableName = "person")

public class Person {


    //将成员变量与表的列对应(一 一对应)
    //generatedId = true表示定义成主键
    // 一般id(字段名)都自定义
    @DatabaseField(columnName = "id",generatedId = true)
    public Integer id;
    @DatabaseField(columnName = "name")
    public String name;
    @DatabaseField(columnName = "age")
    public Integer age;

    //必须要有个无参构造方法(Ormlite)
    public Person() {


    }

    public Person(Integer id, String name, Integer age) {


        this.id = id;
        this.name = name;
        this.age = age;
    }
    //方便打印对象的成员变量
    @Override
    public String toString() {


        return "Person{" +
                "id=" + id +
                ", name='" + name + '\'' +
                ", age=" + age +
                '}';
    }
}

(三)增删改查
① 实现增删改查
在MainActivity.java中,编写如下。
package com.example.testormlite;

import androidx.appcompat.app.AppCompatActivity;

import android.content.Context;
import android.database.sqlite.SQLiteDatabase;
import android.os.Bundle;

import com.j256.ormlite.android.apptools.OrmLiteSqliteOpenHelper;
import com.j256.ormlite.dao.Dao;
import com.j256.ormlite.support.ConnectionSource;
import com.j256.ormlite.table.TableUtils;

import java.sql.SQLException;
import java.util.List;

public class MainActivity extends AppCompatActivity {


    //表必须在数据库中,表必须创建才能用
    //再定义一个类
    //数据库
    class Test extends OrmLiteSqliteOpenHelper {


        public Test(Context context) {


            //参数1:上下文,参数2:数据库名。(重点)
            // 参数3:工厂(不用管),参数4:版本
            super(context, "test.db", null, 1);
        }
        @Override
        public void onCreate(SQLiteDatabase database, ConnectionSource connectionSource) {


            //在test.db数据库创建成功后,创建表(以便将对象存到表中,或将表中数据赋值给对象)
            try {


                //根据类上的对应关系生成表(实现表必须在数据库中) 联系
                TableUtils.createTable(connectionSource, Person.class);
            } catch (SQLException throwables) {


                throwables.printStackTrace();
            }
        }
        @Override
        public void onUpgrade(SQLiteDatabase database, ConnectionSource connectionSource,
                              int oldVersion, int newVersion) {


        }
    }

    @Override
    protected void onCreate(Bundle savedInstanceState) {


        super.onCreate(savedInstanceState);
        setContentView(R.layout.activity_main);

        //定义对象,一个对象对应表的一行
        Person person1 = new Person(null,"luck",0);
        Person person2 = new Person(null,"ch09",0);


        Test test = new Test(this);
        //获取一个具有增删改查方法的对象,叫做Dao对象
        try {


            //<类,id类型>
            Dao<Person,Integer> dao = test.getDao(Person.class);
            //增加数据
            dao.create(person1);
            dao.create(person2);
            //删除
            dao.deleteById(2);
            //修改数据 先查->改值->存到数据库->更新到数据库
            Person p = dao.queryForId(1);
            p.name = "luck_ch09";
            dao.update(p);
            //查看数据 所有all
            List<Person> personDatas = dao.queryForAll();
            System.out.println("查询到的结果数据为:"+personDatas);

        } catch (SQLException e) {


            e.printStackTrace();
        }
    }
}
② 结果展示
注:因为运行了多次(在第一次增加数据后没注意到注释掉),所以表中的数据也增加了多次。

二、任务练习03-联系人管理
1、这里是Day09的内容。
2、任务练习。
3、补整理。
总体要求:
1、实现界面(不要求完全界面一模一样,但是显示得数据要有),并将“添加联系人”界面得数据保存到数据库中
2、“联系人列表“界面里面实现搜索得功能,要求能通过名字模糊搜素数据库得的数据。
3、数据库的所有操作都要用ormlite插件。
(一)准备
① 文件如下

② 引入依赖

(二)步骤展示
1、圆角背景
用于搜索栏部分。

2、布局
① 联系人界面
在home_page.xml里,编写如下。
<?xml version="1.0" encoding="utf-8"?>
<LinearLayout
    xmlns:android="http://schemas.android.com/apk/res/android"
    android:layout_width="match_parent"
    android:layout_height="match_parent"
    android:orientation="vertical"
    >
    <!--头部-->
    <LinearLayout
        android:layout_width="match_parent"
        android:layout_height="60dp"
        android:padding="10dp"
        android:gravity="center_vertical"
        android:background="#f8f8f8">
        <TextView
            android:layout_width="wrap_content"
            android:layout_height="wrap_content"
            android:text="联系人"
            android:textSize="25sp"
            android:textColor="@color/black"
            />
        <TextView
            android:id="@+id/home_add"

            android:layout_width="match_parent"
            android:layout_height="wrap_content"
            android:gravity="right"
            android:text="添加"
            android:textSize="25sp"
            android:textColor="@color/black"
            />
    </LinearLayout>
    <!--搜索栏-->
    <LinearLayout
        android:layout_width="370dp"
        android:layout_height="40dp"
        android:layout_marginTop="15dp"
        android:layout_gravity="center_horizontal"
        android:background="@drawable/home_shape"
        >
        <ImageView
            android:layout_width="30dp"
            android:layout_height="30dp"
            android:layout_gravity="center_vertical"
            android:src="@mipmap/home_logo"
            />
        <EditText
            android:id="@+id/home_find"

            android:layout_width="match_parent"
            android:layout_height="match_parent"
            android:hint="搜索联系人"
            android:background="@drawable/home_shape"
            />
    </LinearLayout>
    <!--列表  联系人信息显示位置-->
    <ListView
        android:id="@+id/home_list"

        android:layout_width="370dp"
        android:layout_height="match_parent"
        android:layout_gravity="center_horizontal"
        android:layout_marginTop="10dp"
        />
</LinearLayout>
② 添加联系人界面
在new_page.xml里,编写如下。
<?xml version="1.0" encoding="utf-8"?>
<LinearLayout
    xmlns:android="http://schemas.android.com/apk/res/android"
    android:layout_width="match_parent"
    android:layout_height="match_parent"
    android:orientation="vertical"
    >
    <!--头部-->
    <LinearLayout
        android:layout_width="match_parent"
        android:layout_height="60dp"
        android:padding="10dp"
        android:gravity="center_vertical"
        android:background="#f8f8f8">
        <TextView
            android:id="@+id/new_off"

            android:layout_width="wrap_content"
            android:layout_height="wrap_content"
            android:text="× 新建联系人"
            android:textSize="25sp"
            android:textColor="@color/black"
            />
        <TextView
            android:id="@+id/new_create"

            android:layout_width="match_parent"
            android:layout_height="wrap_content"
            android:gravity="right"
            android:text="√"
            android:textSize="30sp"
            android:textColor="@color/black"
            />
    </LinearLayout>
    <!--中部-->
    <LinearLayout
        android:layout_width="match_parent"
        android:layout_height="match_parent"
        android:orientation="vertical"
        android:gravity="center_horizontal"
        >
        <ImageView
            android:layout_width="80dp"
            android:layout_height="80dp"
            android:layout_marginTop="20dp"
            android:src="@mipmap/new_logo"
            />
        <TextView
            android:layout_width="wrap_content"
            android:layout_height="wrap_content"
            android:text="保存至:手机"
            android:textColor="#353535"
            android:textSize="25sp"
            />
        <TextView
            android:layout_width="wrap_content"
            android:layout_height="wrap_content"
            android:text="仅保存在手机,开启云空间可同步"
            android:textSize="20sp"
            />
        <!--输入栏-->
        <EditText
            android:id="@+id/new_edtName"

            android:layout_width="370dp"
            android:layout_height="40dp"
            android:layout_marginTop="30dp"
            android:hint="姓名"
            />
        <EditText
            android:id="@+id/new_edtWork"

            android:layout_width="370dp"
            android:layout_height="40dp"
            android:layout_marginTop="20dp"
            android:hint="公司"
            />
        <EditText
            android:id="@+id/new_edtPhone"

            android:layout_width="370dp"
            android:layout_height="40dp"
            android:layout_marginTop="20dp"
            android:hint="电话号码"
            />
    </LinearLayout>

</LinearLayout>
3、创建一个Phone类
用来建立类与表的关系。
package com.example.taskthree;

import com.j256.ormlite.field.DatabaseField;
import com.j256.ormlite.table.DatabaseTable;

//表
@DatabaseTable(tableName = "phone")
public class Phone {


    //建立对应关系
    @DatabaseField(columnName = "id",generatedId = true)
    public Integer id;
    @DatabaseField(columnName = "name")
    public String name;
    @DatabaseField(columnName = "work")
    public String work;
    @DatabaseField(columnName = "phone")
    public String phone;

    //必有,否则会报错
    public Phone() {


    }

    public Phone(Integer id, String name, String work, String phone) {


        this.id = id;
        this.name = name;
        this.work = work;
        this.phone = phone;
    }

    @Override
    public String toString() {


        return "Phone{" +
                "id=" + id +
                ", name='" + name + '\'' +
                ", work=" + work +
                ", phone=" + phone +
                '}';
    }
}
4、活动窗口
① NewActivity.java
package com.example.taskthree;

import android.content.Context;
import android.database.SQLException;
import android.database.sqlite.SQLiteDatabase;
import android.os.Bundle;
import android.view.View;
import android.widget.EditText;
import android.widget.TextView;
import android.widget.Toast;

import androidx.appcompat.app.AppCompatActivity;

import com.j256.ormlite.android.apptools.OrmLiteSqliteOpenHelper;
import com.j256.ormlite.dao.Dao;
import com.j256.ormlite.support.ConnectionSource;
import com.j256.ormlite.table.TableUtils;

public class NewActivity extends AppCompatActivity {


    private TextView newOff,newCreate;
    private EditText newEdtName,newEdtWord,newEdtPhone;

    @Override
    protected void onCreate(Bundle savedInstanceState) {


        super.onCreate(savedInstanceState);
        //加载注册显示布局页面
        setContentView(R.layout.new_page);

        //获取控件  初始化控件
        newOff = findViewById(R.id.new_off);
        newCreate = findViewById(R.id.new_create);
        newEdtName = findViewById(R.id.new_edtName);
        newEdtWord = findViewById(R.id.new_edtWork);
        newEdtPhone = findViewById(R.id.new_edtPhone);

        Data data = new Data(this);

        //点击√创建  增加数据
        newCreate.setOnClickListener(new View.OnClickListener() {


            @Override
            public void onClick(View v) {


                //增加数据
                String name = newEdtName.getText().toString().trim();
                String work = newEdtWord.getText().toString().trim();
                String phone = newEdtPhone.getText().toString().trim();
                //创建对象,传入数据到表的行
                Phone phones = new Phone(null, name, work, phone);
                //判断内容不能为空,才能添加数据成功
                if(!name.equals("") && !phone.equals("")){


                    try {


                        //<类,id类型>
                        Dao<Phone,Integer> dao = data.getDao(Phone.class);
                        dao.create(phones);
                        //吐司显示提示信息
                        Toast.makeText(NewActivity.this, "添加" + name + "联系人成功"
                                ,Toast.LENGTH_SHORT).show();

                    } catch (SQLException | java.sql.SQLException e) {


                        e.printStackTrace();
                    }
                }else{


                    Toast.makeText(NewActivity.this, "联系人信息必须包括有姓名以及" +
                                    "电话号码,请重新输入!"
                            ,Toast.LENGTH_LONG).show();
                }
            }
        });

        //点击×关闭界面 也相当于取消
        newOff.setOnClickListener(new View.OnClickListener(){


            @Override
            public void onClick(View v) {


                finish();
            }
        });
    }

    //创建数据库
    static class Data extends OrmLiteSqliteOpenHelper {


        public Data(Context context) {


            super(context, "phoneMessages.db", null, 1);
        }
        @Override
        public void onCreate(SQLiteDatabase database, ConnectionSource connectionSource) {


            try {


                //真正的生成表
                TableUtils.createTable(connectionSource, Phone.class);
            } catch (SQLException | java.sql.SQLException e) {


                e.printStackTrace();
            }
        }
        @Override
        public void onUpgrade(SQLiteDatabase database, ConnectionSource connectionSource,
                              int oldVersion, int newVersion) {


        }
    }
}
② MainActivity.java
package com.example.taskthree;

import androidx.appcompat.app.AppCompatActivity;

import android.content.Intent;
import android.os.Bundle;
import android.view.KeyEvent;
import android.view.View;
import android.widget.ArrayAdapter;
import android.widget.EditText;
import android.widget.ListView;
import android.widget.TextView;

import com.j256.ormlite.dao.Dao;

import java.sql.SQLException;
import java.util.List;

public class MainActivity extends AppCompatActivity {


    private TextView homeAdd;
    private EditText homeFind;
    private ListView homeList;

    private ArrayAdapter adapter;//桥梁  也就是适配器
    NewActivity.Data data = new NewActivity.Data(this);//接收添加界面的数据  也就是存到了数据库的数据

    @Override
    protected void onCreate(Bundle savedInstanceState) {


        super.onCreate(savedInstanceState);
        setContentView(R.layout.home_page);

        //获取控件
        homeAdd = findViewById(R.id.home_add);
        homeFind = findViewById(R.id.home_find);
        homeList = findViewById(R.id.home_list);

        //添加功能
        // 通过意图来实现界面跳转  到添加联系人界面
        homeAdd.setOnClickListener(new View.OnClickListener(){


            @Override
            public void onClick(View v) {


                Intent intent= new Intent(MainActivity.this, NewActivity.class);
                //启动activity
                startActivity(intent);
            }
        });

        //列表位置
        //获取数据库内的数据  显示添加的信息
        try {


            Dao<Phone,Integer> dao = data.getDao(Phone.class);

            //删除数据库中的所有数据
//            File dbFile = new File("/data/data/com.example.taskthree/databases/phoneMessages.db");
//            dbFile.delete();

            //从数据库中查找到name数据
            List<Phone> names = dao.queryBuilder().selectColumns("name").query();
            //将names类型转成String
            String[] datas = new String[names.size()];
            for(int i=0; i< names.size(); i++){


                datas[i] = names.get(i).name;
            }
            //初始化适配器
            adapter = new ArrayAdapter(this, android.R.layout.simple_expandable_list_item_1,datas);
            homeList.setAdapter(adapter);
        } catch (SQLException e) {


            e.printStackTrace();
        }

        //搜索栏的位置
        //添加监听
        homeFind.setOnEditorActionListener(new EditText.OnEditorActionListener() {


            @Override
            public boolean onEditorAction(TextView v, int actionId, KeyEvent event) {


                //按下回车获取到数据
                String text = homeFind.getText().toString().trim();

                //在数据库中进行模糊查找
                try {


                    Dao<Phone,Integer> dao = data.getDao(Phone.class);
                    List<Phone> names = dao.queryBuilder().where().like("name",
                            "%"+text+"%").query();

                    //添加数据
                    String[] datas = new String[names.size()];
                    for(int i=0; i< names.size(); i++){


                        datas[i] = names.get(i).name;
                    }
                    //初始化适配器
                    ArrayAdapter adapter = new ArrayAdapter(MainActivity.this,
                            android.R.layout.simple_expandable_list_item_1,datas);
                    homeList.setAdapter(adapter);
                } catch (SQLException e) {


                    e.printStackTrace();
                }
                return false;
            }
        });
    }
}
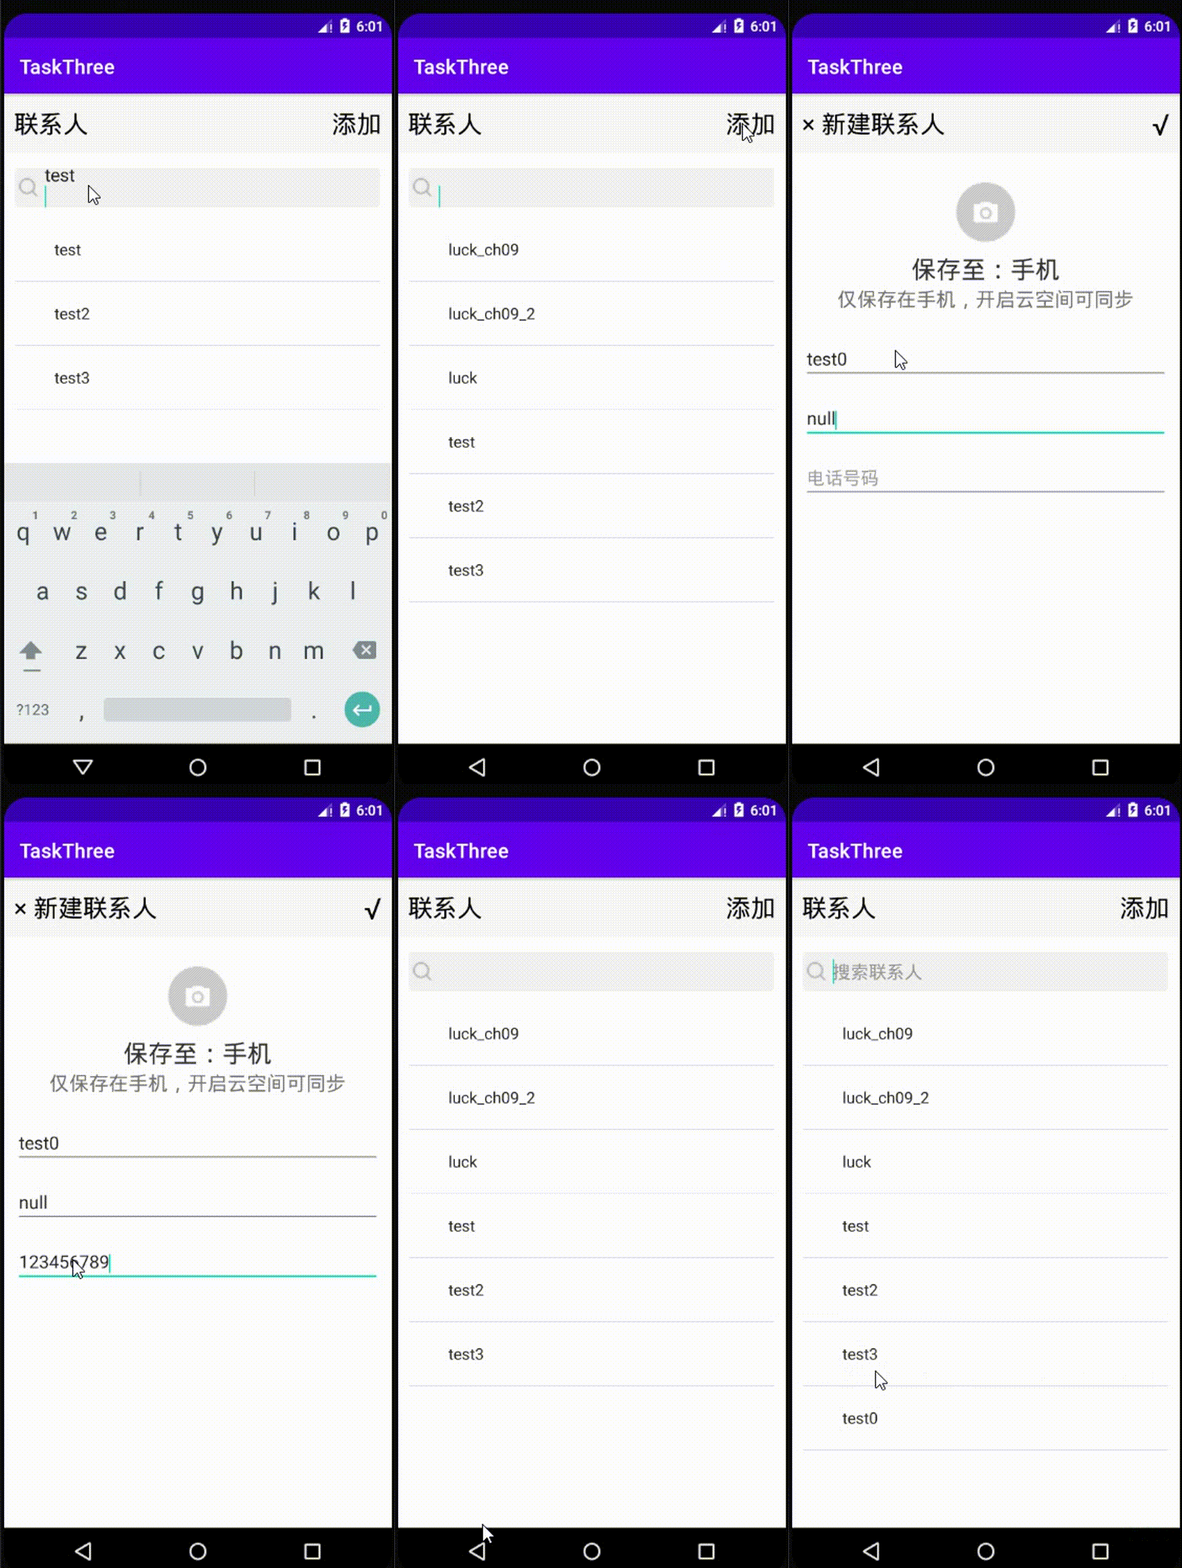
(三)效果展示
① 在项目清单文件,添加如下。

② 测试效果如下。

三、补充
3、数据访问对象(Data Access Object,简称DAO):是一个面向对象的数据库接口。适用于单系统应用程序或小范围本地分布使用。